Disk Space Is Running out in Windows 7/8/10
When installing Windows 7/8/10/XP, or Windows Server 2003/2008/2012 operating systems, you have allocated space for each partition. However, as time goes by, you store large data to your partitions and the drive is running out of space.
If you want to solve the low disk space problem of partitions, you may search for some solutions. When a certain partition is running out of space, in general, there are three methods you can use to solve this issue:
- Delete old or useless files: this way can take effect on partition size to some degrees and it just solves the problem temporarily. It only can release a little disk space and can’t solve your problem fundamentally.
- Upgrade to a larger hard drive: if you have a larger hard drive, you may consider upgrading your old disk to a larger one, but some of you may think it is expensive to buy another disk. But if you have one, you can try to increase hard drive space Windows 7.
- Increase partition size in Windows 7/8/10: this way can help you to extend partition by releasing some free space from a big partition or getting some storage space from your unallocated space on the hard drive. It makes full use of your disk space.
Undoubtedly, to increase the partition size in Windows without formatting your partitions is the best one among those three solutions.
How to Increase Partition Size in Windows 7/8/10 without Formatting
As to the mentioned solutions to the low disk space issue, extending partition size is recommended to you in Windows 7. Let’s look at the following two ways to increase partition size without losing data.
Disk Management Is Restricted to Change Partition Size
Windows has a built-in partition management tool which is called Disk Management. This tool can help you to manage your partitions and disks for free.
As to increasing partition size in Windows 7/8/10, you can use its “Extend Volume” feature to achieve the aim to a certain degree.
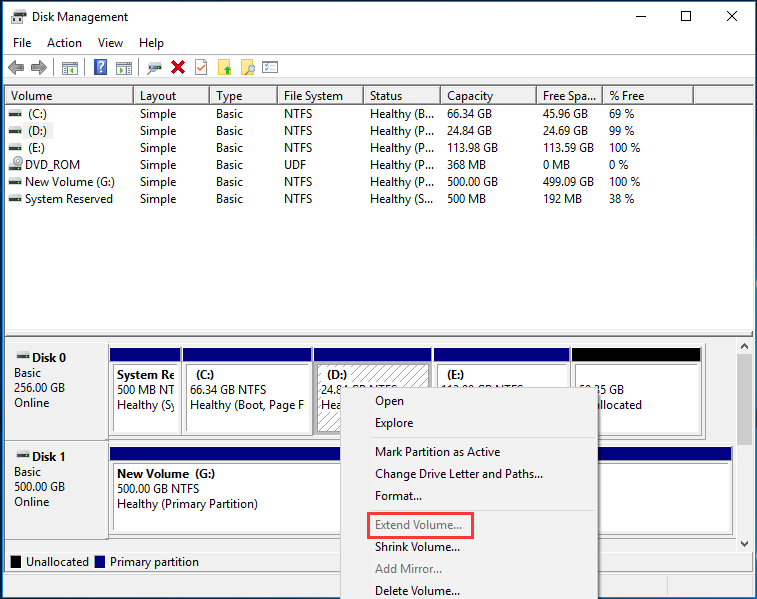
However, sometimes when right-clicking a partition, you can find “Extend Volume” is grayed out. From the following screenshot, you can see this phenomenon.

Related article: Why Extend Volume Grayed out and How to Quickly Fix It
In fact, you may experience extend partition windows 7 greyed out issue in three cases:
1. If the partition you want to extend is a logical partition, but there is only unallocated space and no free space right after the target partition, this feature is useless.
2. Or you want to extend a primary partition, but there is no unallocated space on the adjacent right side of the partition, it is still grey.
3. If you need to extend Windows partition, the partitions must be in NTFS and RAW formats , otherwise, you can’t use Disk Management to extend your partitions.
Consequently, Disk Management is not excellent to resize partition size in Windows 7 without losing data if you are running a Windows 7 PC. You need to find another professional partition manager to do this work.
Increase Partition Size without Formatting Using MiniTool Partition Wizard
Compared to Disk Management, a professional partition and disk management software – MiniTool Partition Wizard can help you to manage partitions in Windows 10/8/7/XP/Vista 32 bit and 64 bit operating systems. This partition magic is easy-to-use, reliable, non-destructive to manage your disk by its basic and advanced features.
Right now, download MiniTool Partition Wizard Free Edition to extend partition in Windows 7 without losing data for free.
MiniTool Partition Wizard FreeClick to Download100%Clean & Safe
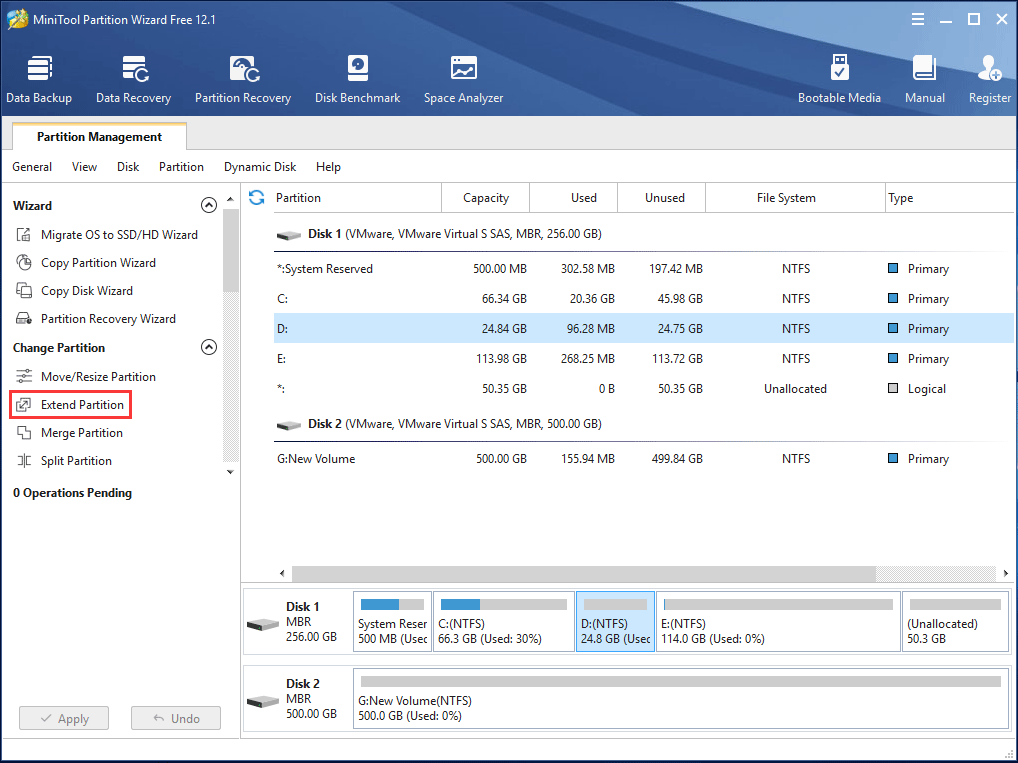
Step 1: Launch the partition manager to go to its main interface. Right-click your target partition and select “Extend Partition” feature from “Change Partition” menu.

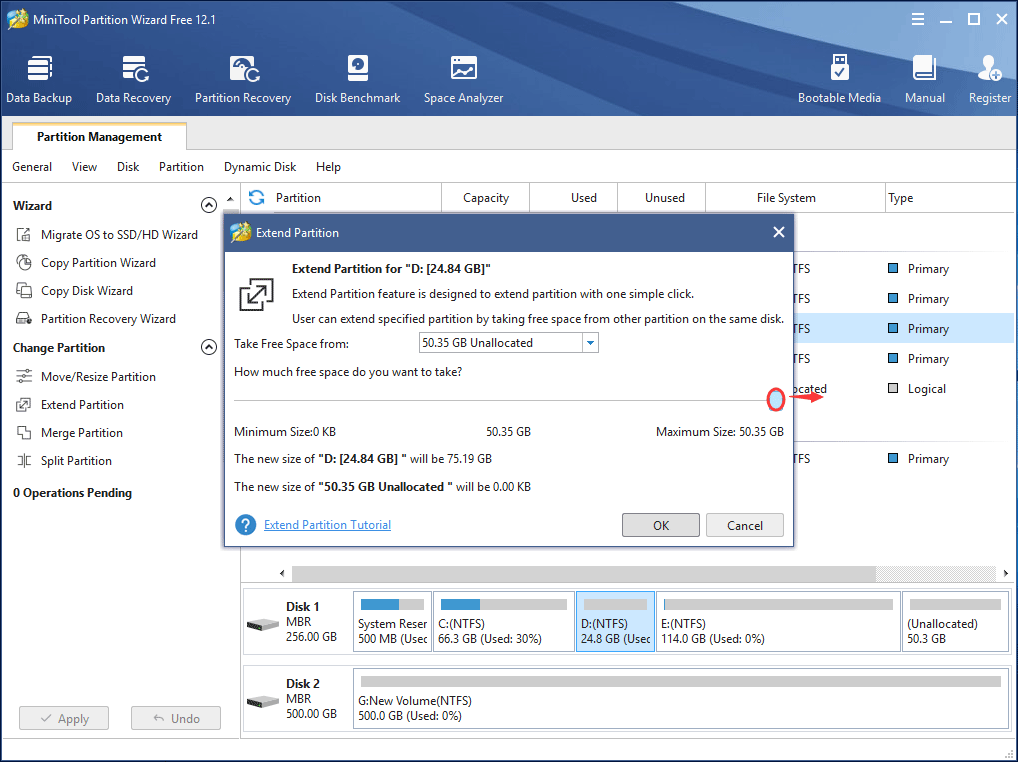
Step 2: Take free space from a partition or unallocated space. You can drag sliding handle to decide how much space to take. After that, click “OK“.

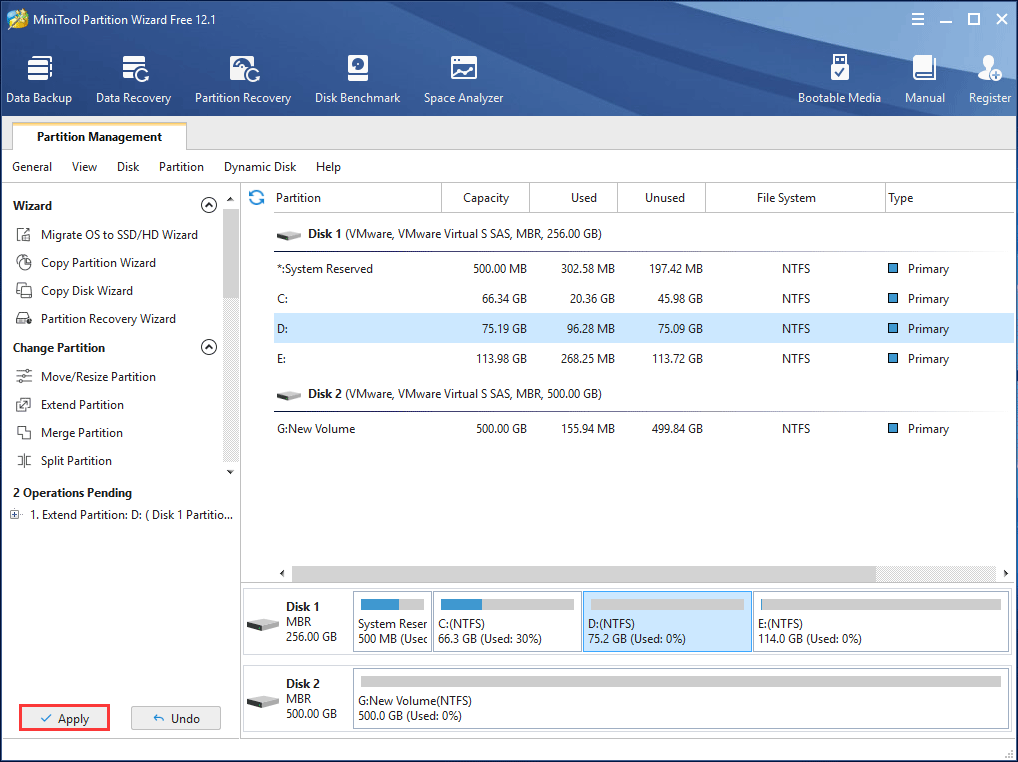
Step 3: Then you can preview the target partition will be extended. Click “Apply” to perform all operations.

In addition to the “Extend” feature, you can also resize partition in Windows 7 without losing data by its “Resize/Move” feature. For example, if D drive has much disk space, you can choose to shrink D drive and extend C drive with this feature.
In addition to Windows 7, all the above operations are also suitable for Windows 10 and 8 users to increase partition size without losing data.
If you are running a Windows 7 computer and are looking for a way to increase partition size in Windows 7 without formatting, just try MiniTool Partition Wizard now! Or, you can share it to twitter to with your friends who don’t know how to increase hard drive space.
MiniTool Partition Wizard FreeClick to Download100%Clean & Safe
Click to tweetChange Partition Size FAQ
- Launch MiniTool Partition Wizard on your Windows 10 PC.
- Right-click the partition that you want to resize and choose Move/Resize.
- Drag the slider towards the left or right to resize the partition size.
- Click Apply to save the change.
- Run MiniTool Partition Wizard.
- Choose the target partition and click Extend Partition from the left panel.
- Take free space from another drive or unallocated space.
- Hit the Apply button.


![[Full Guide] How to Extend Partition Windows 10](https://images.minitool.com/partitionwizard.com/images/uploads/2024/07/extend-windows-10-partition-thumbnail.png)
User Comments :