If your PC doesn’t meet the Windows 11 requirements, you can bypass the TPM and RAM check to upgrade it to Windows 11. However, this will bring the System Requirements Not Met watermark to your Windows 11. This post from MiniTool Partition Wizard shows you how to solve the System Requirements Not Met Windows 11 issue.
System Requirements Not Met Windows 11
In the past, Microsoft tried its best to keep each Windows version’s system requirements aligned so that devices could be upgraded to newer versions of the operating system. However, things were different when Windows 11 was released in 2021.
Windows 11 came with strict hardware requirements. Compared to previous systems, it requires TPM 2.0, while some old PCs may don’t meet the TPM requirement. In this case, they can’t upgrade to Windows 11 through the normal method.
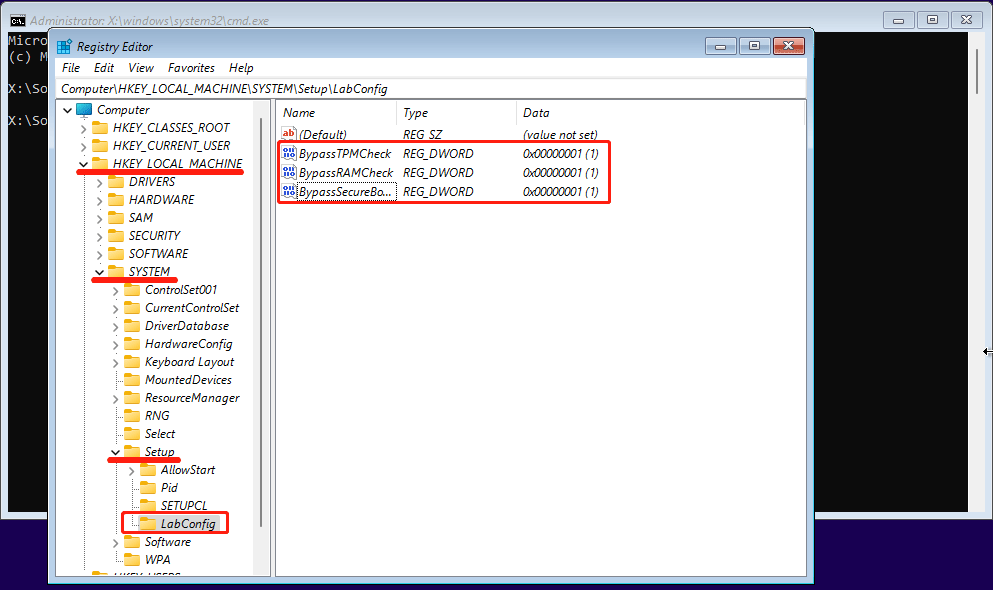
Fortunately, Microsoft introduced options to bypass the system requirements check during installation. You just need to press Shift+F10 on your keyboard after you see the Install Now button. This will open a command prompt. Then, do as follows to open Registry Editor and disable the TPM check:
- Type command “regedit” to open Registry Editor.
- Go to ComputerHKEY_LOCAL_MACHINESYSTEMSetup.
- Right-click the Setup key and select New > Key. Name the key LabConfig.
- Right-click on the LabConfig key and select New > DWORD (32-bit) Value. Name the value BypassTPMCheck and set its data to 1. With the same steps, create the BypassRAMCheck and BypassSecureBootCheck values and set also their data to 1.
- Exit Registry Editor and Command Prompt. You will go back to the Install Now Now, go through the Windows 11 installation process.

In addition to the above method, tools like MediaCreationTool.bat, Ventoy, or Rufus all come with options to bypass the system requirements check during installation or upgrade. However, Microsoft doesn’t recommend this behavior because it can’t guarantee that incompatible systems would receive updates, including security updates, in the future.
In addition, some users find that there will be System Requirements Not Met watermark in Windows 11 if Windows 11 is installed through the above method. This message is also shown on the System section of the settings.
How to Remove the System Requirements Not Met Watermark on Windows 11
To solve the System Requirements Not Met Windows 11 issue, you should edit the registry editor in Windows 11. Here is the guide:
- Press Windows key + R to open the Run box.
- In the Run box, type “regedit” and press Enter to open Registry Editor.
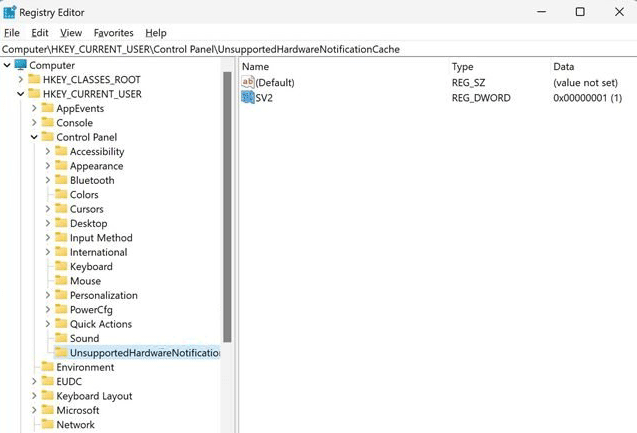
- Go to HKEY_CURRENT_USERControl PanelUnsupportedHardwareNotificationCache.
- In the right pane, right-click on the SV2 DWORD and choose modify. Then, set the Value data to 0 and click the OK button.
- Restart the PC and the watermark should be gone.

This PC Can’t Run Windows 11: What Should You Do to Fix It?
The above content is all about why the System Requirements Not Met watermark appears and how to remove this notification from Windows 11. If you have other ideas, please share them with us in the following comment zone. I will appreciate that very much.

