How to fix a black screen on the Lenovo laptop? When you run into “Lenovo black screen”, don’t panic as it’s often not hard to fix the issue. This post introduces 7 solutions to the issue and shows you how to check your hard drive health and recover the lost data caused by the issue using MiniTool Partition Wizard.
Lenovo Black Screen
Many Lenovo users report that Lenovo laptop screen goes black after pressing the power button. Why does the Lenovo laptop screen go black? How to fix “Lenovo black screen of death”? Keep reading.
Many causes may lead to “Lenovo laptop black screen of death”, for example:
- Outdated graphics driver
- Faulty laptop battery
- Faulty laptop display
- Software errors
- …
How to fix “Lenovo laptop black screen”? Based on the reasons for the issue, we suggest you trying the following solutions.
Solutions to “Lenovo Black Screen”
- Reset the connection between the OS and the screen display
- Hard reset your Lenovo laptop
- Update your graphics card driver
- Restart the explorer.exe process
- Disable Fast Startup
- Reinstall the memory modules
- Perform a system restore
Now, follow the tutorials below one by one until the issue “Lenovo black screen of death” gets solved.
Fix 1: Reset the Connection
When the Lenovo operating system loses its connection to the screen display, the Lenovo laptop will get black. So, try resetting the connection between the two to fix Lenovo black screen.
To perform the connection resetting, you just need to use the key combination: Windows + Ctrl + Shift + B.
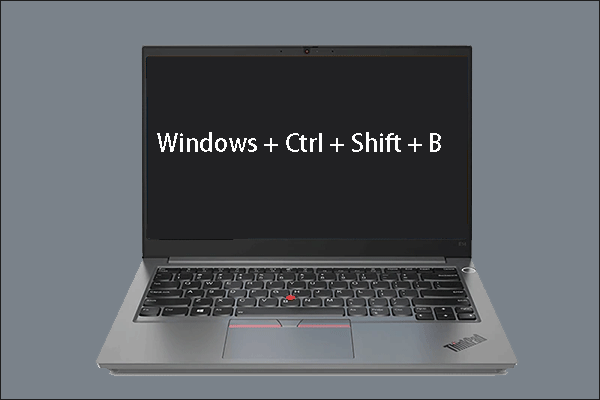
Then, check if your Lenovo screen goes normal. If yes, congratulation! If your Lenovo laptop screen still goes black, try the following fix.
Fix 2: Hard Reset Your Lenovo Laptop
As above mentioned, the hardware issues like the peripheral devices connected to your Lenovo might also cause “Lenovo laptop screen black”. To remove the hardware issue, hard rest your Lenovo laptop.
To hard reset your Lenovo laptop, perform the following operations:
Step 1: Turn off your Lenovo laptop.
Step 2: Unplug the power cord. Then, gently remove the battery and connected external peripheral devices from your laptop.
Step 3: Put your Lenovo laptop aside for 30 to 40 seconds.
Step 4: Press and hold the power button on your Lenovo laptop for about one minute.
Step 5: Place the battery back in your Lenovo laptop and reconnect the power cord.
Step 6: Restart the laptop.
Does your Lenovo laptop screen still go black? If the screen returns to normal, this signifies that one of the peripheral devices does cause “Lenovo screen black”. To figure out which peripheral device causing the issue, please connect all your peripherals devices one by one until you see the black Laptop screen again.
If “Lenovo laptop screen black” persists, please try the following solutions in safe mode (boot your Lenovo laptop into safe mode).
Fix 3: Update Your Graphics Card Driver
See if the graphics driver is to blame for the issue “Lenovo screen black”.
Step 1: Press Windows + R to launch the Run dialog box.
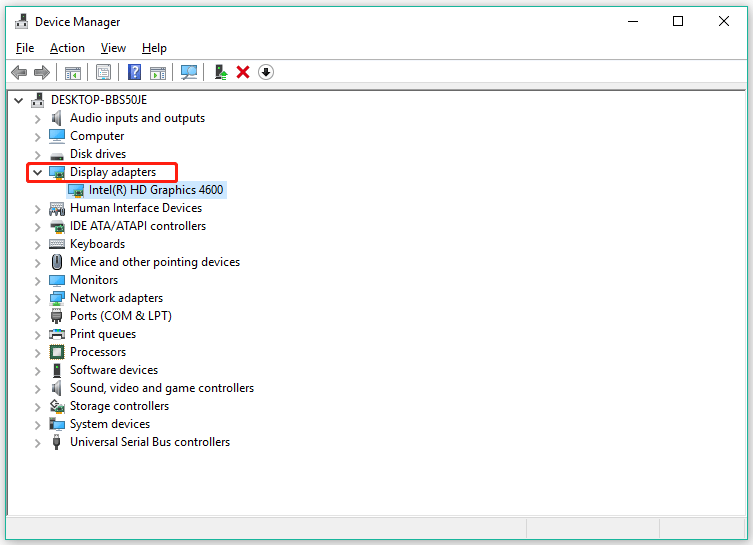
Step 2: Type devmgmt.msc into the Run dialogue box and hit the Enter key to launch Device Manager.
Step 3: Once inside the Device Manager window, expand the Display adapters category.
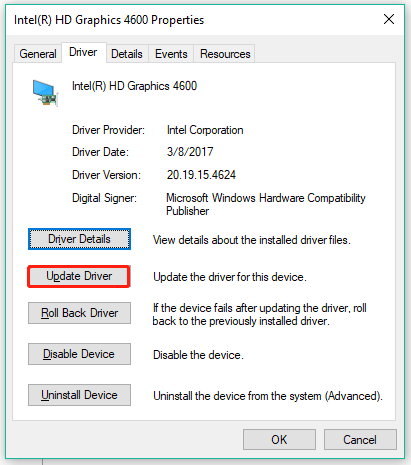
Step 4: Double-click the graphics card under the category. Then, switch to the Drivers tab on the graphics card properties window and click the Update Driver button.
Step 5: Choose the Search automatically for Updated driver software option.
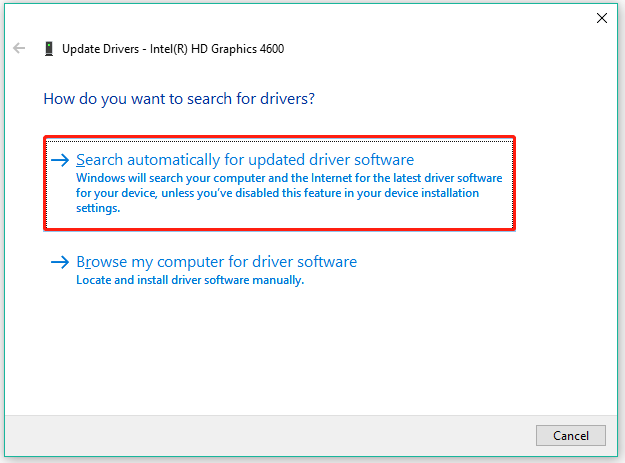
Step 6: Follow the on-screen instructions to complete updating the driver.
Step 7: Once finished, reboot your computer for changes to take effect.
Check if the issue “Lenovo black screen” still appears. If the Lenovo laptop screen goes black again, please apply the following solutions.

Fix 4: Restart the Explorer.exe Process
Explorer.exe is responsible for various essential operations, such as desktop, taskbar, among others. If it is closed on your Lenovo laptop, your desktop and taskbar will be invisible and your Lenovo laptop screen will go black. So, try restarting the explorer.exe process.
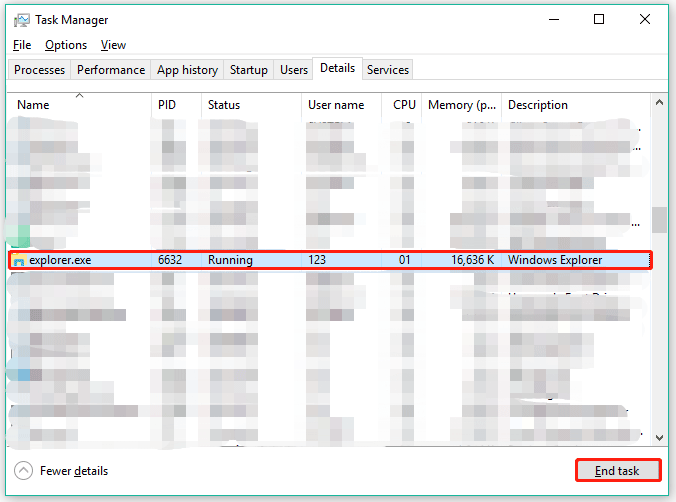
Step 1: Use the key combination: Ctrl + Shift + Esc to open Task Manager.
Step 2: Once Task Manager opens, switch to the Details tab on the current window.
Step 3: Under the Details tab, find the explorer.exe process and click the End task button.
Fix 5: Disable Fast Startup
Windows 10 comes with a feature called Fast Startup that makes your computer boot faster. However, the feature does not always work as expected and it sometimes messes up with the startup process and causes a black screen of death. So, disable the feature to see if this fix is useful.
Here is how to disable the Fast Startup feature:
Step 1: Press Windows + R to launch the Run dialogue box.
Step 2: Type powercfg.cpl into the Run dialogue box and then hit the Enter key.
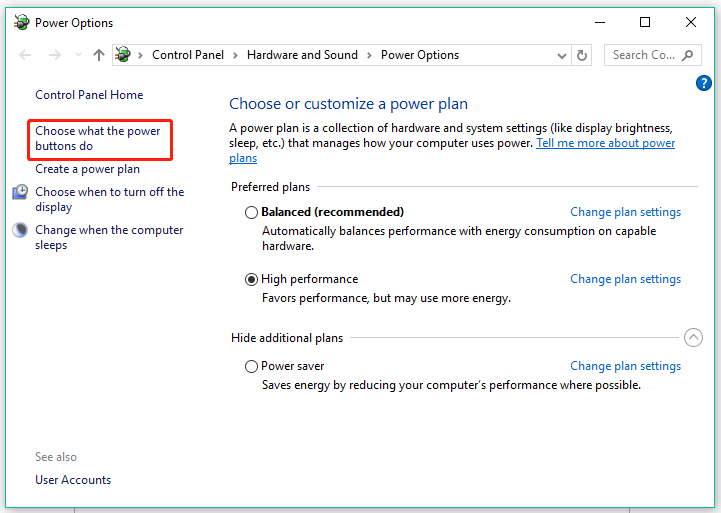
Step 3: Click the Choose what the power buttons do option available on the Power Options window. Then, click the Change settings that are currently unavailable option on the next window.
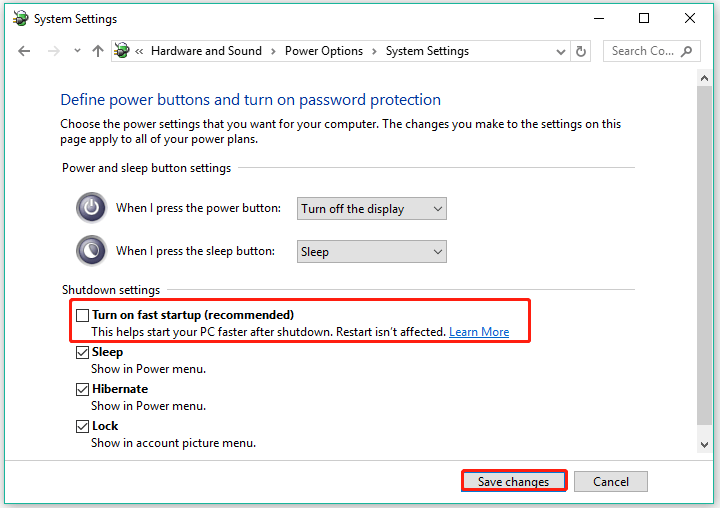
Step 4: Untick the checkbox for the Turn on fast startup (Recommended) option, then click the Save Changes button and close the window.
Step 5: Restart your Lenovo laptop and see if its screen returns to normal.
Fix 6: Reinstall the Memory Modules
Now try reinstalling the memory module – removing it from the DIMM slots and later correctly playing them in the slot, which can fix lots of laptop issues, such as long start-up time, laptop black screen, etc.
So, follow the steps below to reinstall the memory modules on your Lenovo laptop.
Step 1: Turn off your Lenovo laptop, disconnect power cables and remove the battery from the laptop.
Step 2: Remove the screws from the back of the computer and pull out the service door.
Step 3: Once you see a memory slot that is held by two arms, pull both these arms simultaneously to release the memory module from the spring tension position.
Step 4: Use a clipper to take out the memory module from the hatch gently.
Step 5: Use a clean cloth to brush the memory slot. Note that do not touch it directly with your hands.
Step 6: Line up the notch in the memory module and try to insert it properly into the slot.
Step 7: Slowly push the memory module down until it latches correctly.
Step 8: Tighten the service door and attach the battery to its position.
Fix 7: Perform a System Restore
Have you recently made any changes to your Lenovo laptop, such as installing a new program or running a Windows update? If yes, these changes may cause “Lenovo black screen”. Due to that, we recommend that you perform a system restore to revert your laptop to a previous state before these changes.
Follow the steps below to perform a system restore:
Step 1: Click the search icon on the taskbar, then type restore, and click Create a restore point.
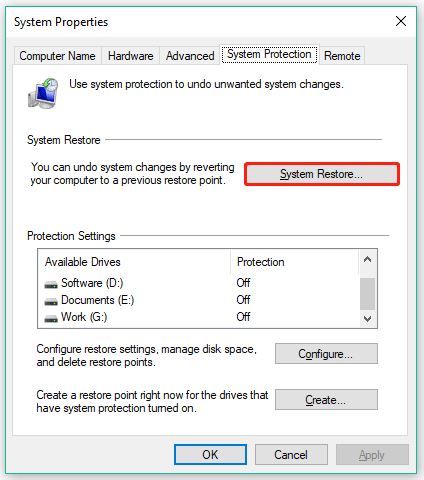
Step 2: Under the System Protection tab, click the System Restore button.
Step 3: Read the information on the System Restore window and then click the Next button to continue.
Step 4: Tick the checkbox for Show more restore points, select the restore point that you want your system to, and click the Next button.
Step 5: Follow the on-screen instructions to finish the system restore process.
Step 6: Restart your computer to see if “Lenovo screen black” gets solved.
That’s all solutions to “Lenovo black screen”. Do you resolve the issue?
What to Do After Repairing Lenovo Black Screen
If you have fixed “Lenovo black screen”, the so great!
The error black screen of death is often not hard to fix at all, but its appearance always reveals some issues such as Hard disk bad sectors and causes data loss. So, after repairing “Lenovo black screen”, we recommend that you check whether your hard drive has bad sectors and data loss happens.
Tip One: Scan Hard Drive for Bad Sectors
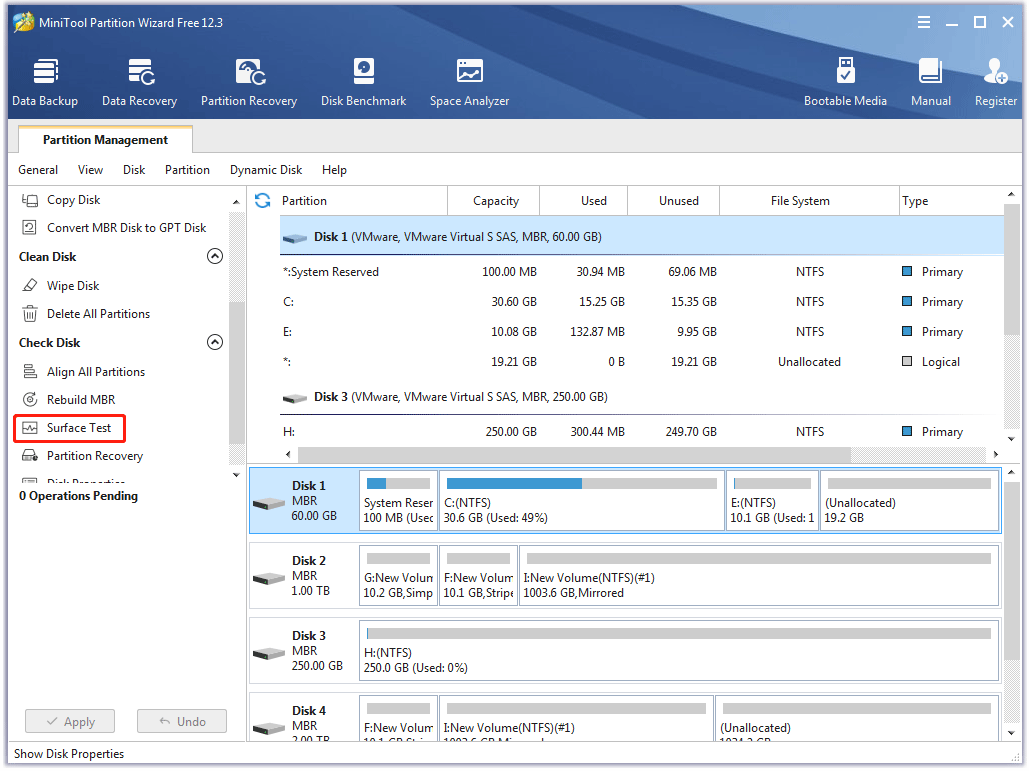
To scan the hard drive for bad sectors, you can try MiniTool Partition Wizard. The program enables you to see your hard disk health more intuitively.
Here’s how to check your hard drive health using MiniTool Partition Wizard.
Step 1: Launch MiniTool Partition Wizard to access its main interface.
MiniTool Partition Wizard FreeClick to Download100%Clean & Safe
Step 2: Highlight your disk and choose the Surface Test feature from the left panel.
Step 3: Click the Start Now button on the Surface Test windows. After that, the program starts scanning the disk for bad sectors, and it will make the bad sectors red once it finds them.
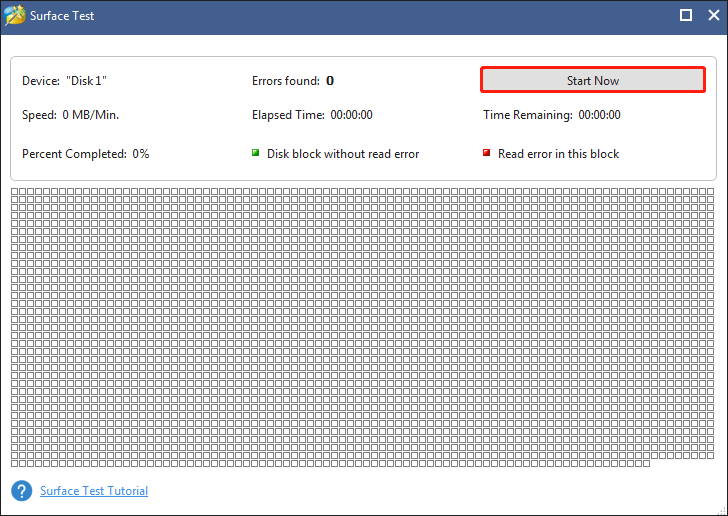
Step 4: When the program finishes the task, check the result it offers. If you see a large area of red, it means there are many bad sectors on your hard drive. In this case, it is highly recommended that you back up your computer as soon as possible.
Tip Two: Scan Your Hard Drive for Lost Data
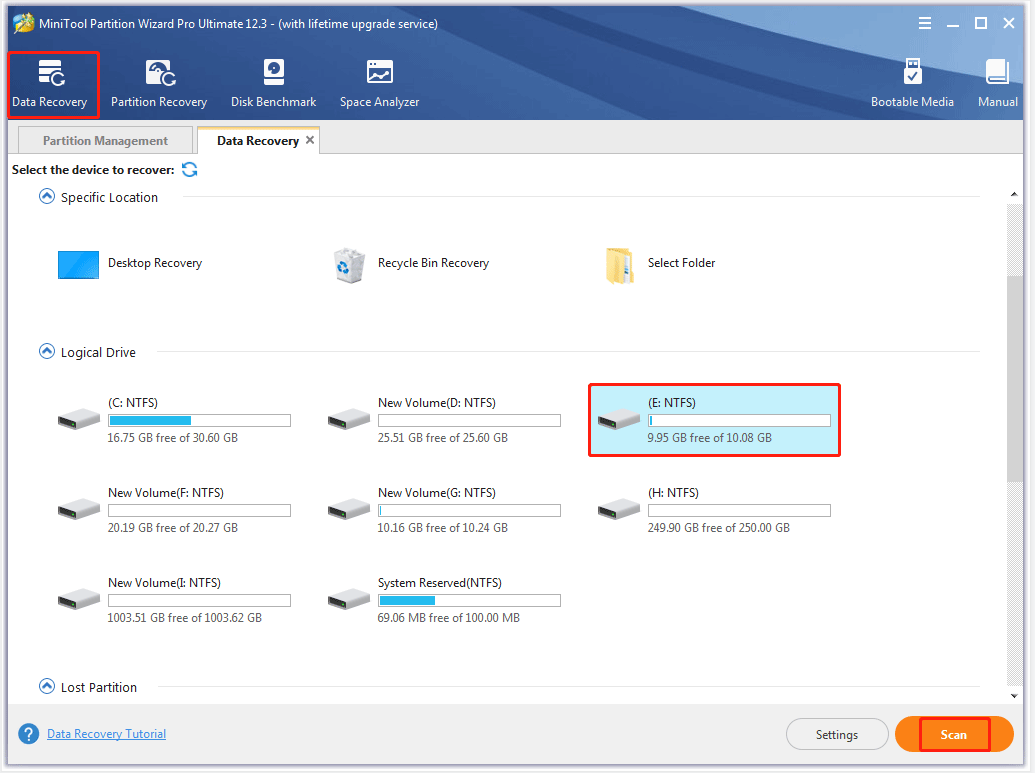
To check whether data loss happens after fixing “Lenovo black screen”, you can also try MiniTool Partition Wizard. Its Data Recovery feature enables you to scan various destinations for lost data, such as a folder, desktop, Recycle Bin, partition, unallocated space, and hard drive.
To scan your hard drive for lost data using MiniTool Partition Wizard, follow the tutorial below.
Step 1: Launch MiniTool Partition Wizard to access its main interface.
MiniTool Partition Wizard DemoClick to Download100%Clean & Safe
Step 2: Click the Data Recovery feature on the top bar. Then, locate the destination to be scanned, click it, and click the Scan button.
Step 3: Now, the program starts scanning the selected destination. When it finds lost files, you can click one of the files and click the Preview button to see what it is.
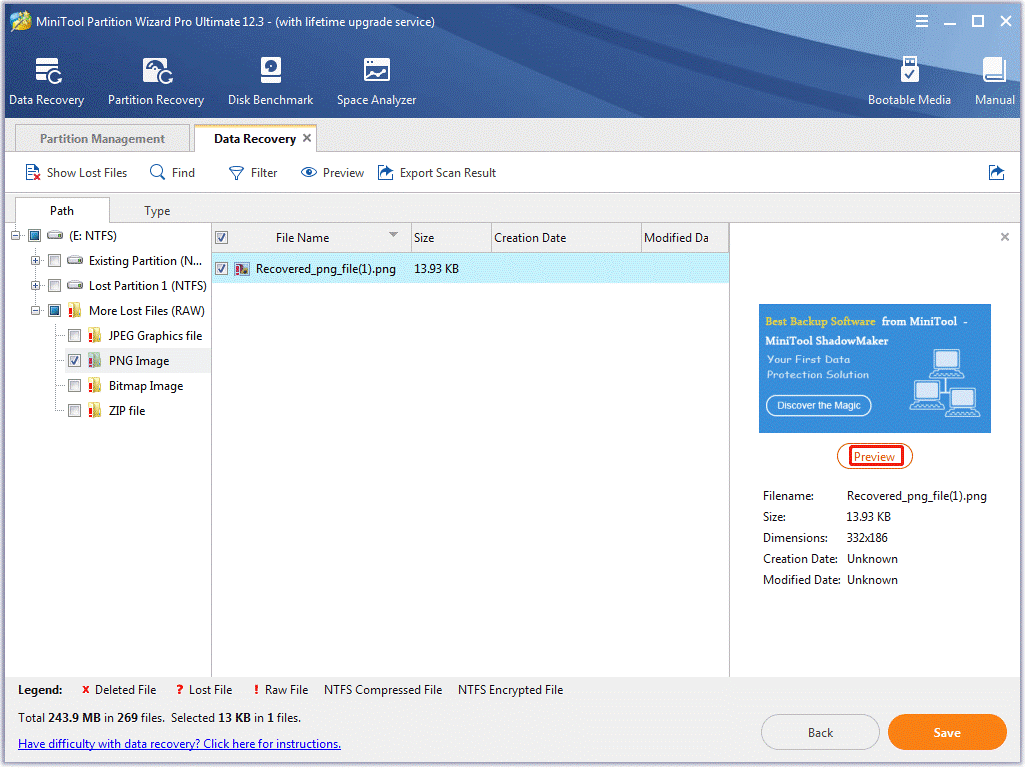
Step 4: If you think the found files are important and want to restore them, tick the checkboxes for them and click the Save button.
That’s all about what we suggest you do.
Bottom Line
“Lenovo black screen” is an annoying problem but it is often not hard to be fixed. Well, have you fixed the issue through the above fixes? Wait for your news! If you fix the issue, it’s great! But before you start your work on your repaired Lenovo laptop, please spend several minutes scanning your hard drive for bad sectors and lost files in case of further problems.
If you have some doubts about the mentioned fixes, please leave them in the comment zone and we will contact you as soon as possible.
If you have some problems with using MiniTool Partition Wizard, please contact us via [email protected].
Lenovo Black Screen FAQ
You can apply the following fixes:
- Reinstall the graphics card driver
- Change power settings
- Scan and virus or malware
For the detailed steps of these fixes, please go to Laptop Screen Goes Black Randomly.