What Is a VM?
In computing, a “virtual machine” (VM) is the virtualization or emulation of a computer system. Virtual machines are based on computer architectures and provide the functionality of a physical computer.
Before the introduction of virtualization technology, users had to dual boot Windows and Linux if they wanted to run both operating systems on the same computer. This is very inconvenient because:
- The dual boot setup is complicated.
- Linux and Windows cannot communicate with each other.
- If one system is infected with viruses, the other system will be infected, too.
The VM technology solves the above issues. It uses codes to emulate a guest system on the host system for you. For example, you can create a Linux VM on Windows using the VM software. A VM usually has the following advantages:
- Cost Saving: VMs can run multiple operating system environments on a single physical computer, saving physical space, time, and management costs.
- Agility and Speed: Spinning up a VM is relatively easy and quick and is much simpler than provisioning an entirely new environment for your developers.
- Portability: VMs are easy to move from one hypervisor to another on a different machine. This offers a backup solution in the event the host goes down unexpectedly.
- Interactivity: VM allows you to share files easily between the host and guest systems via drag and drop, even if the host system is Windows while the guest system is Linux.
- Security: VM is sandboxed. The guest system runs in a completely isolated environment and therefore what you do within the guest system won’t affect the host system.
The disadvantage of VMs is that they are less efficient and run slower than a full physical computer. In addition, running multiple virtual machines on one physical machine can result in unstable performance if infrastructure requirements are not met.
What Is WSL?
WSL, short for Windows Subsystem for Linux, is a feature of Windows that allows developers to run a Linux environment without the need for a separate virtual machine or dual booting. There are two versions of WSL: WSL 1 and WSL 2.
What about WSL 1 vs 2? The biggest difference between them is that WSL 1 uses the Windows kernel to implement Linux system calls, while WSL 2 uses Hyper-V technology, a virtual machine technology.
In terms of WSL 1 vs 2, the advantage of WSL 1 is the performance across OS file systems, while the advantage of WSL 2 is the full system call compatibility with Linux.
WSL vs VM: Which Is Better?
As mentioned above, WSL 2 also uses VM technology. However, it is just a little Hyper-V VM. When it comes to VM software, VMware or VirtualBox are all better than Hyper-V because Hyper-V will conflict with many VM software/Android emulators.
In addition, VMware and VirtualBox can access USB devices more easily and their graphical interface performance is also better than Hyper-V.
Should you use WSL or VM? Compared to VM, WSL’s biggest advantage is its lightweight, fast startup, easy installation, and close integration with Windows. If you just want to run Linux command-line tools, Bash shell scripts, and GNU/Linux command-line applications, WSL is recommended.
However, if you want to have a full Linux experience and focus on ease of use, VM software like VMware and VirtualBox is recommended.
Create a Separate Partition for the VM
If you want to use WSL, you can refer to this post: How to Install Windows Subsystem for Linux (WSL) on Windows 11.
If you want to use VM software, I recommend you create a separate partition for the VM so that you can manage the VM better. Please note that the VM file will increase as your VM usage frequency increases.
If you don’t use the Linux VM frequently, a partition of 30GB is OK. If you need to run the VM frequently, 80GB is recommended.
MiniTool Partition Wizard can help you create a partition easily. Here is the guide:
MiniTool Partition Wizard FreeClick to Download100%Clean & Safe
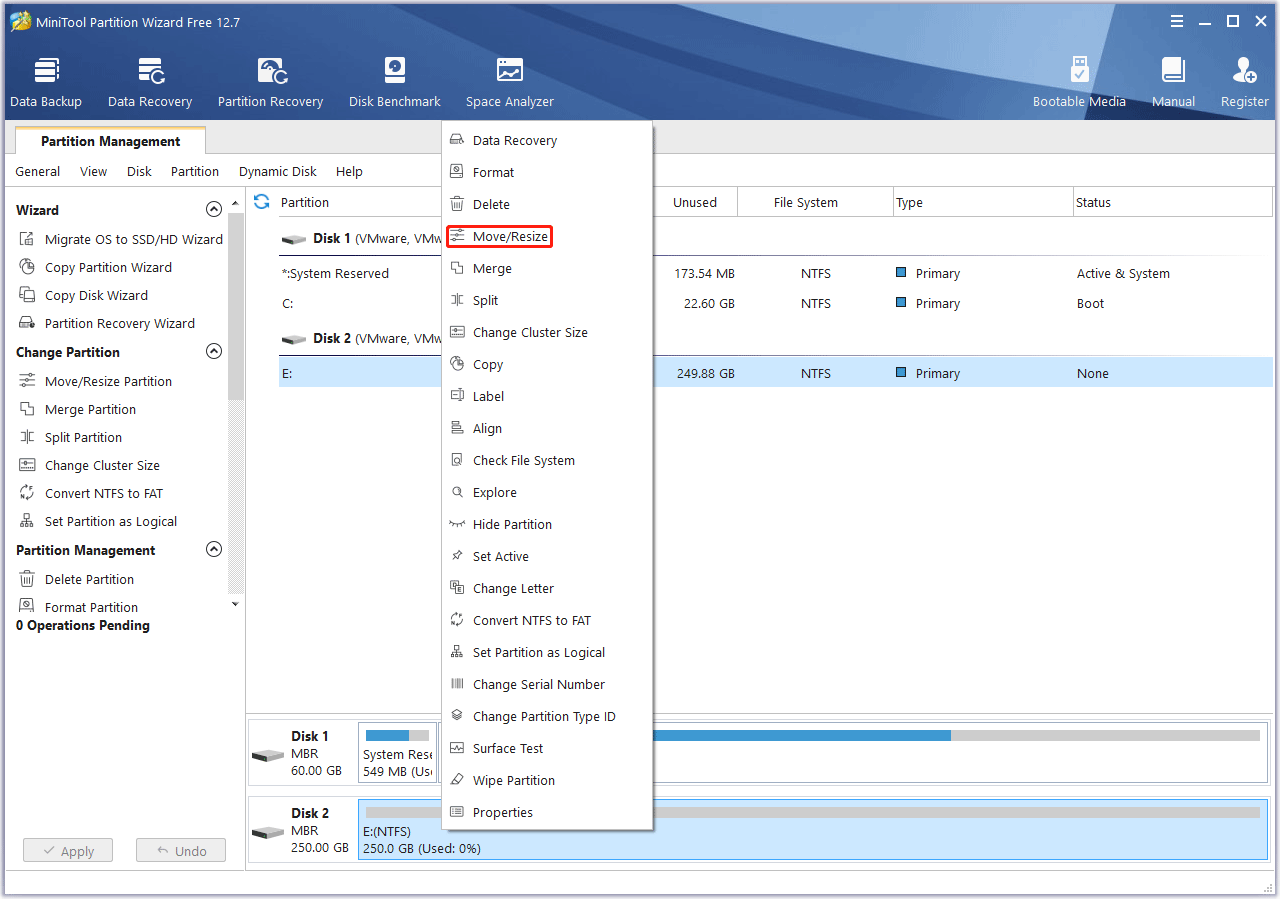
Step 1: Launch MiniTool Partition Wizard. Right-click a partition and choose Move/Resize.
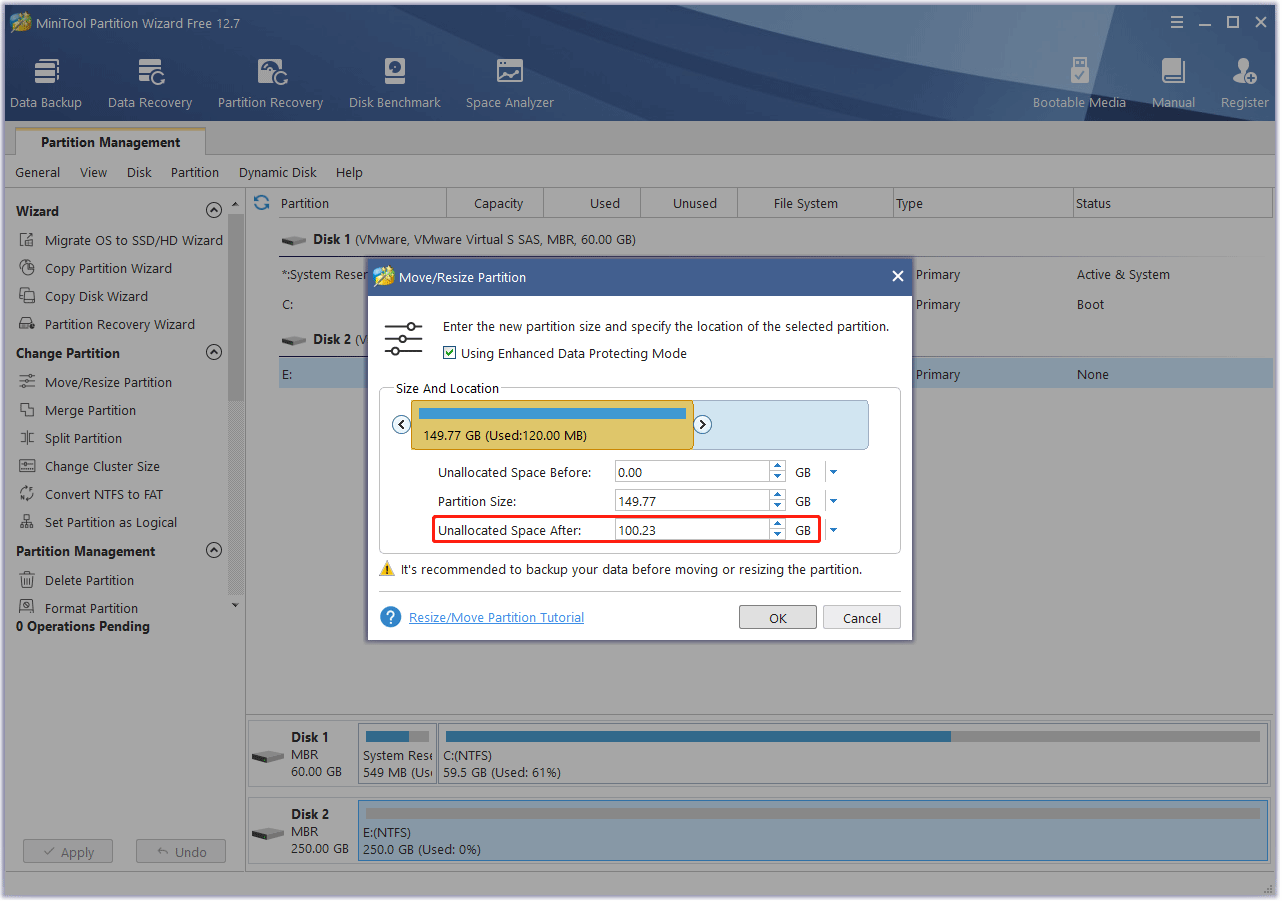
Step 2: Drag the arrow icon to decide how much space you want to shrink. Click the partition block and drag it to decide the location of the partition. Then, click the OK button.
You can check the unallocated space before and after to know how much space you have shrunk. If the unallocated space is not enough, you can move/resize multiple partitions.
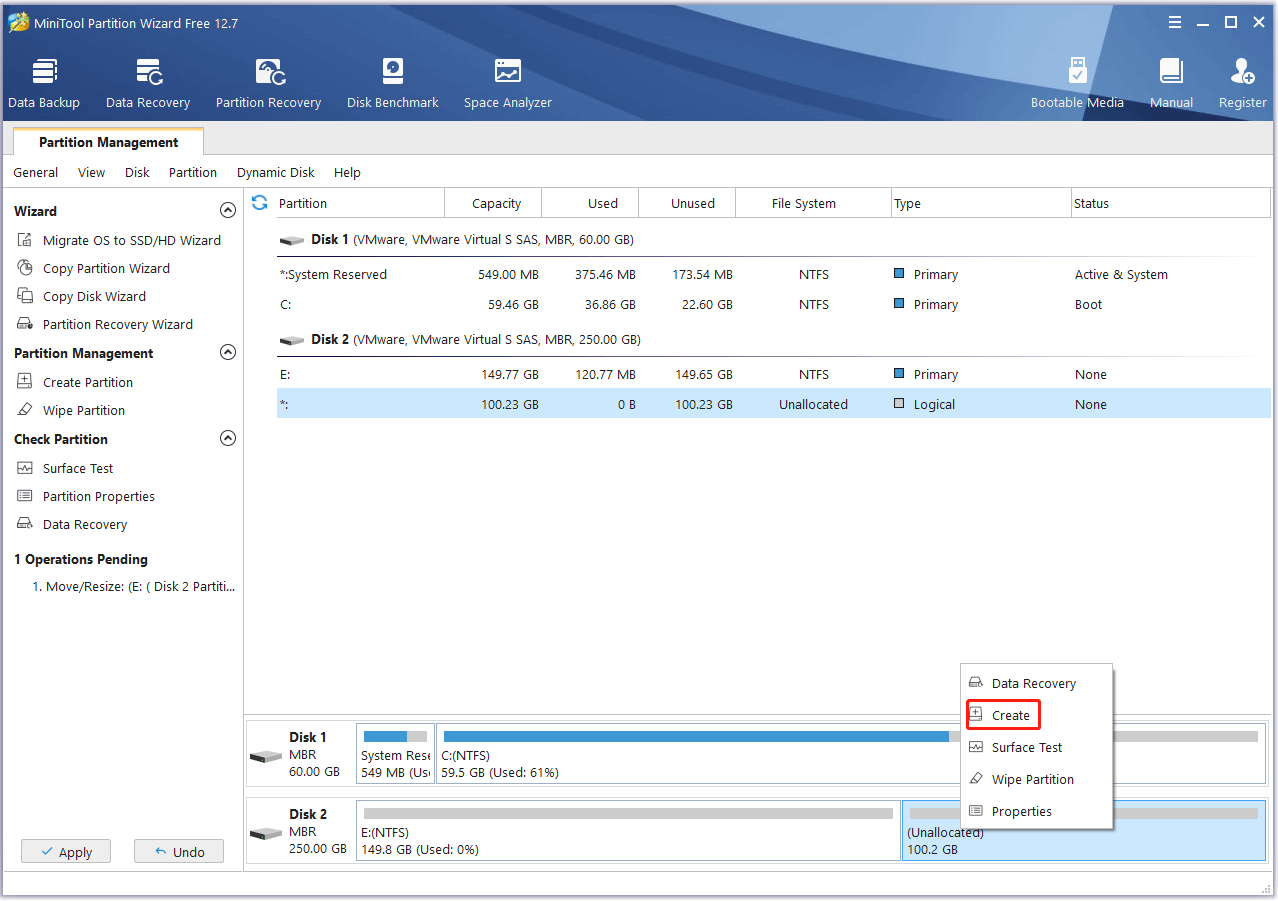
Step 3: Right-click the unallocated space and choose the Create button.
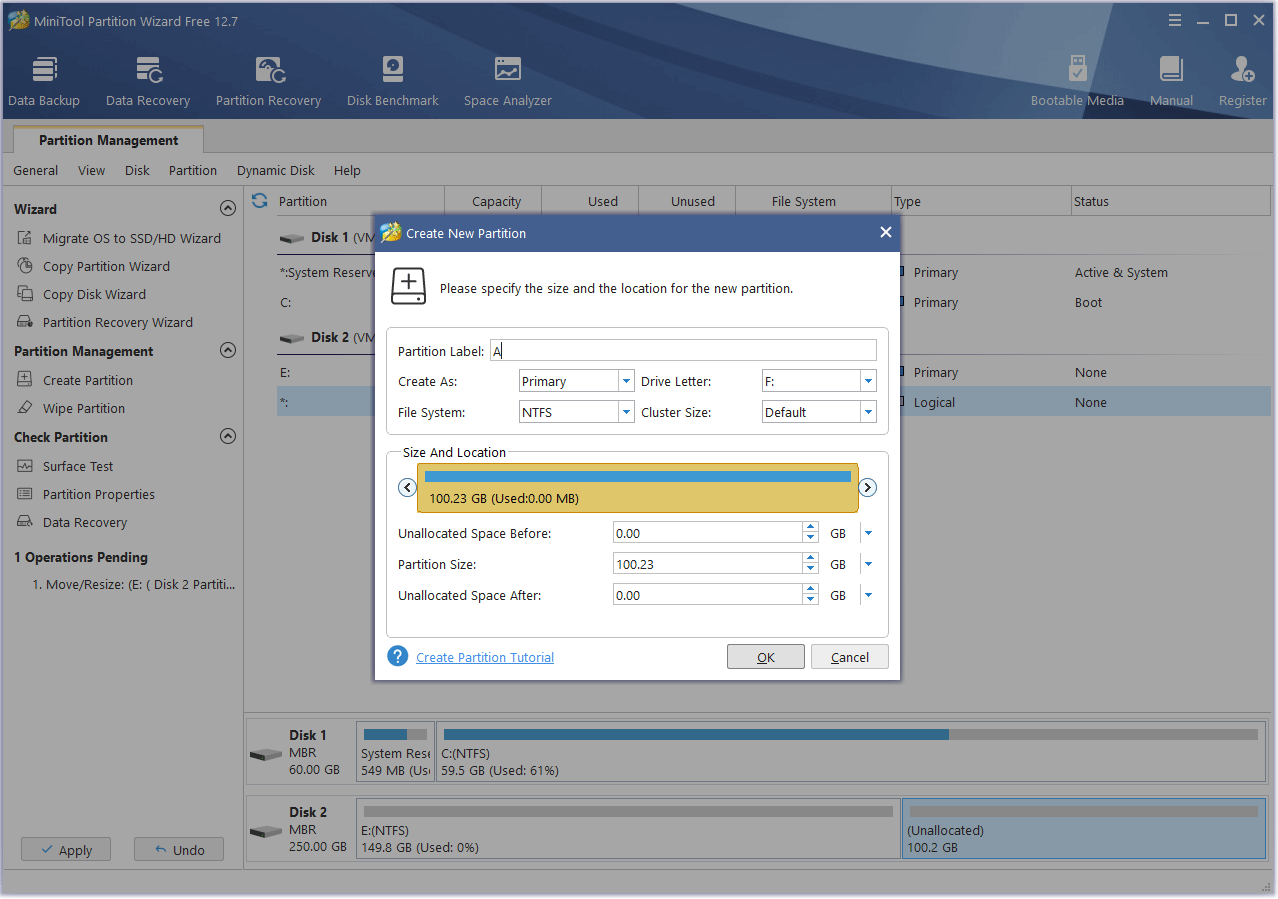
Step 4: Set parameters for the new partition. You can keep them to the default value if you don’t have specific demands. Then, click the OK button.
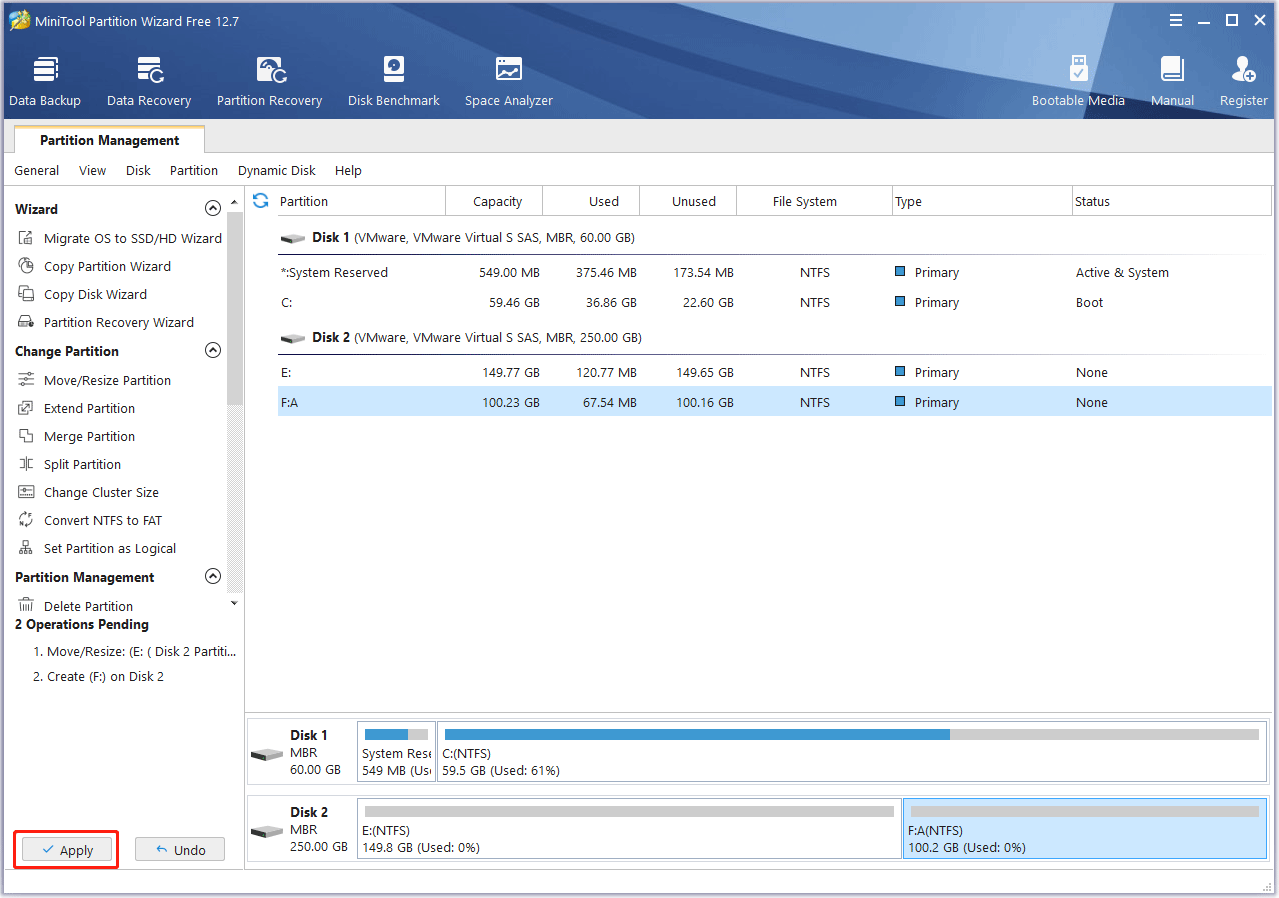
Step 5: Click the Apply button to execute pending operations.
Bottom Line
Is this post useful to you? Do you have other ideas about WSL vs VM and WSL 1 vs 2? Share them with us in the following comment zone. In addition, if you encounter problems when using MiniTool Partition Wizard, please feel free to contact us via [email protected]. We will get back to you as soon as possible.

![[Solved] WSL Not Working After Upgrading to Windows 11](https://images.minitool.com/partitionwizard.com/images/uploads/2023/01/wsl-not-working-in-windows-11-thumbnail.png)
![How to Install Linux (Ubuntu) on Windows 10 [Ultimate Guide]](https://images.minitool.com/partitionwizard.com/images/uploads/2020/02/install-linux-on-windows-10-thumbnail.png)
User Comments :