A great many people complain about Windows 10 diagnosing your PC error. Why Windows 10/11 stuck on diagnosing your PC? How to get out of diagnosing your PC loop? Now, let’s explore the answers together with MiniTool Partition Wizard.
Windows 10 Laptop stuck on “Diagnosing your PC”. I've had problems with my laptop for the last around 24 hours, and it's gotten to this screen, but never advanced to the advanced startup blue screen. A bunch of searching hasn't helped me and I don't have money to buy anything, although I have another laptop that is broken (HP Windows 10) if that means anything.https://answers.microsoft.com/en-us/windows/forum/all/laptop-stuck-on-diagnosing-your-pc/685ee7c7-9c02-47a0-ab26-9f6ae1cd6039
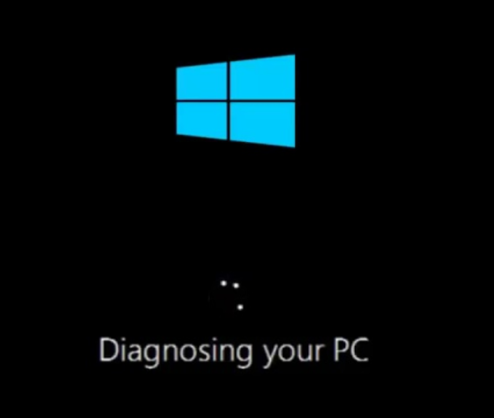
Why Windows 10/11 Stuck on Diagnosing Your PC
What causes the “diagnosing your PC Windows 10/11” error? After investigating extensive user reports, the problem is mainly related to corrupted or damaged system files. In addition, other factors like insufficient disk space, a temporary glitch in the Automatic Repair utility, corrupted BCD files, recently installed updates, or some unknown bugs are also responsible for the “diagnosing your PC stuck” issue.
How to Fix Windows 10/11 Diagnosing Your PC Error
How to fix Windows diagnosing your PC? Here we summarize 10 feasible ways to get out of the “diagnosing your PC loop” error. Let’s try them in order until the error gets fixed.
# 1. Force Reboot Your PC
The first and simplest solution is to hard reboot your PC if Windows 10 diagnosing your PC stuck on the screen. This operation has been proven by many people to be useful. For that:
Step 1. Unplug the power supply from your computer and remove the battery.
Step 2. Wait for several minutes to clear all temporary cache. Then re-plug the power supply and reinstall the battery.
Step 3. Press and hold the Power button until the computer turns on. Once powered on, check if the Windows 10 diagnosing your PC error persists.
# 2. Boot into Safe Mode
Sometimes the “Windows 10 diagnosing your PC” error can be caused by incompatible or outdated device drivers. In this case, we recommend you boot the computer into Safe Mode.
Step 1. Click the Start icon at the bottom left corner press the Power icon, and then click the Restart button with the Shift key pressed.
Step 2. Now, your computer will boot into the Windows Recovery Environment menu. Once here, click on Troubleshoot > Advanced options.
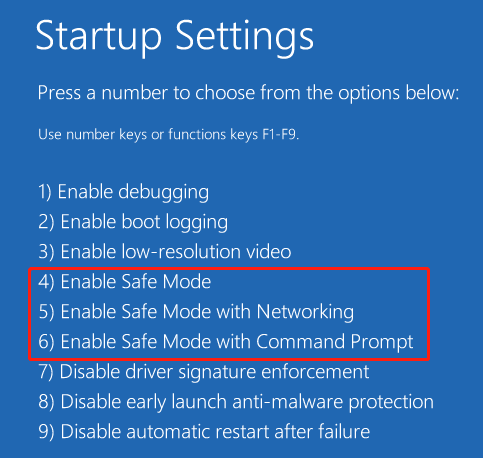
Step 3. In the Advanced options menu, select Startup Settings. Then you will see 3 options to enter Safe Mode. Just press F4, F5, or F6 based on your needs. If the error persists in Safe Mode, just move down to other solutions.
# 3. Run Disk Cleanup
If there is not enough space on the system partition, you may encounter the Windows 11 diagnosing your PC error. To free up disk space, you can run Disk Cleanup in Safe Mode.
Step 1. Boot into Safe Mode as we just explained above. Then press the Win + R keys to open the Run dialog box, type cleanmgr, and press Enter to open Disk Cleanup.
Step 2. Select the C drive from the drop-down menu and click on OK.
Step 3. Click Clean up Systems files in the Disk Cleanup window to scan more files.
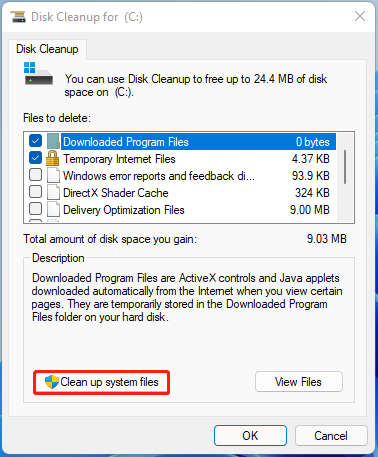
Step 4. Wait for the scan to complete. Select the files that you want to delete and click on OK. Then click on Delete Files to further confirm the cleanup.
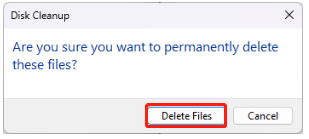
Once finished, restart your PC and see if the Windows 11 diagnosing your PC error disappears.
# 4. Extend the System Partition
Another effective way is to extend the system partition. If you don’t want to delete anything or even if the computer can’t boot into Safe Mode normally, MiniTool Partition Wizard can help you extend/resize the partition using bootable media. It’s a professional disk/partition manager that can copy/format/wipe partitions, convert MBR to GPT, rebuild MBR, and migrate OS even when the PC is unbootable.
MiniTool Partition Wizard DemoClick to Download100%Clean & Safe
Step 1. Plug the prepared USB into a working computer or insert a USB drive or CD/DVD.
Step 2. Launch the MiniTool software to access its main interface. Click Bootable Media in the upper right corner and follow the on-screen instructions to create a bootable USB drive.
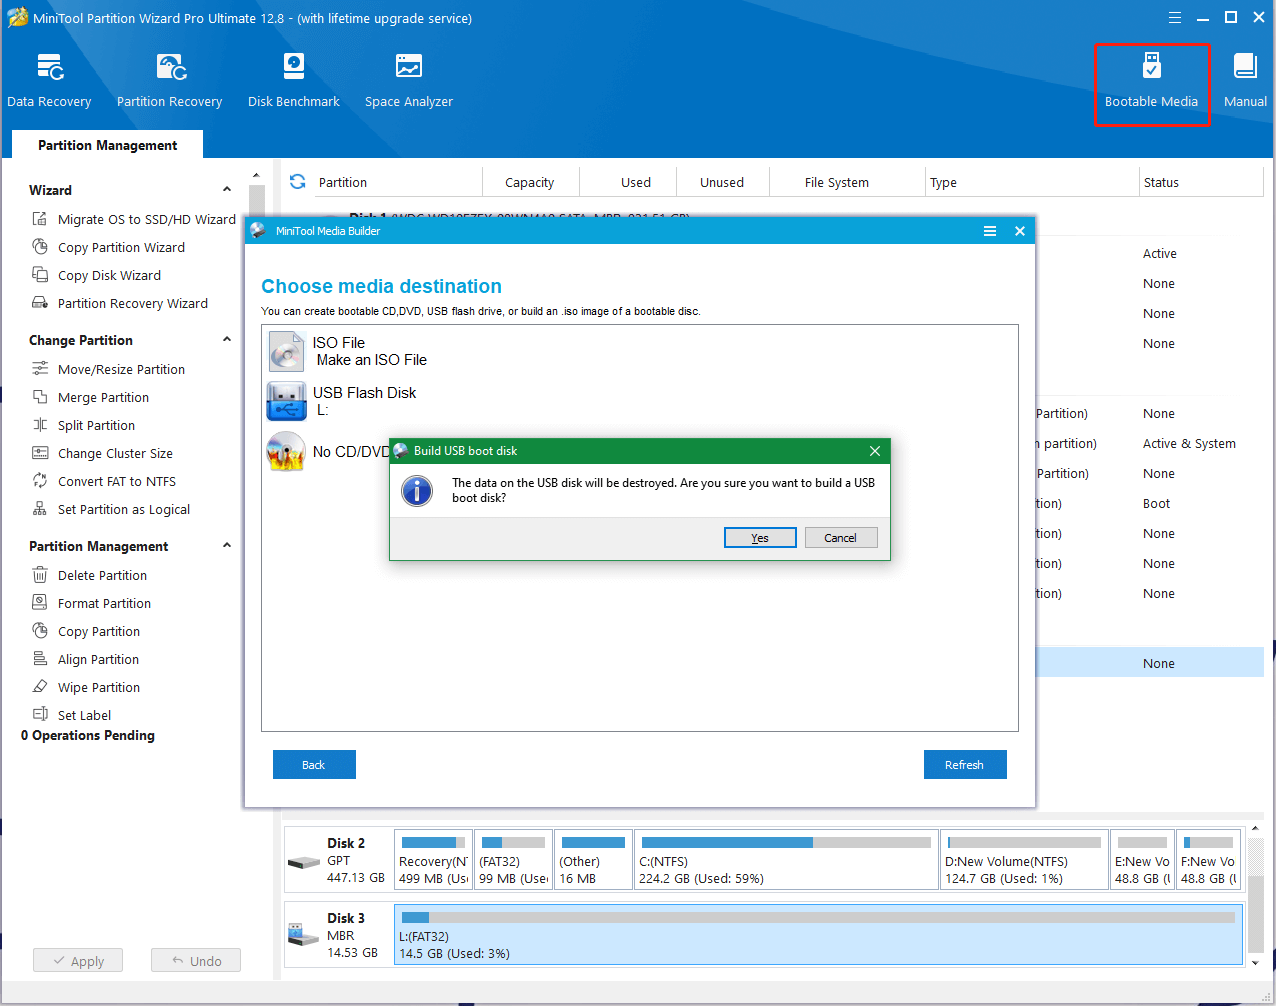
Step 3. Insert the bootable USB into the original computer, restart your computer, and press F2 or Delete keys to enter BIOS, change boot order, and make your computer boot from the USB drive.
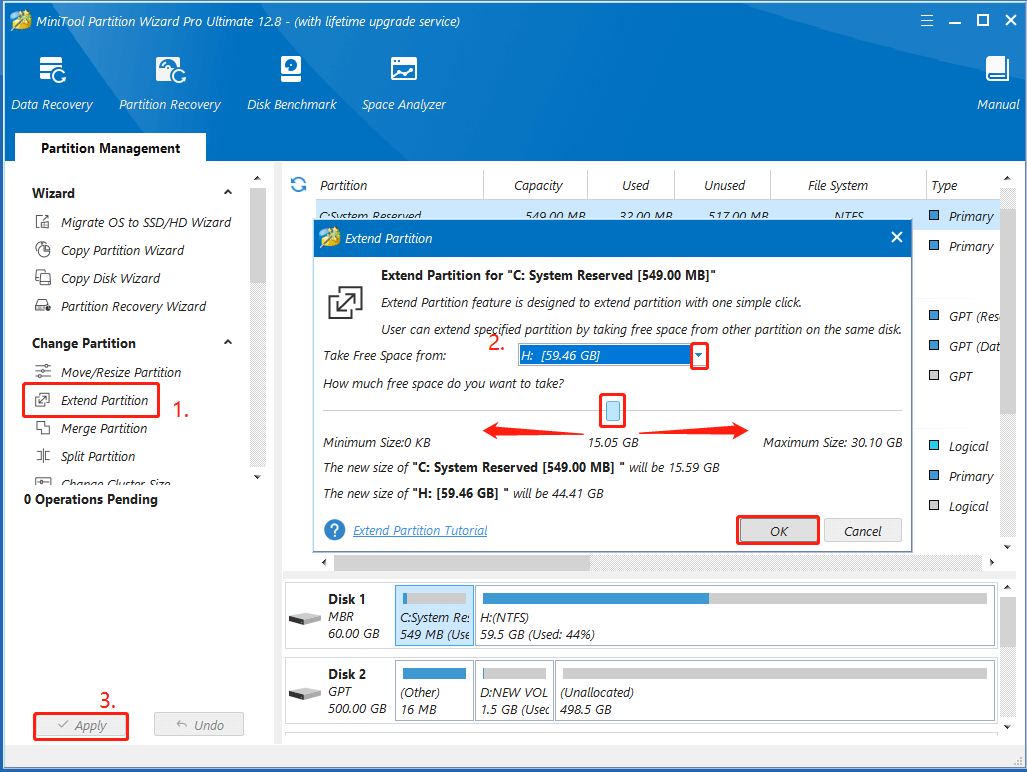
Step 4. In the main interface of MiniTool Partition Wizard, select the system partition from the disk map and click on Extend Partition from the left pane.
Step 5. Select unallocated space or a partition from the drop-down menu, drag the sliding bar to occupy the space, and click on OK. Then Click on Apply to execute the process
# 5. Repair Your Computer
In addition, you can repair the computer using a Windows installation media. Some users have proven that this method can help fix the Windows 10 diagnosing your PC error. Let’s have a try.
Step 1. Insert the Windows installation disc into your computer and restart it from the disc. Then press any key to boot from the media.
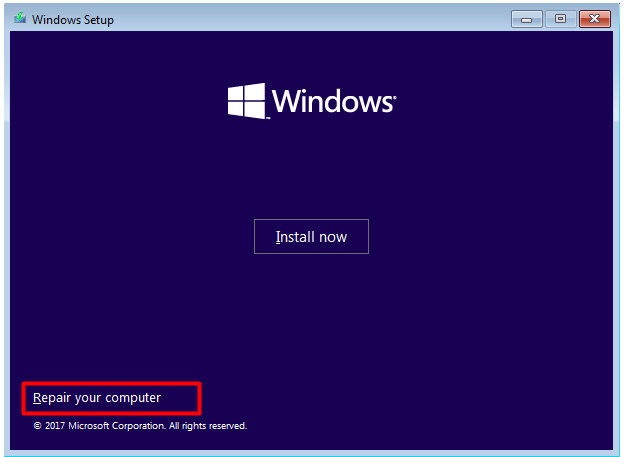
Step 2. Choose the language preference and go on until you arrive at the Install Now screen. Then click on Repair Your Computer to access the Advanced Settings menu.
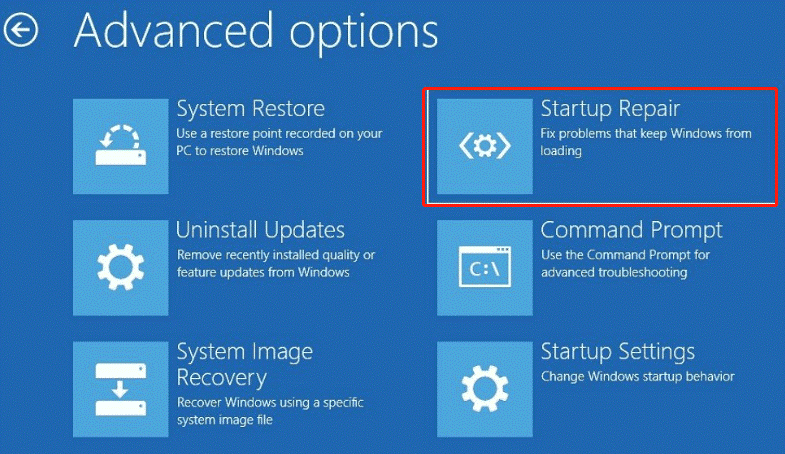
Step 3. Select Troubleshoot and access Advanced Options, and click Startup Repair in order. Then it will automatically repair your system. Wait for the repair to finish and reboot your computer to see if diagnosing your PC Windows 10 error is gone.
# 6. Repair the System Files
If some important system files are corrupted or missing, you may also encounter the Windows 10 diagnosing your PC stuck error. In this case, you can run an SFC scan or DISM in WinRE to repair the system files.
Step 1. Follow Step 1 to Step 4 in Solution 5 to access the Advanced options menu and select Command Prompt.
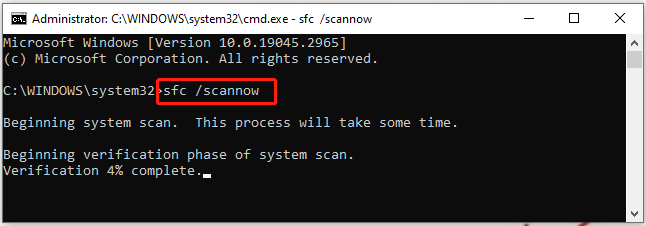
Step 2. In the Command Prompt window, type the sfc /scannow command and hit Enter to repair system files automatically. This process may take you some time to complete. So, please wait patiently.
Step 3. After the scan is complete, restart your computer and re-follow the same steps to come back to the elevated Command Prompt window. Once opened, type the following commands in order and press Enter after each one.
- Dism /Online /Cleanup-Image /CheckHealth
- Dism /Online /Cleanup-Image /ScanHealth
- Dism /Online /Cleanup-Image /RestoreHealth
# 7. Uninstall the Recently Installed Updates
Some users reported that the Windows 10 diagnosing your PC error occurs after installed the latest Windows features and updates. If this scenario also applies to you, follow the steps below to uninstall the update.
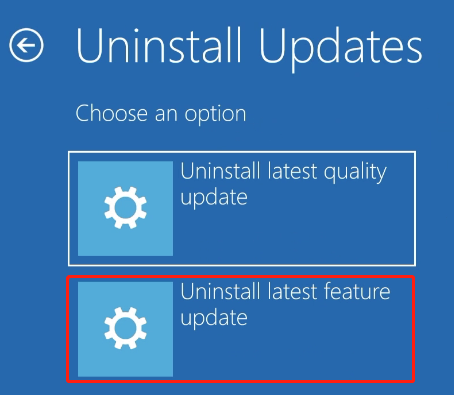
Step 1. Enter WinRE as we explained above and access the Advanced options menu, then select Uninstall Updates.
Step 2. In the Uninstall Updates window, select Uninstall latest feature update, and enter your admin password when prompted. Then wait until your PC finishes the uninstallation and reboot to see if the diagnosing your PC Windows 10 error gets solved.
# 8. Perform a System Restore
If the above method fails to get out of the Windows 10 diagnosing your PC error, you can try performing a system restore from WinRE. This will undo the recent changes you made and revert your system to an earlier state in which your PC works normally. To do this work, follow the quick guide below:
Step 1. Enter WinRE as we explained above and access the Advanced options menu as we showed above, then select System Restore.
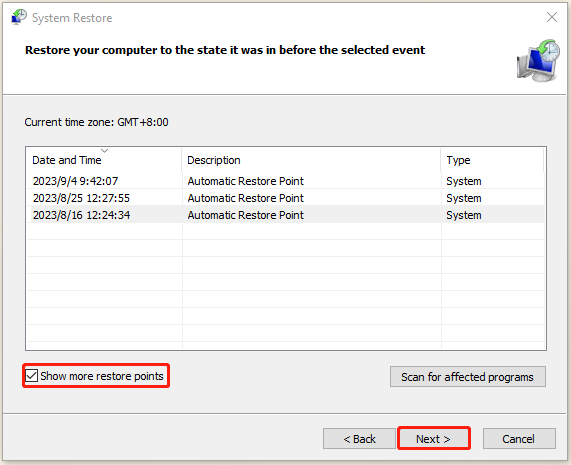
Step 2. The System Restores window will pop up immediately, and click Next to continue.
Step 3. In the list of all system restore points, select the Restore point that you prefer and click the Next button. Here you can tick the checkbox next to Show more restore points.
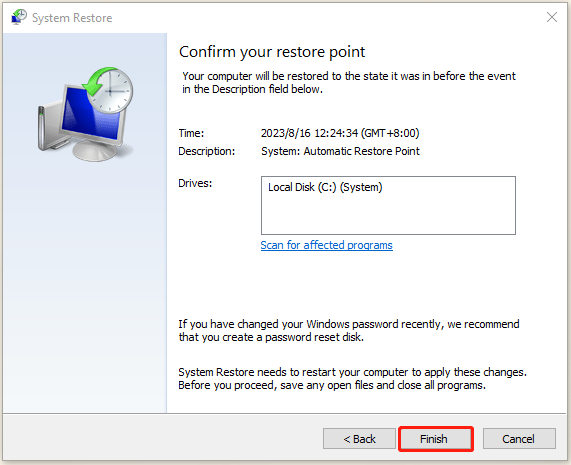
Step 4. Then confirm your restore point by clicking the Finish button. After that, your computer should be restored to an earlier state, and the Windows 10 diagnosing your PC stuck error gets solved.
# 9. Rebuild BCD
The Boot Configuration Data (BCD) is a vital Windows component that contains boot configuration parameters and is used to boot Windows properly. If the BCD data gets corrupted or into chaos, you will encounter the diagnosing your PC Windows 10/11 error. In this case, you’d better follow the steps below to rebuild BCD.
Step 1. Enter WinRE using your Windows installation disc and select Command Prompt in the Advanced options menu.
Step 2. In the elevated Command Prompt window, type the following commands in order and hit Enter after each one.
- bootrec /fixmbr
- bootrec /fixboot
- bootrec /scanos
- bootrec /rebuildbcd
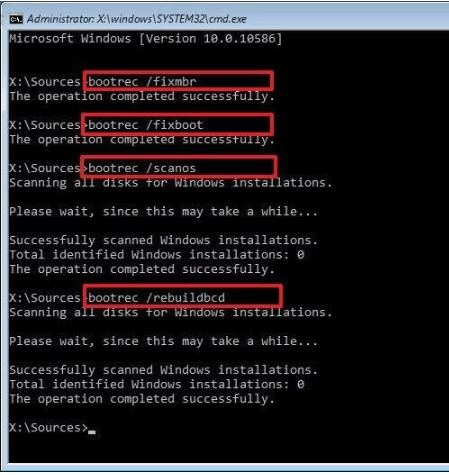
Step 3. When the repair is complete, type exit and press Enter. Then restart your computer and check if the Windows diagnosing your PC error is gone.
# 10. Clean Install Windows 10/11
If none of the above methods can get rid of the “Windows 10/11 stuck on diagnosing your PC” error, you may consider performing a clean installation of Windows 10/11. This method will reset your PC to its factory settings and delete everything on the hard disk, which can help clean the error. Before you do, make sure you have backed up all important data on your computer.
After that, you can refer to the following guides to know more details:
How to Clean Install Windows 11? Here Are 5 Options
How to Reinstall Windows 10 without CD/USB Easily (3 Skills)
What’s Your Opinion
How to get out of diagnosing your PC loop error on Windows 10/11? We have illustrated 10 feasible fixes in the above. If you have any other solutions to this problem, please share them with us in the following comment zone. Besides, you can contact us via [email protected] if you have any confusion or feedback about MiniTool Partition Wizard.

User Comments :