Windows Virtual PC, a virtualization program for Microsoft Windows, has been superseded by Hyper-V. In this post, MiniTool shows you how to use Hyper-V, the Virtual PC Windows 10, to create a VM.
I have a very old app that only works on Windows XP. I thus have a Windows XP VM – as a “Windows Virtual PC” VM, on my Windows 7 Pro desktop. Will I still be able to use this VM when my Windows 7 Pro is upgraded to Windows 10 Pro? — answers.microsoft.com
Is there a Virtual PC version for Windows 10? Some users who have upgraded from Windows 7 to Windows 10 not for long may ask this question. Actually, starting with Windows 8, Windows Virtual PC—a virtualization program for Microsoft Windows—has been superseded by Hyper-V.
You can view Hyper-V as Virtual PC Windows 10. With Windows Hyper-V, you can create any operating system you like, such as Windows 7, Linux, etc., so long as it’s compatible with the virtualization software you’re using.
Like other virtual machine software, this Microsoft virtual machine also allows you to try out a new OS without affecting your files, and evaluate software and services without the risk of messing up your real Windows 10 installation.
Then, how to create a virtual machine in Windows 10 with Hyper-V? This post offers you the detailed tutorial. Creating a virtual PC Windows 10 is very easy. You just need to do the following works:
- Determine whether your PC is capable of running Hyper-V.
- Make a partition for the virtual machine Windows 10.
- Create a virtual network for the Windows 10 VM.
- Create a virtual PC with Hyper-V Windows 10.
Now, read the following content to get the detailed steps.
Move 1. Decide Whether Your PC Is Capable of Running Hyper-V
Hyper-V is a virtualization technology tool embedded in 64-bit Windows 10 Pro, Enterprise, and Education. In other words, if you are running Windows 10 Home Edition or 32-bit Windows, this feature is not included.
Apart from the above system requirements, there are some hardware requirements your PC needs to meet:
- 64-bit CPU with Second Level Address Translation (SLAT).
- CPU’s support for VM Monitor Mode Extension (VT-c on Intel chips).
- 4GB of memory at a minimum. The Windows virtual machine shares memory with the Hyper-V host, so you need to provide enough memory to handle the expected virtual workload.
If you are not sure whether the hardware in your PC meets the above requirements, you can verify the hardware compatibility with Hyper-V via CMD. Please do as follows:
Step 1: Open and run Command Prompt or PowerShell as administrator.
- To run Command Prompt as administrator: open Cortana search box and type in “cmd“. Then right click the best-matched result and click Run as administrator.
- To run PowerShell as administrator: Press “Windows + X” key simultaneously and then click Windows PowerShell (Admin).
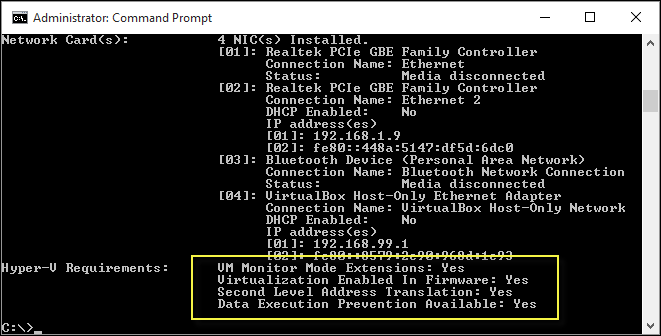
Step 2: Type the command “systeminfo” and then press Enter. After the result comes out, please check the Hyper-V requirements part. Only when all Hyper-V requirements are Yes, you can run Hyper-V without problem.
Move 2. Make a Partition for Virtual PC Windows 10
Microsoft allows you to install the Windows 10 virtual PC in any partition without the need of creating a partition dedicated to the virtual machine. However, for the best performance of the Windows VM and the host computer, I recommend you to create a partition for the virtual PC Windows 10. The reasons are as follows:
- Running virtual machines generates a lot of disk fragmentation. Putting the VM file and other program files in the same partition will affect the running speed.
- On the partition storing the virtual machine, some operations like disk defragmentation cannot be performed because that may cause the virtual machine to fail (virtual machine files are corrupted). Therefore, it is wise to create a partition dedicated to the virtual PC Windows 10.
- …
Then, how to make a partition for the virtual PC Windows 10? I recommend you to use MiniTool Partition Wizard, with which you can make a partition more easily. Please follow the steps below:
MiniTool Partition Wizard FreeClick to Download100%Clean & Safe
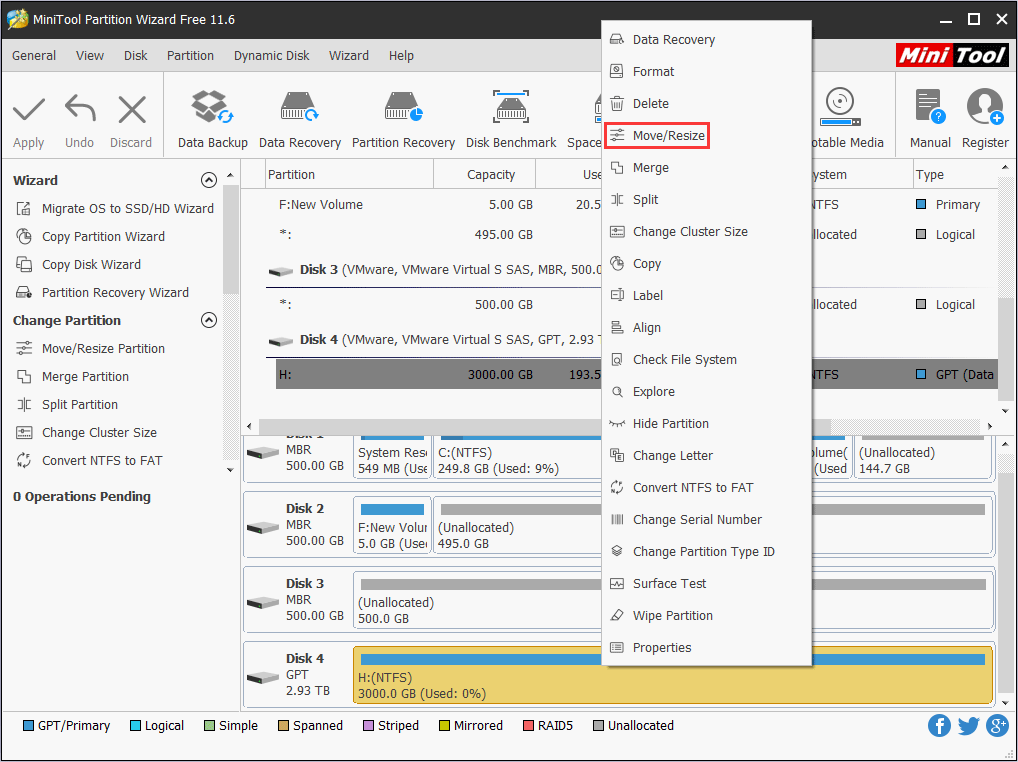
Step 1: Click the above button to download MiniTool Partition Wizard. Launch this software and go to its main interface. Then, right-click the partition you want to shrink and choose Move/Resize from the context menu.
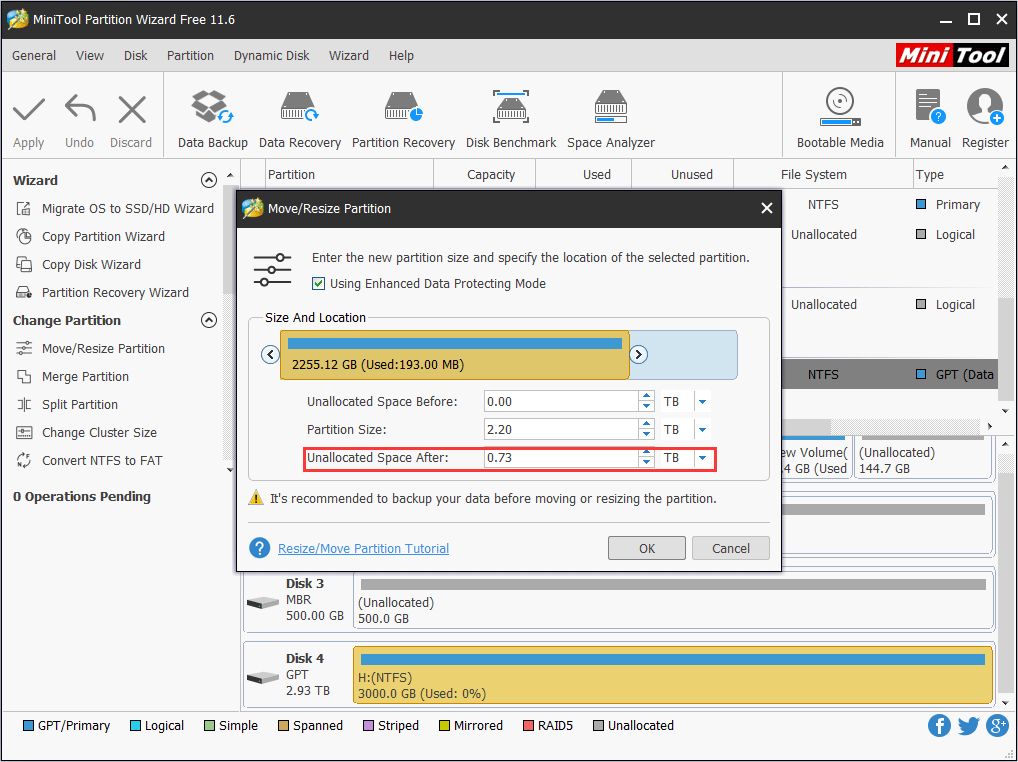
Step 2: In the popup window, drag the slider to choose how much size you want to shrink and click OK to continue. The number in the box following Unallocated Space After is the space size you reserve for the new partition.
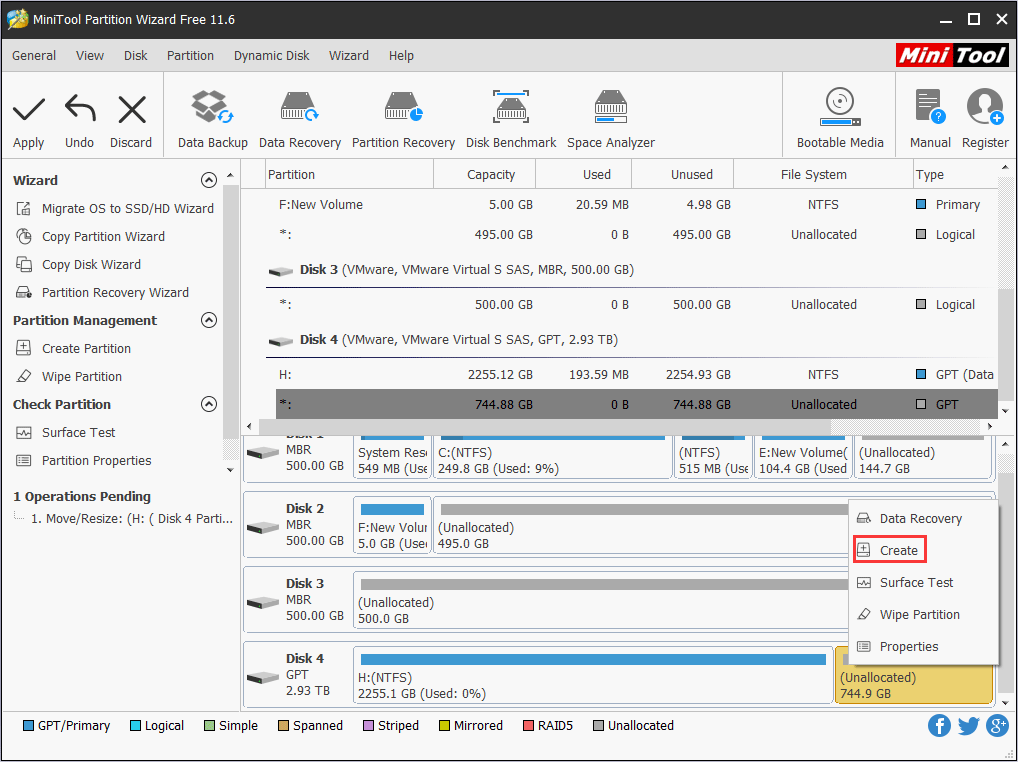
Step 3: Right-click the gray unallocated space and choose Create from the context menu.
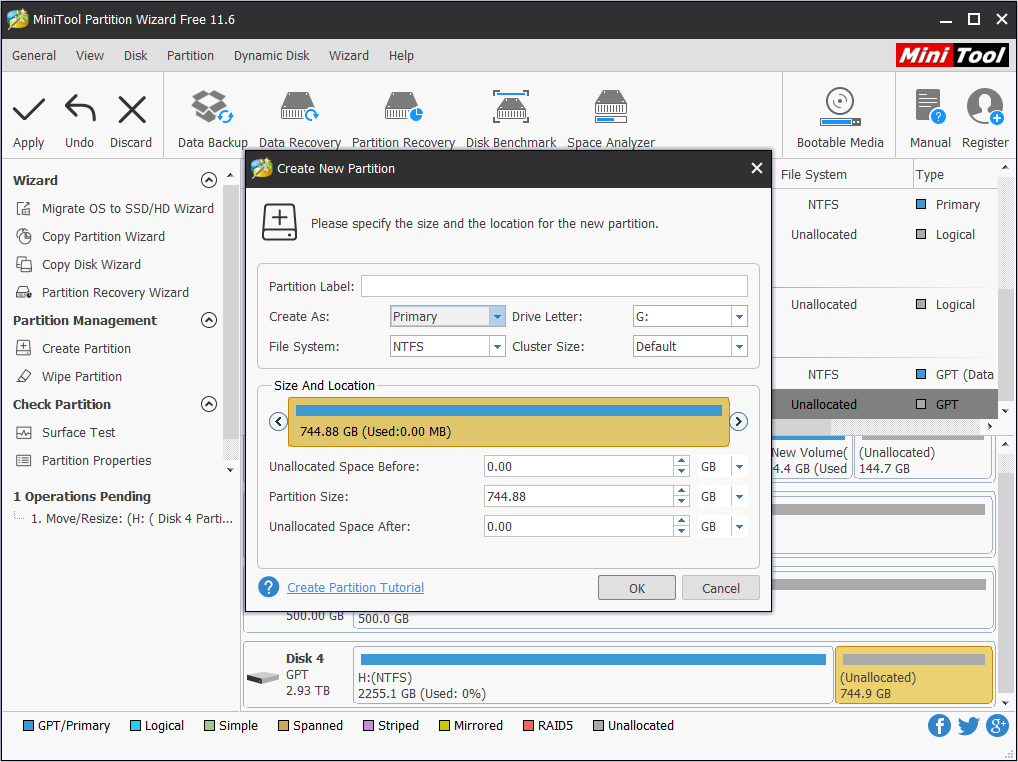
Step 4: In the popup window, choose partition properties like file system, partition label, drive letter and so on. Then, click OK to continue.
Step 5: Preview the changes and click Apply to confirm the changes.
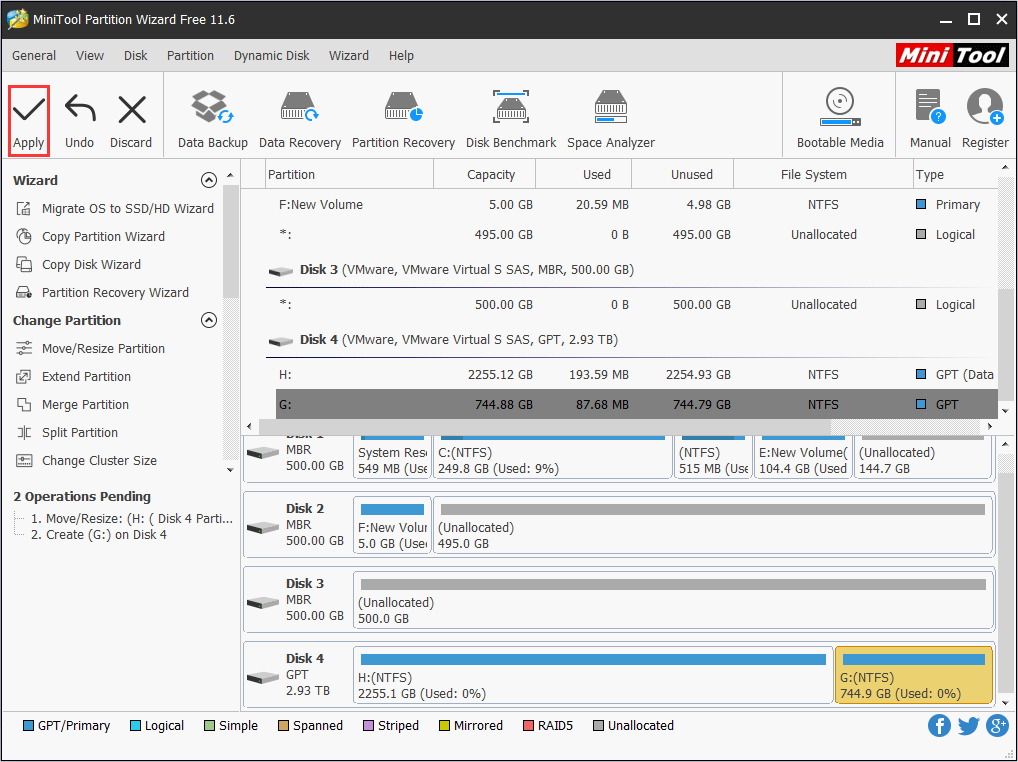
Through the above steps, the partition for the Windows virtual machine has been created and then you can perform the next movement.
Move 3. Create a Virtual Network for the Windows 10 Virtual Machine
If your virtual machine needs to be connected to the internet or a network, you should create a virtual network for it, so that it can share a network with your computer. If your virtual machine doesn’t need to be connected to the internet or a network, you can skip to next move.
Please follow the steps below to create a virtual network for the virtual PC Windows 10:
Step 1: Enable Hyper-V.
- Right-click on the Windows button and select Apps and Features.
- Scroll down the right pane to find Related settings. Under this section, click Programs and Features.
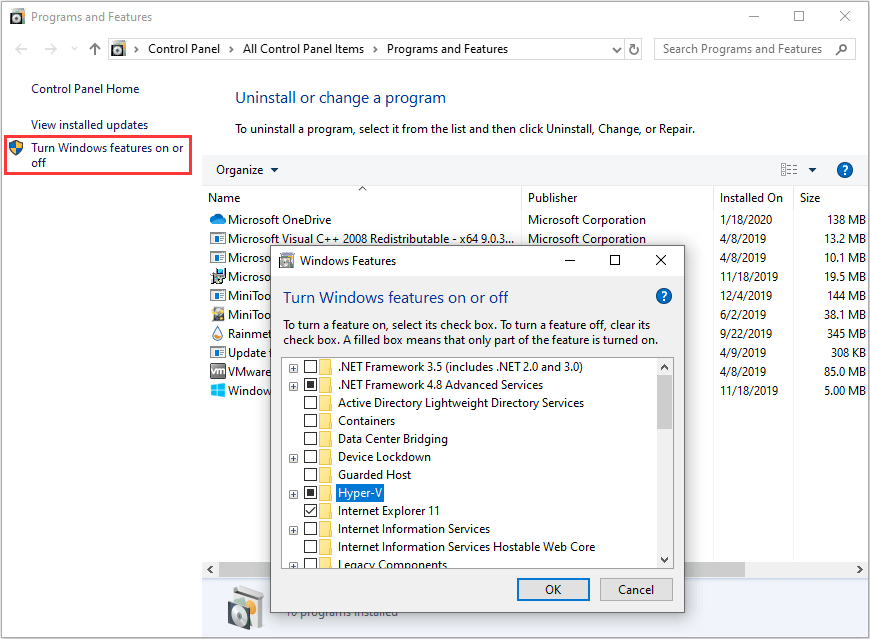
- On the new window, select Turn Windows Features on or off.
- On the Windows Features window, select Hyper-Vand click OK. Please make sure Hyper-V Management Tools and Hyper-V Platform under the Hyper-V directory are selected.
- When the installation has completed, you are prompted to restart your computer. Do as required.
Step 2: Open Virtual Switch Manager.
- Open Start and search for Hyper-V Manager. Then, click the top result to open Hyper-V Manager.
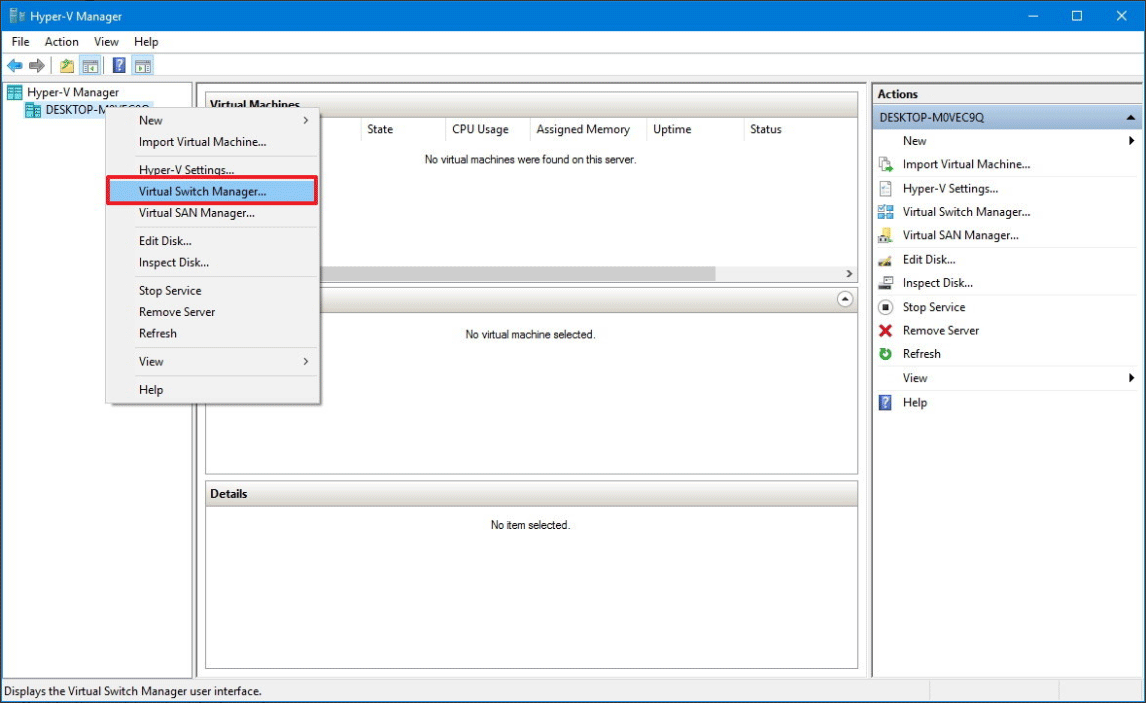
- Select the server in the left pane. Then click on the Action menu and select Virtual Switch Manager… This will open a Virtual Switch Manager window.
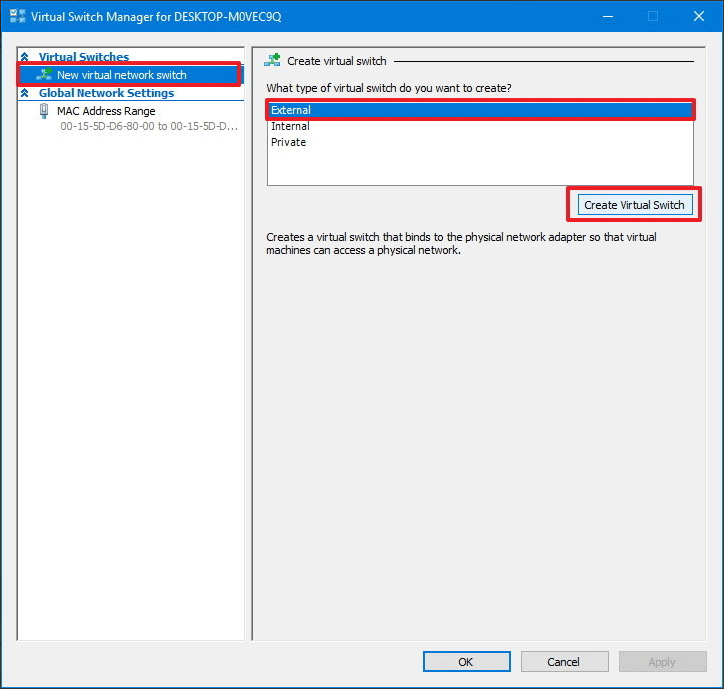
Step 3: Create an external virtual switch, which can provide virtual machines with access to the physical network so that they can communicate with servers and clients on the external network. The external virtual switch can also allow virtual machines on the same Hyper-V server to communicate with each other.
- Under the Virtual Switches section, select New virtual network switch.
- Under What type of virtual switch do you want to create, select External.
- Select the Create Virtual Switch
Step 4: Configure Virtual Switch Properties for the new switch.
- Under Name, enter a name for the new switch.
- Under Connection Type, ensure that External network has been selected.
- Select the physical network card to be paired with the new virtual switch. This is the network card that is physically connected to the network.
- Click the Apply and the OK
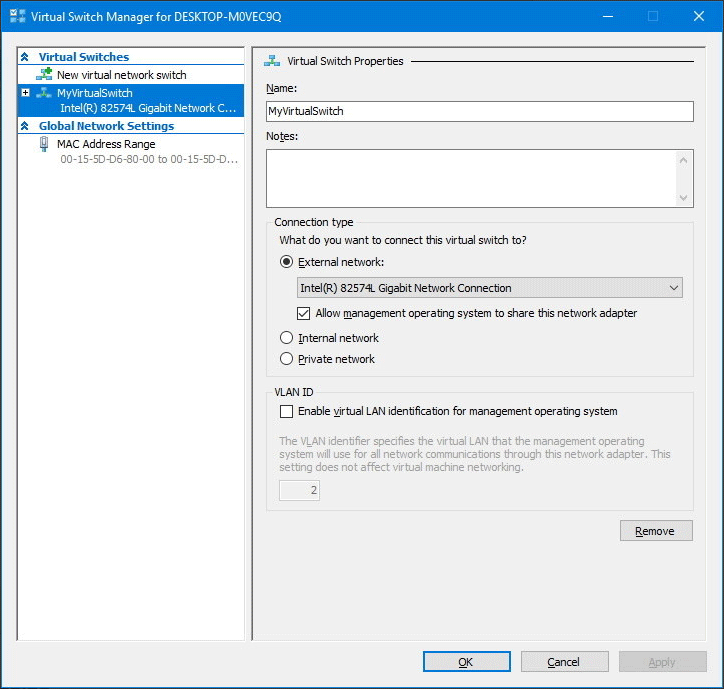
Now that the virtual switch is created and configured, you can create a virtual machine.
Move 4. Create a Virtual Machine with Hyper-V Windows 10
How to set up a virtual machine with Hyper-V on Windows 10? The exact steps vary depending on the Windows 10 version you are using.
Windows 10 Version 1607 and Earlier
Step 1: On the Hyper-V Manager window, click Action>New>Virtual Machine to bring up the New Virtual Machine Wizard.
Step 2: On the Before You Begin tab, review the content and click Next. Then, on the Specify Name and Location tab, enter a name and choose a location for your virtual machine program (this name and this location are not used for the guest virtual PC). After that, click Next button.
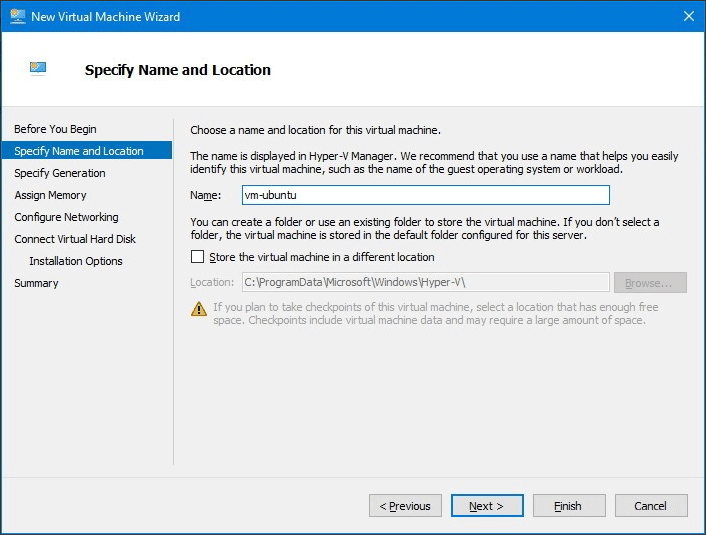
Step 3: On the Specify Generation tab, choose Generation 1 or Generation 2. Then, click Next button.
Step 4: On the Assign Memory tab, select 2048 MB for the Startup Memory value and leave Use Dynamic Memory selected. Then, click the Next button.
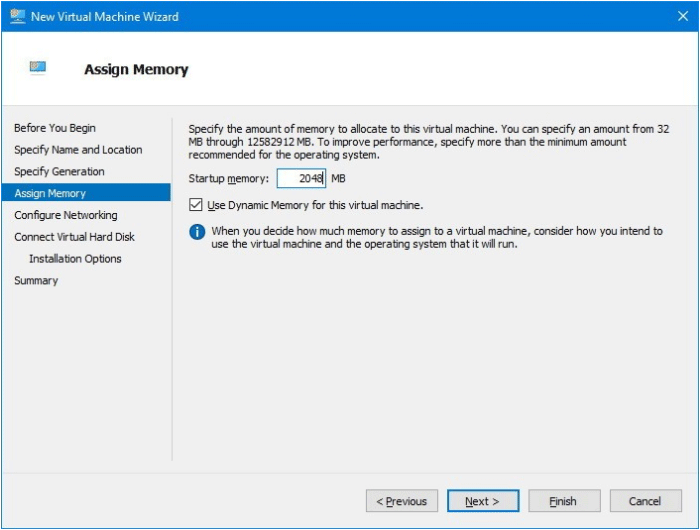
Step 5: On the Configure Networking tab, select the virtual switch that you created just now for the virtual machine and click Next.
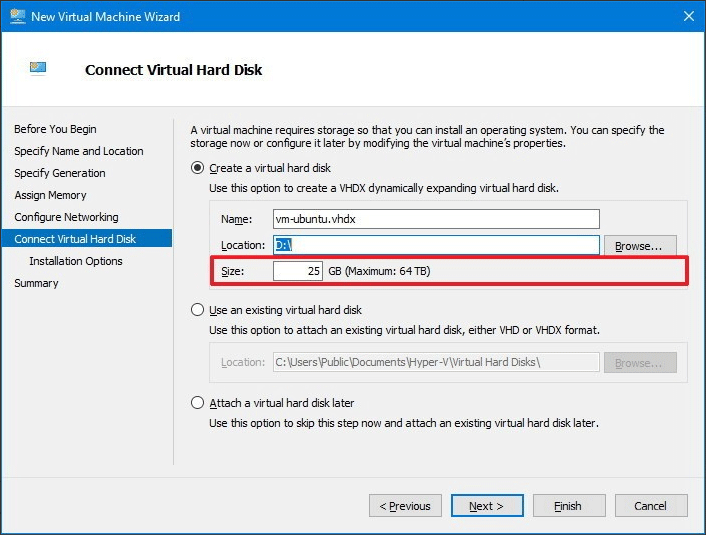
Step 6: On the Connect Virtual Hard Disk tab, give the virtual hard drive a name; select the partition you created for the VM (in Move 2) as the location; and allocate space to the virtual hard disk.
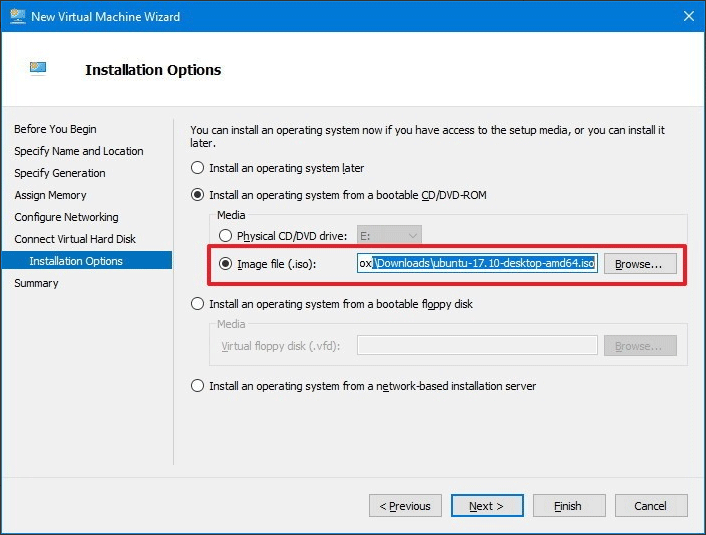
Step 7: On the Installation Options tab, select Install an operating system from a bootable image file and then select an operating system .iso file. Click Next once completed.
Step 8: On the Summary tab, review the virtual machine details and click Finish to complete the virtual machine creation.
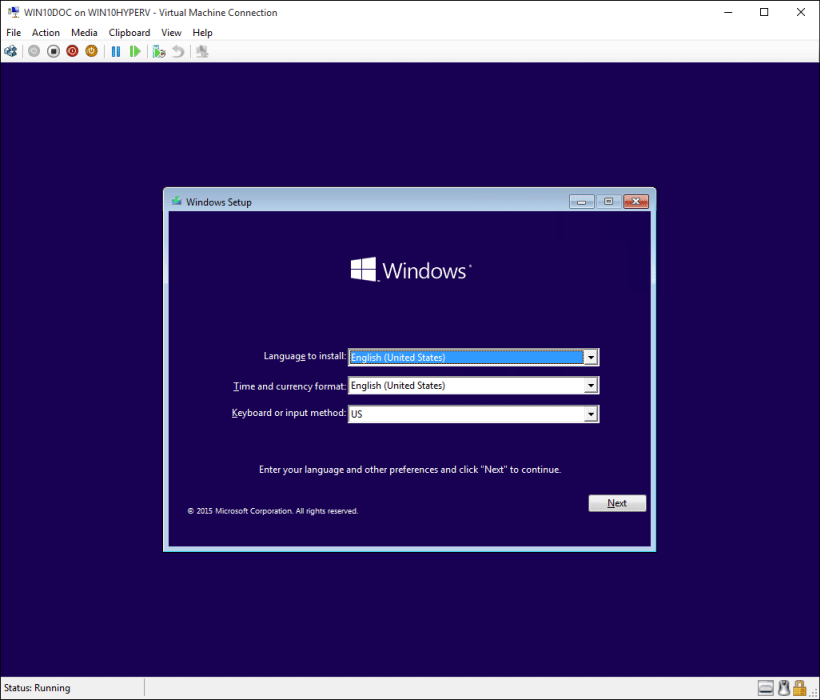
Step 9: In Hyper-V Manager, double-click on the virtual machine you created just now to launch the VMConnect tool. In VMConnect, click on the green Start button and then walk through the operating system installation.
Windows 10 Version 1703
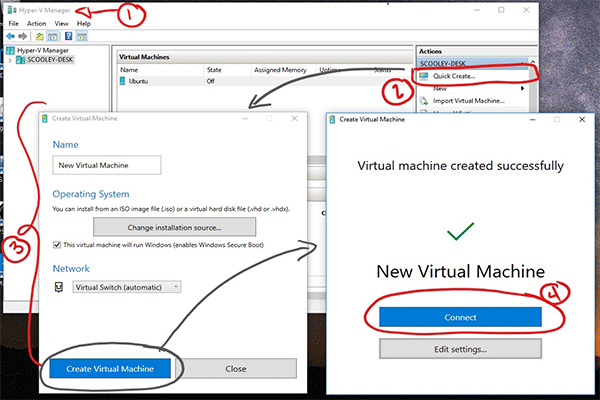
Starting with this version, Quick Create feature is introduced, which can help you create a virtual PC Windows 10 more easily. If your Windows 10 version is 1703, please follow the steps below:
Step 1: Open Hyper-V Manager and find Quick Create in the right hand Actions menu.
Step 2: Customize your virtual machine on the creation window.
- Give the virtual machine a name.
- Select the installation media for the virtual machine.
- Set up network.
Step 3: ClickCreate Virtual Machine and Connect to start your virtual machine and then you can walk through the operating system installation.
Windows 10 Version 1709 and Later
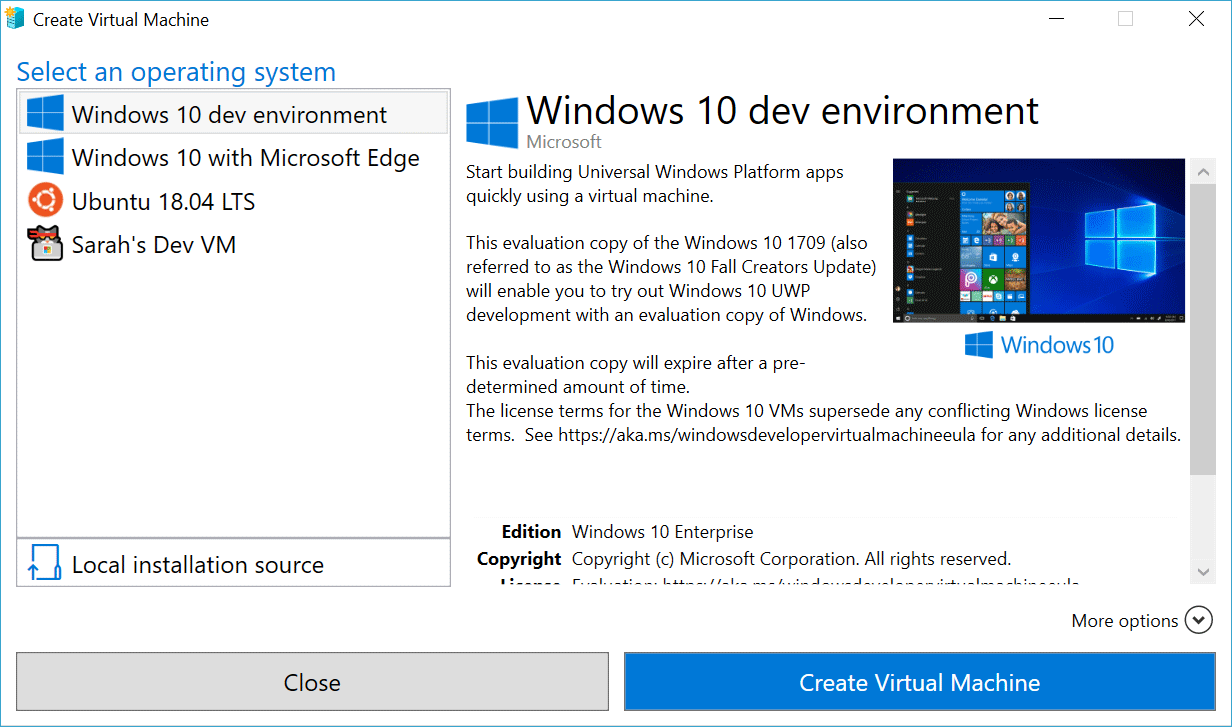
If your Windows 10 version is 1709 or later, the Quick Create feature has changed and it expanded to include a virtual machine gallery that can be launched independently from Hyper-V Manager. You can use it to create a virtual PC Windows 10 through the following steps:
Step 1: Search Hyper-V Quick Create feature in Start menu and open it directly (without the need to open Hyper-V Manager).
Step 2: Select an operating system. You can select one OS offered by the VM software. You can also choose your own by clicking Local Installation Source and selecting Change Installation Source. In this way, you can use your own image to create the virtual machine.
Step 3: Complete the creation process and perform the system installation.
Bottom Line
Do you have difficulty in making a partition or creating a virtual machine? If so, please leave your problems below or email them to us via [email protected]. We will reply to you as soon as possible.
Virtual PC Windows 10 FAQ
- Open Hyper-V Manager and activate New Virtual Machine Wizard.
- Customize your virtual machine settings like memory, hard drive, networking, etc.
- Walk through the operating system installation.
- VMware
- VirtualBox
- Hyper-V


User Comments :