What Is SteamOS
The SteamOS, a Linux-based operating system released in 2013, is built based on Debian 8 and offers an environment similar to that of a console. It is built for playing video games in the living room as no keyboards or mice are required to interact with the OS. Besides, it makes your PC behave in a console-esque manner.
Being an open Linux platform, SteamOS leaves you in full control. It means that you can take charge of your system and install new software or content as you like. With this system, you can transform your current computer into a Steam Machine so that you don’t have to get a SteamOS computer.
How to install Steam OS? Follow the guide offered below now!
Best Operating System for Computers – How to Dual Boot
Hardware Requirements for Steam OS Installation
Before getting the Steam OS installation, you need to know the hardware requirements of this system and then check if your PC meets the specs. Actually, most mid to high-end computers can run SteamOS without issues.
- Processor: Intel or AMD 64-bit capable processor
- GPU: Nvidia graphics card, AMD graphics card (Radeon 8500 and later), or Intel graphics
- Memory: 4GB or above
- Hard Drive: 500GB
- UEFI boot support
In addition to the above system requirements, you should also prepare an Ethernet connection, a USB game controller, and a USB flash drive with at least 4GB of space.
1. The SteamOS is still in beta, which means that parts of the operating system are not 100% functional. There are some bugs with the SteamOS that need to be worked out.
2. The SteamOS installation operation will erase your entire hard drive, so back up your important data to external drives in advance.
There are two options for the Steam OS installation. The first one is to completely transform the current system into SteamOS, while the second one is to dual boot SteamOS and Windows 10 (or other systems). Pick one option based on your needs.
Option 1: Transform the Current System into SteamOS
Steam OS ISO Download
To download SteamOS ISO, you need to follow these steps.
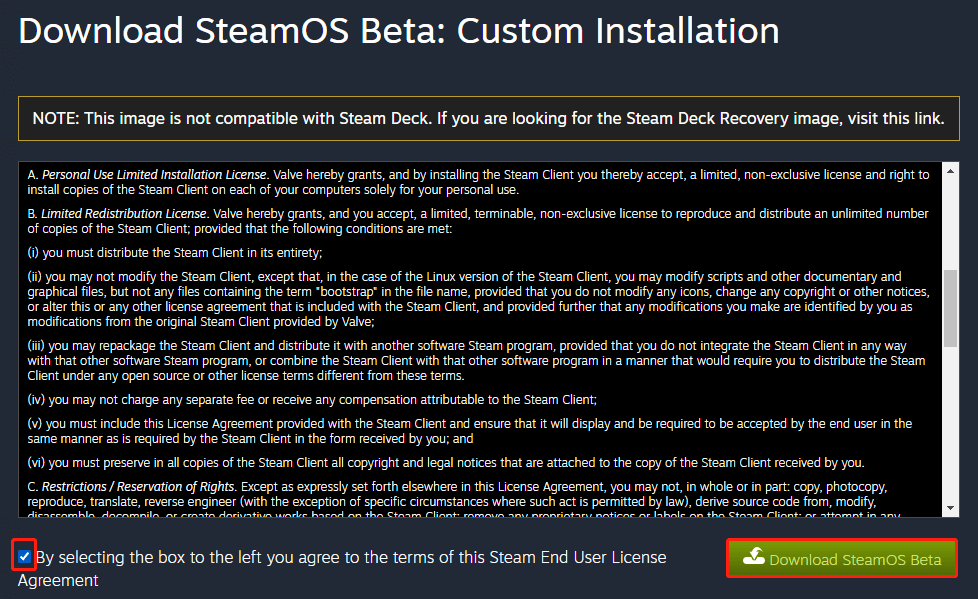
Step 1: Move to the Download SteamOS Beta page by clicking here.
Step 2: Check the Steam End User License Agreement.
Step 3: Click on the Download SteamOS Beta link to start the SteamOS download process.
Make a Steam OS Bootable USB
After getting the SteamOS ISO download, you need to make a Steam OS bootable USB drive. For doing that, connect a blank USB flash drive to your computer. The USB drive should be in FAT32 format with the MBR partition table.
To meet the requirement, you need to format your USB to FAT32 on computer. You can do that with Windows built-in utilities like File Explorer, Command Prompt, and Disk Management, or use third-party USB formatter like MiniTool Partition Wizard. Then name the USB device as BACKUP.
MiniTool Partition Wizard FreeClick to Download100%Clean & Safe
Check if the partition table of the USB flash drive is MBR. If not, you need to convert it to MBR manually. Here are detailed steps for that.
Step 1: Right-click on the Windows icon and tap Disk Management.
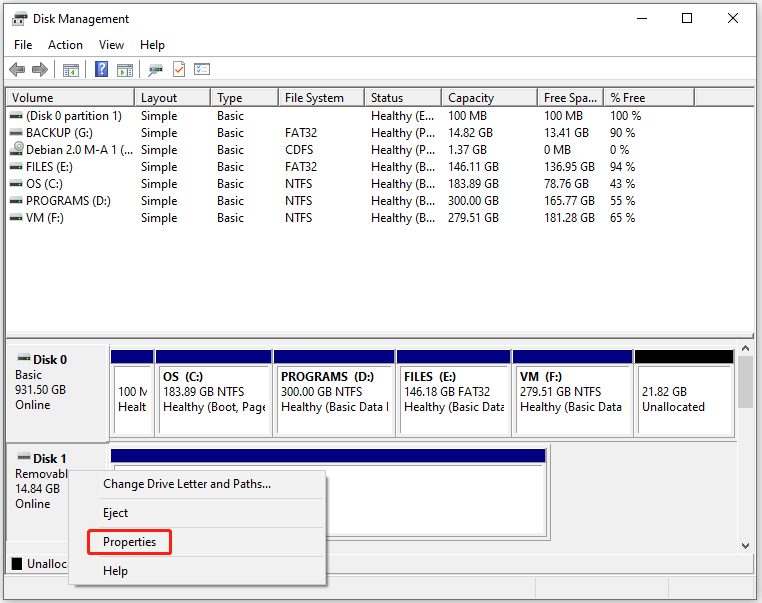
Step 2: Right-click on the USB drive and click Properties.
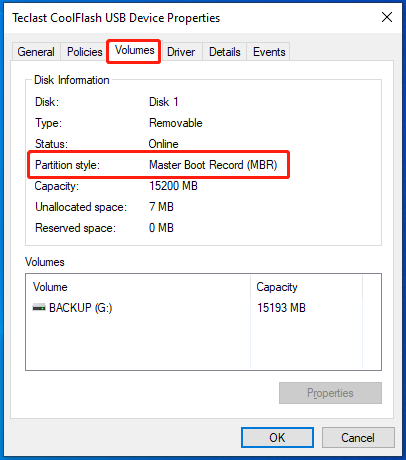
Step 3: Navigate to the Volumes tab in the Properties window and check partition style. Then click OK to exit the window.
After that, unzip the downloaded SteamOS ISO file to your USB drive. Then unplug the Steam OS bootable USB drive and plug it into the target computer.
Install SteamOS
- Turn off the target PC and then boot it again. During the startup process, keep pressing F2, DEL, F8, F10, F12, or other BIOS keys to enter the BIOS boot menu.
- Set your USB flash drive as the first boot option, and then click F10 and Enter to save the changes. Then your computer will automatically boot from the USB drive.
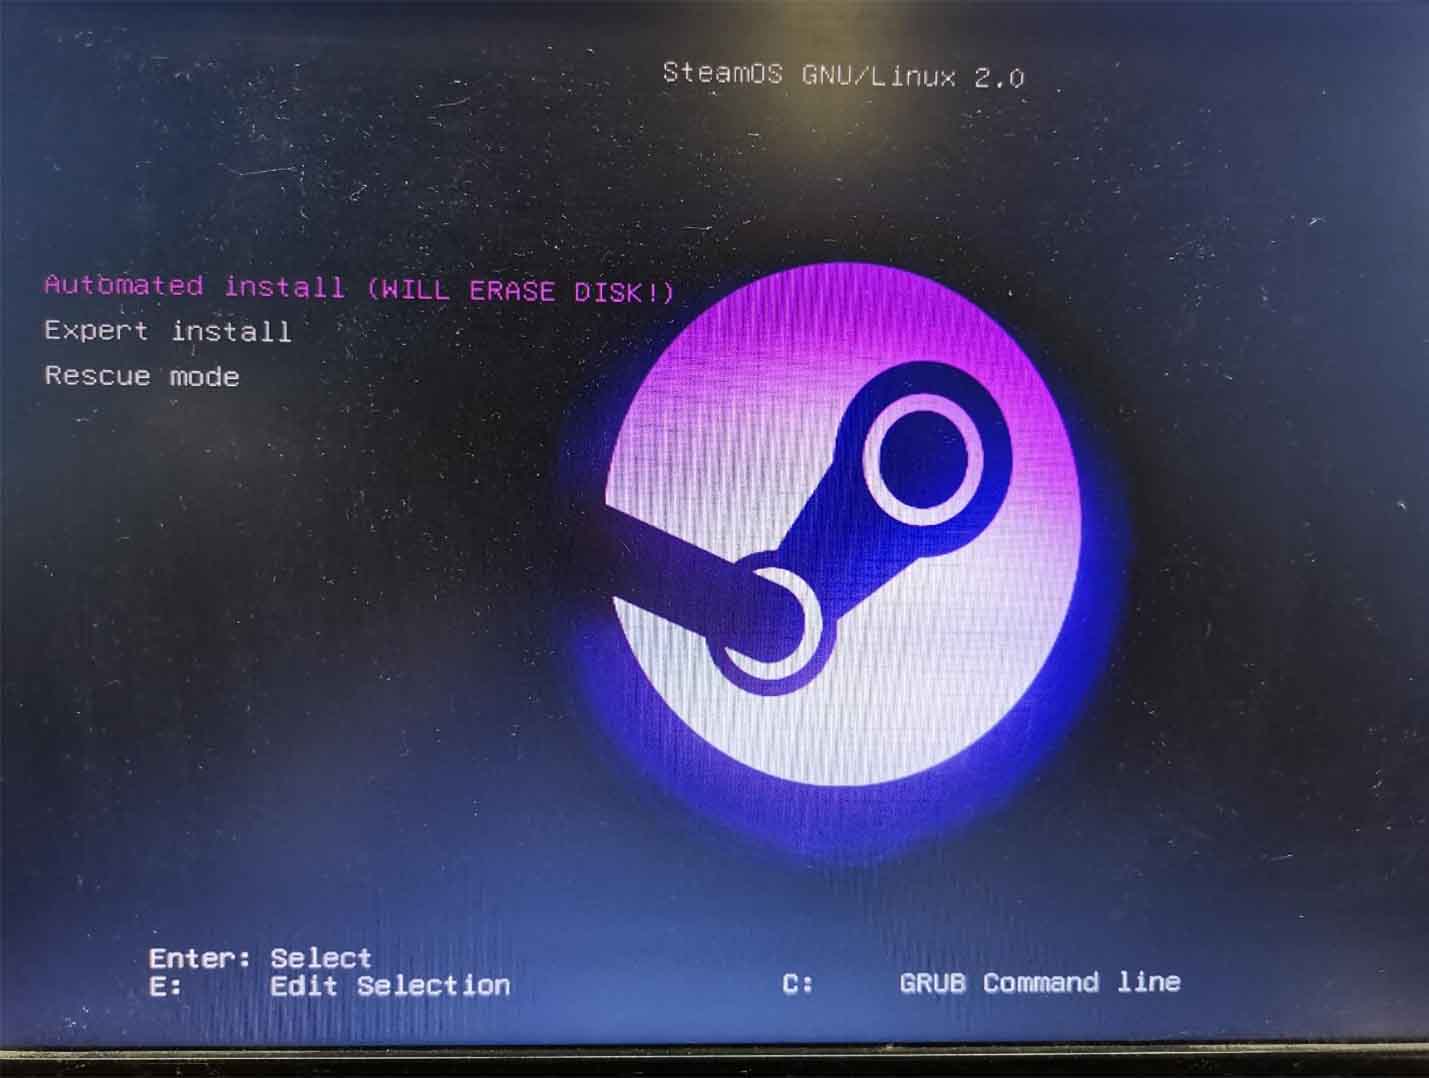
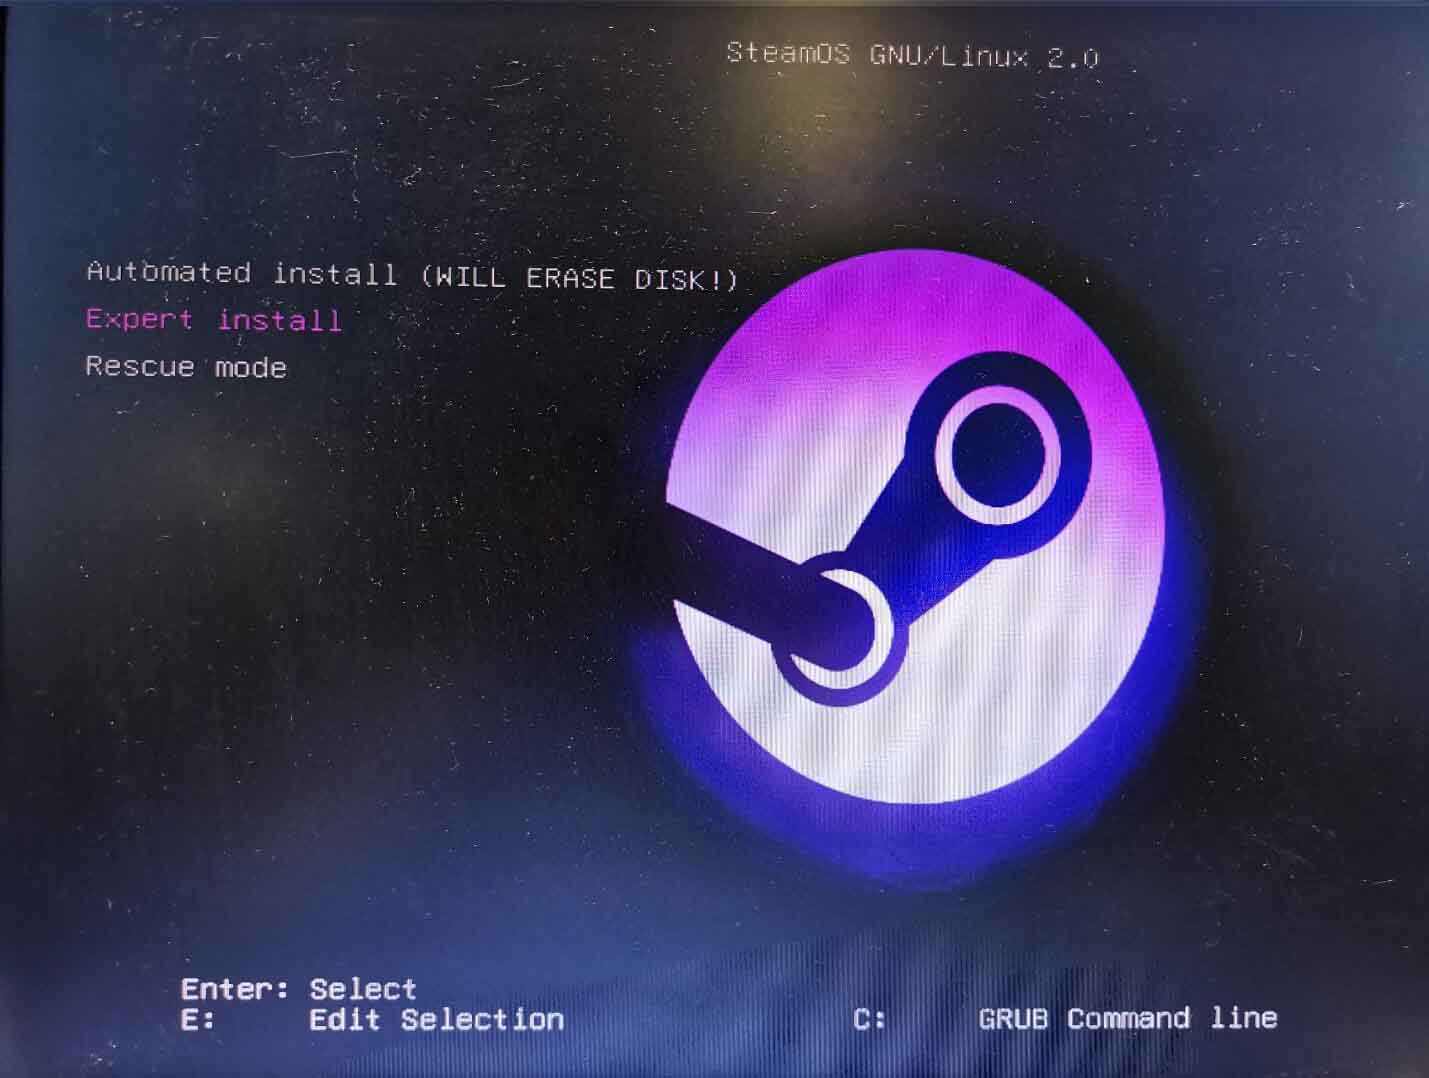
Then you will see the screen as shown below. Here you have two ways to install the SteamOS.
Way 1: Automated Install (Will Erase Disk)
Step 1: Providing that the Automated install (will erase disk) option is highlighted, directly press the Enter key to confirm that.
Step 2: In the next screen, choose the Install the base system option and click Continue.
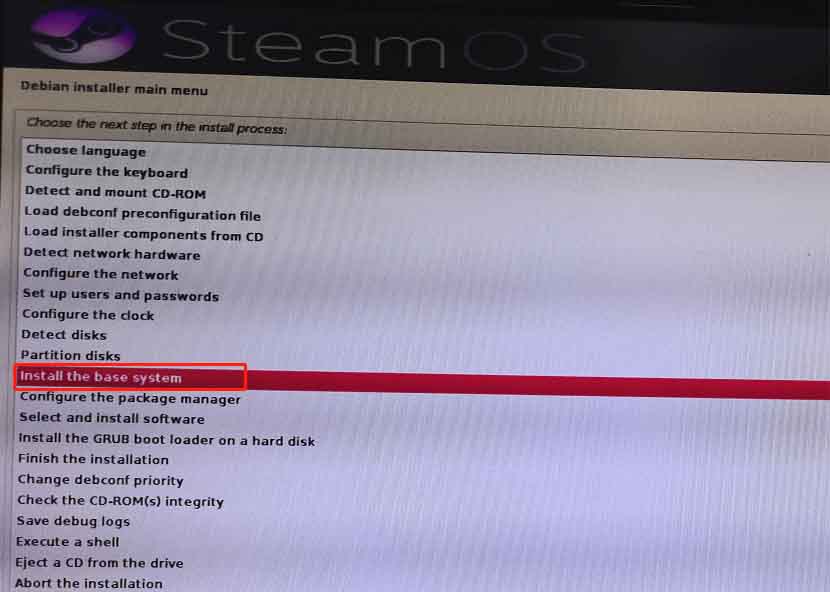
Step 3: Then the computer will automatically detect needed items and install the base system. You just need to wait patiently until the installation process ends.
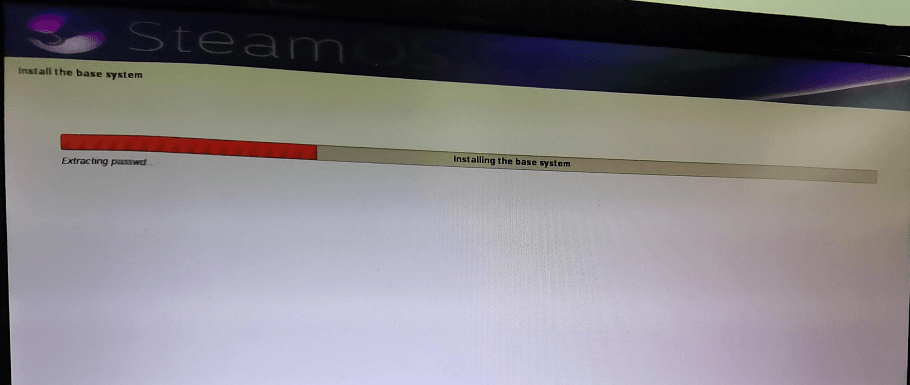
Step 4: After the installation process finishes, the SteamOS will reboot and automatically log on and install Steam. It will create a backup of the system partition by itself. Choose reboot to boot into the SteamOS when the backup process ends.
Way 2: Expert Install
Step 1: Press the down arrow key on the keyboard to navigate to the Expert install option and then press Enter to continue.
Step 2: Choose your preferred language, location, and keyboard layout in the prompted windows.
Step 3: Different from automated install, you are allowed to change the default disk partitioning in the expert install process.
Step 4: Follow the on-screen instructions to finish the installation process. After that, your computer will reboot. If everything works, both SteamOS and Windows would be shown as boot options. It means that you can dual boot SteamOS and Windows 10 here.
How to Install Ubuntu on VirtualBox? Here’s the Full Guide
Further reading:
No matter SteamOS configures the hardware drivers or not, you will be presented with the GNOME desktop. Besides, the system will configure the kernel after the Steam client is downloaded. The PC will reboot again and then it would show a new boot image with some additional options.
Then let GRUB choose the capture system partition. Once the creation of system partition backup finishes, choose the reboot option. At this time, let GRUB pick the default SteamOS option. After SteamOS prepares hardware drivers, Steam would launch in Big Picture mode.
Option 2: Dual Boot SteamOS and Windows 10
If you just want to try the SteamOS and don’t want to remove the current system, dual-boot is a good choice. There are many dual-boot cases. For instance, you can boot these systems at the same time.
- Dual boot Windows 10 and Windows 11
- Dual boot Windows 11 and Linux
- Dual boot Windows 11 and Windows 7
- Dual boot Windows 11 and macOS
- Dual boot Windows 7 and Windows 10
Create a Partition for the SteamOS
To dual boot SteamOS and Windows 10, you need to get enough space at first. Besides, you’d better create a new partition to hold the SteamOS in order to not affect the current system. Here, you should create a partition with 500GB space or more. Hence, your hard drive should have at least 1TB of space.
If the present unallocated space is less than 500GB, you need to shrink partitions to obtain space. The Move/Resize Partition feature of MiniTool Partition Wizard can help you do that with ease. Besides, it allows you to put unallocated space together by moving the locations of the partition. Here’s the full guide for you.
Step 1: Download MiniTool Partition Wizard by clicking the button below and then install it.
MiniTool Partition Wizard FreeClick to Download100%Clean & Safe
Step 2: Right-click on the partition that you would like to shrink and click Move/Resize.
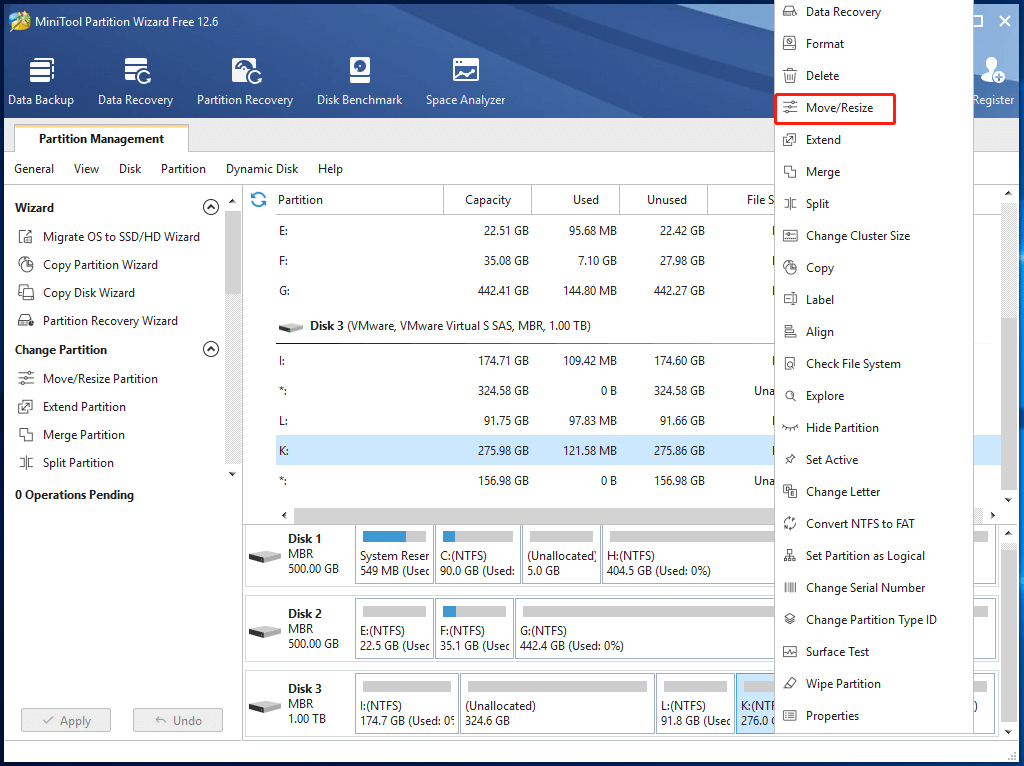
Step 3: In the pop-up window, drag the arrow icon to resize the partition and change the location of the partition by moving the partition block. After that, click OK to save changes.
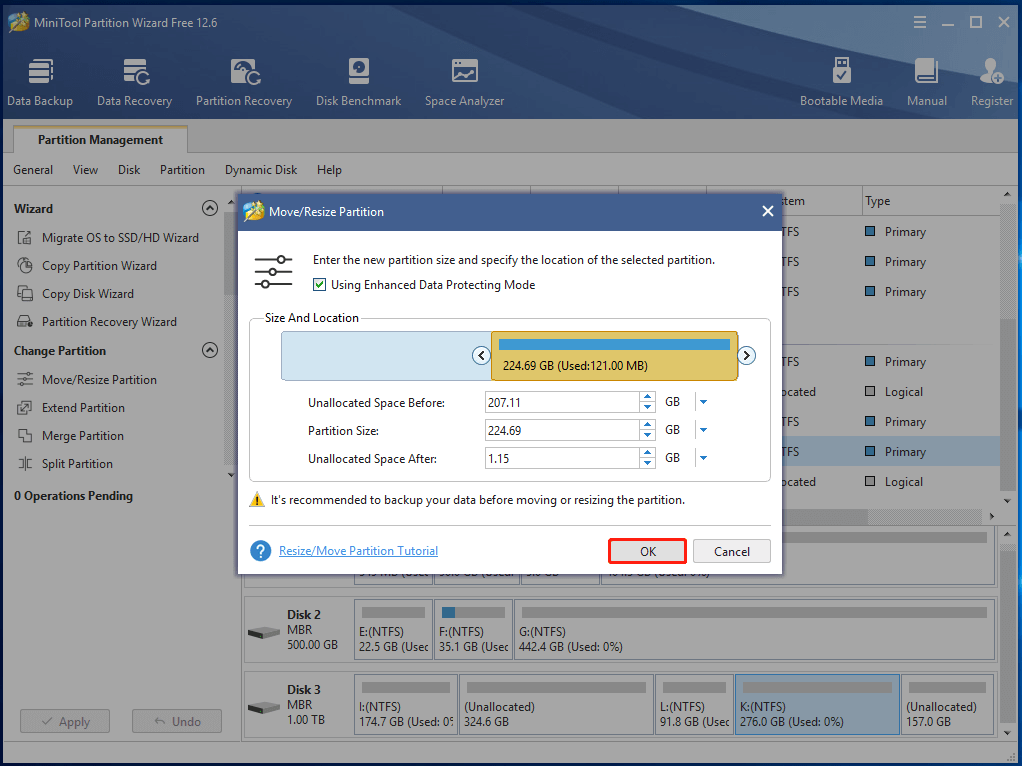
Step 4: Here, you need to change the location of partition L and unallocated space behind it. Similarly, right-click on L partition and tap Move/Resize. Drag the partition block to move rightward and then click OK. Then you will see the unallocated space is merged together.
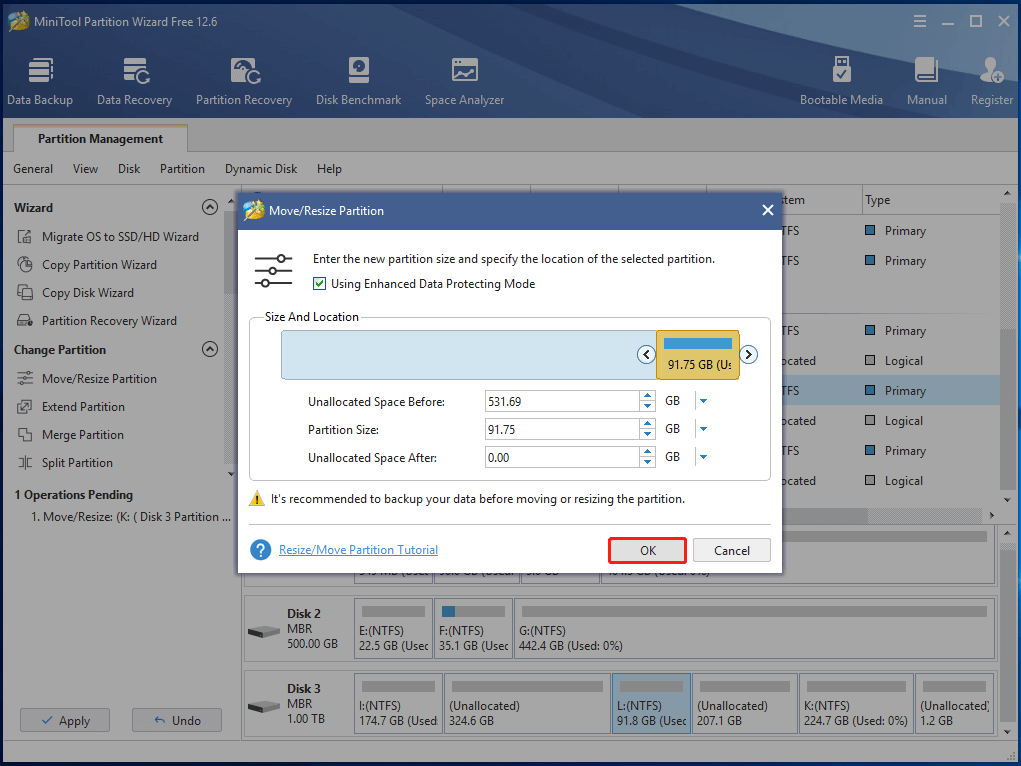
Step 5: Highlight the unallocated space and click Create Partition in the action panel.
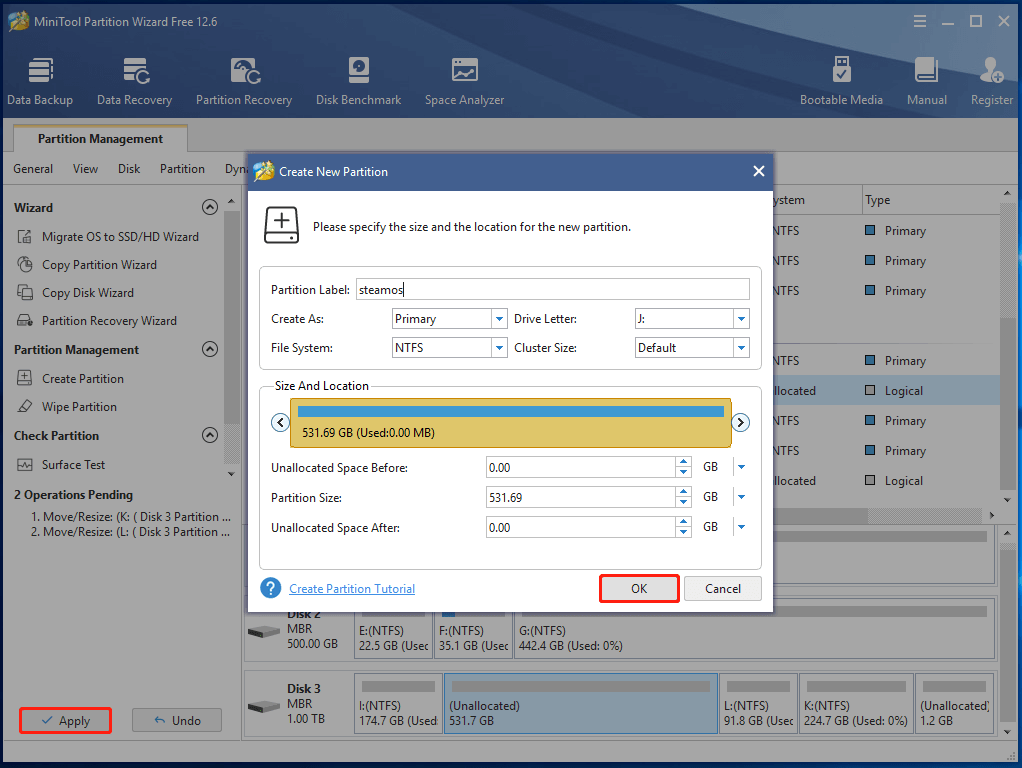
Step 6: In the prompted window, set the partition label as steamos and click OK if you don’t have other needs.
Step 7: Finally, click Apply to execute the pending operations.
Also read: Quickly Switch Between Graphical and Text-Based Boot Menu
Download Ye Olde SteamOSe
To dual boot SteamOS and Windows 10, Ye Olde SteamOSe is recommended. It is an unofficial third-party respin of the SteamOS installer. As said before, SteamOS is still in the Beta period and has some bugs. In addition, installing it would wipe the entire disk.
Compared with SteamOS, Ye Olde SteamOSe has some advantages. You can obtain a quick view from the table below.
| SteamOS | Ye Olde SteamOSe | |
| Supported firmware interface | UEFI | UEFI and BIOS |
| Required disk space | 500GB | 40GB |
| Supported Graphics | Nvidia | Intel, AMD, VMware, VirtualBox |
| Networking | Realtek hardware or firmware-free networking | Typical networking drivers like Wi-Fi support |
| Audio output | HDMI | Almost any sound card |
| Supported partitions | Only basic partitions | LVM and software RAID |
| Boot | Take over the PC | Dual-boot |
In addition to that, Ye Olde SteamOSe can resize NTFS partitions while SteamOS monopolizes drives. You can download Ye Olde SteamOSe using steps below.
Step 1: Click here to move to the Steam OS installer page.
Step 2: Tap Go to file.

Step 3: Input steamos in the search box and hit Enter. Click a link from the search results to download.

Step 4: As you see, the file format of the SteamOS is .deb. You should convert the file to .iso format by using a converter. Then copy the ISO to USB.
Step 5: Plug the Steam OS bootable USB drive into the target machine. Boot the device into BIOS menu and set the USB drive as the first boot option. Follow the prompted steps to complete the SteamOS installation process.
You will see a boot menu each time you boot your computer. According to your demand, you can boot into SteamOS or Windows 10 by using the arrow and Enter keys.
Wrap Up
You can get the SteamOS download as long as your PC meets the hardware requirements. Then you can back up the current system and important data to an external drive and then install SteamOS. Alternatively, you can also dual boot SteamOS and Windows 10.
If you have any thoughts about SteamOS, share them in the following comment area. If you encounter any difficulties while using MiniTool Partition Wizard, contact us via [email protected].

![[How-To] Install Android on PC & Dual Boot Android and Windows](https://images.minitool.com/partitionwizard.com/images/uploads/2022/05/install-android-on-pc-thumbnail.png)
User Comments :