You may receive the KB5029263 not installing on Windows 11 issue while trying to install it. If so, pay attention to this post. Here, MiniTool Partition Wizard summarizes possible reasons and some available fixes for the issue.
KB5029263, released on Patch Tuesday of August 2023, is the latest security update of Windows 11. It is a Cumulative Update for Windows 11 version 22H2 x64-based systems. It can cope with security issues in internal OS functionality.
Like others, you may want to get it installed on your computer. However, it’s very likely that KB5029263 is not installing on Windows 11. What causes KB5029263 installation failure? Here are some possible reasons.
- Windows Firewall interferes with the update process.
- Windows Update feature is disabled.
- Disk space is not enough.
- Windows Update cache is corrupted.
- The Internet connection is unstable.
- System files are corrupted.
- Etc.
What should I do when KB5029263 failed to install on Windows 11? This post would like to share some methods with you based on the above reasons.
Similar posts:
Windows 10 could not complete the installation
Windows 11 Update KB5027303 not installing/downloading
Windows 10 KB5018410 is not installing
Windows 11 22H2 is not installing or showing up
Solution 1: Restart Windows Update Service
When the KB5029263 not installing on Windows 11 issue occurs, check and ensure that the Windows update and its related services are in the running state. If it’s disabled or stuck on running, try restarting the Windows update and its associated services. Here’s how to do that.
Step 1: Hold the Windows and R keys to open the Run window.
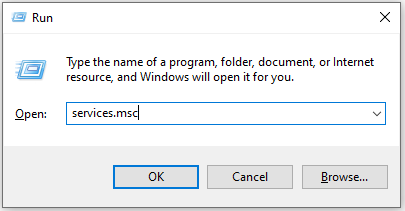
Step 2: Type services.msc in the window and click OK.
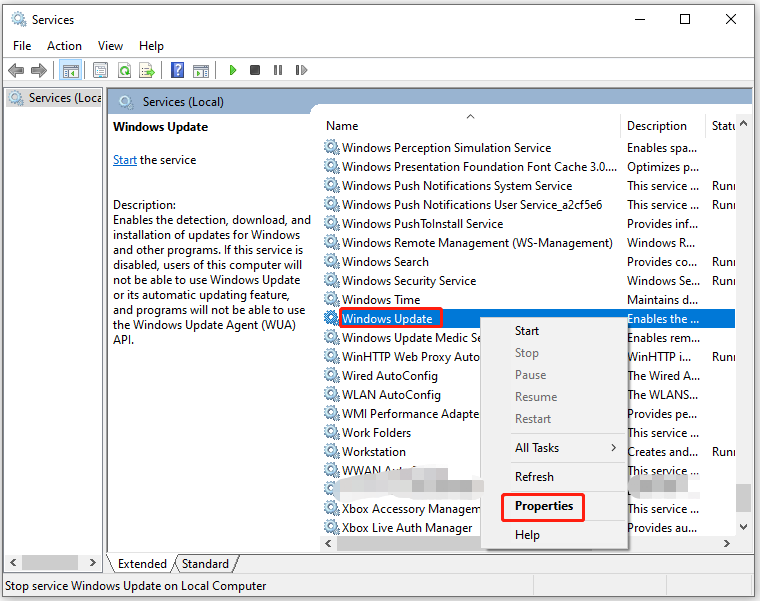
Step 3: In the Services window, find and right-click the Windows Update service, and then click Properties.
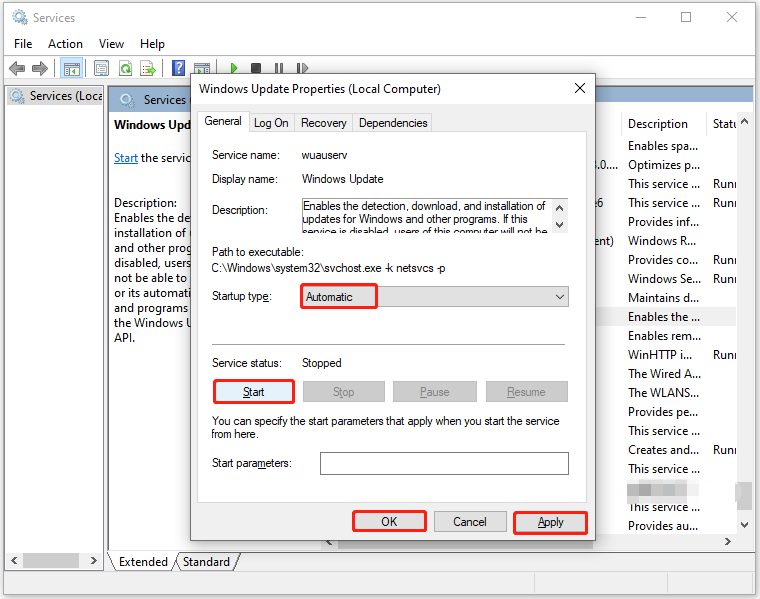
Step 4: In the Properties window, configure Startup type as Automatic, and then click the Start button under the Service status section.
Step 5: Tap on Apply to execute the changes and then click OK to confirm the operation.
Solution 2: Run the Windows Update Troubleshooter
The Windows Update Troubleshooter is a built-in utility on Windows computers, which can troubleshoot some issues that are related to updates. Here, you can run it to fix the Windows 11 KB5029263 update not installing issue.
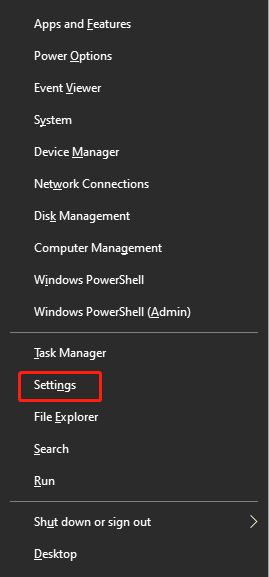
Step 1: Press the Windows and X keys on the keyboard to open the Start menu.
Step 2: In the prompted menu, click Settings.
Step 3: Click the System tab in the left panel and then click Troubleshoot on the right side of the window.
Step 4: Move to Other troubleshooters and click the Run button next to Windows Update.
Step 5: Follow the on-screen instructions to complete the operation.
Solution 3: Clear the Update Cache
Once files in the update cache are corrupted, you will be stopped from installing an update, causing the KB5029263 not installing on Windows 11 issue. So, an available way to solve Windows 11 KB5029263 update not installing is to clear the update cache.
The following steps show you how to clear the update cache.
Step 1: Type cmd in the search box and then click the Run as administrator option under the searched Command Prompt app in the right panel.
Step 2: In the pop-up window, type the commands below and press Enter after each.
net stop wuauserv
C:
rmdir %windir%\SoftwareDistribution
del /f /s /q Download
Step 3: After running these commands, all the corrupted update cache will be cleared.
Step 4: Now, install the update again to see if the Windows 11 KB5029263 update not installing issue happens.
Solution 4: Get More Free Disk Space
Sometimes, KB5029263 is not installing on Windows 11 due to insufficient disk space on the computer. To be specific, you can’t download and install the update completely. If so, try your best to increase disk space for laptop.
A simple way to reach this purpose is to delete unnecessary programs and files on the computer to free up space. Find what’s taking up your hard drive space by using a space analyzer and then remove unimportant but space-consuming files. As a comprehensive partition manager, MiniTool Partition Wizard enables you to do that easily.
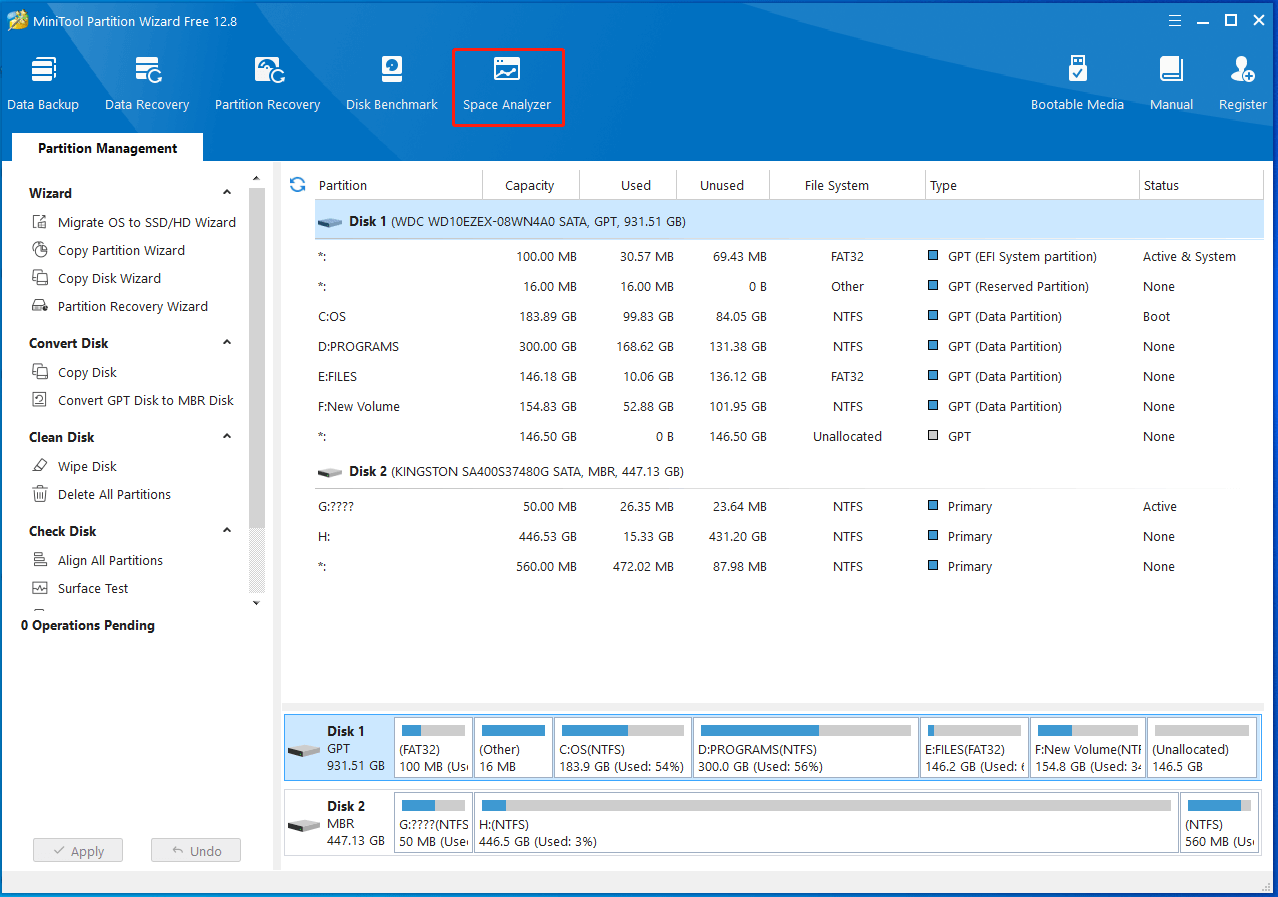
The Space Analyzer feature of this program helps you check disk space usage and then delete unneeded files. Download and install MiniTool Partition Wizard on your PC. Then launch it and follow the steps below to complete the operation.
MiniTool Partition Wizard FreeClick to Download100%Clean & Safe
Step 1: In the main interface of the software, click the Space Analyzer option at the top toolbar.
Step 2: Choose the drive for installing KB5029263 from the drop-down menu. Then click the Scan button to start the process.
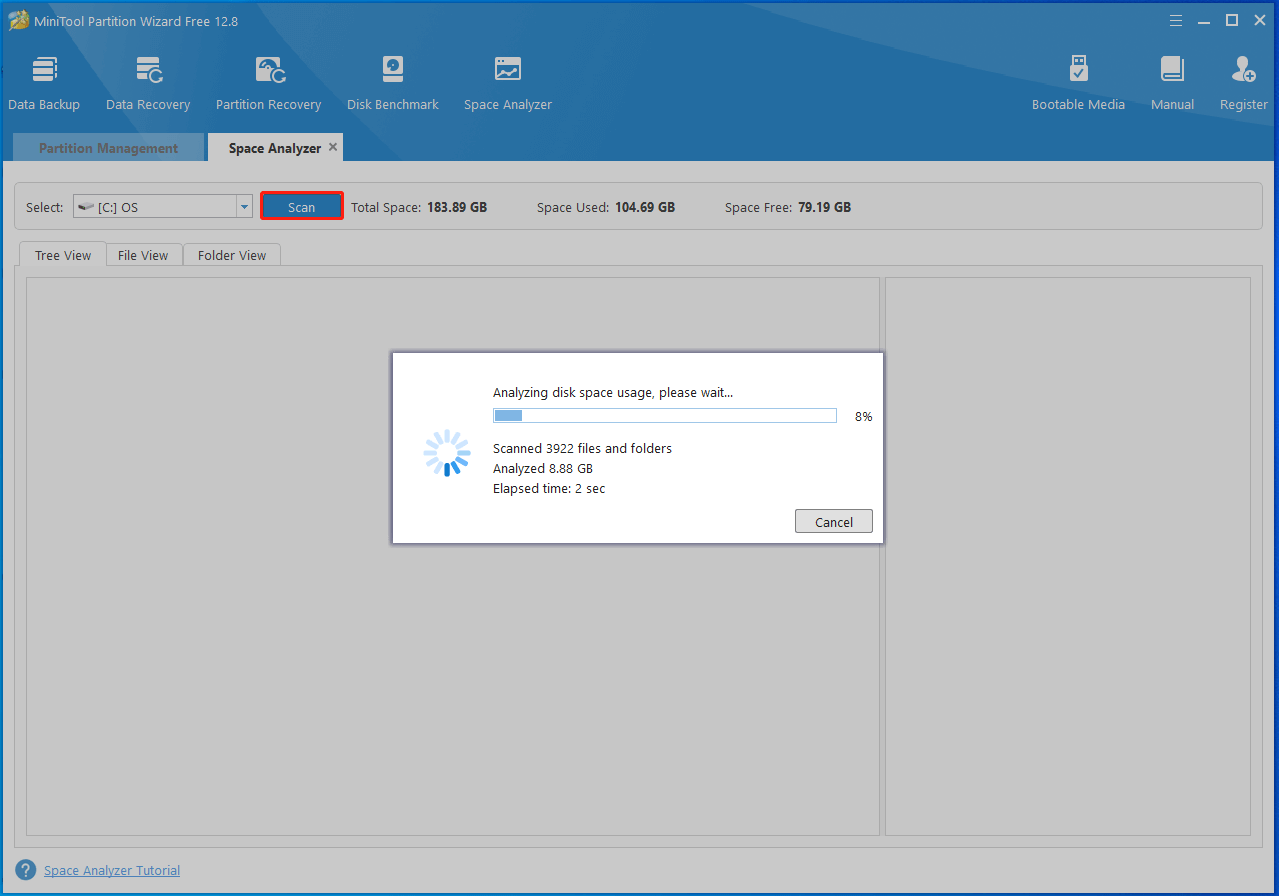
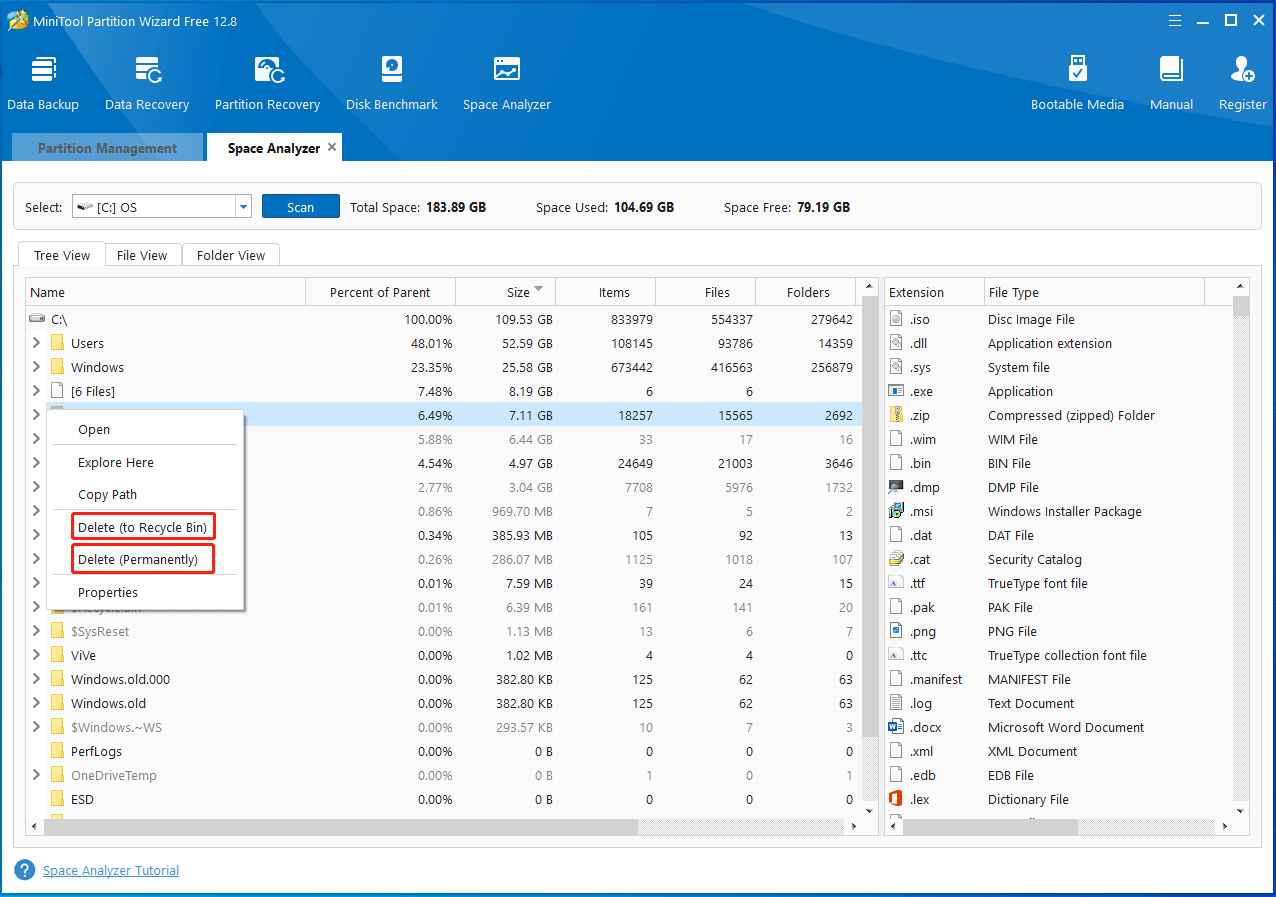
Step 3: Wait for some time. After the scanning process ends, you will see the scan result. It is worth noting that the scan result can be shown in three view types (Tree View, File View, and Folder View).
Step 4: Find useless but large files on the drive from the scan result. Then right-click one of these files and click Delete (to Recycle Bin) or Delete (Permanently) based on your demands. Repeat this operation until all the unneeded files are removed.
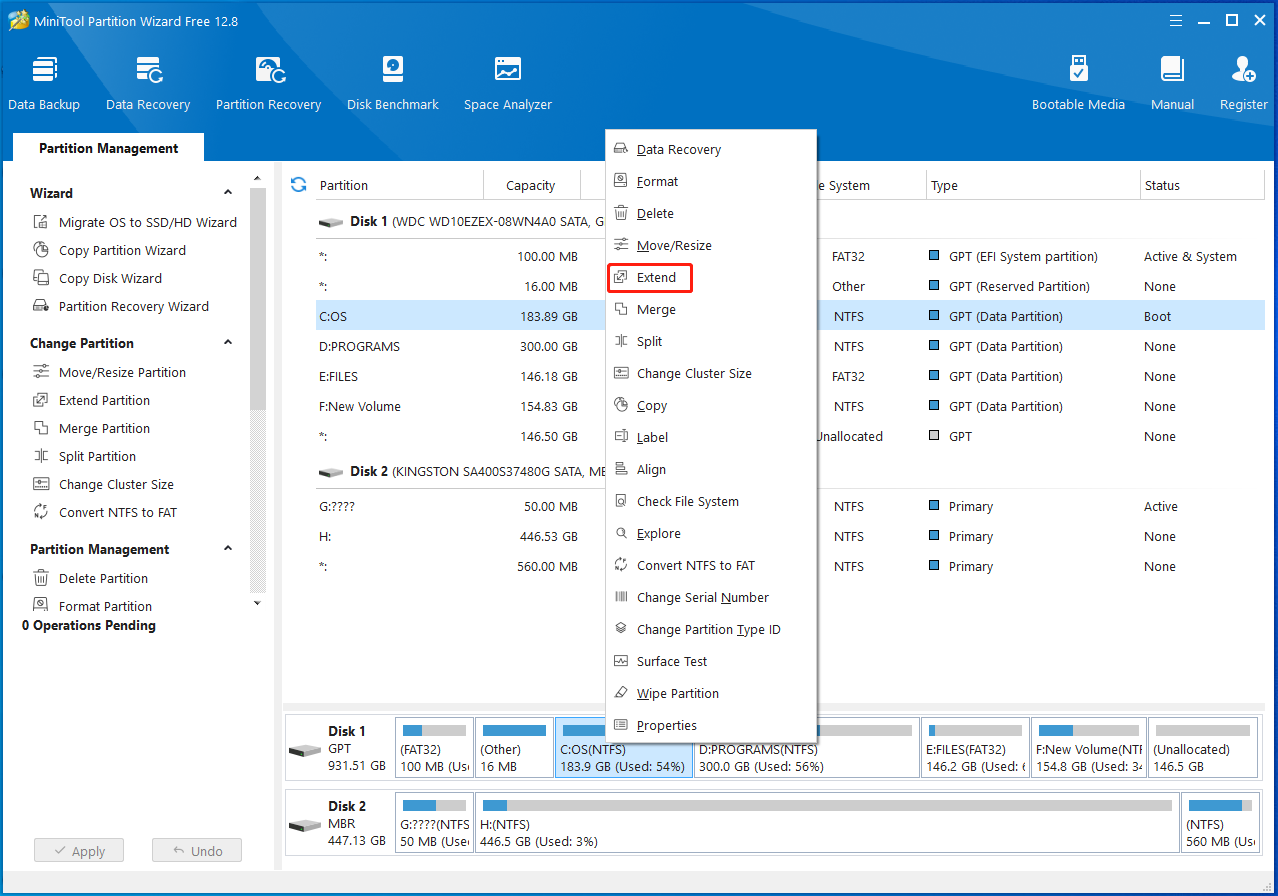
If all your files are important and you don’t want to lose them, increase partition size by taking free space from other partitions or unallocated space on the hard disk. Here, MiniTool Partition Wizard comes into use again. Enlarge your partition size with its Extend Partition feature by using the steps below.
MiniTool Partition Wizard FreeClick to Download100%Clean & Safe
Step 1: Right-click on the C drive and click Extend in the context menu.
Step 2: In the next window, choose unallocated space or a partition from the drop-down menu to take space from. Then drag the blue block leftward or rightward to decide how much space do you want to take from the selected location. After that, click OK to save changes.
Step 3: Finally, click Appy to execute the operation.
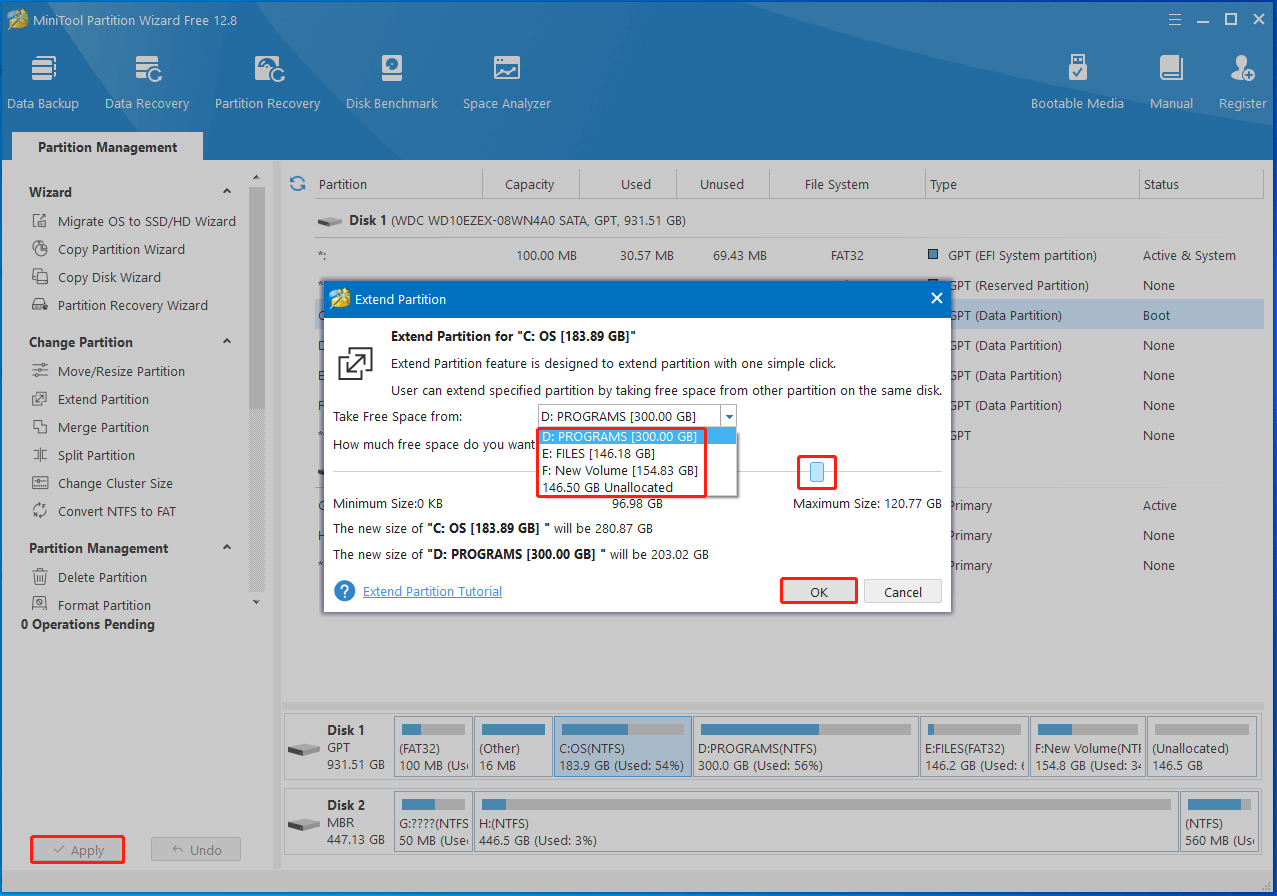
In addition to the Extend Partition feature, its Move/Resize Partition is also capable of expanding partition capacity. However, this feature requires that the free space is adjacent to the partition to enlarge.
Solution 5: Run System File Checker
If KB5029263 fails to install because of corrupted system files, run System File Checker to detect and fix them.
Step 1: Open the Run window, type cmd, and press Ctrl + Shift + Enter keys to run Command Prompt as administrator.
Step 2: In the Command Prompt window, type sfc /scannow and hit Enter.
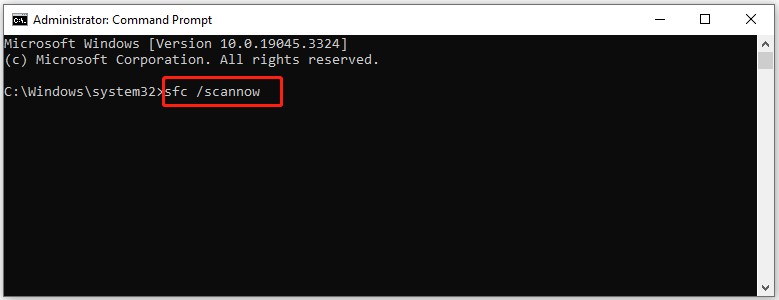
Step 3: Wait until the process ends. Then restart your computer and try installing KB5029263 again to see if you can install it successfully. If not, try other solutions in this post immediately.
Solution 6: Perform a Clean Boot
A Clean Boot starts Windows with a minimal set of drivers and services. Hence, performing a Clean Boot eliminates the possibility of startup software and services that conflict with the update process. This may solve the Windows 11 KB5029263 update not installing issue.
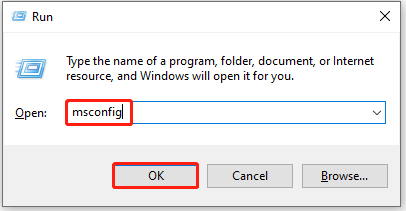
Step 1: After opening the Run window, type msconfig and click OK.
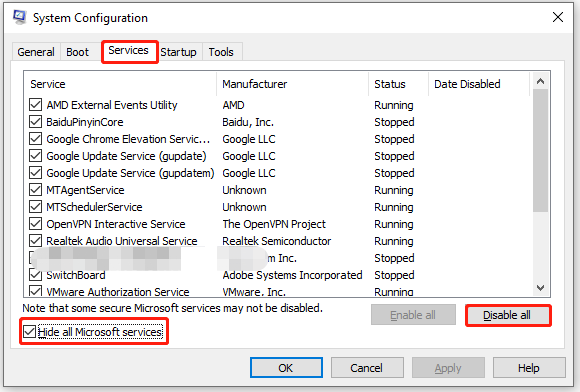
Step 2: Navigate to the Services tab, tick the Hide all Microsoft services box, and then click Disable all.
Step 3: Switch to the Startup tab and click Open Task Manager.
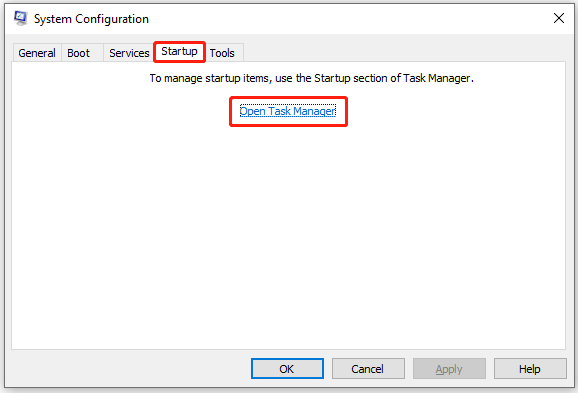
Step 4: In the Task Manager window, right-click on the listed items and select Disable. Repeat this operation until all the items are disabled.
Step 5: Click Apply > OK to save all the modifications in the System Configuration window. Choose Restart in the prompted warning window.
Solution 7: Reset Windows Update Components
Resetting the Windows Update components will remove any potential issues that trigger the KB5029263 not installing on Windows 11 issue. You can do that by referring to the steps below.
Step 1: Run Command Prompt as administrator from the search box.
Step 2: In the Command Prompt window, type the following commands and hit Enter after each to stop the BITS, Cryptographic & Windows Update services.
net stop bits
net stop wuauserv
net stop cryptsvc
net stop msiserver
Step 3: Then copy and paste the command below and hit Enter to delete the qmgr* .dat files.
Del “%ALLUSERSPROFILE%\Application Data\Microsoft\Network\Downloader\qmgr*.dat”
Step 4: Type this command and press Enter.
cd /d %windir%\system32
Step 5: If you want to reregister the BITS & Windows Update files, copy and paste these commands one by one and hit Enter after each.
regsvr32.exe atl.dll
regsvr32.exe urlmon.dll
regsvr32.exe mshtml.dll
regsvr32.exe shdocvw.dll
regsvr32.exe browseui.dll
regsvr32.exe jscript.dll
regsvr32.exe vbscript.dll
regsvr32.exe scrrun.dll
regsvr32.exe msxml.dll
regsvr32.exe msxml3.dll
regsvr32.exe msxml6.dll
regsvr32.exe actxprxy.dll
regsvr32.exe softpub.dll
regsvr32.exe wintrust.dll
regsvr32.exe dssenh.dll
regsvr32.exe rsaenh.dll
regsvr32.exe gpkcsp.dll
regsvr32.exe sccbase.dll
regsvr32.exe slbcsp.dll
regsvr32.exe cryptdlg.dll
regsvr32.exe oleaut32.dll
regsvr32.exe ole32.dll
regsvr32.exe shell32.dll
regsvr32.exe initpki.dll
regsvr32.exe wuapi.dll
regsvr32.exe wuaueng.dll
regsvr32.exe wuaueng1.dll
regsvr32.exe wucltui.dll
regsvr32.exe wups.dll
regsvr32.exe wups2.dll
regsvr32.exe wuweb.dll
regsvr32.exe qmgr.dll
regsvr32.exe qmgrprxy.dll
regsvr32.exe wucltux.dll
regsvr32.exe muweb.dll
regsvr32.exe wuwebv.dll
Step 6: To reset Winsock, input this command and hit Enter.
netsh winsock reset
Step 7: To restart the BITS, Cryptographic & Windows Update services, run the commands below one after another.
net start bits
net start wuauserv
net start cryptsvc
net start msiserver
Step 8: Now, install the KB5029263 update on your computer to see if it can be installed smoothly.
Solution 8: Manually Download and Install Windows 11 Updates
Last but not the least, manually download and install the Windows 11 KB5029263 update on your computer. For doing that, follow these steps.
Step 1: Download the Windows update offline installer package from the Microsoft Update Catalog. To do that, navigate to the website, type KB5029263 into the search bar, and then press Enter or click Search.
Step 2: Find the correct version of the update for your device and click the Download button to start the process.
Step 3: Then directly install the update from there by following the on-screen instructions.
Step 4: Restart your computer and run it as usual.
Also read: Top 2 Methods to Install Windows 10 on New SSD Without USB
Bottom Line
It is confusing to get KB5029263 failed to install on Windows 11. Actually, a lot of users are bothered by it. Fortunately, you can get it solved by using the methods offered in this post. If KB5029263 is not installing on Windows 11, just try these methods to troubleshoot it.
For any questions related to MiniTool Partition Wizard, please feel free to contact us by sending an email to [email protected]. We will get back to you as soon as possible.


User Comments :