This post tells what Remix OS is and how to install Remix OS on VirtualBox. If you want to try this system, installing it on VirtualBox is a good option because this won’t impact the current OS. To get more details, read this post of MiniTool Partition Wizard now!
About Remix OS
Remix OS is an Android OS for desktop computers, which supports Legacy BIOS and UEFI boot methods. Actually, it is an Android variant that has a slick desktop-style interface to Android. It can be installed and used on ARM devices.
Remix OS can be installed via a USB and can also be dual-booted with your present OS. However, you are required to boot the system from a USB drive each time and you can’t work with the default OS simultaneously. In this case, install Remix OS on VirtualBox or VMware.
By doing so, you can use Remix OS and your existing system at the same time. After installing Remix OS, you can run any of your favorite Android apps on your computer freely. Then you don’t need to install Android emulators to run Android apps on the PC.
In this post, we show you how to install Remix OS on VirtualBox PC step-by-step. You just need to follow the given instructions in this post to get Remix OS on VirtualBox.
The whole process is divided into three parts. Here’s a brief introduction to each part.
- Make preparations: Learn the minimum requirements for installing Remix OS on VirtualBox and create a separate partition for VirtualBox.
- Download and set up VirtualBox: Get the VirtualBox installed on your computer step by step.
- Install Remix OS on VirtualBox: Download the Remix OS ISO and install the system on VirtualBox.
Related articles:
Part 1: Make Some Preparations
Before you get Remix OS on VirtualBox, you should learn some minimum requirements for running Remix OS on VirtualBox.
You have to get 4GB RAM at least so that you can allocate 1GB (at least) for Remix OS. The higher the RAM, the better it will perform. Besides, you should prepare 16GB storage space for the virtual hard drive and at least a dual-core processor.
To avoid glitches with other programs, it is recommended to create a separate partition for VirtualBox. If there’s unallocated space on the hard drive, you can directly create a partition based on it. However, if the unallocated space is insufficient or there’s no unallocated space, you need to shrink partitions to get enough unallocated space.
The Move/Resize feature of MiniTool Partition Wizard enables you to do that easily. This all-in-one partition manager also allows you to partition hard drives, format SSDs/HDDs, convert MBR to GPT (and vice versa) without data loss, clone hard drives, migrate Windows 10, recover data from hard drives, etc.
You can obtain unallocated space and then create a partition with the gotten space via MiniTool Partition Wizard using the steps below.
Step 1: Download and install MiniTool Partition Wizard on your computer.
MiniTool Partition Wizard FreeClick to Download100%Clean & Safe
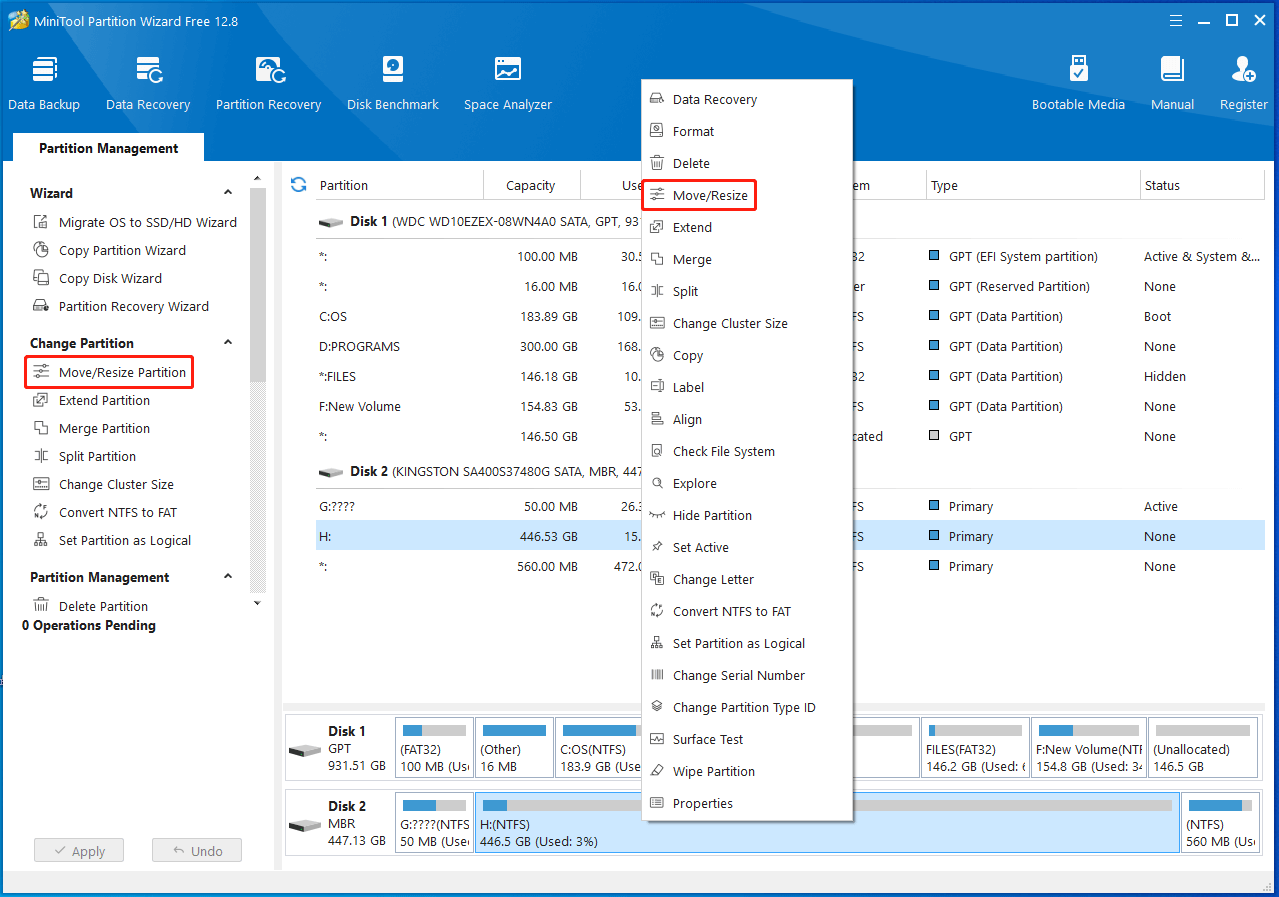
Step 2: Launch the program to enter its main interface. Then right-click on your partition and click Move/Resize on the contextual menu. Alternatively, click on the target partition and click Move/Resize Partition in the left pane.
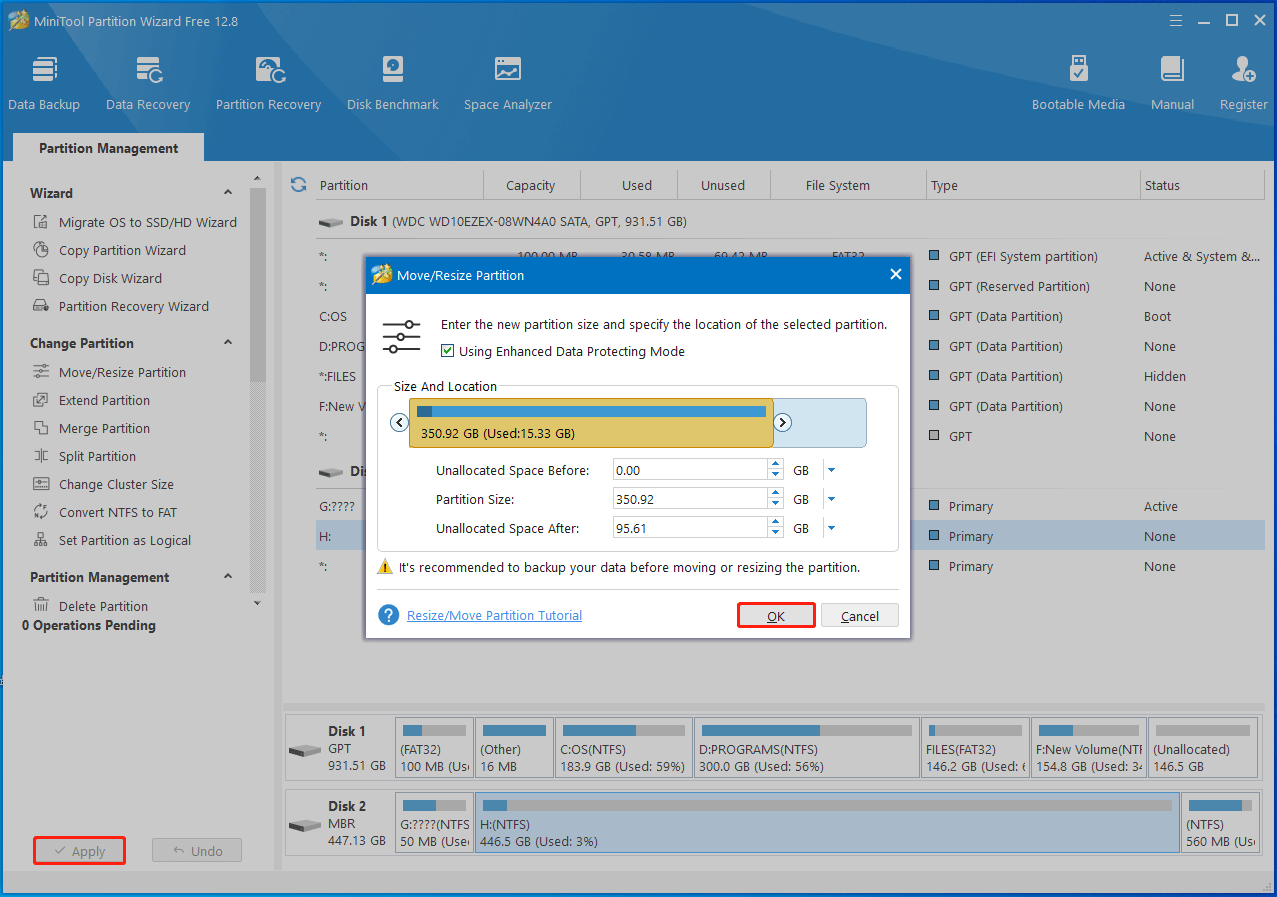
Step 3: In the pop-up window, drag the arrow icon to decide how much space you want to shrink. You can also type the exact number in the Unallocated Space Before/After field. After that, click OK to save changes.
Step 4: Tap Apply to execute the pending operation.
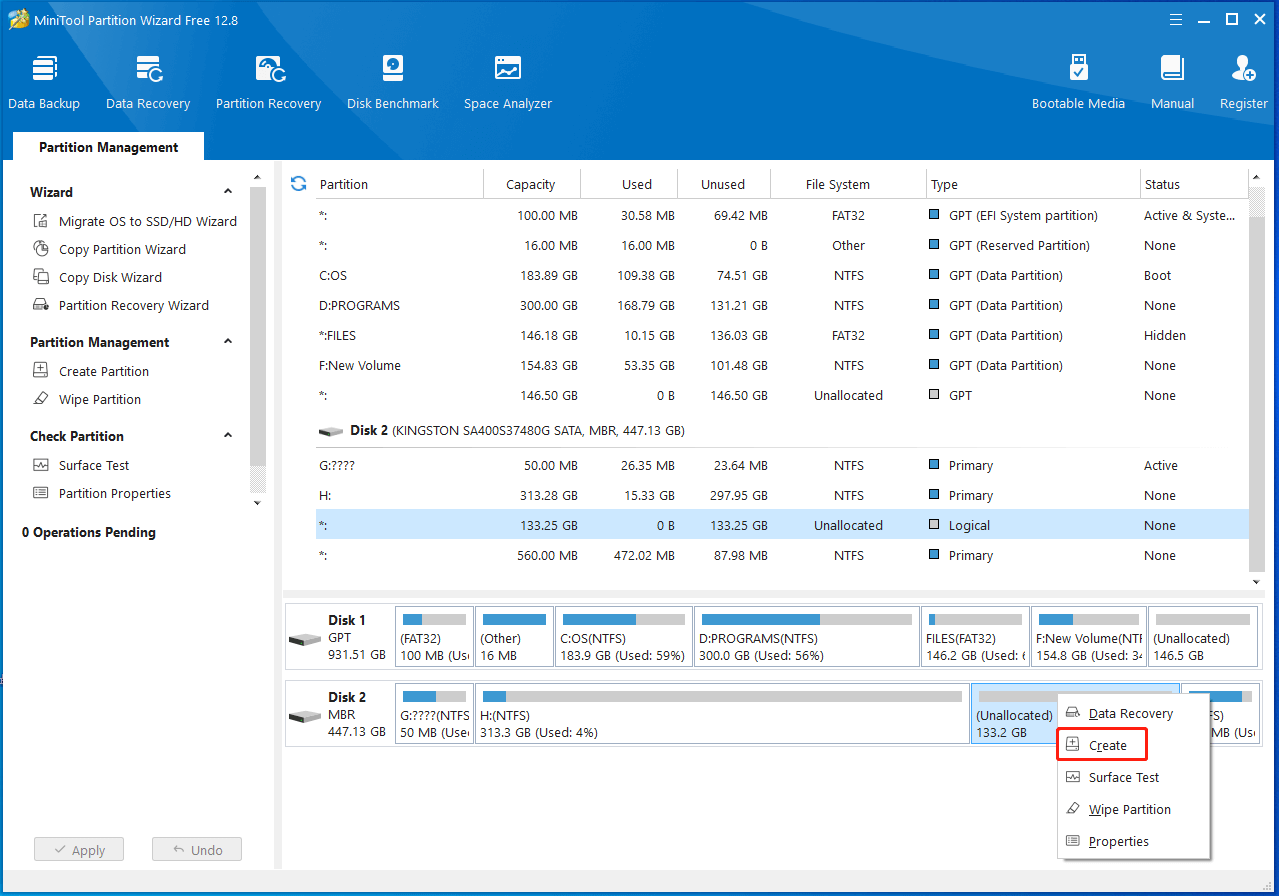
Step 5: Right-click the unallocated space and select Create.
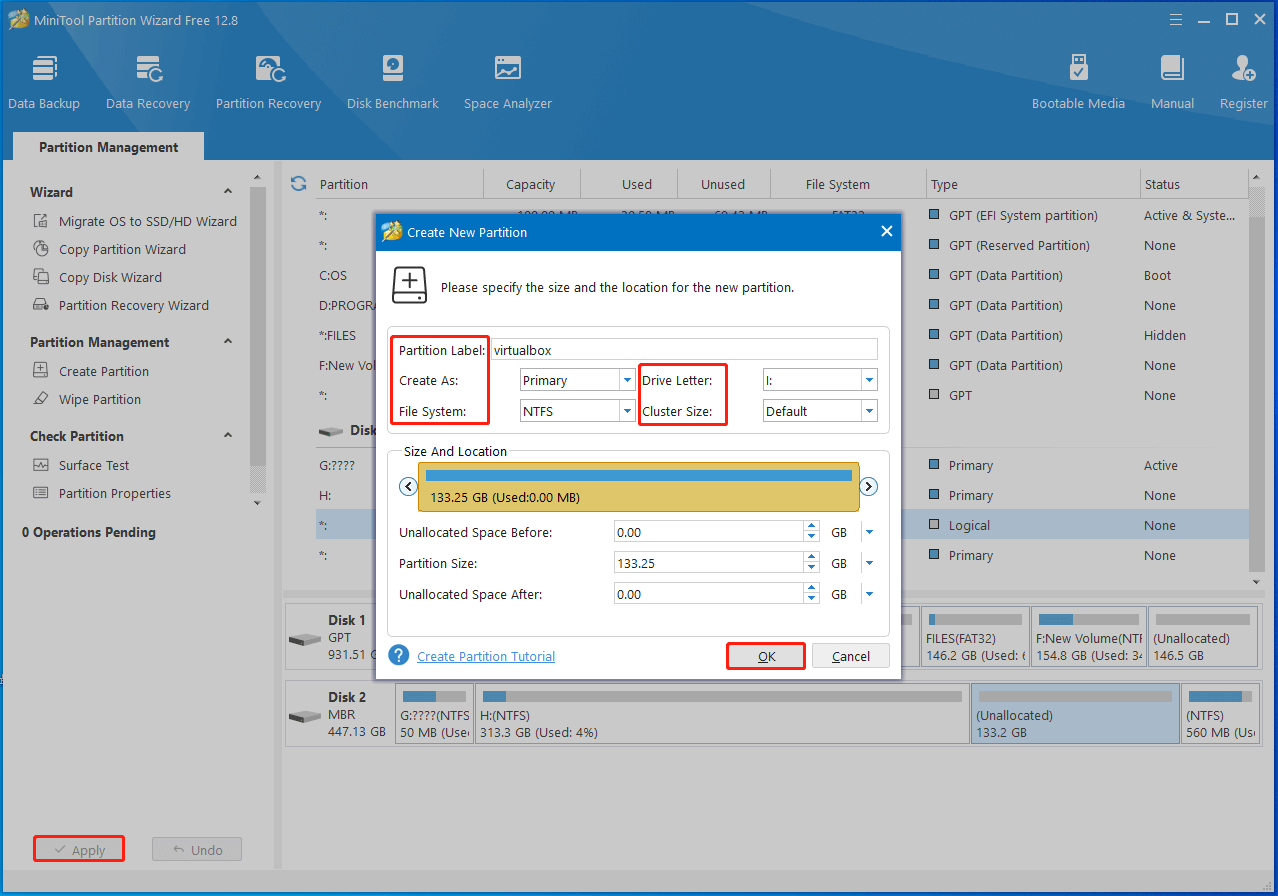
Step 6: In the prompted window, configure parameters like partition label, partition type, file system, drive letter, and cluster size. Then click OK > Apply to carry out the operation.
Read more: How to Transfer Files Between Virtual Machine and Host Computer
Part 2: Create VirtualBox for Remix OS
If you haven’t got VirtualBox installed, download and install it by yourself. Here are the detailed steps.
Step 1: Click here to download VirtualBox.

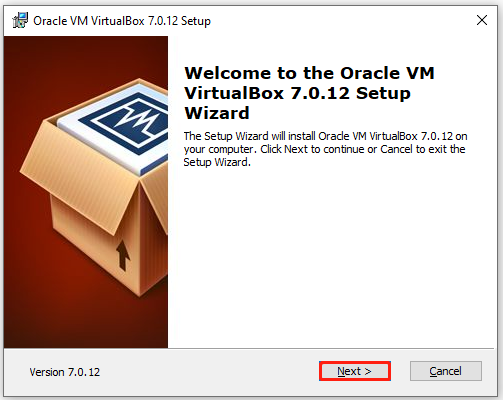
Step 2: Double-click on the downloaded file to run it. When the window below occurs, click Next to move on.
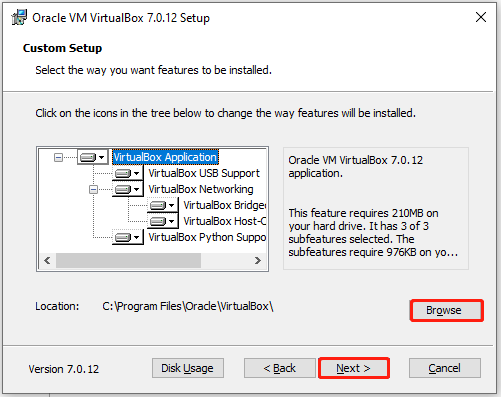
Step 3: In the next window, click Browse, choose the partition you created before, and configure the directory for the VirtualBox. Then click Next and follow the pop-up instructions to finish the installation.
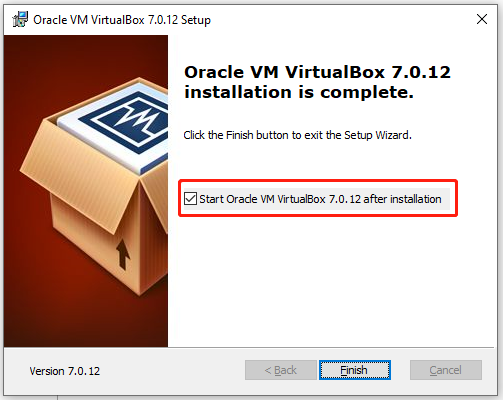
Step 4: When you see this window, tick Start Oracle VM VirtualBox after installation and click Finish.
Step 5: In the automatically opened Oracle VM VirtualBox Manager window, click on the New icon to create VirtualBox for Remix OS.
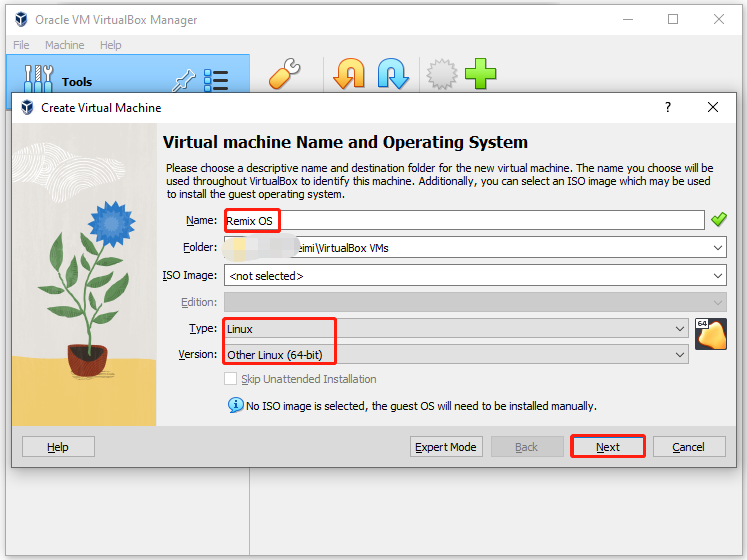
Step 6: Type Remix OS, and then choose Linux and Other Linux (64-bit) in the corresponding field. After that, click the Next button.
Step 7: On the next screen, allocate the memory and processor for VirtualBox and hit Next. You should allocate 1GB RAM at least.
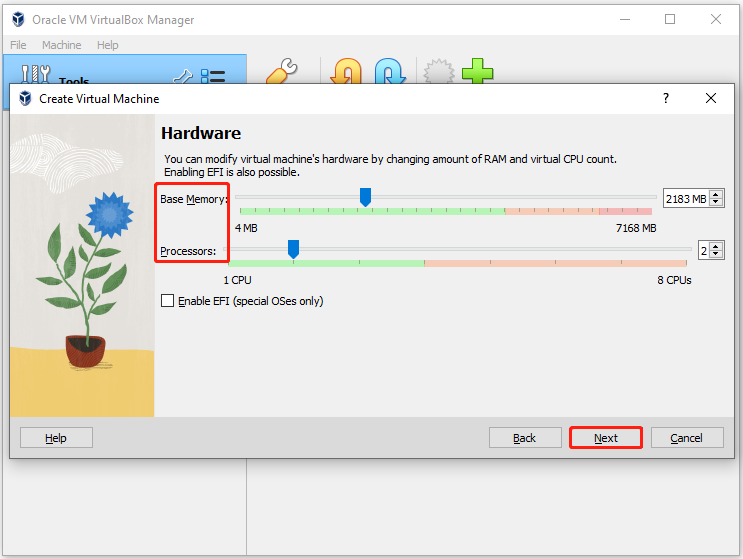
Step 8: Pick the Create a Virtual Hard Disk Now option, set the disk size, and click Next.
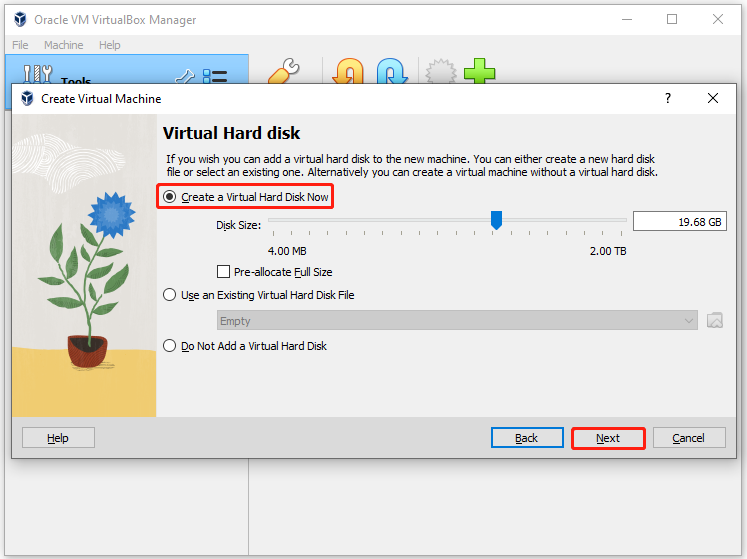
Step 9: View the settings you’ve made and then click Finish to save changes.
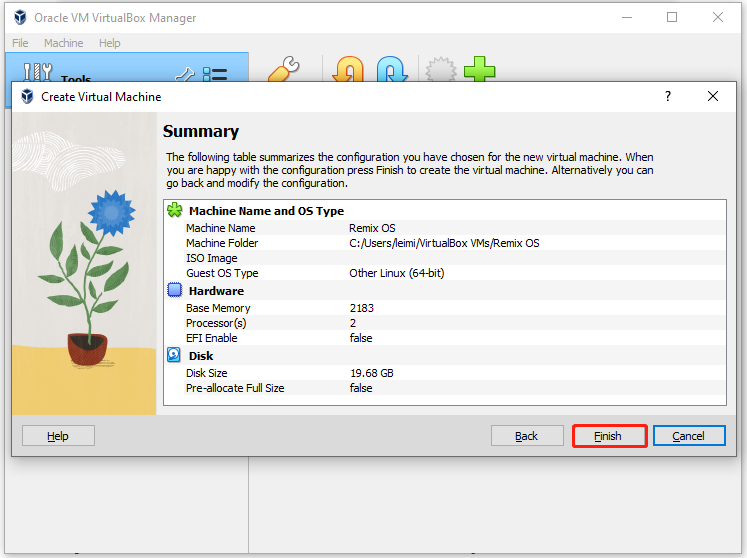
After the process ends, you will see Remix OS in the left pane of the Oracle VM VirtualBox Manager window.
Part 3: Get Remix OS ISO and Install the System on VirtualBox
Now it’s time to download Remix OS ISO file and then install Remix OS on VirtualBox PC. The detailed steps are shown in this section. Simply refer to these steps to complete the operation.
Step 1: Download Remix OS ISO file from the official website and then extract it from the zip file. To unzip the folder, right-click on the zip folder and choose Extract all. In the next window, click Extract to confirm the operation.
Step 2: In the Oracle VM VirtualBox Manager window, right-click Remix OS and choose Start > Normal Start.
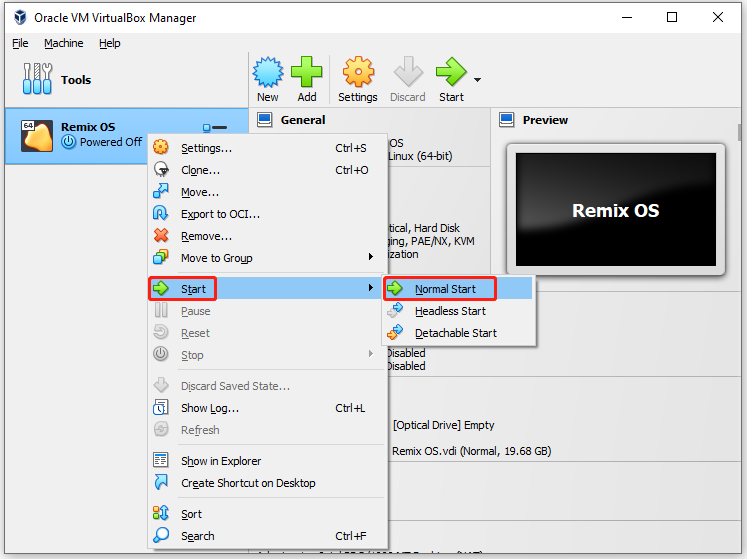
Step 3: Then VirtualBox will boot and prompt a dialog box where you should choose the Remix OS ISO file and click Mount and Retry Boot.
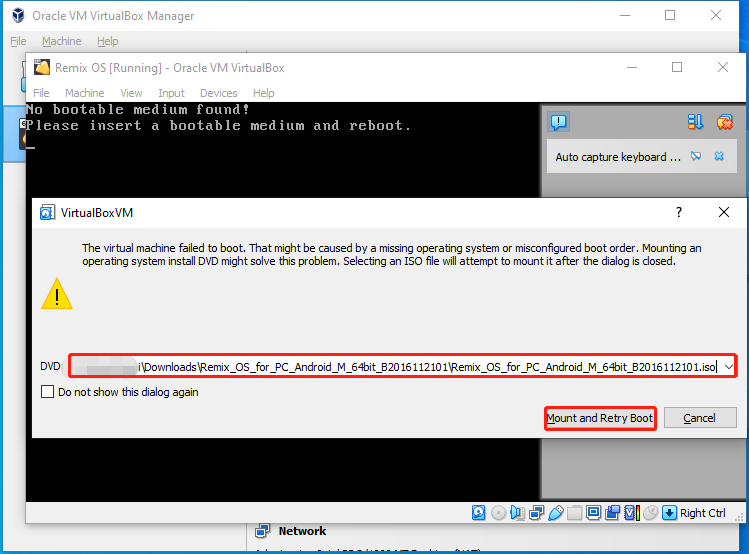
Step 4: Once you click the button, Remix OS will automatically start. You don’t need to do anything until the screen below appears. Choose a mode by using the down or up arrow keys, and thenpress the Tab key to edit. To be specific, type vga=791 behind “DATA_IN_MEM=1” and hit Enter.
- Resident mode: It saves all your apps and data for the next time you run VirtualBox.
- Guest mode: It doesn’t save your data for the next time you restart the Virtual Machine.
- Verbose mode: It saves log files for debugging.
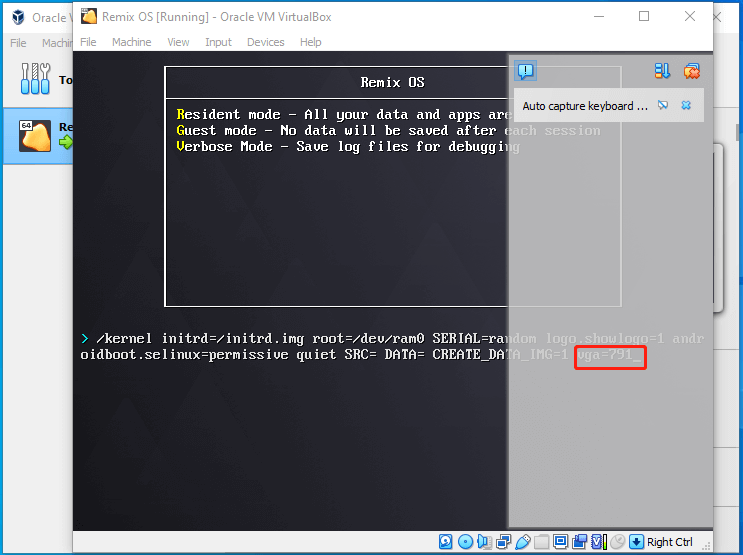
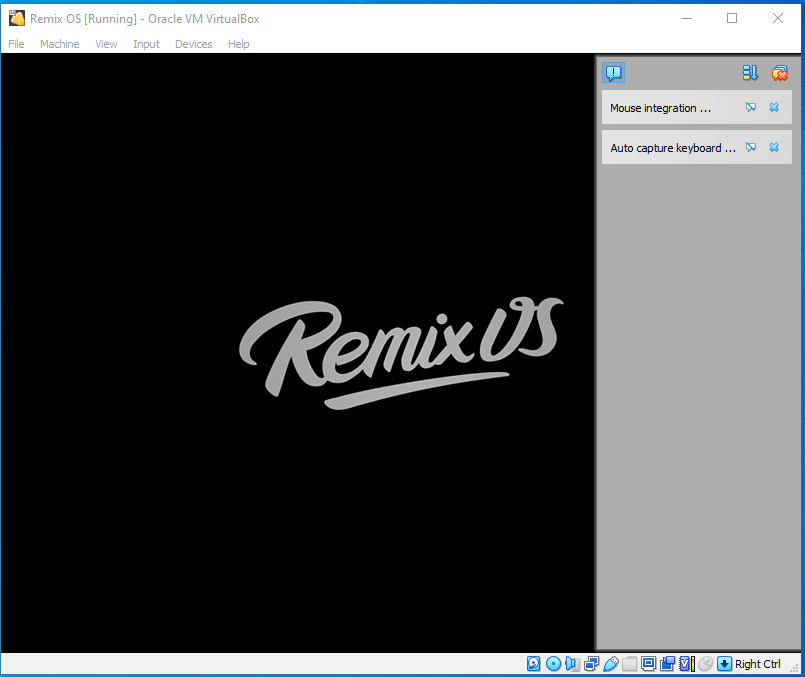
Step 5: Then Remix OS will boot up. To integrate the mouse with Remix OS, click Input > Mouse Integration.
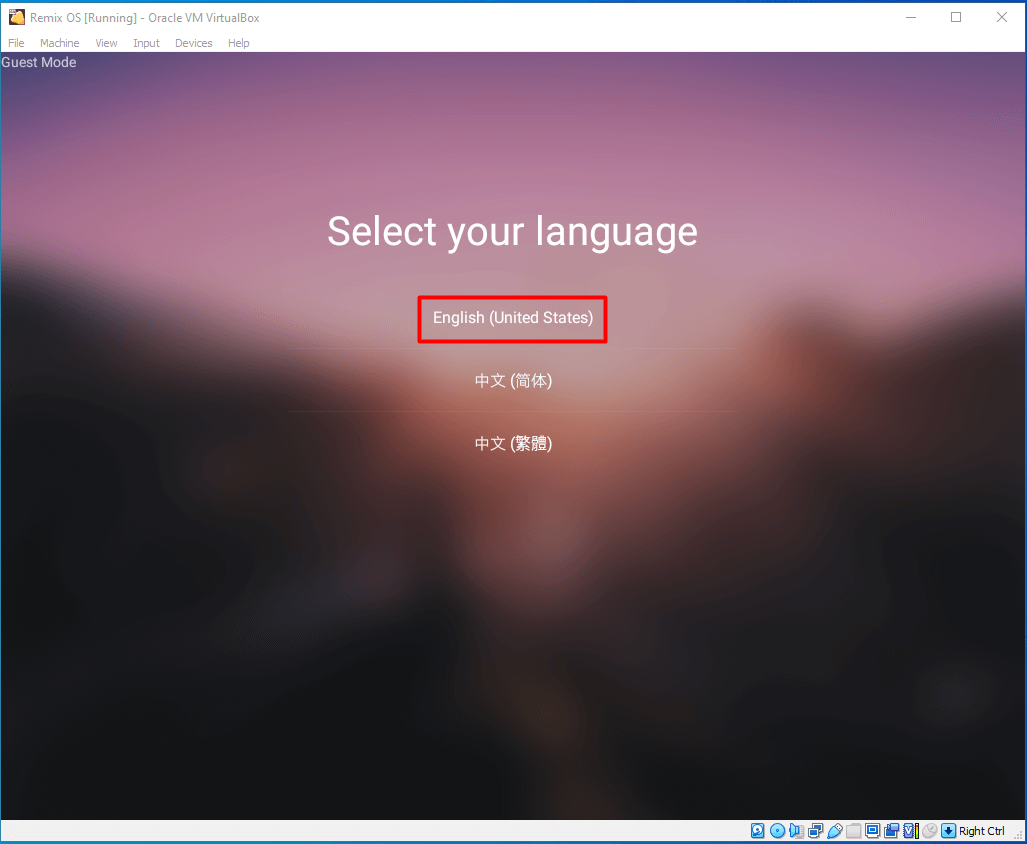
Step 6: After a while, you will get the window below. Select a language from the given options. Here, we select English (United States).
Step 7: Accept the User agreement by clicking the Agree button.
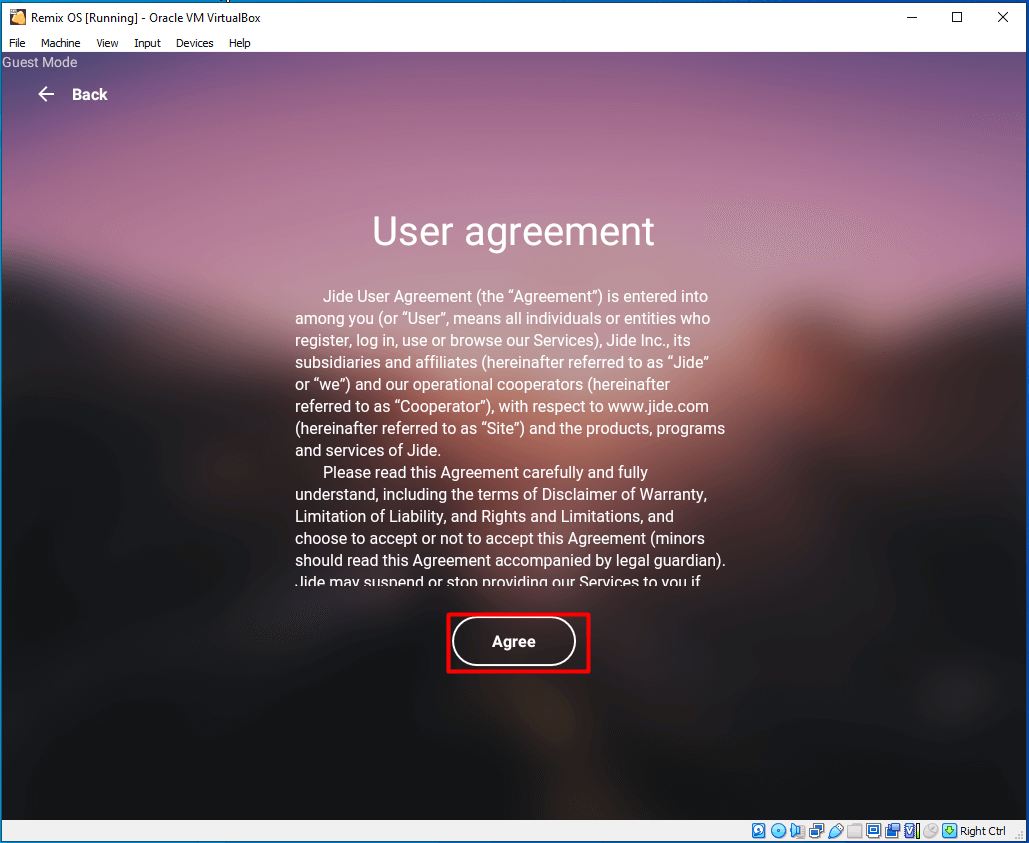
Step 8: Follow the on-screen instructions to set up Wi-Fi and activate Google Play. After completing the setup, Remix OS will run into its main interface. Then you can use the system as you like.
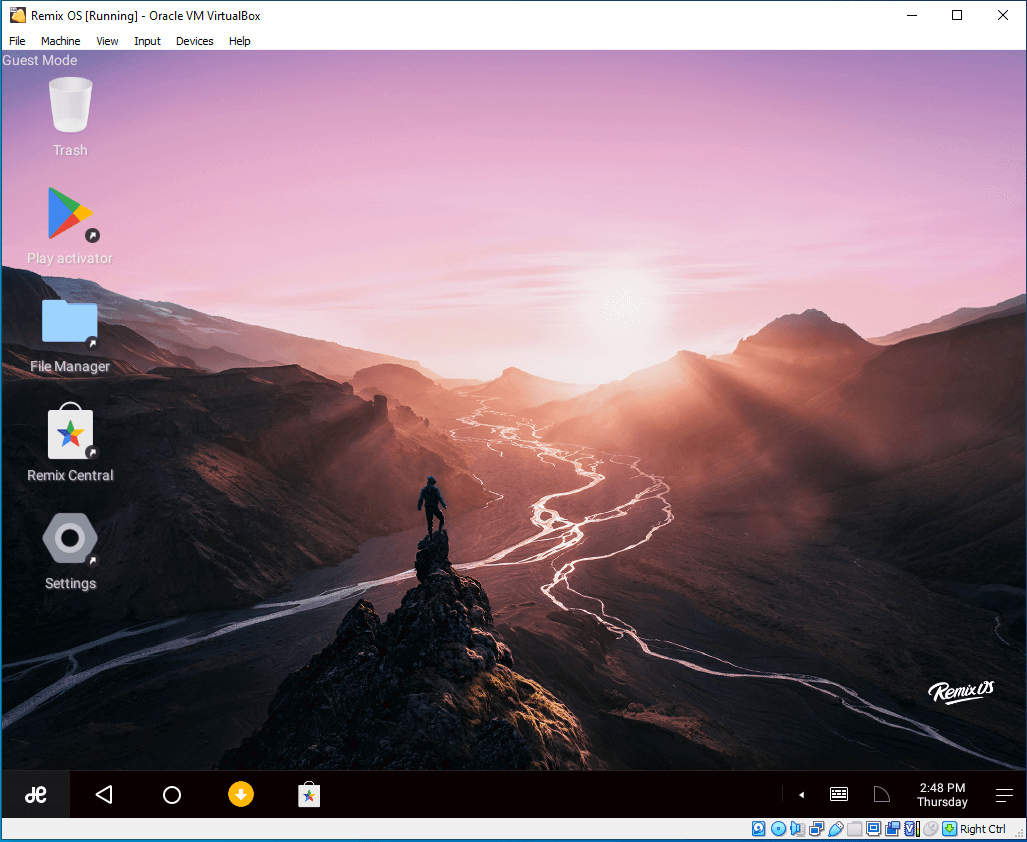
Up to now, all the steps to install Remix OS on VirtualBox PC have been shown to you. If you want to get Remix OS on VirtualBox, just follow the given steps in this post.
Also read: [Fixed]: Virtual Disk Service Error: The Disk Is Not Empty
Bottom Line
This post summarizes some information about Remix OS, different ways to install Remix OS on computers, and detailed steps to install Remix OS on VirtualBox. Simply put, this is a comprehensive tutorial on Remix OS. If you want to get Remix OS on VirtualBox, refer to this guide now!
For any thoughts about Remix OS installation, you can write them down in the following comment area for discussion. As for problems with MiniTool Partition Wizard, directly contact us by sending an email to [email protected].

User Comments :