Space on my SSD is getting really low and Overwatch patches are so huge that I need to move the game to my other SSD. Is this possible without completely downloading the game another time?
--from Blizzard forums
Blizzard Entertainment, which is an American video game developer, is a creator of Blizzard games (e.g., World of Warcraft, Diablo 3, Overwatch, and Heroes of the Storm). It’s known that the most recent games become so large that a storage crisis usually occurs. Some Blizzard games can take up to 130 GBs of space on your hard drive. It may be an issue if you don’t have enough storage space.
Why Move Blizzard Games to Another Drive
Some users want to move Blizzard games to another drive for different reasons. For instance, the hard drive with Blizzard games installed is running out of space. Besides, the default game installation location is the C drive. With more and more games installed, users may encounter issues like C drive full and PC running slow.
Besides, they may want to move Blizzard games to SSD to get faster speed and better performance. In addition, some users want to migrate the games to an external hard drive or a new computer.
Is it possible to move Blizzard games to another drive without reinstalling? The answer is yes. You can move almost all the Blizzard games and Activision games (e.g., Call of Duty: VANGUARD, Call of Duty: Warzone, Call of Duty: Modern Warfare 2) that are installed via the Battle.net client.
So how to move Blizzard games to another drive? There are several methods listed below.
Method 1. Move Blizzard Games via Copy & Paste
When it comes to how to move Blizzard games to another hard drive, you can try to copy and paste the Blizzard game files to another hard drive manually. Then you should change the game location in the Battle.net game settings. Follow the detailed steps below to move the Blizzard games to another drive.
Step 1. Launch the Battle.net app and then select the game you want to migrate.
Step 2. Click the Gear icon that is next to the Play button. Then select the Show in Explorer option.
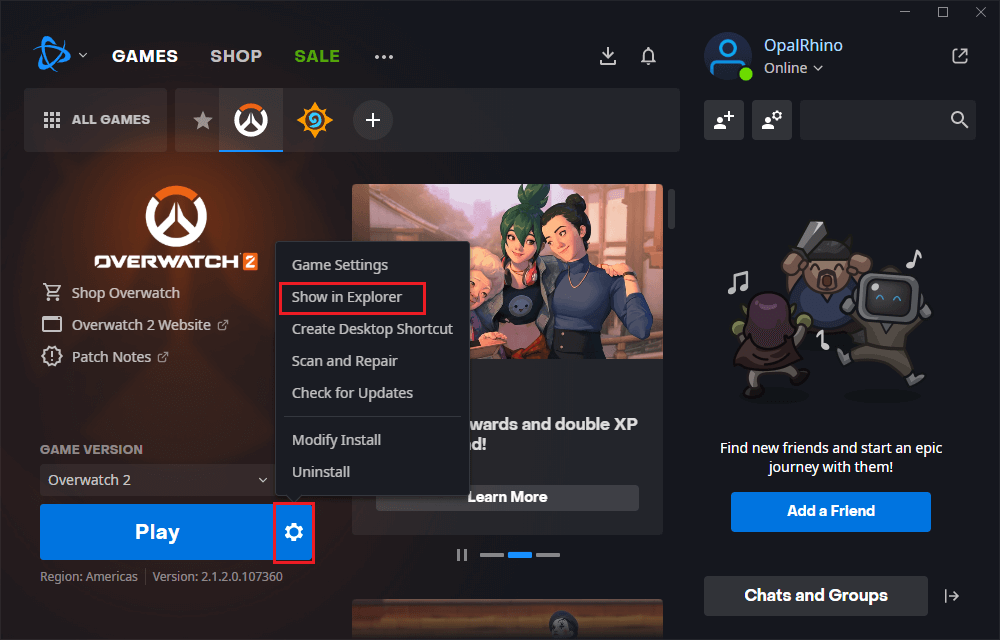
Step 3. The game folder in File Explorer will open. Right-click your selected game folder and select Copy.
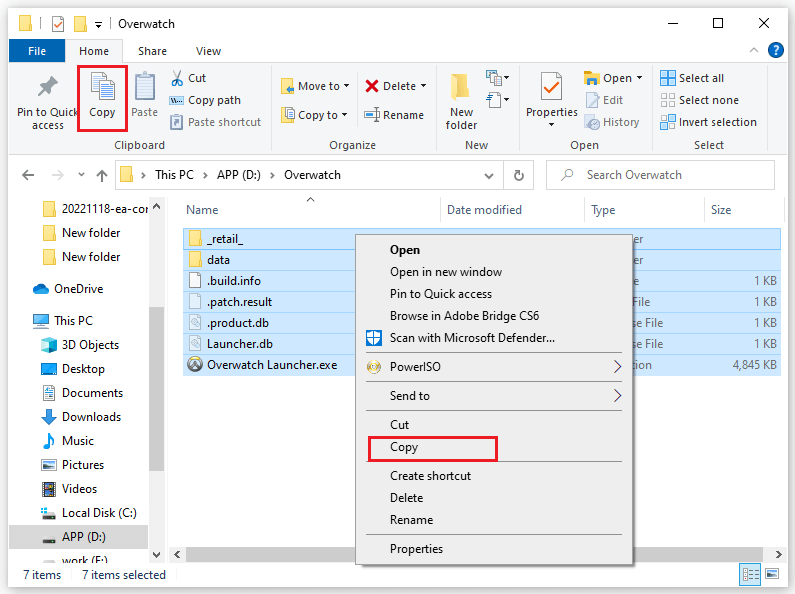
Step 4. Create a new folder on another drive to which you want to move the Blizzard games. Then you can paste the copied content into the new folder. Wait patiently until the process ends up.
Step 5. Go to the Battle.net app. Then click the Gear icon and select the Game Settings option.
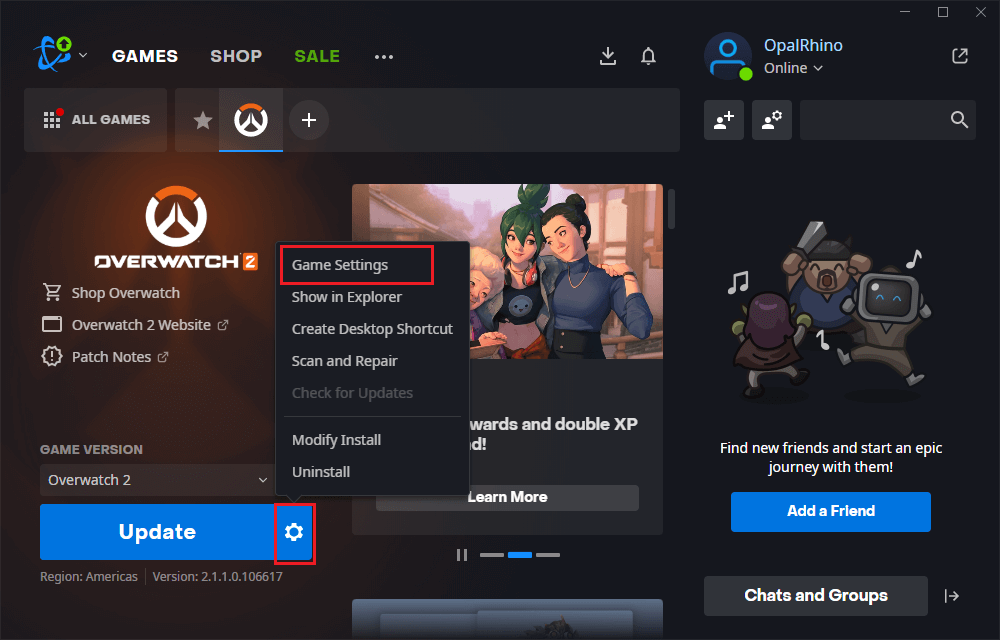
Step 6. In the pop-up window, click the Use a Different Folder button. Then navigate to the newly created game folder and select it. Click Select Folder in the File Explorer window.
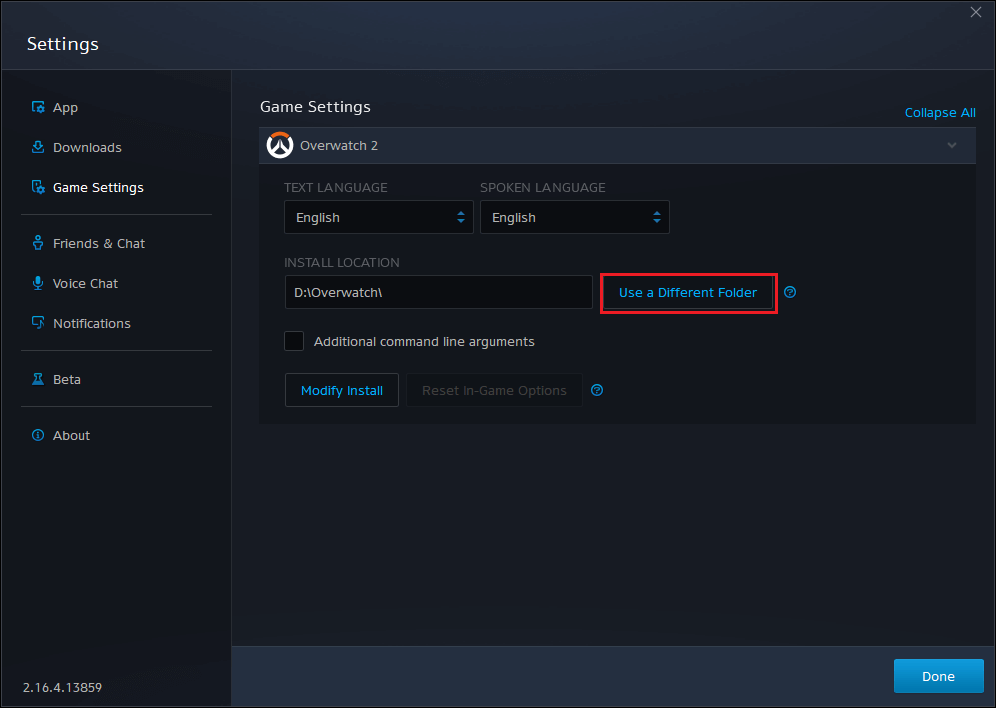
Step 7. Once done, click the Done button in the game Settings window.
You can repeat the above steps to move other Blizzard games to another hard drive. After moving, click the Update button to download and install pending updates for the game.
Method 2. Change Blizzard Games’ Default Installation Directory
If you don’t want to install Blizzard games in C drive or another default directory, you can modify the default installation location in the settings. Besides, to move Blizzard games to another drive, you can change the installation game folder via the following steps.
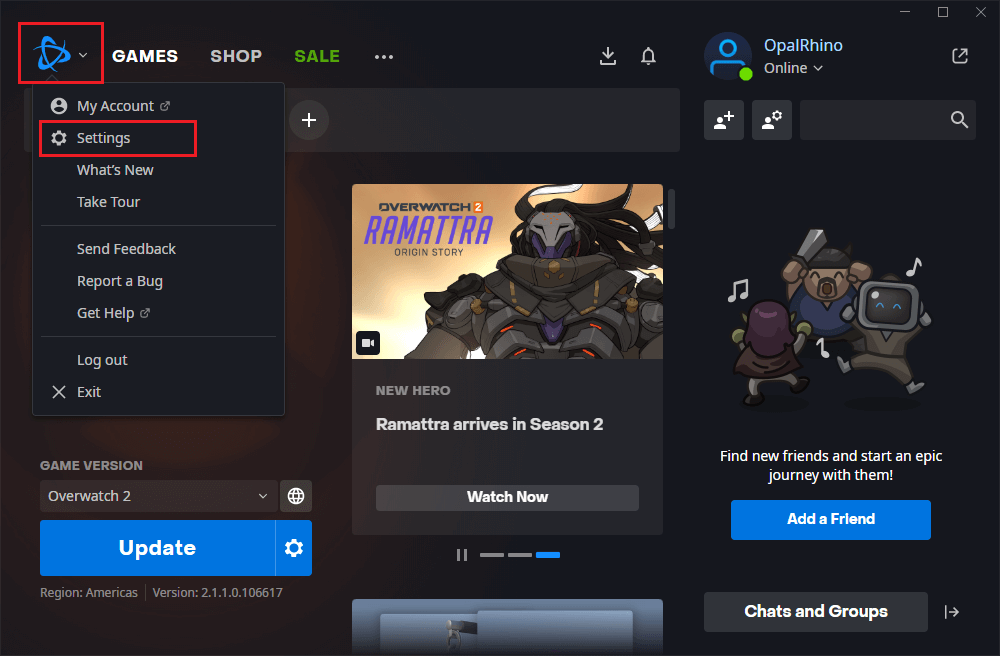
Step 1. In the Battle.net app, select the game you want to migrate and then click the Blizzard icon on the upper left menu. Click the Settings option.
Step 2. In the prompted window, click the Downloads option and then select the Change button under DEFAULT INSTALL DIRECTORY.
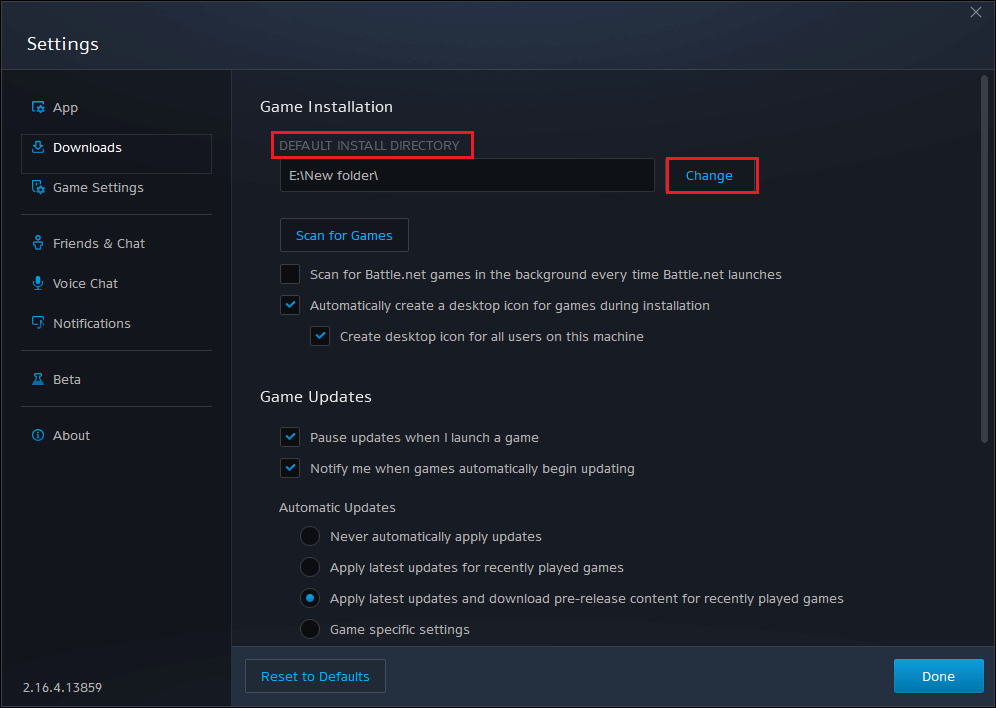
Step 3. In the pop-up window, select an existing folder or create a new folder on the destination hard drive, and then click Select Folder.
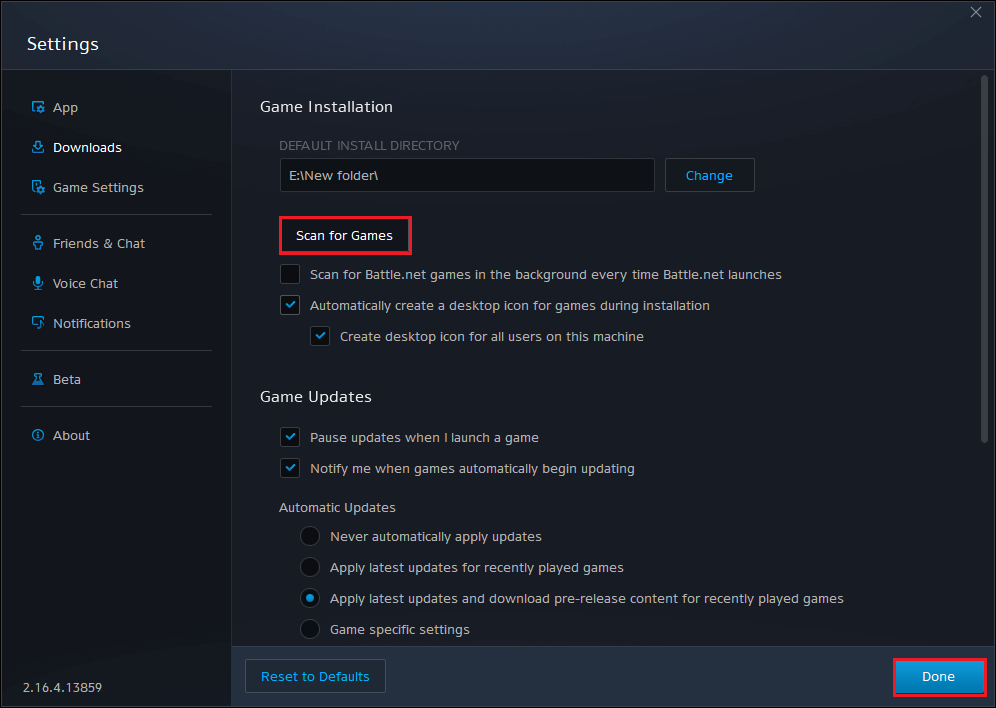
Step 4. Click the Done button to save the changes. Then the Battle.net will download and install games to the new installation directory.
Step 5. Click the Scan for Games button and the game folder will be scanned automatically. Then check the games that you want to move in the Scan For Games window. Click Change to select the new installation directory. Then click Done.
You should cut the original game folder to the desired installation directory in advance.
Method 3. Move the Blizzard Games by Reinstalling
You can also choose to reinstall the Blizzard games on another hard drive. Ensure that there is enough space on the hard drive to hold all the Blizzard games you want to reinstall. This method is a little time-consuming. You can refer to the following steps to reinstall the blizzard games.
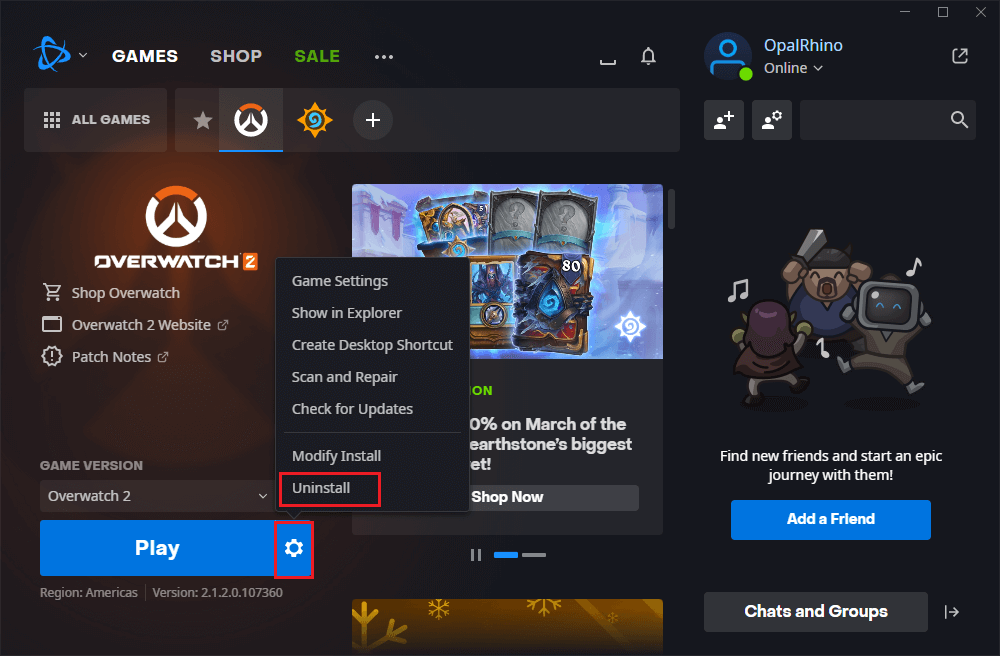
Step 1. Open the Blizzard Battle.net app, and select the game that you want to install. Click the Settings button and select Uninstall.
Step 2. After uninstalling successfully, click the All Games option in the Blizzard Battle.net app. Then find the game that you want to reinstall and click Play For Free.

Step 3. In the installation window, you can click Change Folder in the Install Location section to select your desired drive for the installation. Then click Start Install.
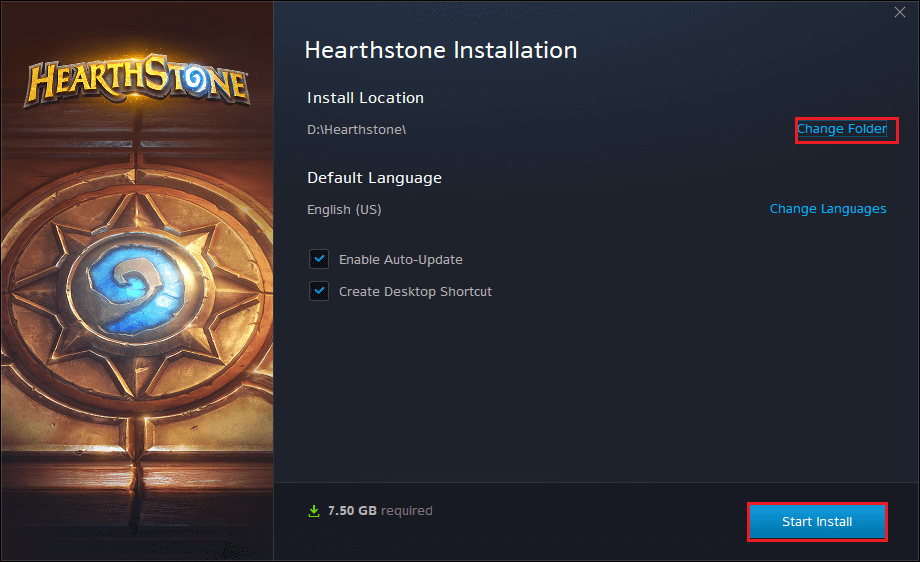
You can repeat the above steps to reinstall more games in the Blizzard Battle.net app on another hard drive.
Method 4. Move Blizzard Games Using MiniTool Partition Wizard
As a professional partition manager, MiniTool Partition Wizard can help you manage your disk and partition safely and conveniently. It has numerous useful functions. For instance, the Extend function can help you extend the partition.
Besides, the Label function can help you rename the partition. In addition, if you want to recover lost data, you can use the Data Recovery function of MiniTool Partition Wizard.
1. Extend the Partition with the Blizzard Games Installed
If you want to move Blizzard games because there is not enough space on the game hard drive, you can extend the drive where you save the games. You can follow the detailed steps below to use MiniTool Partition Wizard to extend the hard drive space.
If you save the game files in the C drive, it’s recommended to use the Bootable Media of MiniTool Partition Wizard to extend the system partition.
Step 1. Download MiniTool Partition Wizard Edition, install and launch it to get its main interface.
MiniTool Partition Wizard FreeClick to Download100%Clean & Safe
Step 2. Right-click the target partition and select Extend. Also, you can highlight the target partition and click the Extend Partition option from the left action panel.
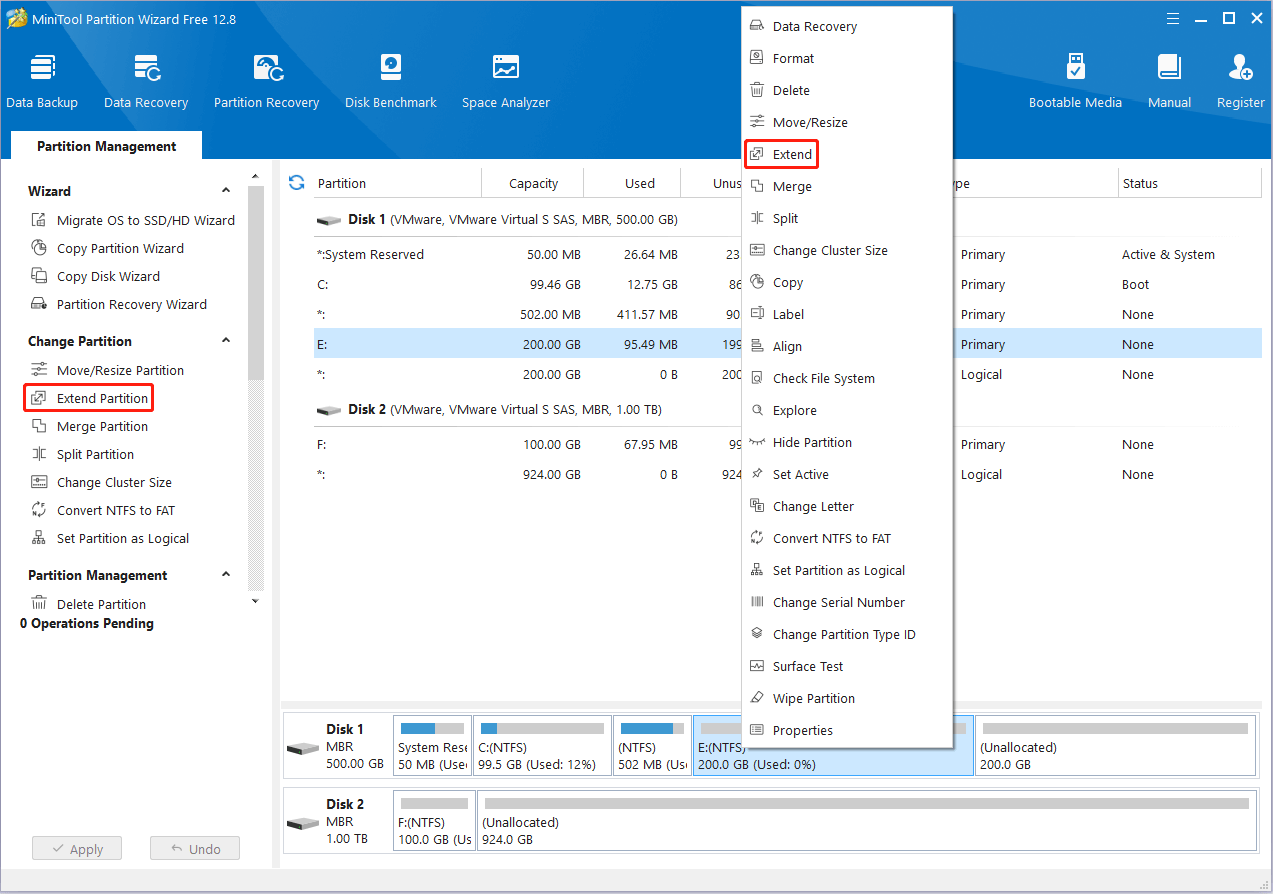
Step 3. In the pop-up window, click the drop-down arrow of the Take Free Space from option. Then choose the unallocated space or partition to take free space from.
Step 4. Drag the sliding handle to decide how much space to take. After that, click OK to continue.
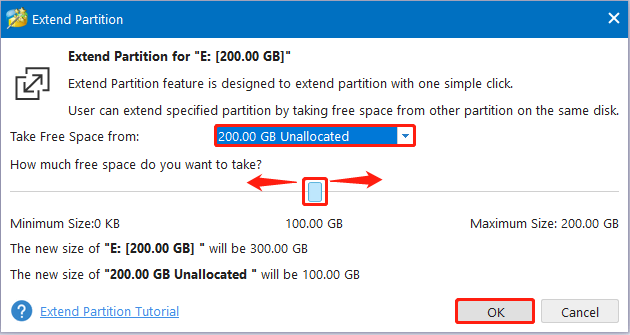
Step 5. Once done, click the Apply button.
Now, the partition is extended. If there is unallocated space or free space next to the target partition, you can use the Move/Resize function of MiniTool Partition Wizard. Besides, if you are running out of disk space, you can choose to free up space via the following article.
2. Move the Blizzard Games to External Hard Drive
If you want to move the Blizzard games to an external hard drive, you can use the Copy Partition Wizard of MiniTool Partition Wizard to migrate them to the external hard drive. The detailed steps are as follows.
Step 1. After connecting your external hard drive to the computer, launch the software to get its main interface.
If the Blizzard games are installed on the C drive, you need to use MiniTool Partition Wizard Pro Edition. Besides, it is recommended to use Copy Disk or Migrate OS to SSD/HD function.
MiniTool Partition Wizard FreeClick to Download100%Clean & Safe
Step 2. Click the Copy Partition Wizard from the toolbar. Then in the pop-up window, click Next to continue.
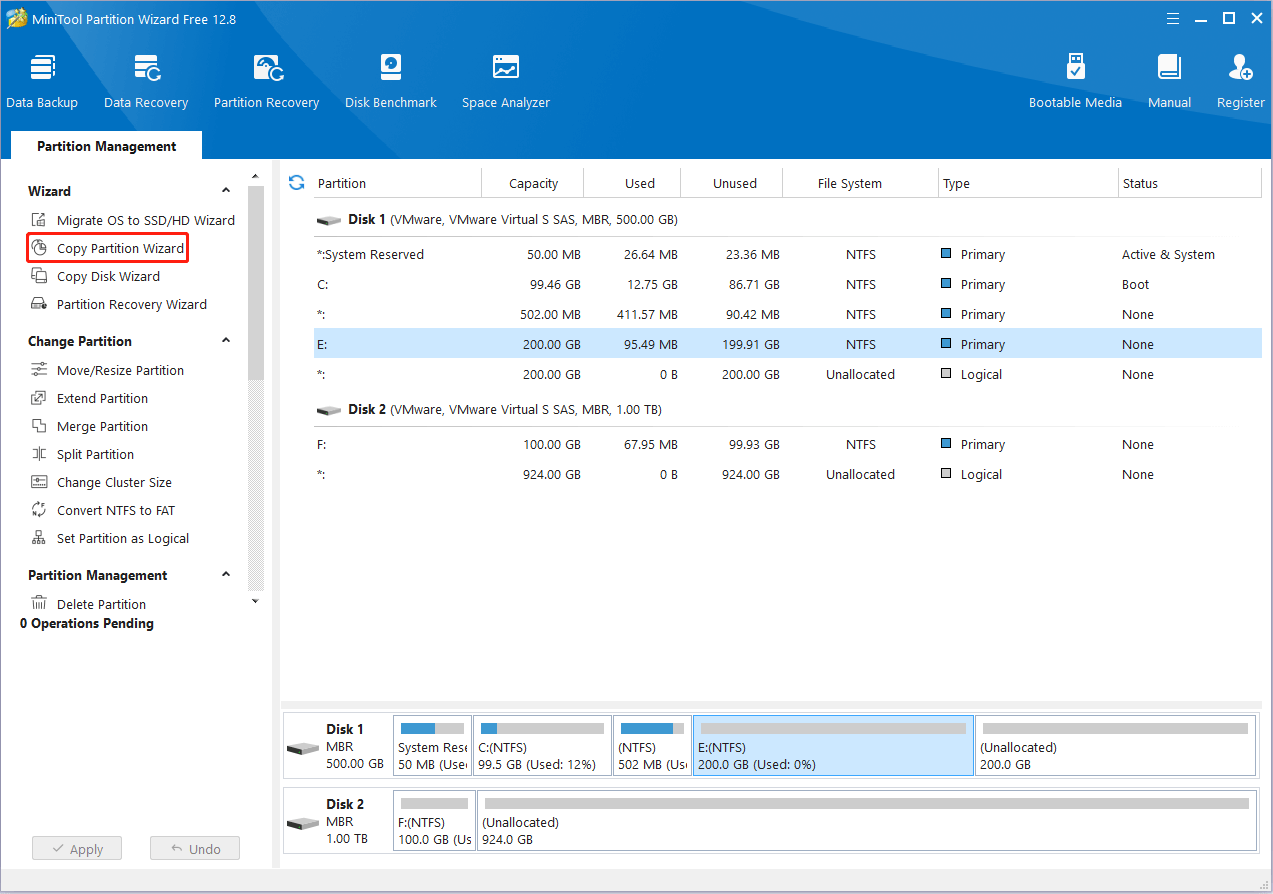
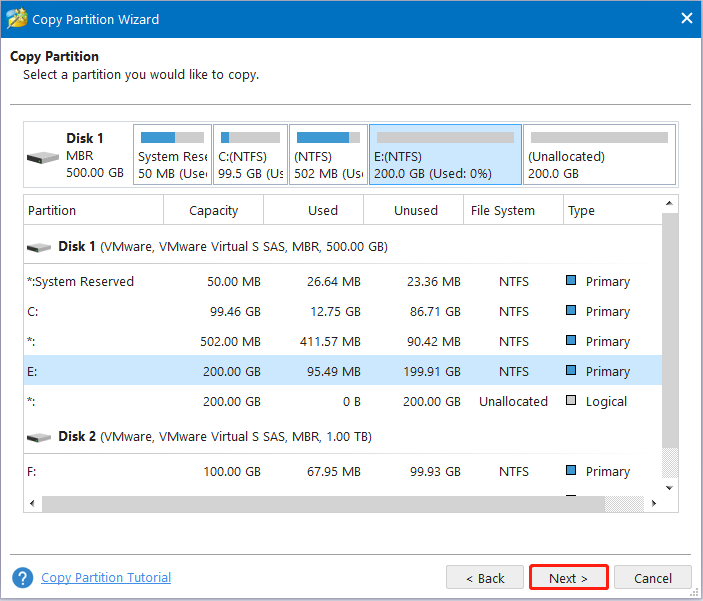
Step 3. Then select the partition containing the Blizzard games to copy. Click Next.
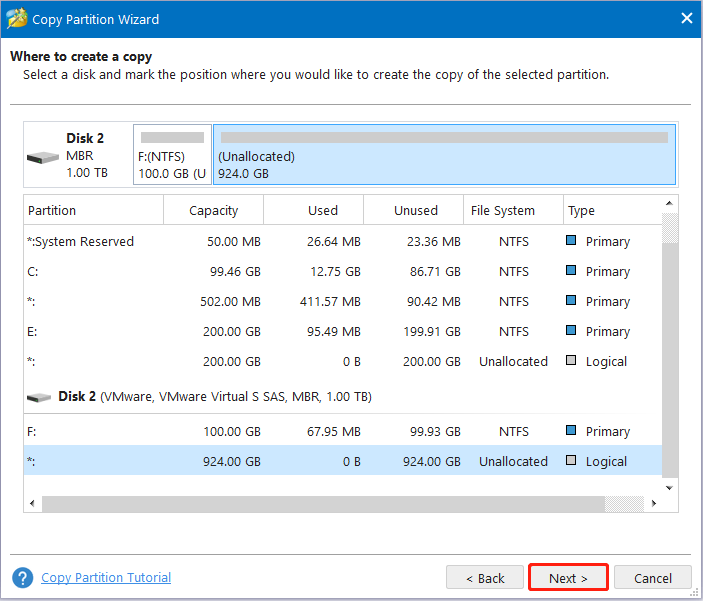
Step 4. Select the partition on the external hard drive to save the copy of the selected partition. Click Next.
The space of the selected partition should be large enough to hold all data on the source partition.
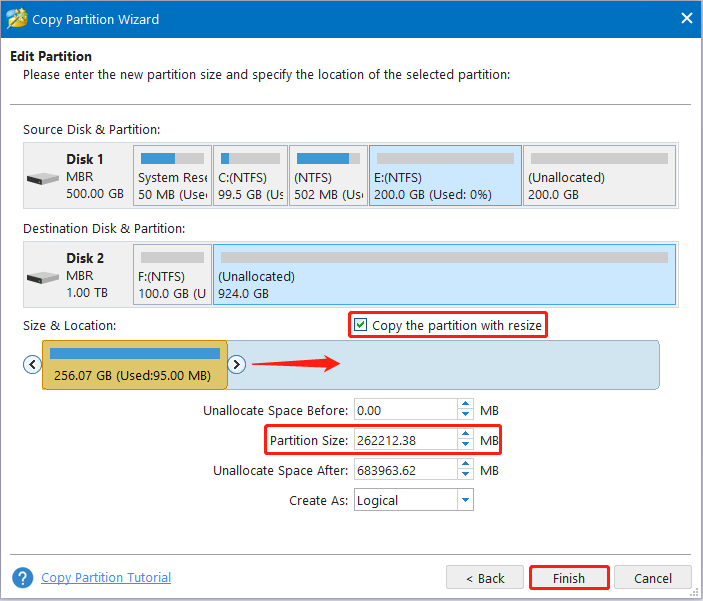
Step 5. Move the handle to change the new partition size, or you can type the exact partition size directly. Then click Finish.
Step 6. Once done, click the Apply button to save the change. Click Yes in the confirmation window. Then wait patiently until the process ends up.
Bottom Line
Now, this post comes to an end. It has introduced several methods to help you move Blizzard games to another drive. Besides, you can choose to extend the partition or free up the disk space to solve the “running out of space” issue. Just feel free to try on these methods.
If you still have problems or better suggestions about how to move Blizzard games to another hard drive, you can put them forward in the comment zone below. Besides, if you have issues with using MiniTool Partition Wizard, you can contact us via [email protected] or leave us a message.


![How to Uninstall Games on PC [Microsoft Store, Epic, and Origin]](https://images.minitool.com/partitionwizard.com/images/uploads/2022/09/how-to-uninstall-games-on-pc-thumbnail.png)
![10 Ways to Free up Disk Space in Windows 10/11 [Guide]](https://images.minitool.com/partitionwizard.com/images/uploads/2019/07/free-up-disk-space-thumbnail.png)
User Comments :