How to check hard drive space Windows 7? If you are using Windows 7 still, this post may help you. In this post, MiniTool Partition Wizard shows you how to check hard drive space and free up space in Windows 7.
How to Check Hard Drive Space Windows 7
Hard drive is a physical device that you use to store files, install programs and operating systems. If the PC storage is not enough, you can’t install software or store files anymore. Moreover, various PC problems including PC crash may occur.
Therefore, when you use a PC, you should pay attention to the hard drive usage. Nowadays, many people still use Windows 7 and they want to know how to check hard drive space Windows 7. This post will explain this problem to Windows 7 users.
How to Check Hard Drive Space Windows 7 via Windows Explorer
Step 1: Check whether there is unallocated space or a partition without drive letter. Unallocated space and partitions without drive letter will not appear on PC and therefore you can’t use them.
- Click the Start icon and type “computer management” in the search box.
- From the result list, click Computer Management program to open it.
- In the tool, go to Storage > Disk Management. You will see whether there is unallocated space and partition that have no drive letter.
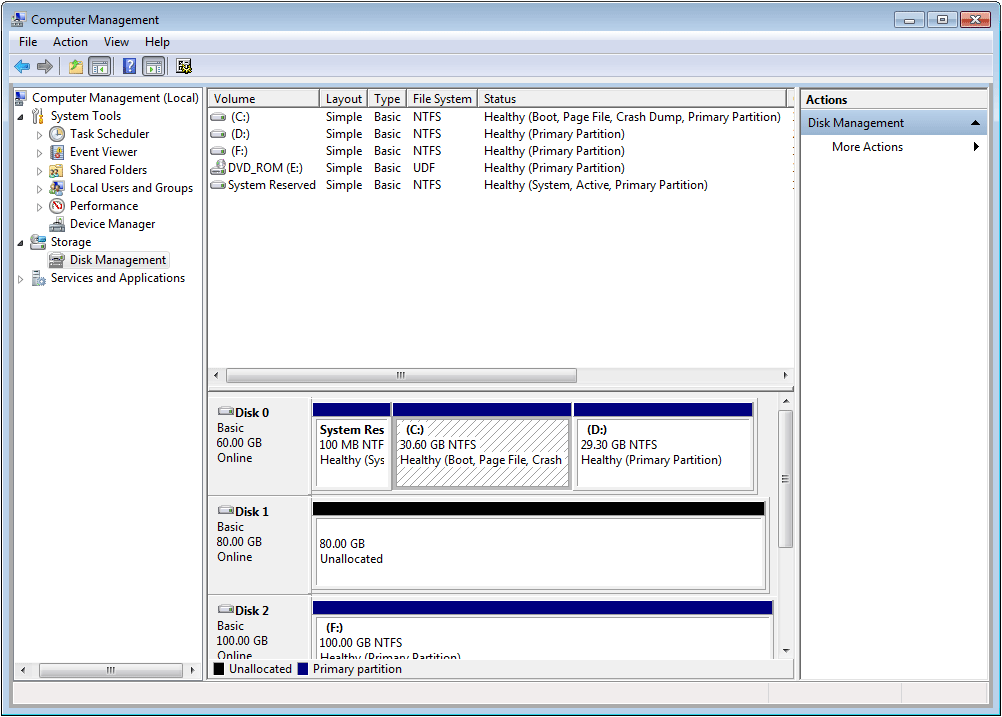
In most cases, there is no unallocated space, or partitions without drive letter (except for the system reserved partition). You should then go on the next step.
Step 2: Click Windows Explorer icon on the Taskbar or My Computer icon on the desktop. Highlight Computer and then you can see the total size of each drive and how much space is left in each drive.
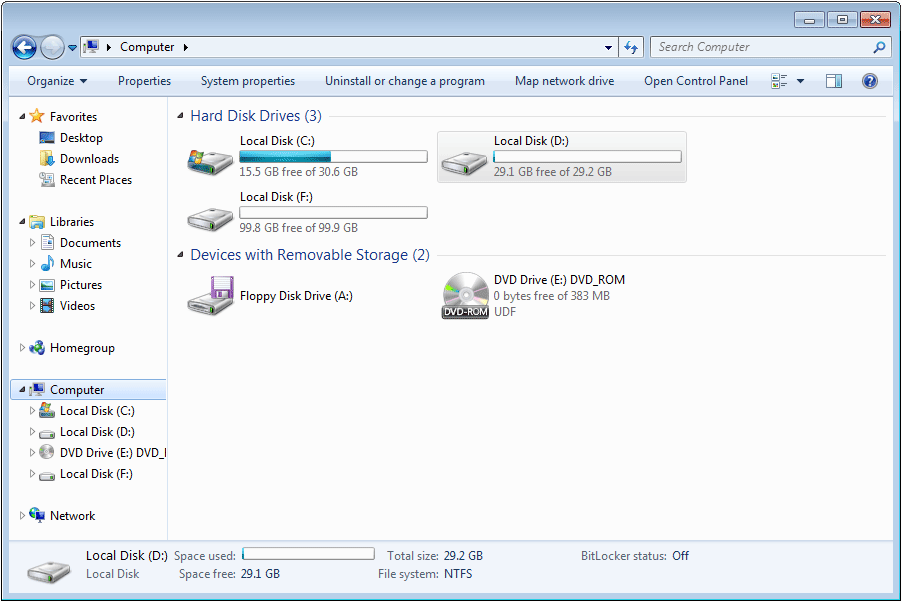
To see more detailed information about the usage of a drive, you can then right-click on the drive and choose Properties. Then, you will get a window like the following picture:
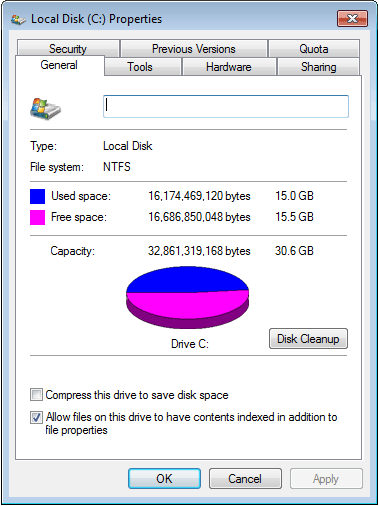
Under the General tab, you can see the size of used space, the size of free space, and the total capacity. In addition, there is a pie graph, showing used vs free space on the drive, helpful for visualizing how much space you’re using on this hard drive or other devices.
How to Check Hard Drive Space Windows 7 via Commands
For some users, they may prefer to check hard drive space using Command Prompt. If you also want to use commands to check hard drive space, please refer to the following steps:
- Press “Windows + R” keys simultaneously to open Run.
- In the Run box, type “cmd” and press Enter to open Command Prompt.
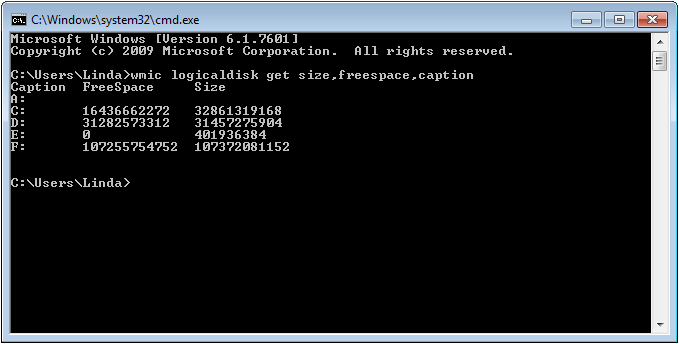
- In the Command Prompt window, type command “wmic logicaldisk get size,freespace,caption” and press Enter. You will get an output showing each drive’s free space size and total capacity size.
What to Do If the Drive Doesn’t Have Enough Free Space
After checking hard drive space, you can know whether your PC has enough free space. If the drive has enough free space, it’s good. But what if the drive doesn’t have enough free space? In this case, you can use the following methods to free up disk space Windows 7.
Method 1. Run Disk Cleanup Windows 7
Disk Cleanup is a Windows built-in tool used for clearing Downloaded Program Files, Temporary Internet Files, Recycle Bin, Setup Log Files, Temporary files, and Thumbnails. These files are usually not needed anymore. Clearing them can free up disk space Windows 7. Here is the guide:
- Open Windows Explorer and highlight Computer.
- In the right panel, right-click on the drive where you want to free up space and choose Properties.
- Under the General tab, click Disk Cleanup.
- In the Disk Cleanup window, check files to be deleted and click the OK.
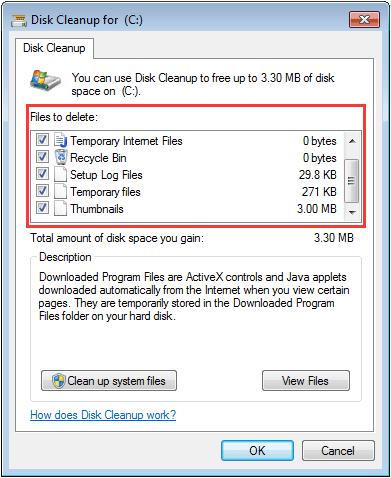
If you want to free up more space, you can click the Clean up system files button, and then new options will be listed in the Files to delete box. These new options include Service Pack Backup Files, Temporary Windows installation files, Windows Update Cleanup, and System archived Windows Error Report files.
If you want to delete these files, check them and click the OK button. If don’t know what these files are used for, please read the Description box before ticking these files.
What Is Safe to Delete in Disk Cleanup? Here Is the Answer
Method 2. Delete or Move Personal Files
Have you stored too much personal files on the PC? For example, movies, pictures, various documents, etc. If so, you can move files to another drive, an external drive, or your cloud storage to free up disk space Windows 7.
If you don’t need these files anymore, you can delete them. But please remember to empty the Recycle Bin later.
Method 3. Uninstall Unnecessary Software
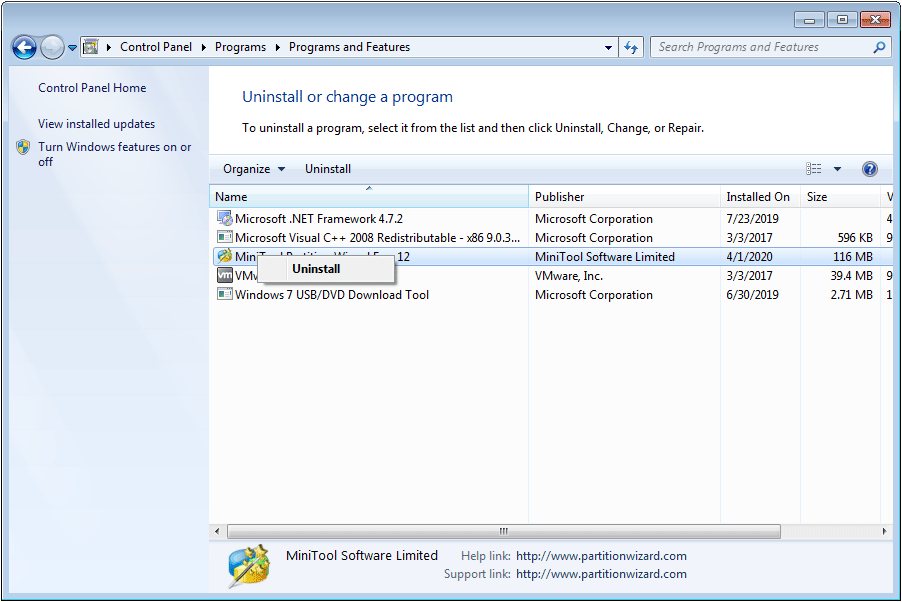
If you have installed many programs, your PC may be also lacking in disk storage. In this case, you can try uninstalling software through the following steps:
- Press Start button and click Control Panel.
- Click Uninstall a program under Programs section (in Category view).
- Right-click on a program and click Uninstall.
- Click Yes to confirm the uninstall operation.
Method 4. Clean up WinSxS Folder
In most cases, WinSxS folder is the culprit of insufficient disk space (especially for C drive). This folder is located in the Windows folder on your PC (for example, C:WindowsWinSxS). It stores the Windows Component Store files that are used to support functions needed to customize and update Windows.
However, you can’t delete files from the WinSxS folder or delete the entire WinSxS folder directly, because this might severely damage your system and make it impossible to restart or update your PC.
To clean up WinSxS, you should use Task Scheduler tool. Here is the guide:
- Press Start button and type “Task Scheduler” into the search box.
- Click Task Scheduler from the result list to open it.
- Go to Task Scheduler Library > Microsoft > Windows > Servicing.
- Select StartComponentCleanup, and then select Rununder Selected item.
However, in some cases, you can’t find the Servicing item. In this case, you can use command “Dism /online /Cleanup-Image /SPSuperseded” to clean up the WinSxS folder.
WinSxS Folder Cleanup: Clean WinSxS Folder on Windows 10/8/7
Method 5. Adjust System Restore Settings
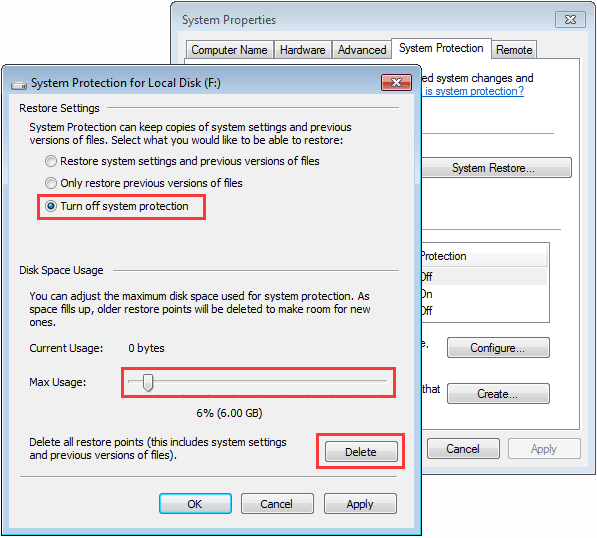
System Restore is a Windows feature that can restore system, software and settings to a specific date. System Restore realizes this function by saving system file changes to a restore point. These restore points take up a lot of hard disk space. If no adjustments are made, System Restore can occupy 4% of the hard drive space.
To free up disk space Windows 7, you can adjust System Restore settings through the following steps:
- Open Windows Explorer.
- Right-click Computer and choose Properties.
- Click System protection.
- Click Configure.
- Click Delete to delete all restore points.
- Drag the block to reduce the amount of space used for system restore, or turn off system protection directly.
[Solved] What Does System Restore Do in Windows 10?
Method 6. Delete Hidden Files with Tools
How to see what’s taking up space on PC Windows 7? In most cases, you don’t know what files are eating up your disk storage. You may want to know how to find out these large files and delete them. In this case, MiniTool Partition Wizard is recommended. You can use its free feature Space Analyzer to find out these large files easily.
Here is the guide:
MiniTool Partition Wizard FreeClick to Download100%Clean & Safe
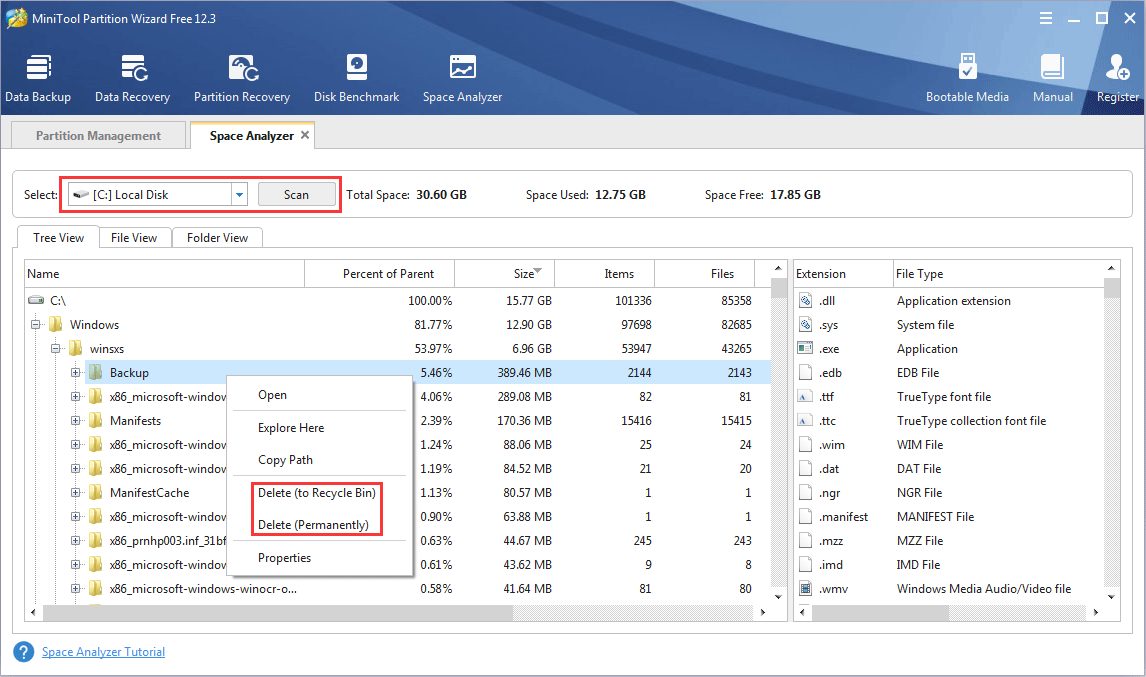
Step 1: Launch MiniTool Partition Wizard and click Space Analyzer.
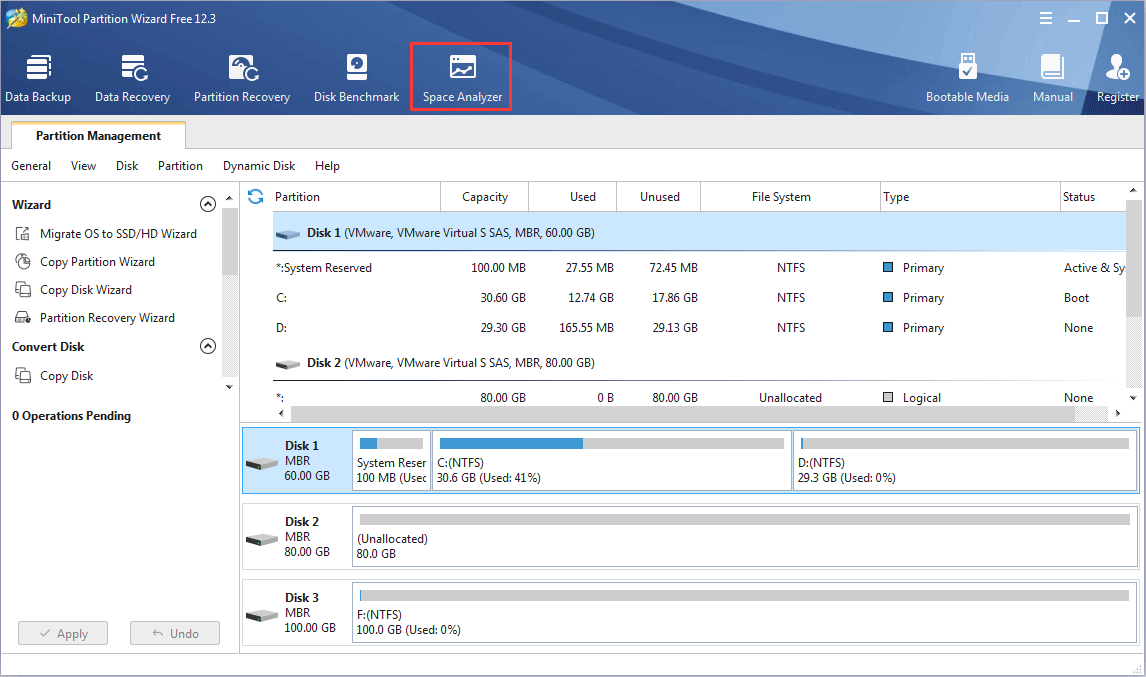
Step 2: Select the drive where you want to free up space and click Scan. Then, you can see how much space (size and percentage) each file is taking. Right-click files you want to delete and choose Delete.
If you want to know more detailed tutorial, please read this post: How to Find Large Files Taking up Hard Drive Space on Windows 10.
Method 7. Extend Partition
If there is free space on the entire hard drive, and only a local disk is lacking in space, you can solve the problem by extending the local disk. To extend a partition easily, you can use MiniTool Partition Wizard.
Here is the guide:
MiniTool Partition Wizard FreeClick to Download100%Clean & Safe
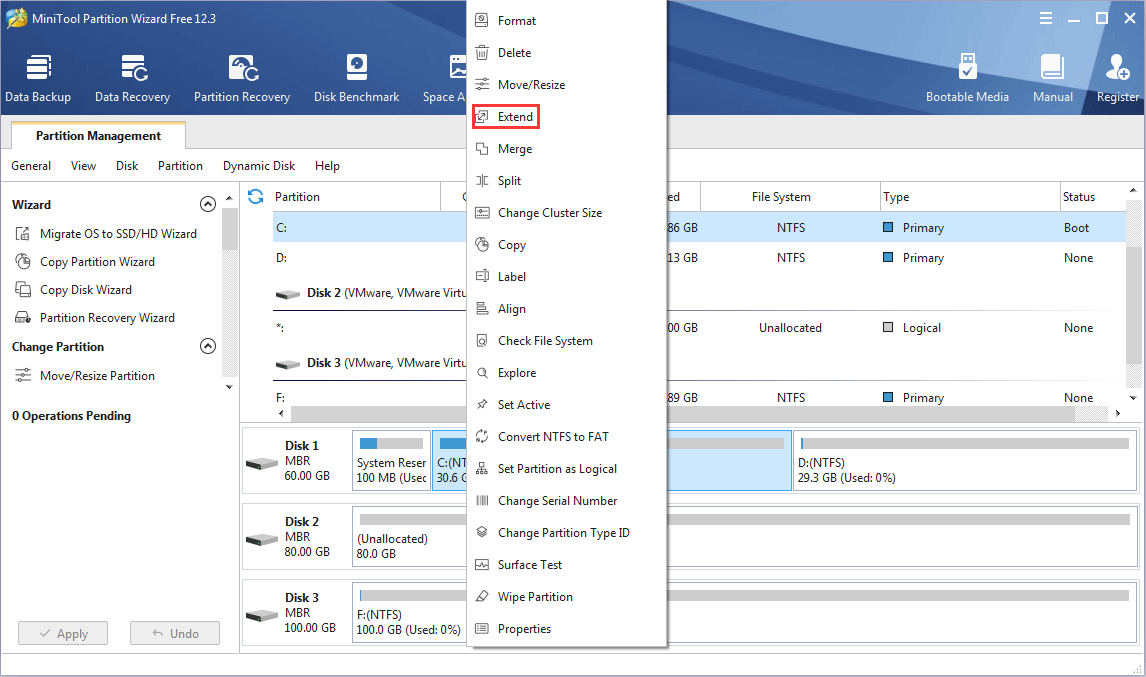
Step 1: Launch MiniTool Partition Wizard and right-click on the drive you want to extend. Choose Extend feature.
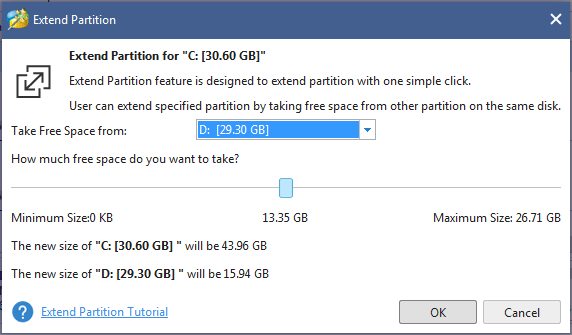
Step 2: In the drop-down menu, choose where to take free space. Then, drag the block to decide how much free space you want to take. Finally, click the OK button.
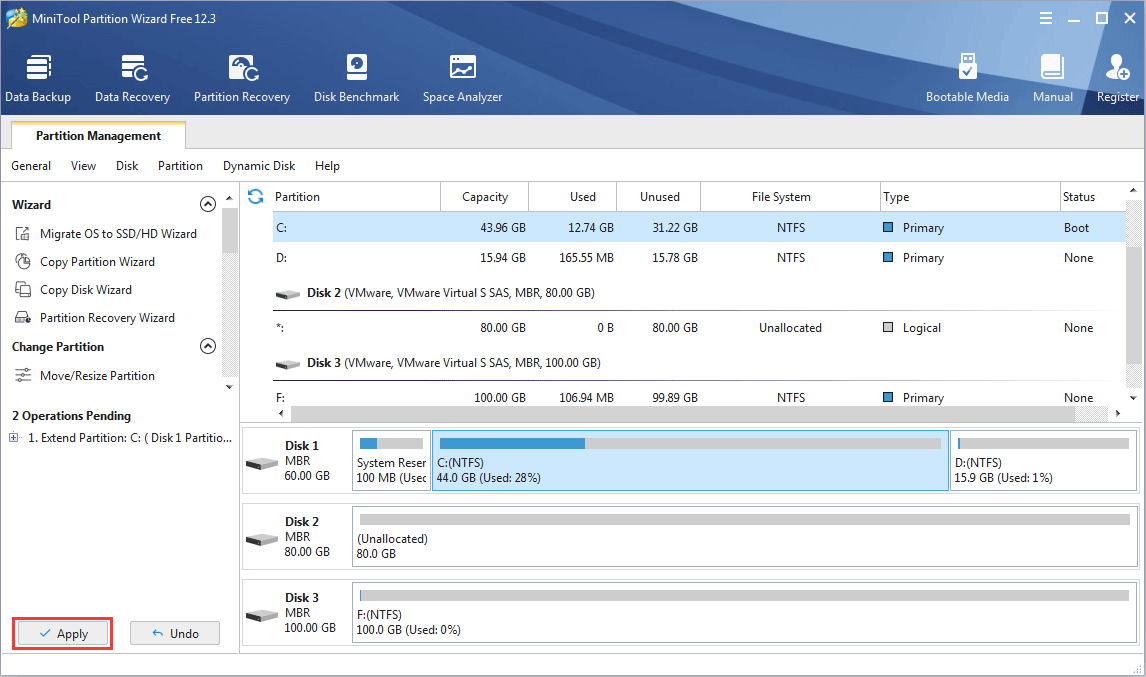
Step 3: Click the Apply button to execute pending operations.
Method 8. Add More Storage
If the total size of the hard drive is very small or you don’t want to delete any files, adding more storage is a good choice. You can expand your PC’s storage capacity by adding removable storage, including SD cards, USB flash drives, DVDs or CDs, or using cloud storage or network drives.
You can also add more storage by upgrading to a larger hard drive or adding a second hard drive.
Bottom Line
Is this post helpful to you? Do you have other methods to check hard drive space Windows 7? Do you have other methods to free up disk space Windows 7? Please leave comments in the following zone for sharing. In addition, if you have difficulty in extending partition, please feel free to contact us via [email protected]. We will get back to you as soon as possible.
How to Check Hard Drive Space Windows 7 FAQ
You can find out the hard drive size in Disk Management or Windows Explorer. In Windows Explorer, you can even see the used space size and free space size.
- Click Windows Explorer icon on the Taskbar.
- Highlight Computer and then you can see the hard drive size and how much free space is left.


User Comments :