In this post, Partition Magic provides you with a complete hard drive allocation guide, including its necessity, maximum number of partitions, allocation procedure, and common errors. In a word, it shows you how to allocate a hard drive in detail.
Why You Need to Allocate a Hard Drive
To make full use of the hard drive’s capacity, you need to know how to allocate a hard drive. Besides, you can’t write, read, and store data on an unallocated disk or space. What does allocating a hard drive mean? Well, the operation of allocating a hard drive means making the drive ready for the data storage.
The hard drive allocation process involves initializing, partitioning, formatting, extending, shrinking, merging, and splitting. During the allocation process, you can configure parameters like size, drive letter, label, file system to the partition based on your needs.
Sometimes, you need to reallocate a hard drive if it becomes unallocated due to some reason or you have other demands. It’s means that you need to repeat the above allocation process again. Why hard drive becomes unallocated? Possible reasons for this phenomenon are listed below.
- The hard drive is disconnected from the power supply suddenly.
- Partitions are created or modified improperly.
- The hard drive is infected by a virus or spyware.
- An additional hard drive is installed.
- There’s hardware failure.
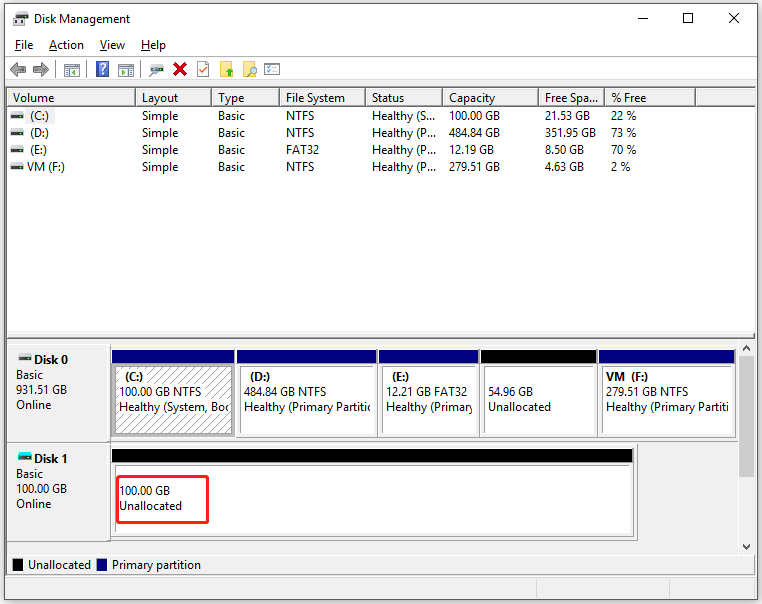
Further reading:
Read here, you may be curious about the topic “allocated vs unallocated space”. Here, I will explain the difference between allocated and unallocated space for you.
Allocated space is the portion of a storage device used for data storage, while unallocated space is the empty portion that is not assigned for storing data yet. Allocated space is the area of a hard drive that may contain files. As for unallocated space, it refers to the free space on the hard drive which can be used to create partitions or extend a partition with low disk space warning.
Allocated vs unallocated space: what’s the difference? Now, you may have the answer in your mind.
How Many Partitions Should Be Created on a Hard Drive
The maximum partition number of a hard drive depends on its partition table (MBR or GPT). To be specific, on an MBR disk, you are only allowed to create 4 primary partitions or create 3 primary partitions plus one extended partition. You can create an infinite number of logical partitions on the extended partition only if there are enough disk space on it.
You should note that the maximum addressable storage space of an MBR disk is 2TB. Once a hard drive is larger than 2TB, the exceeded disk space will be unusable and marked as “Unallocated”. So, if you have a hard drive over than 2TB, you’d better use the GPT partition table.

On a GPT disk, you can create 128 primary partitions at most. However, it doesn’t mean that the more partitions, the better. Does partitioning a hard drive affect performance? Yes, of course. Resources of the hard drive can be divided due to partitioning, resulting in increased fragmentation. This can slow down read and write speeds of the hard drive.
If you create dozens of partitions, the hard drive’s performance will drop. Hence, you should create a reasonable number of partitions.
How to Allocate a Hard Drive
You can allocate or reallocate a hard drive by referring to the instructions offered in this section. I collects several common operations that can be conducted while allocating a hard drive (including the existing partitions and unallocated space). In a word, you can learn how to allocate hard drive Windows 10/11 in this section.
- Create partitions on the hard drive
- Extend/shrink partitions on meet the demand for space
- Merge/split partitions to organize partitions
#1: Create Partitions on a Hard Drive
Creating partitions is the most basic step to allocate hard drive Windows 10. It is also an available way to allocate unallocated space. Besides, partitioning is also required if you want to use them.
Depending on your needs, you can create multiple partitions. For instance, you may want to create partitions to store data, applications, games, videos, audios, etc. To create partitions, you can either use Windows built-in utilities like Disk Management and Diskpart or professional third-party partition managers like MiniTool Partition Wizard.
MiniTool Partition Wizard FreeClick to Download100%Clean & Safe
According to your preference, select a utility to create partitions. In this scenario, I show you how to create partitions via Disk Management.
Step 1: Right-click on the Windows icon on the desktop and then click Disk Management from the elevated Start menu.
Step 2: Right-click on the unallocated space and hit New Simple Volume in the context menu.
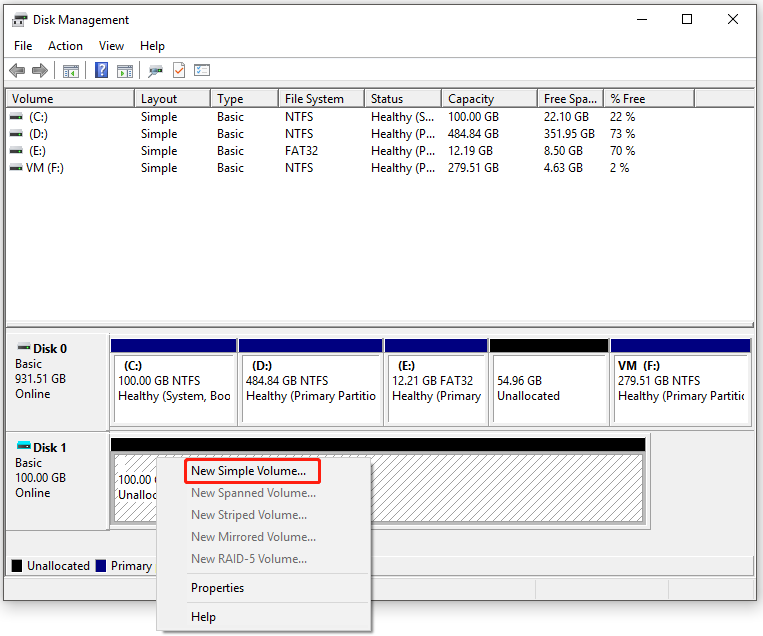
Step 3: Click Next in the prompted window. Then specify the volume size and click Next in the next window.
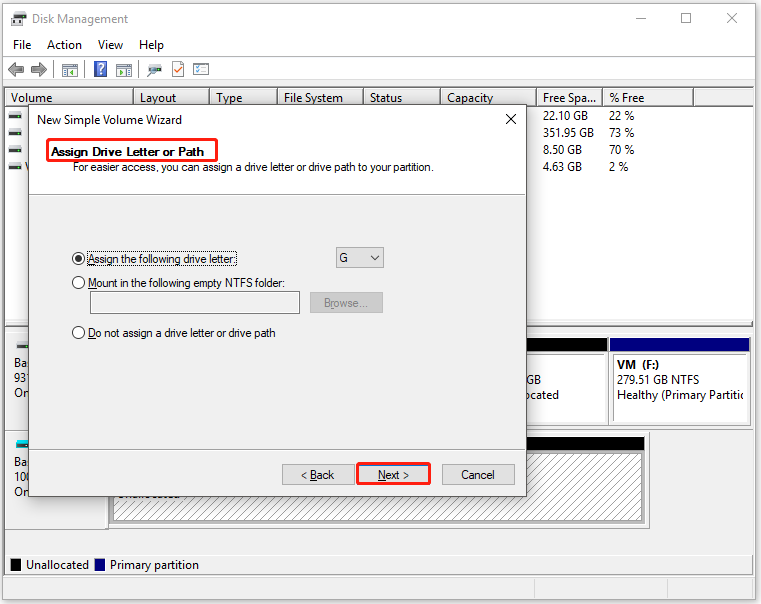
Step 4: Choose an available drive letter from the Assign the following drive letter drop-down menu and then click Next to move forward. If you don’t assign a drive letter, the partition won’t appear in File Explorer. Then you can’t access and use it.
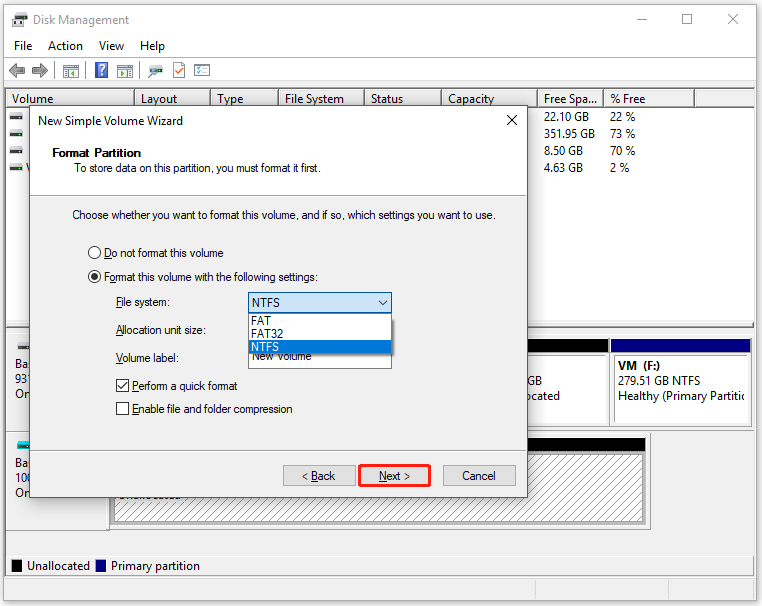
Step 5: In the next window, you need to configure settings like file system, allocation unit size, and volume label for the created partition. After that, click the Next button.
Step 6: Finally, click Finish to end the process.
#2: Extend/Shrink/Move Partitions on the Hard Drive
Extending, shrinking, and moving partitions are also part of hard drive allocation. According to your situation, conduct the corresponding operation.
Extend partition
When you encounter low disk space warning or similar issues, it’s time to extend your partition. Though you can free up disk space by deleting useless files or folders, it won’t make a big difference. Then you will encounter disk space shortage soon.
So, it is recommended to expand the partition size by taking space from other partitions or unallocated space on the hard drive. Extending partitions is another option to allocate unallocated space.
Shrink partition
If you want to create a new partition but there’s no unallocated space, consider shrinking partitions to make unallocated space. You can also delete partitions to get unallocated space, but you will take the cost of data loss. You’s better back up the data on the partition in advance.
Move partition
You may need to move partitions if you want to merge non-adjacent unallocated spaces or merge non-adjacent partitions.
Though Disk Management allows you to extend and shrink partitions, it has some limits that can prevent you completing the operation. For instance, if you want to extend a partition, contiguous unallocated space is required and it should be behind the target partition. Otherwise, the Extend volume feature will be greyed out.
Besides, it can’t move partitions. Apart from that, it prompts you with various errors, affecting your working efficiency. In cases like that, you can use MiniTool Partition Wizard. It allows you to extend a partition to non-contiguous unallocated or free space.
As an expertized partition manager, it allows you to partition hard drives, clone hard drives, migrate Windows 10/11, create/format/extend/shrink/move/merge/split/copy/delete/recover partitions, convert FAT to NTFS (and vice versa), etc.
Download and install MiniTool Partition Wizard on your computer. Then launch it and use it to extend/shrink/move partitions by following the steps below.
MiniTool Partition Wizard FreeClick to Download100%Clean & Safe
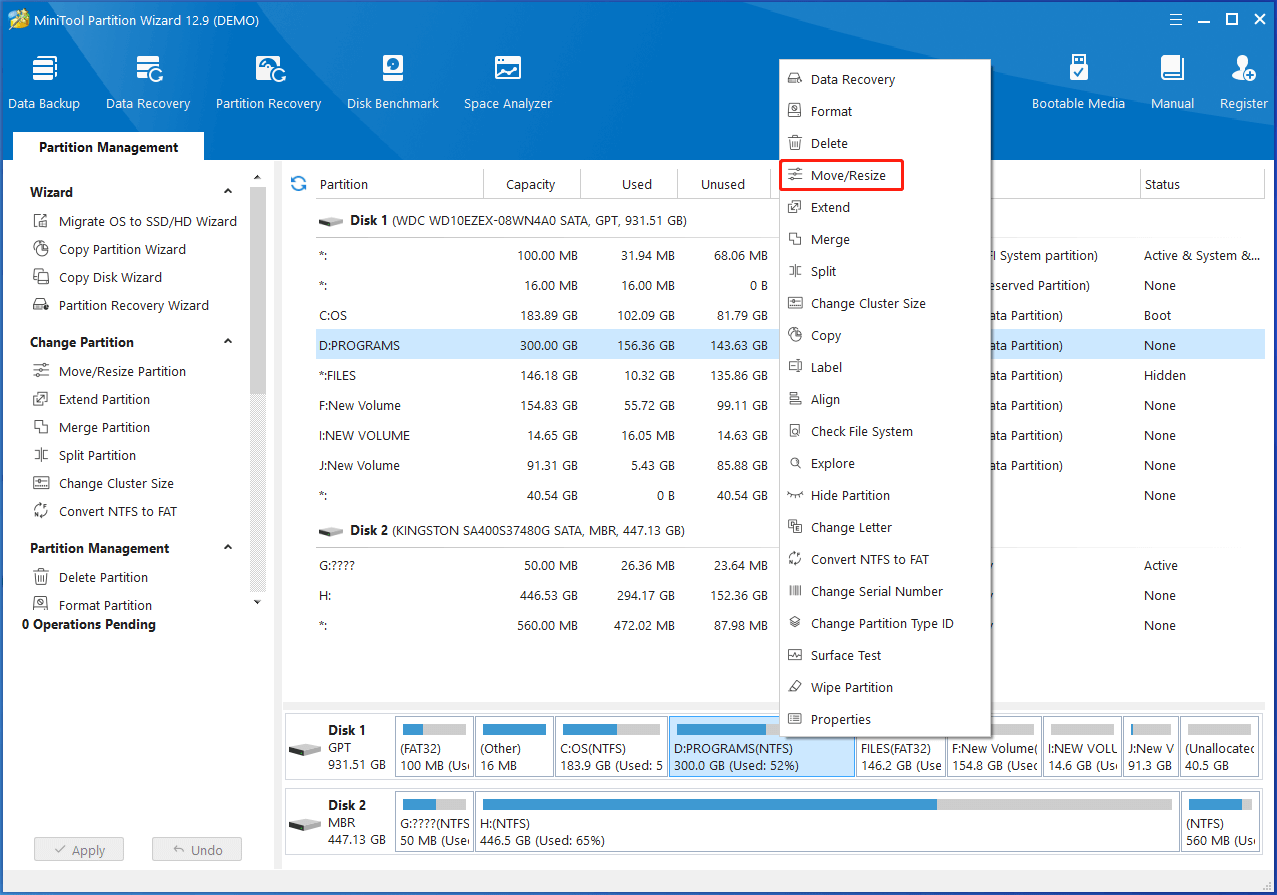
Step 1: Right-click the target partition and choose Move/Resize. Alternatively, click on the target partition and hit Move/Resize Partition under Change Partition in the left panel.
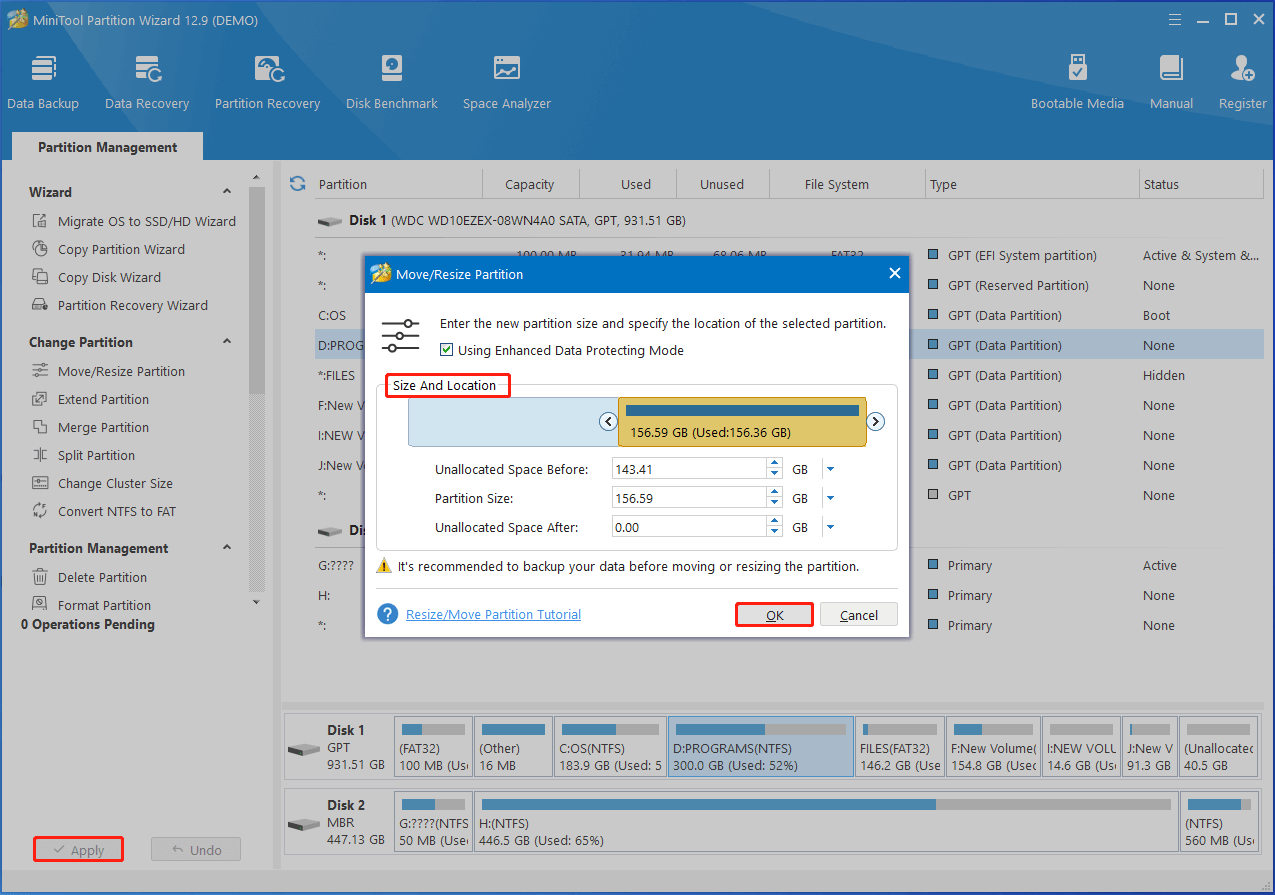
Step 2: Drag the right-arrow icon leftward or type the specific partition size to shrink the partition. Then drag the partition block to change the location of the partition. After that, click OK > Apply to save changes and execute the operation.
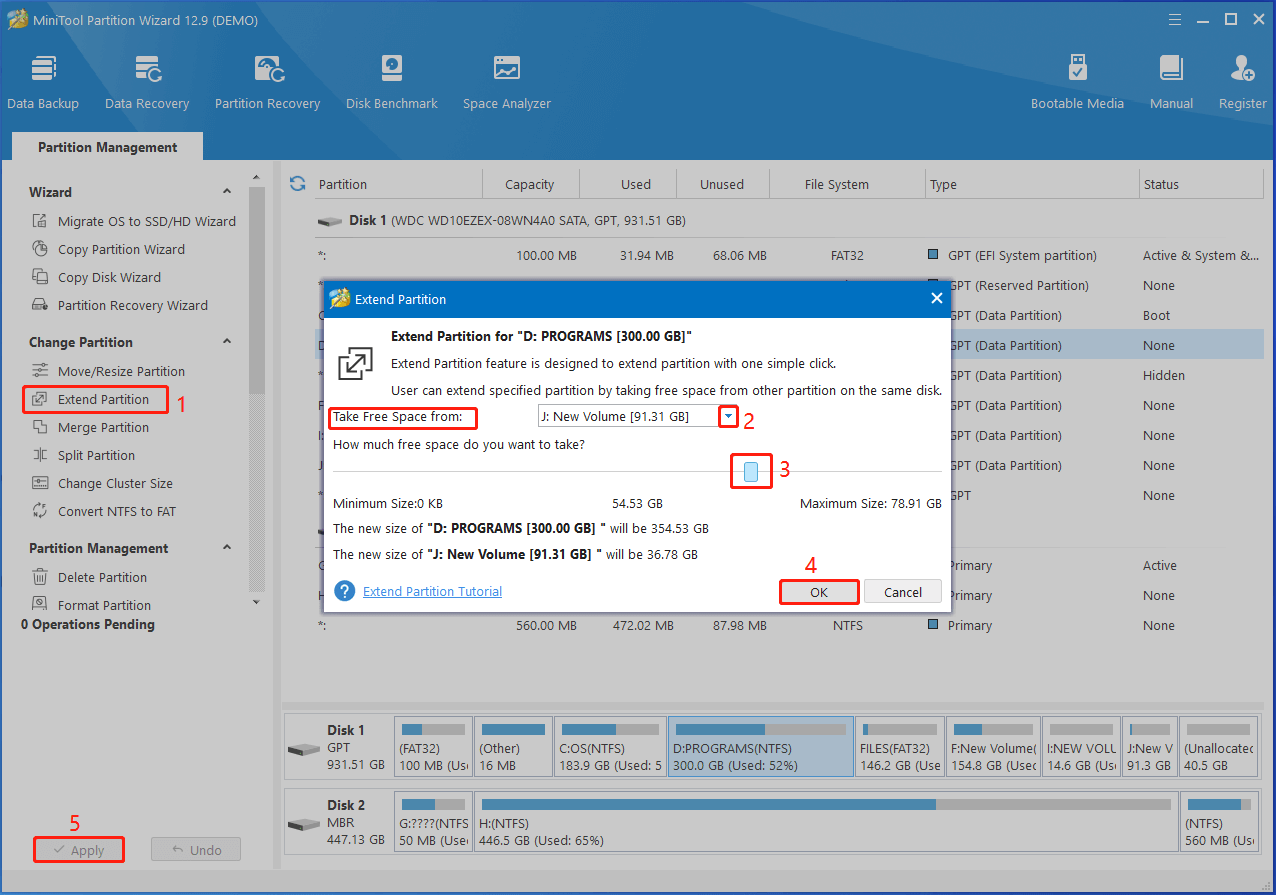
Step 3: To extend a partition, follow these instructions.
- Right-click on it and choose the Extend option on the context menu.
- Choose the partition or unallocated space from the Take Free Space from drop-down menu.
- Move the blue block to decide the amount of space to take.
- Click OK to save changes.
- Click Apply to carry out the pending operation.
#3: Merge/Split Partitions to Get More Organized
According to the actual demands, you can merge or split partitions to make the hard drive more organized. For instance, if there are too many partitions, consider merging some of them to reduce partitions. If you think partitions are insufficient, try splitting them, such as, split C drive into C and D, split E to C.
MiniTool Partition Wizard is handy again. It helps you merge and split partitions with ease. If necessary, you can also use it to delete or wipe partitions.
MiniTool Partition Wizard DemoClick to Download100%Clean & Safe
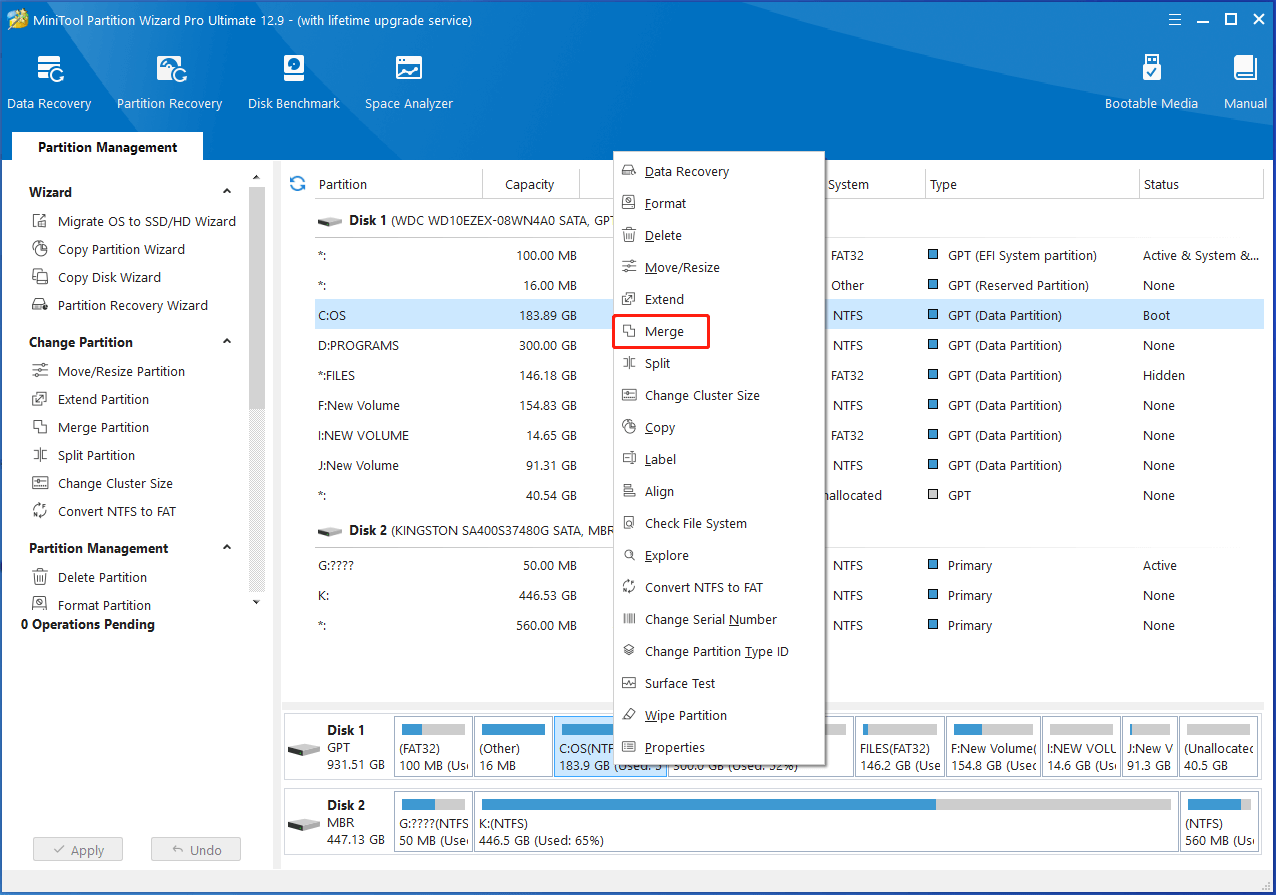
As you see, there are several partitions on Disk 1. You can merge partitions on this disk. There are few partitions on Disk 2, so consider splitting partitions. Now, merge or split partitions via MiniTool Partition Wizard by following these steps.
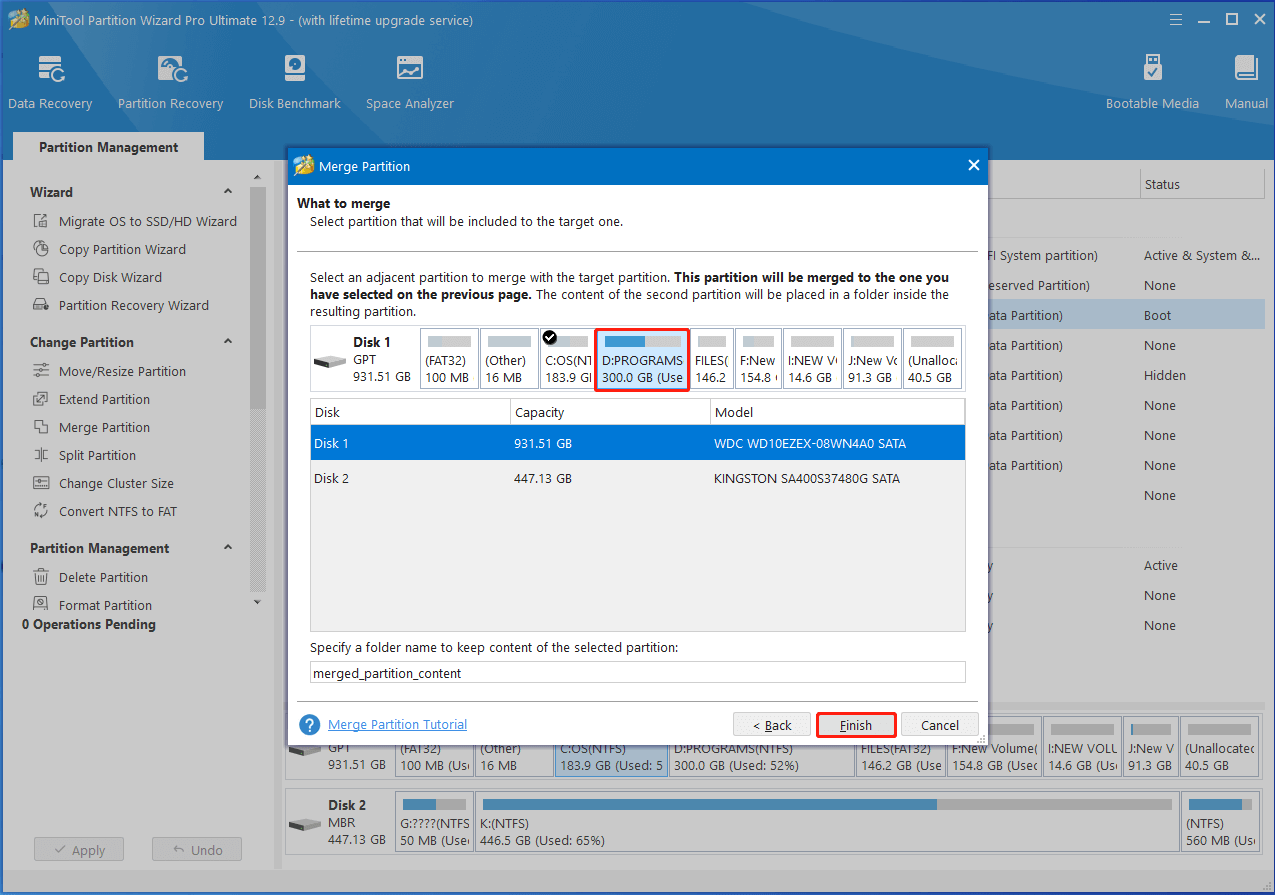
Step 1: Right-click on the target partition on Disk 1 and choose Merge.
2. Folders in two partitions will be displayed in two separate folders after merging partitions.
3. To merge C drive and other non-adjacent partitions for a successful boot, I advise you use the extend partition feature of MiniTool Partition Wizard Bootable Edition to perform the task.
Step 2: In the next window, click Next to continue.
Step 3: Choose what to merge and name the folder that contains the content of the selected partition. Then click Finish > Apply to execute the operation.
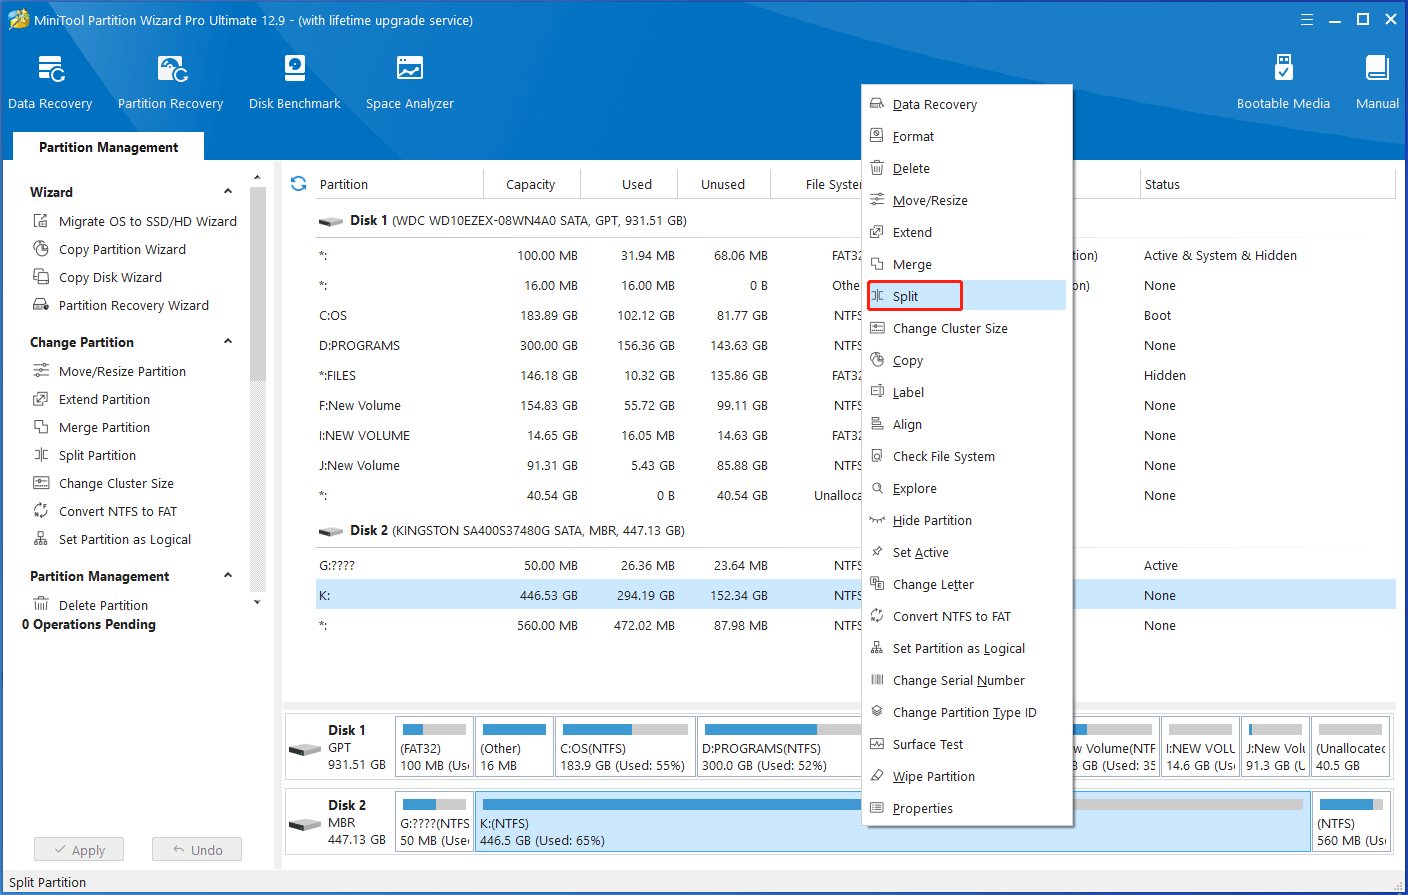
Step 4: Right-click on the K partition and select Split.
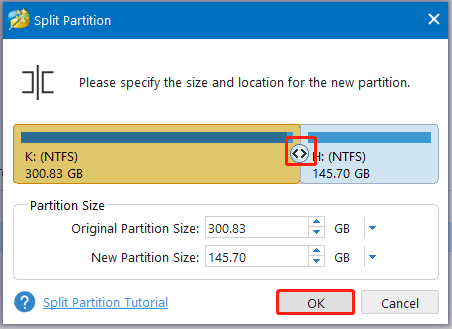
Step 5: Drag the arrow icon to decide where to split. Then click OK to save changes.
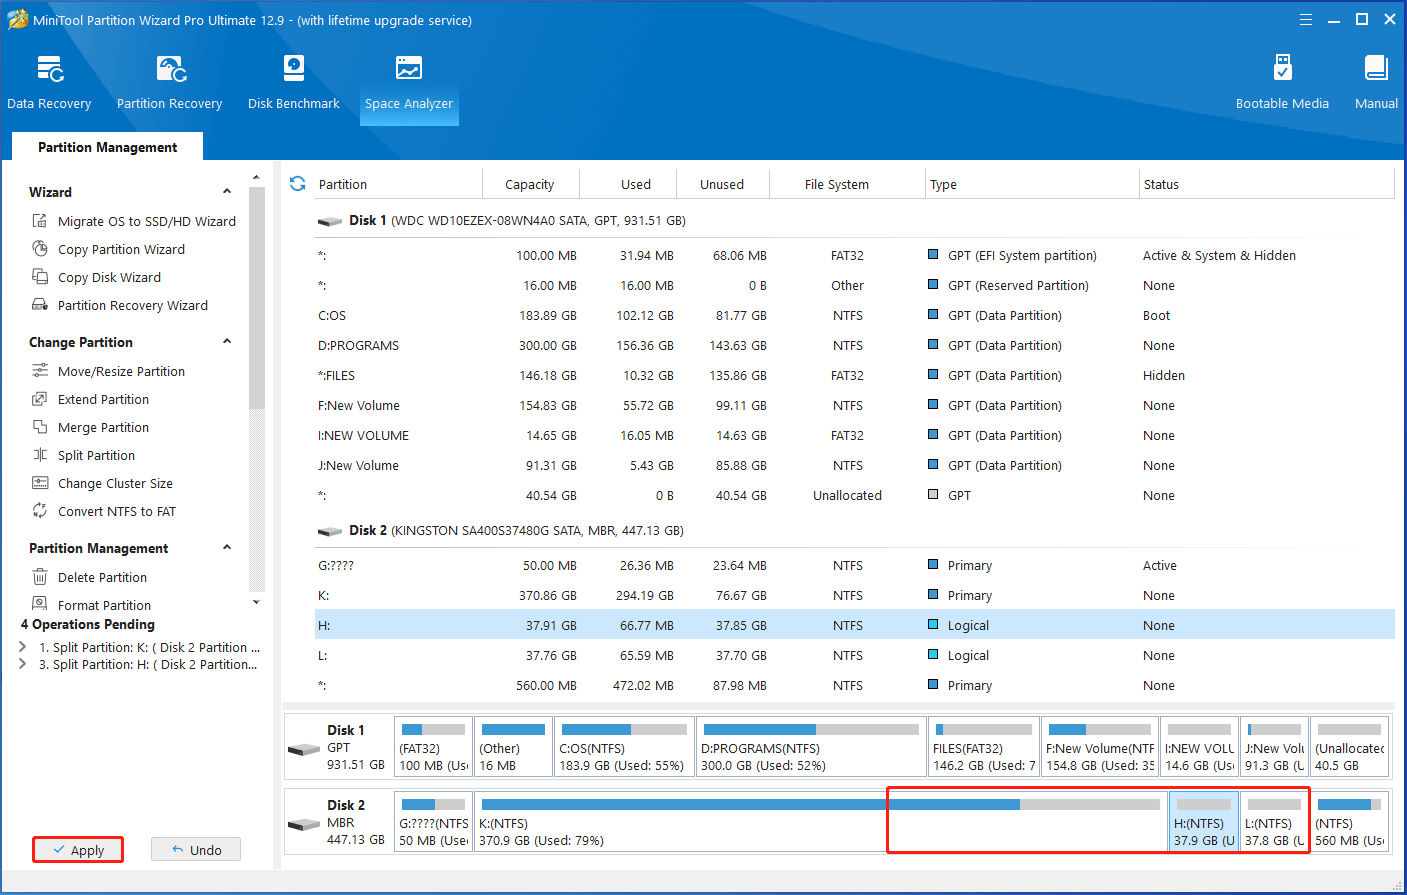
Step 6: Repeat Step 4 and Step 5 to split enough partitions. View the partition splitting effect in the main interface and click Apply to execute the operation.
Hard Drive Allocation Errors
While you allocate unallocated space or allocate hard drive Windows 10/11, you may encounter various errors causing hard drive allocation failure. Here are some frequently encountered issues or prompts during the allocation process.
- Can’t use unallocated space (eg: cannot create partition on unallocated space)
- Initialize the disk before Logical Disk Manager can access it
- Disk unknown not initialized
- My hard drive won’t let me allocate
- Hard drive space can’t be allocated for Windows install
How to troubleshoot these problems? Try reinitializing, reallocating, or reformatting your hard drive. You can also consult technical support of your hard drive manufacturer.
Wrap Things Up
To sum up, this post explains the reasons, maximum partition number, allocation procedure, and common issues with hard drive allocation. Simply put, it offers a guide on how to allocate a hard drive. If you are going to allocate/reallocate a hard drive, this post deserves your attention.
If you encounter any difficulty while using MiniTool Partition Wizard, contact us by sending an email via [email protected]. We will get back to you as soon as possible.

User Comments :