A lot of gamers are troubled by the Hogwarts Legacy DirectX Runtime error on Windows 10/11 PCs. What causes the error? How to fix Hogwarts Legacy DirectX Runtime error? Now, let’s explore the answers together with MiniTool.
Hogwarts Legacy is a newly-released action role-playing game developed by Avalanche Software and published by Warner Bros. Games on 10 February 2023. Since its release, this game attracts a large number of players.
Meanwhiles, however, the game also runs into some problems on Windows PC such as Hogwarts Legacy stuck on loading screen, Hogwarts Legacy crashing, Hogwarts Legacy unable to connect to WB games PC, Hogwarts Legacy DirectX Runtime error, etc.
These problems are heatedly discussed in many forums and communities. You may find some troubleshooting methods in the communities but detailed steps and clear screenshots are missing. Don’t worry. Here we will walk you through how to fix Hogwarts Legacy DirectX Runtime error in detail.
Hi guys! I got the Hogwarts Legacy DirectX Runtime error. have never played the game before, but it always gives this error. I have tried everything I could find and still nothing. Is there something missing? besides throwing away my laptop and buying a desktop (just joking xD).
from https://steamcommunity.com/
What Causes the Hogwarts Legacy DirectX Runtime Error
What causes the DirectX Runtime error in Hogwarts Legacy? There are still no official declaims about the causes of the error. But after investigating extensive user reports, we find the error is often related to an incompatible DirectX version. In addition, some factors like corrupted game files, outdated graphics card drivers, and a known bug may trigger the Hogwarts Legacy DirectX Runtime error as well.
How to Fix Hogwarts Legacy DirectX Runtime Error on Windows 10/11
How to fix Hogwarts Legacy Runtime error on Windows 10/11 PCs? You can try the following 6 ways in order until the error gets fixed.
# 1. Check the System Requirements of the Game
First of all, you need to make sure that your PC meets the minimum system requirements of Hogwarts Legacy below. If you are unclear about your PC specs, you can read this guide and see if your computer meets the requirements.
- OS: Windows 10 64-bit
- Processor: Intel Core i5-6600 (3.3 GHz) or AMD Ryzen 5 1400 (3.2 GHz)
- Memory: 16 GB
- Storage: 85 GB available space
- DirectX: Version 12
- Graphics: NVIDIA GeForce GTX 960 4GB or AMD Radeon RX 470 4GB
- Additional Notes: SDD (Preferred), HDD (Supported), 720p/30 fps, Low-Quality Settings
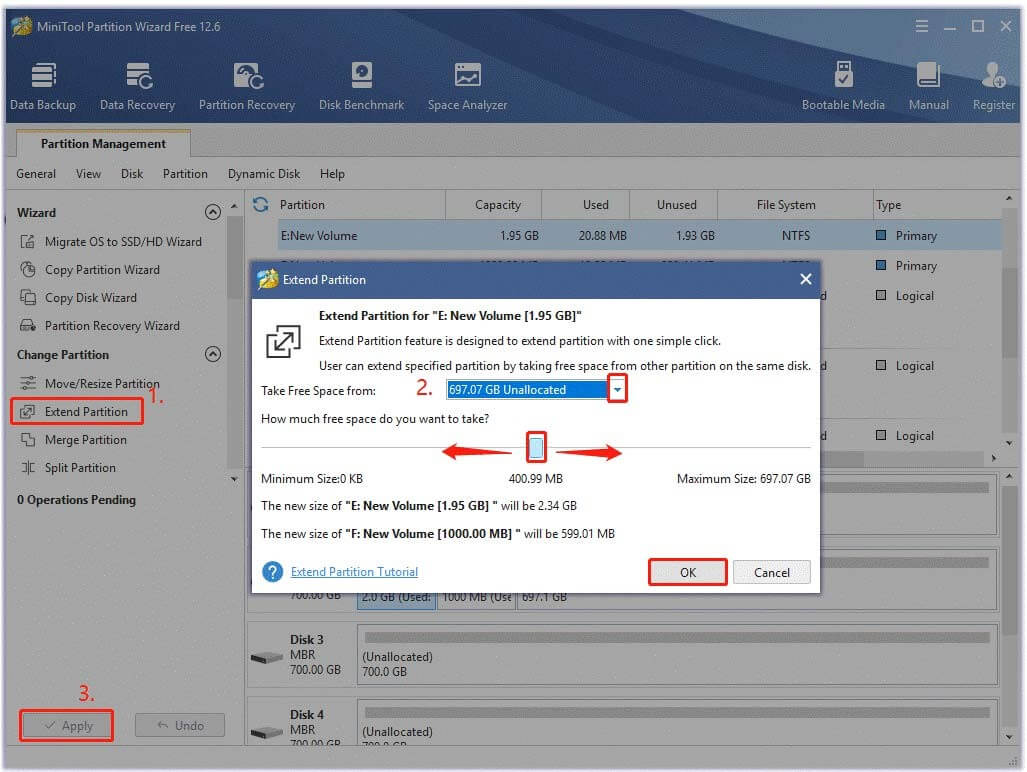
According to the above information, you can find this game requires a large amount of disk space (at least 85 GB), which be challenging for many players. How to free up so large disk space at one time? If your C drive is full but another drive has enough space, extending the partition is an effective way.
Here MiniTool Partition Wizard can help you extend the game partition easily. It is a professional and trustworthy partition manager that can extend/resize/format partitions, convert NEFT to FAT without data loss, migrate OS, etc.
MiniTool Partition Wizard FreeClick to Download100%Clean & Safe

In addition, you can refer to the following guide to upgrade your hardware and software if your computer doesn’t meet the requirements.
How to Install a Graphics Card on Your Computer? See a Guide!
How to Add RAM to a Laptop? See the Simple Guide Now!
How to Upgrade Motherboard and CPU without Reinstalling Windows
How to Upgrade to a Larger Hard Drive Without Data Loss
How to Upgrade 32 Bit to 64 Bit in Win10/8/7 without Data Loss
# 2. Reinstall DirectX
As the error message suggests, the DirectX Runtime error in Hogwarts Legacy is related to an incompatible DirectX version. If you are using DirectX 11 or 9, you may encounter the error. In this case, we recommend you install the latest version of DirectX 12 on Windows 10/11 PCs.
# 3. Move the Game to C Drive
Some users from the Reddit forum reported the Hogwarts Legacy Runtime error disappears after moving the game to C drive via Steam. It may seem strange but worth trying. If you installed the game outside the C drive, try this method.
If there is not enough space on the C drive to save the game, you can extend it first as we explained above, and then move the game to it. To know more details, you can refer to this guide “3 Methods to Help You Move Steam Games to Another Drive”.
# 4. Repair the Game Files
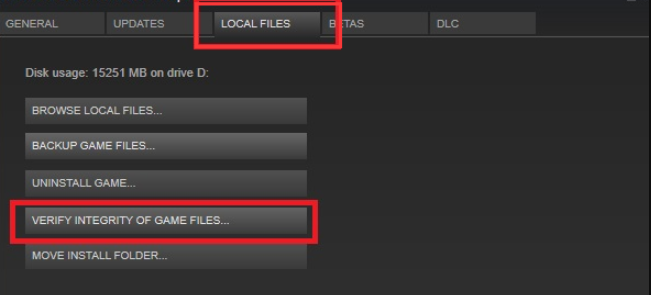
Sometimes the game files may get corrupted or missing, triggering various errors like the Hogwarts Legacy DirectX error. To rule out this situation, you’d better verify the integrity of the game using Steam.
Step 1. Launch your Steam client and sign in to your account and navigate to the Library tab.
Step 2. Right-click Hogwarts Legacy from the left panel and select Properties.
Step 3. Inside the Properties window, navigate to the Local Files section and click on the Verify Integrity of Game Files option.

# 5. Check Your Graphics Card Driver
Graphics card drivers play an important role in a modern game. Once the GPU drivers get outdated or corrupted, you will encounter some errors while playing the game. To fix the DirectX error Hogwarts Legacy, you should check the GPU drivers.
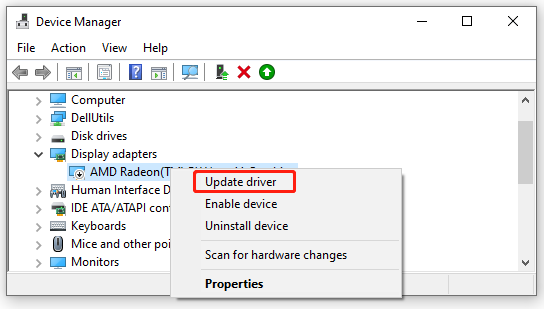
Step 1. Press the Win + R keys to open the Run dialog box, and then type devmgmt.msc and hit Enter to open Device Manager.
Step 2. Expand the Display adapters section, right-click the graphics card driver, and select the Update driver option.

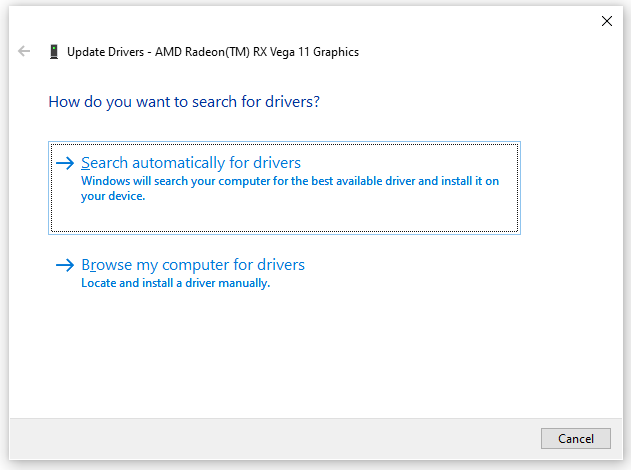
Step 3. In the pop-up window, you can update the display driver automatically or manually based on your demands. After selecting the way, follow the on-screen prompts to complete the update.

Once done, restart the game and check if the DirectX error gets fixed. If not, you can right-click the GPU driver, select Uninstall device like in Step 2, and follow the on-screen prompt to reinstall the driver.
# 6. Perform a System Store
A user from the Steam community reported the DirectX error Hogwarts Legacy can be solved by performing a system restore. If the error occurs after you installed some updates or programs, this solution is worth trying.
Don worry. System Store won’t delete your personal data, instead reverting your system to an earlier state. Here you can refer to this post “How to Perform a System Restore from Command Prompt Windows 10/7”.


![Sons Of The Forest Low FPS & Stuttering & Lag on PC? [Fixed]](https://images.minitool.com/partitionwizard.com/images/uploads/2023/02/sons-of-the-forest-low-fps-thumbnail.jpg)
User Comments :