In this post, Partition Magic introduces how to effectively change free space into unallocated space in Windows 10/11 in detail. If you are considering doing so for your partitions, you can pay attention to this post.
Unallocated Space vs Free Space
Both free space and unallocated space account for a portion of your computer’s storage space. In some cases, they are the same, and in others, they are not. Read on to learn all about unallocated space vs free space.
Free Space
Free space can refer to the part of the extended partition where no logical partition is created in Disk Management, or it can refer to the available but unused space in an existing partition.
- Free space is the part of the extended partition where no logical partition is created.
- Free space is the unused space in the primary partition.
The following image shows the free space under an extended partition in Disk Management:
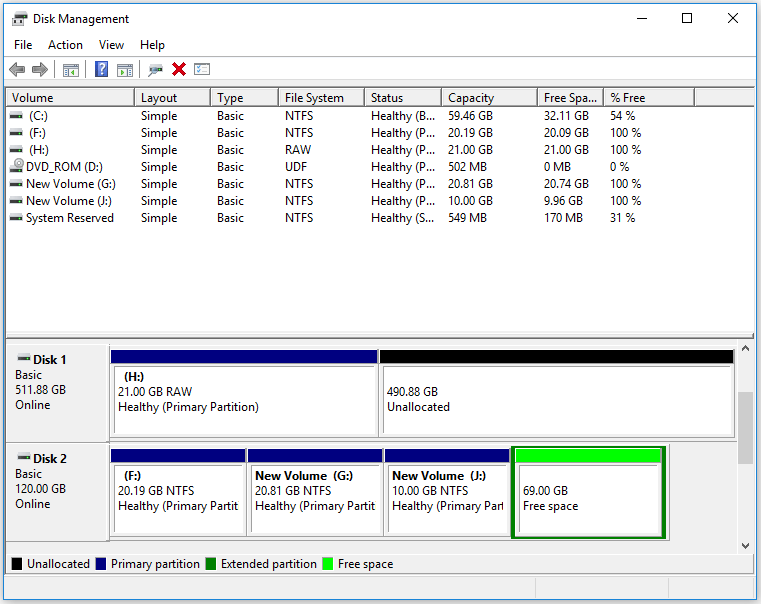
There is an extended container on the right, and the free space is within the green border. In the old MBR format, there can be only four primary partitions in total, or three primary partitions and one extended partition, the latter of which can hold any number of sub-partitions called logical partitions. The unused space inside the container is called free space.
Unallocated Space
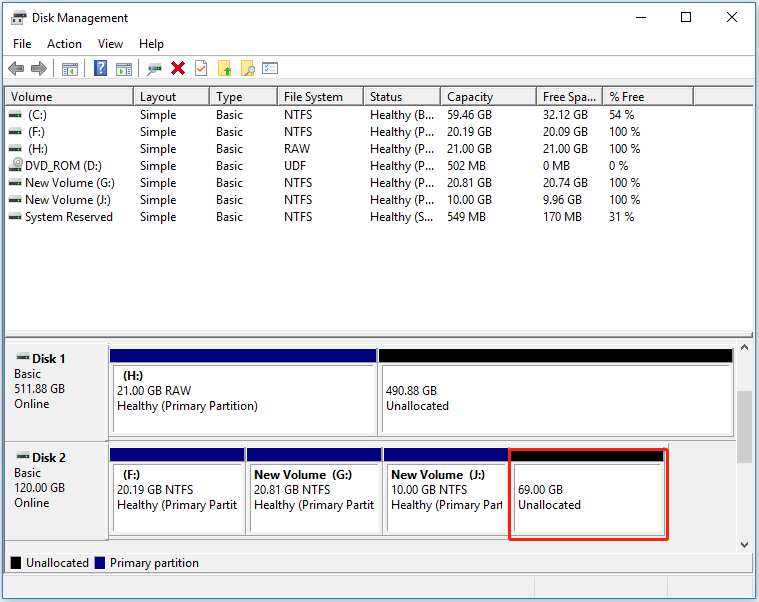
The unused space inside the primary partition is called unallocated space. Unallocated space refers to disk space on a hard disk or external storage device that has not been assigned to any partition or volume. Therefore, it is unavailable, which means you cannot use it for data storage and no program can write data to this part of disk storage.
You may get an unallocated space in the following cases:
- You will see the entire disk as unallocated in Disk Management after initializing the disk.
- When you create a partition on a storage device, the remaining space will be marked as unallocated.
- If you delete or shrink a partition, Windows will mark the unused space part as unallocated.
- A hard disk, USB, or SD card may suddenly become unallocated due to misuse or virus attacks.
Usually, for computer users who need to resize hard disks or create new partitions, converting free space to unallocated space is a common task. But when users resize partitions, they get free space instead of unallocated space. Here is a true example from the answers.microsoft forum:
How to change free space into unallocated space? Normally shrinking a drive gives us an unallocated space. But when I shrunk a volume, I got free space instead of unallocated space.https://answers.microsoft.com/en-us/windows/forum/all/how-to-change-free-space-into-unallocated-space/
How to convert free space into unallocated space? Just keep reading to learn the step-by-step guide.
How to Change Free Space into Unallocated Space?
You can convert free space to unallocated space to utilize the free space. To utilize it, you can either create a new primary partition or add it to an existing partition.
You can try to create a new partition or move the free space to change free space into unallocated space. Although you can use the Windows built-in tool Disk Management to manage or create a new partition, this tool has many limitations.
- For basic disks, Microsoft stipulates that Disk Management is only applicable to RAW or NTFS partitions. In addition, for the Extend Volume feature, there needs to be continuous unallocated space behind the partition you want to extend. Otherwise, you will see the Extend Volume option is grayed out.
- When handling a primary partition with an extended partition, you may encounter the “The operation you selected will convert the selected basic disk(s) to dynamic disk(s).” error message.
But for MiniTool Partition Wizard, this is not a problem. It breaks the Disk Management requirement for continuous unallocated space and can help you manage partitions with NTFS and FAT32 file systems. It can also handle operations on primary and extended partitions.
What’s more, MiniTool Partition Wizard is an all-in-one partition manager that offers lots of useful features for partition/disk management such as create/format/extend/move/resize/merge/split/delete/wipe partitions, partition a hard drive, convert MBR to GPT, recover data from a hard drive, clone a hard drive, and more.
First, you need to download and install MiniTool Partition Wizard on your PC. Then launch it to its main interface.
MiniTool Partition Wizard FreeClick to Download100%Clean & Safe
Way 1. Create a New Partition
To change free space to unallocated space, you can try to create a new partition on free space using MiniTool Partition Wizard and then delete it in Disk Management. You can follow the steps to do that.
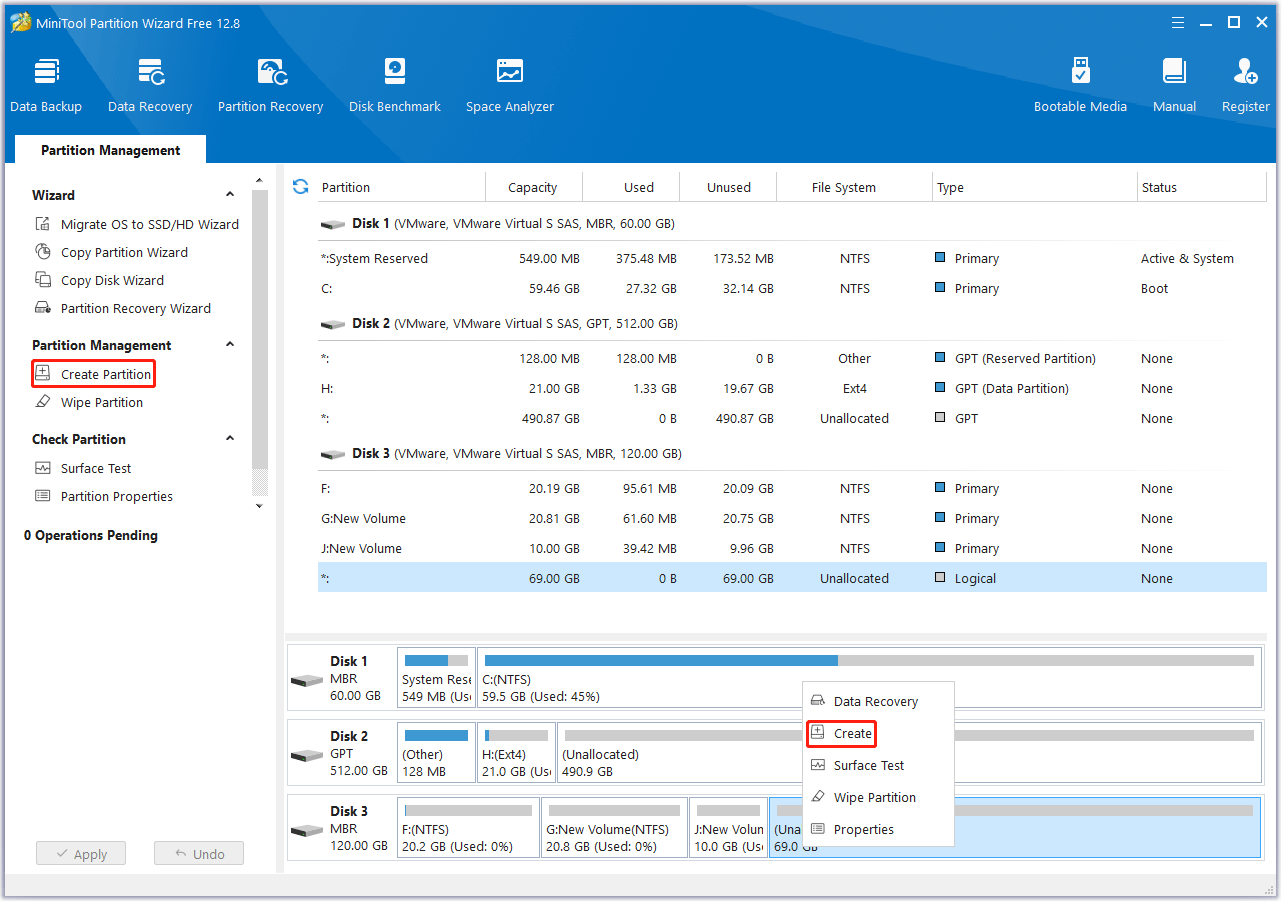
Step 1: In the main interface of MiniTool Partition Wizard, select the free space and click on Create Partition from the left action panel. Alternatively, you can right-click on the target partition and select Create from the right-click menu.
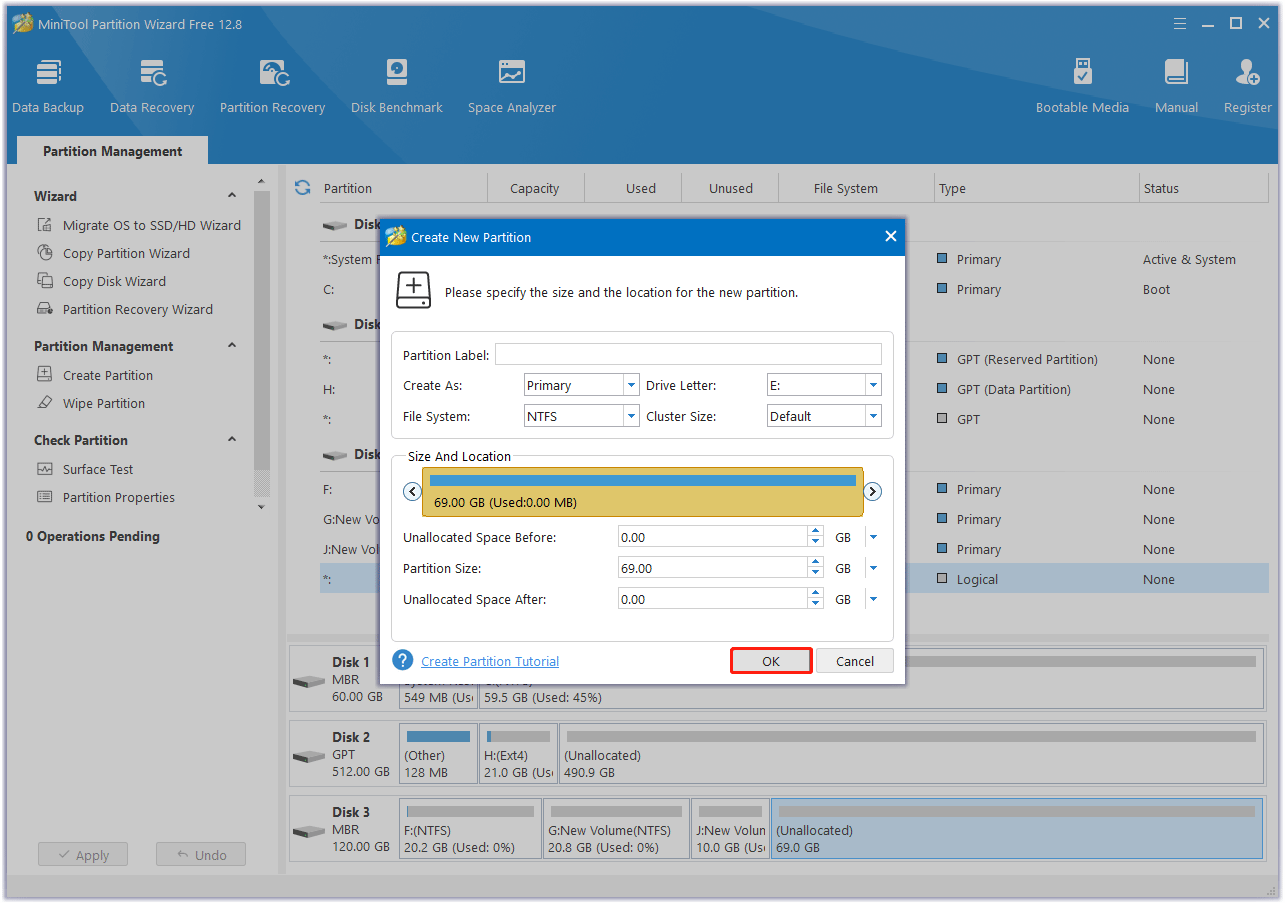
Step 2: In this interface, you are expected to confirm parameters including Partition Label, Partition Type, Drive Letter, File System, Cluster Size, Partition Volume, Partition Location, and Partition Alignment Method. After that, click on OK to go back to the main interface of the software.
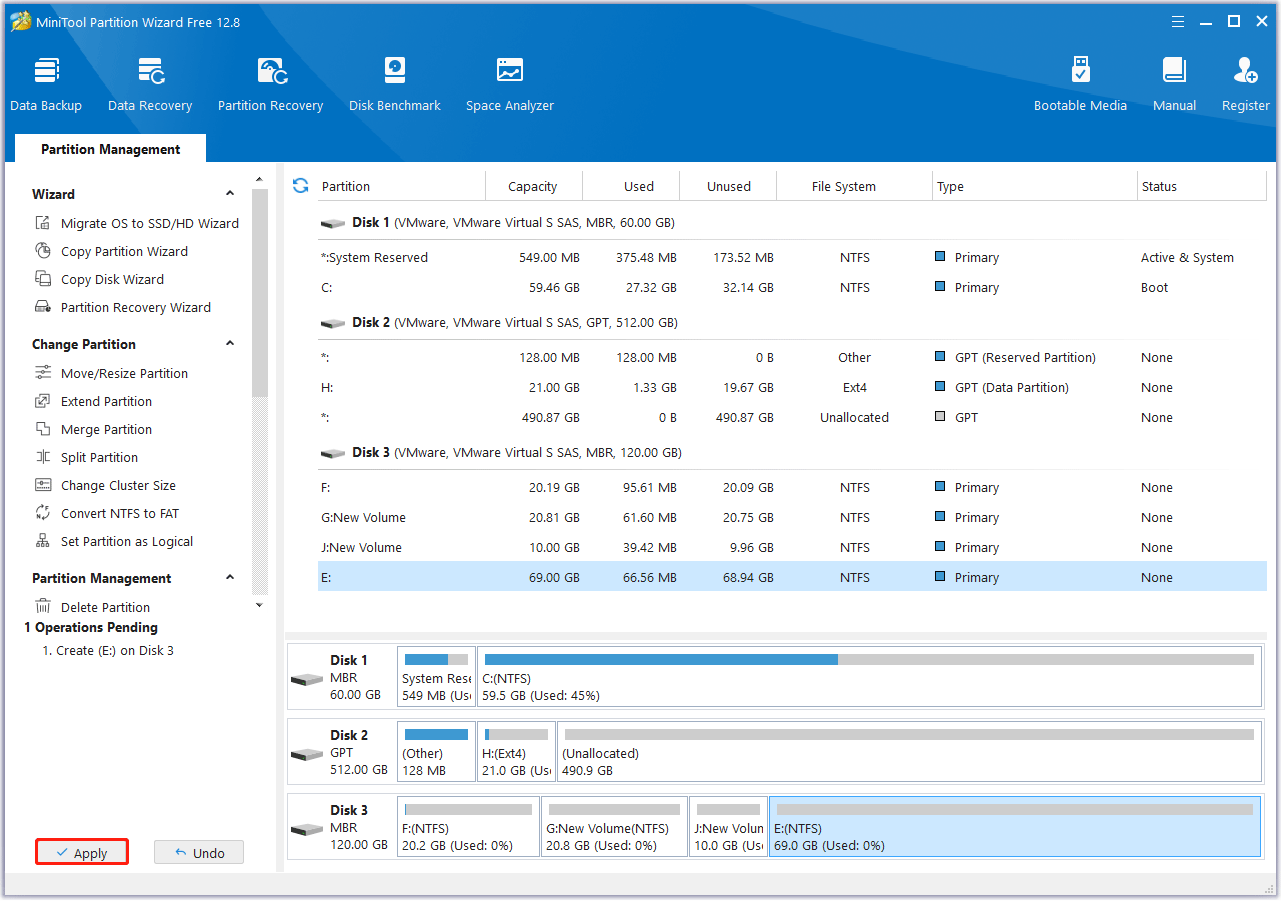
Step 3: Now you can preview a new partition that will be created. Click on Apply to confirm the creation.
Step 4: Open Disk Management, right-click on the new primary partition, and select Delete Volume. Then click on Yes to confirm the changes.
Way 2. Move/Resize the Free Space
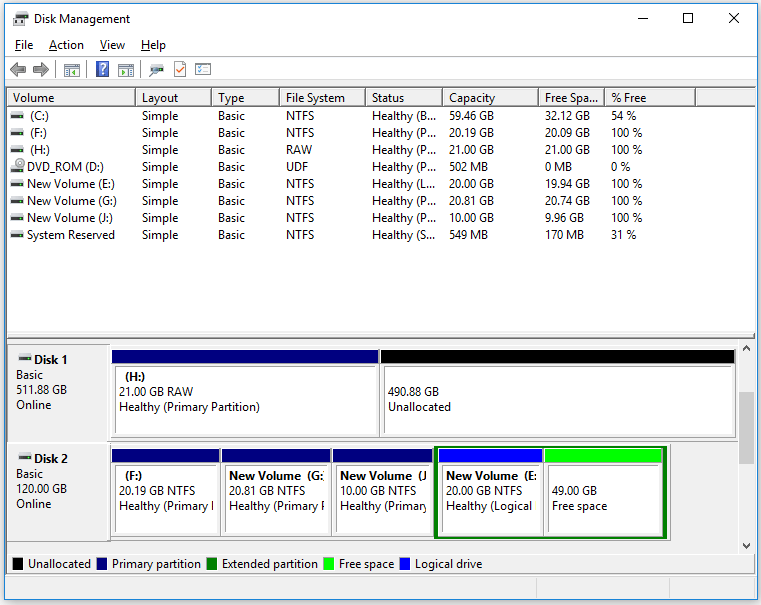
As you can see from the above image, free space is after the logical drive in the extended partition. In this case, you can use the Move/Resize Partition feature of MiniTool Partition Wizard to change free space into unallocated space. This feature is capable of changing partition size and location in Windows with ease. Here is the guide:
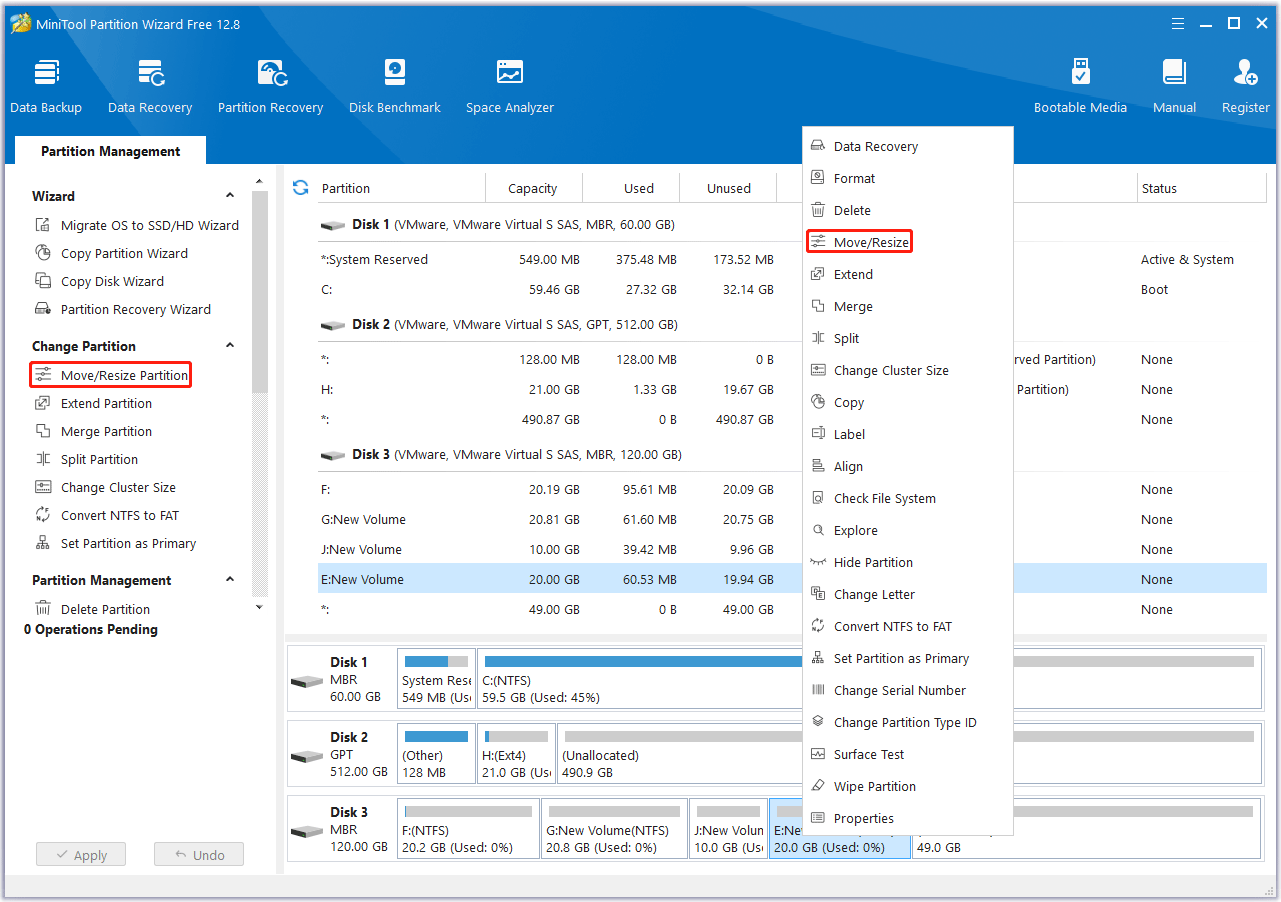
Step 1: In the main interface of MiniTool Partition Wizard, select the logical partition next to free space and click on Move/Resize Partition from the left action pane or select Move/Resize from the right-click menu.
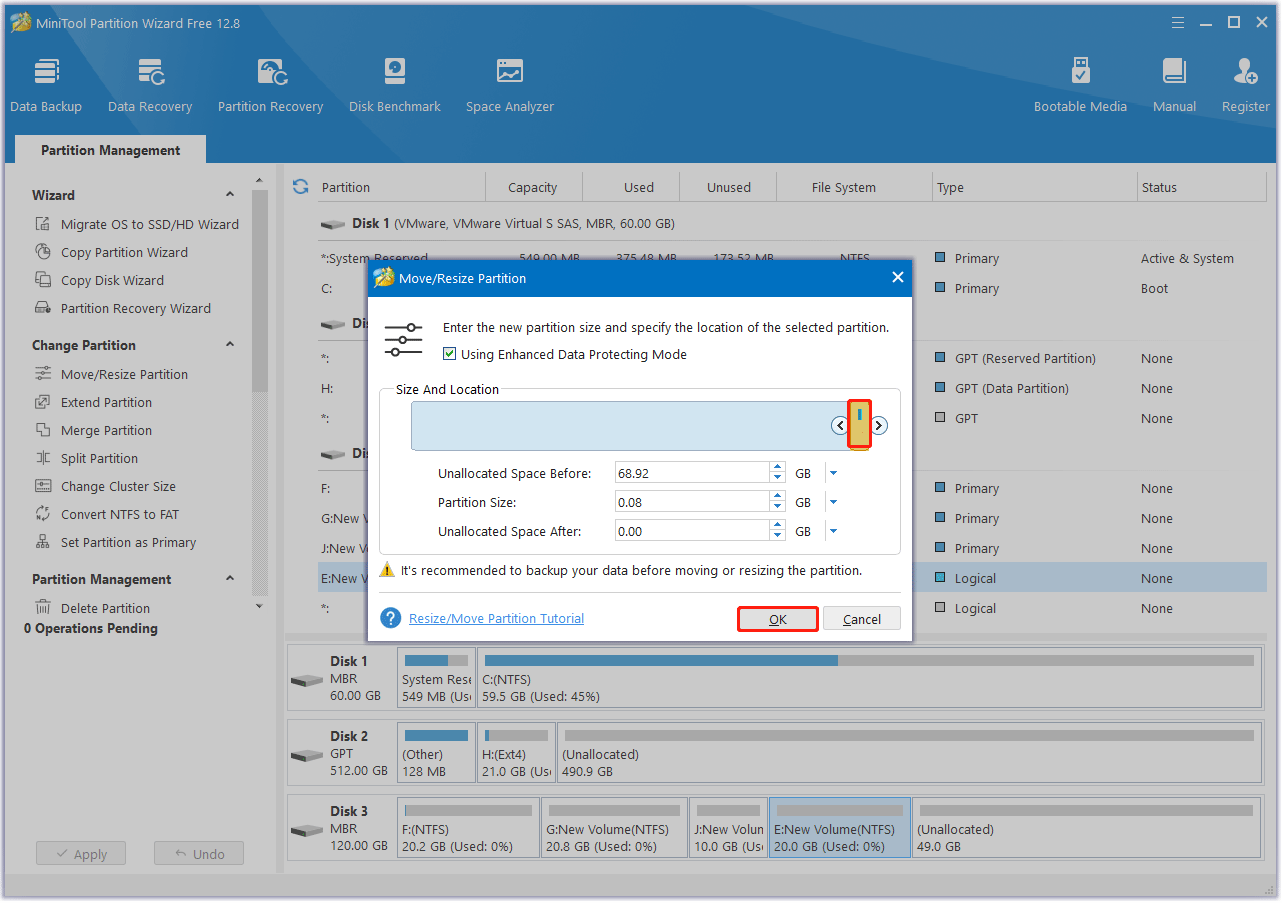
Step 2: In the pop-up window, the blue handle represents partition while the blank area means unallocated space. Here you should shorten the handle by dragging the triangles.
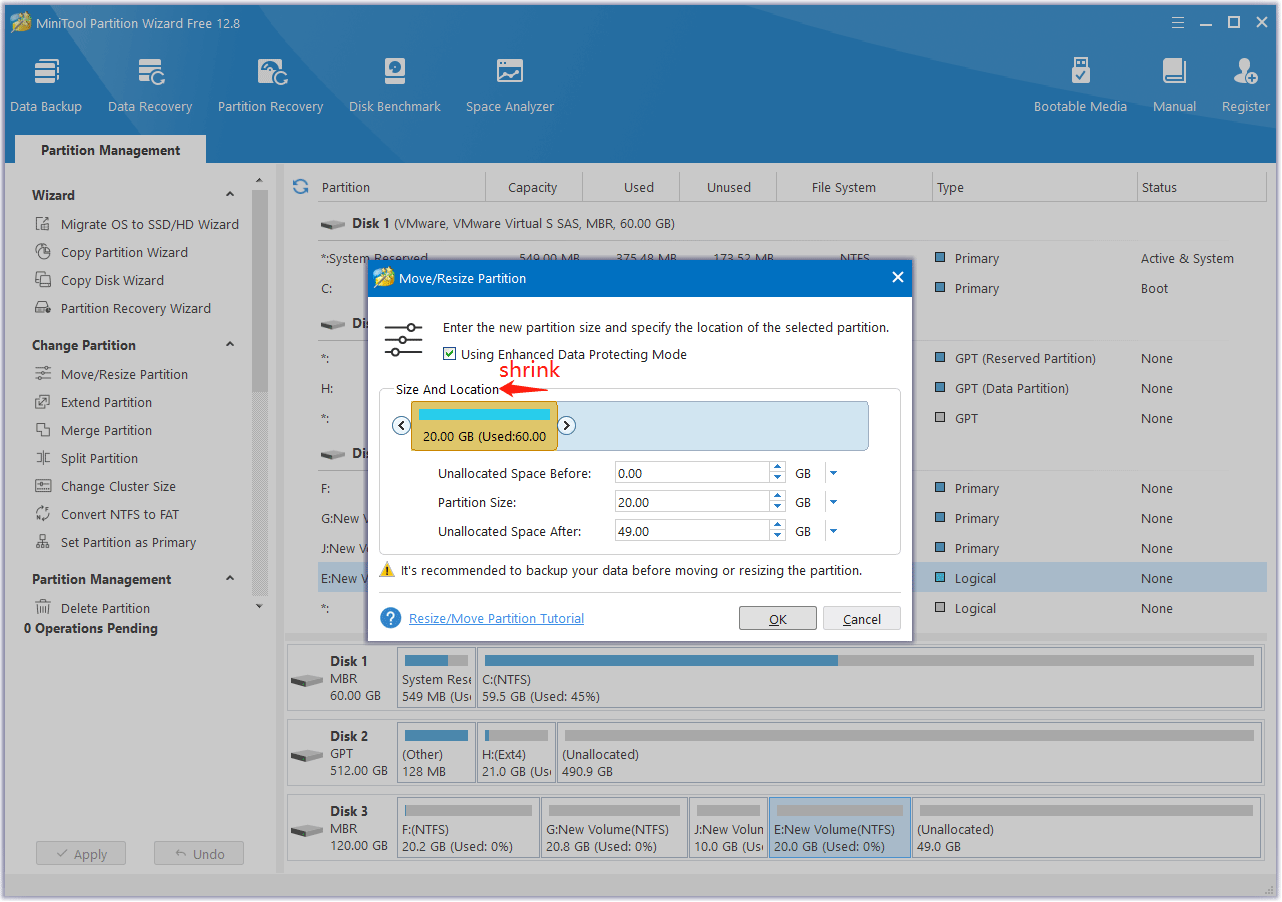
To move a partition, drag the whole partition handle towards unallocated space. Then click on OK to go back to the main interface.
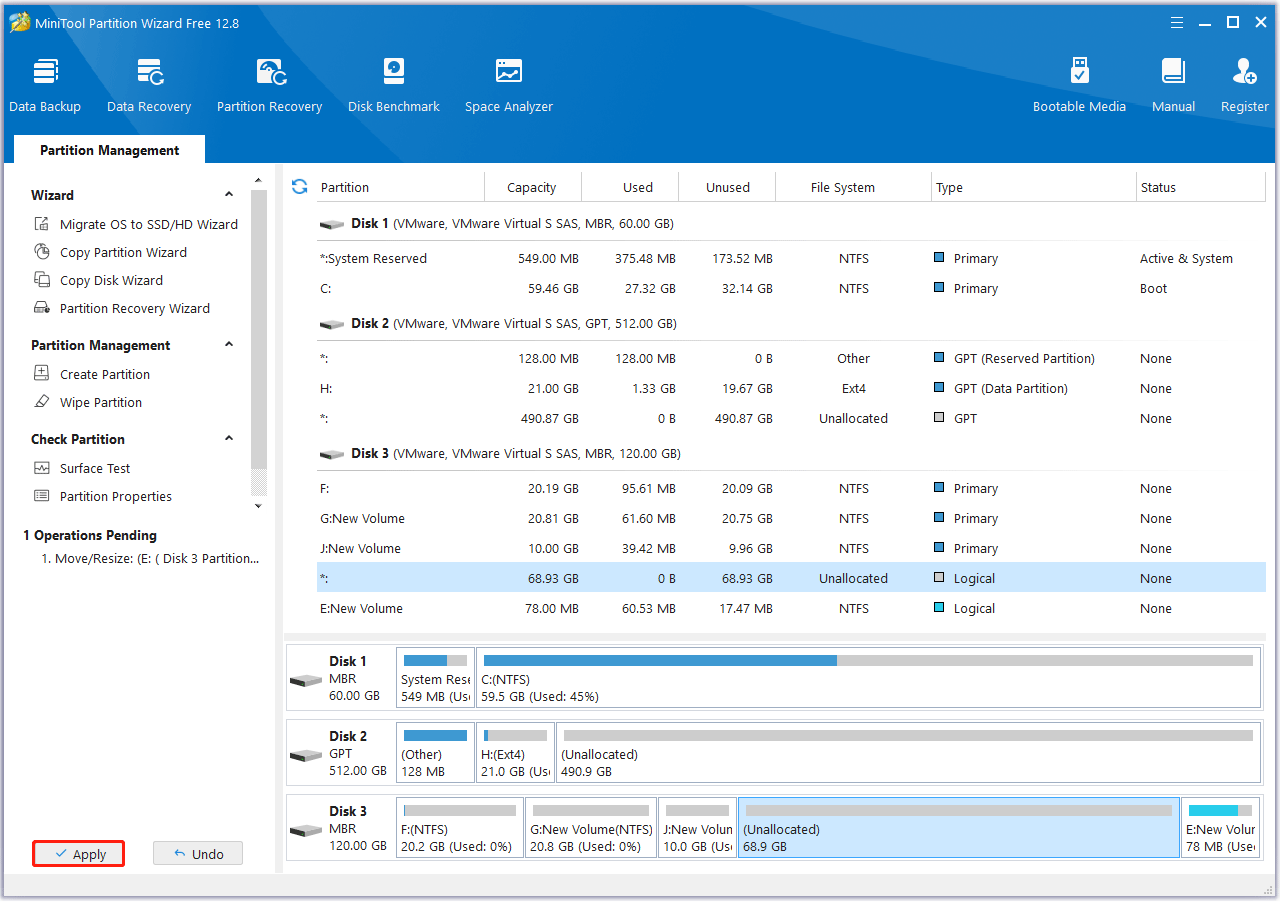
Step 3: From the main interface, you can preview that the selected partition has changed its position. At this time, please click on Apply to apply the change.
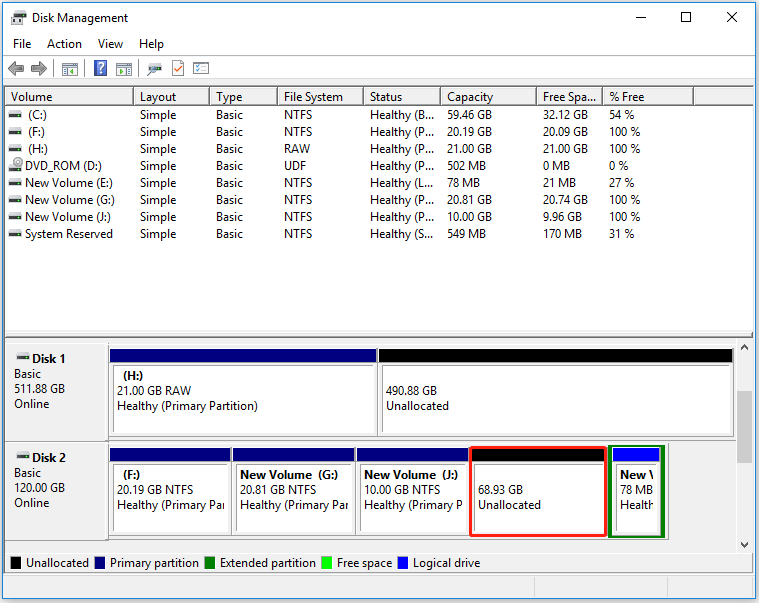
Now, you can see the free space in Disk Management has become an unallocated space. The picture is shown below:
Way 3. Extend an Existing Partition
Usually, the reason you want to convert free space to unallocated space is to extend another partition. Then you can try to extend an existing partition with this free space. The Extend Partition feature of MiniTool Partition Wizard can help you do that with a few clicks. The steps are as follows:
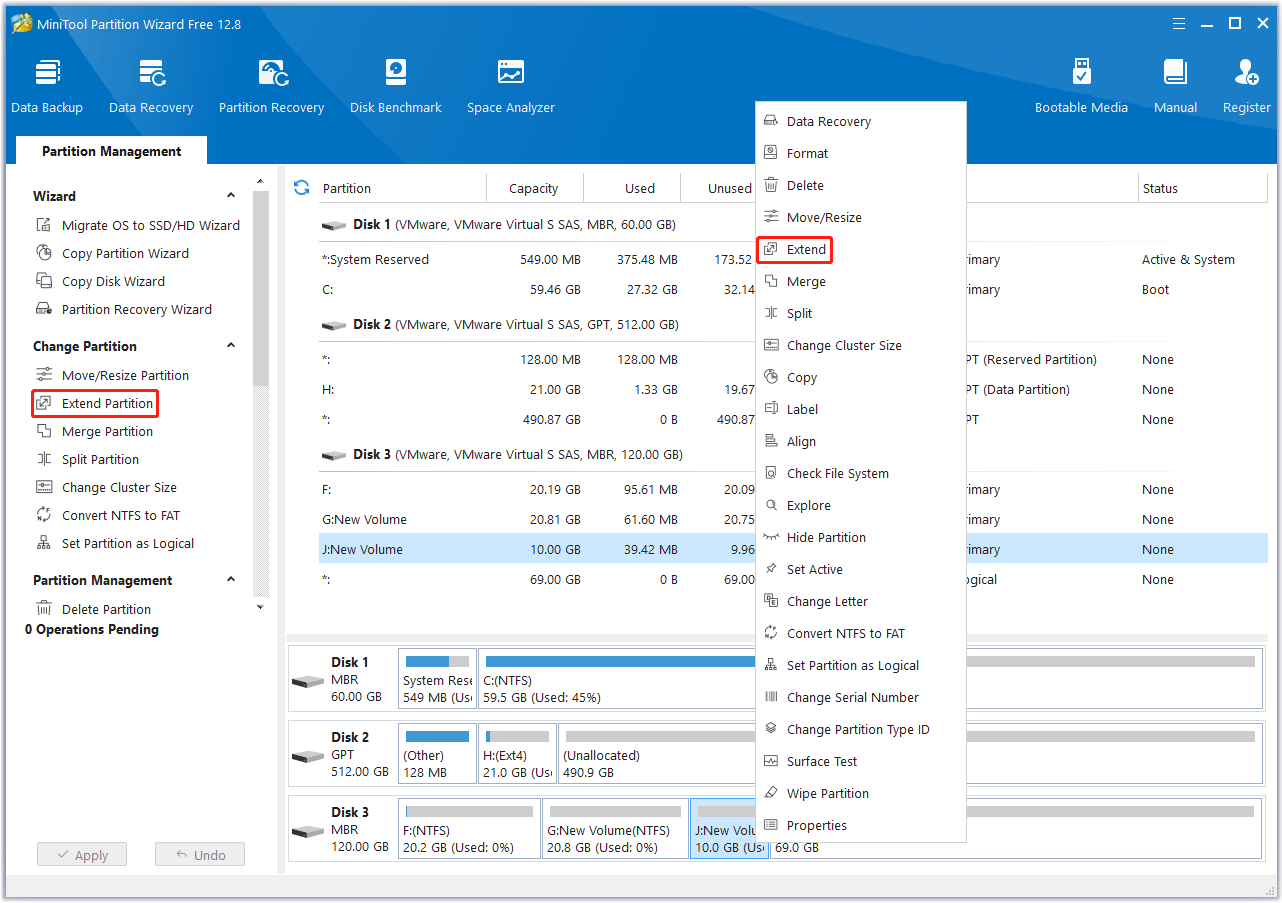
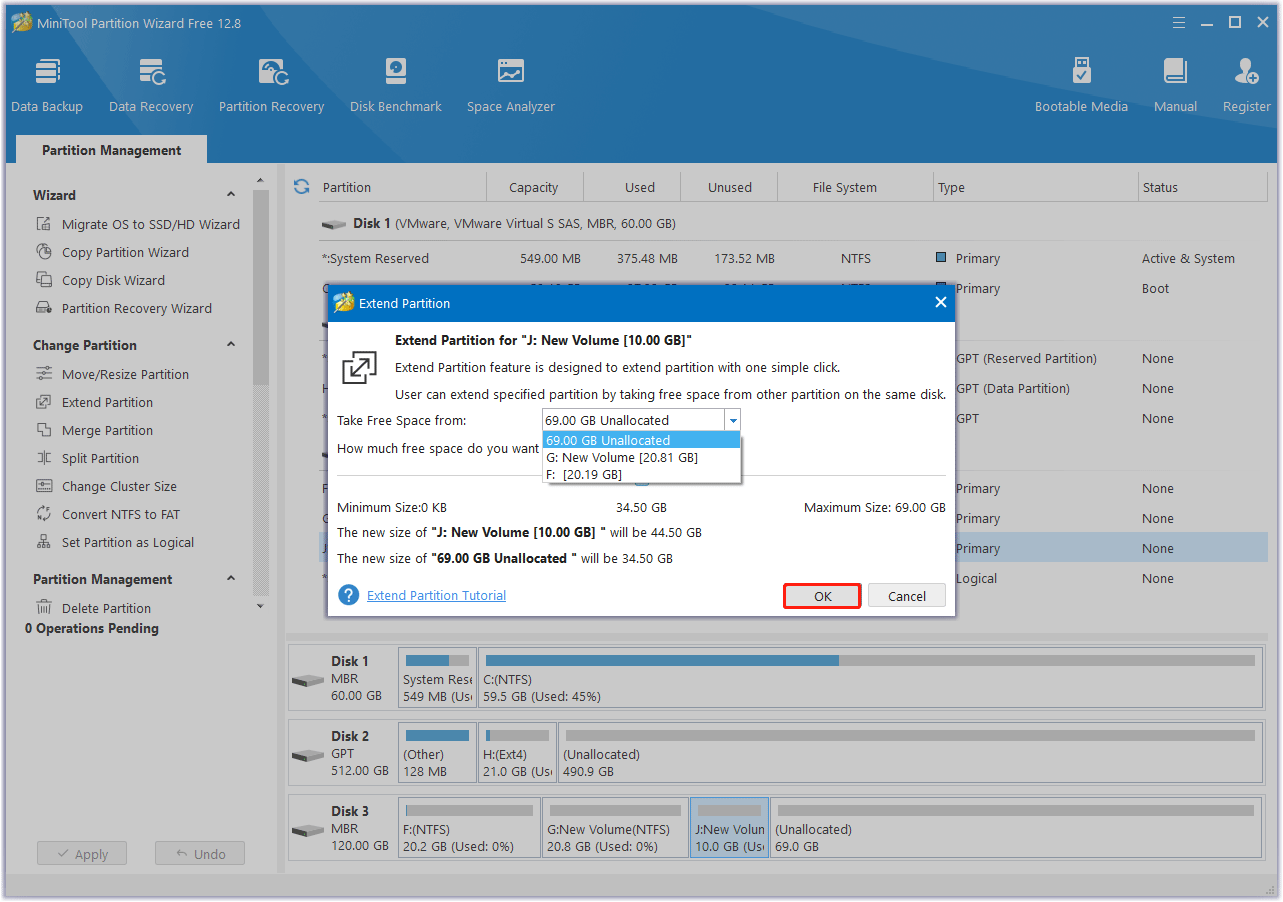
Step 1: In the main interface of MiniTool Partition Wizard, select the target partition and click on Extend Partition from the left action pane or click on Extend from the right-click menu.
Step 2: Open the drop-down list of Take Free Space from and choose the free space to take. Then you can drag the sliding handle leftwards or rightwards to decide how much space to take, with partition size changing intuitively. After that, click on OK to continue.
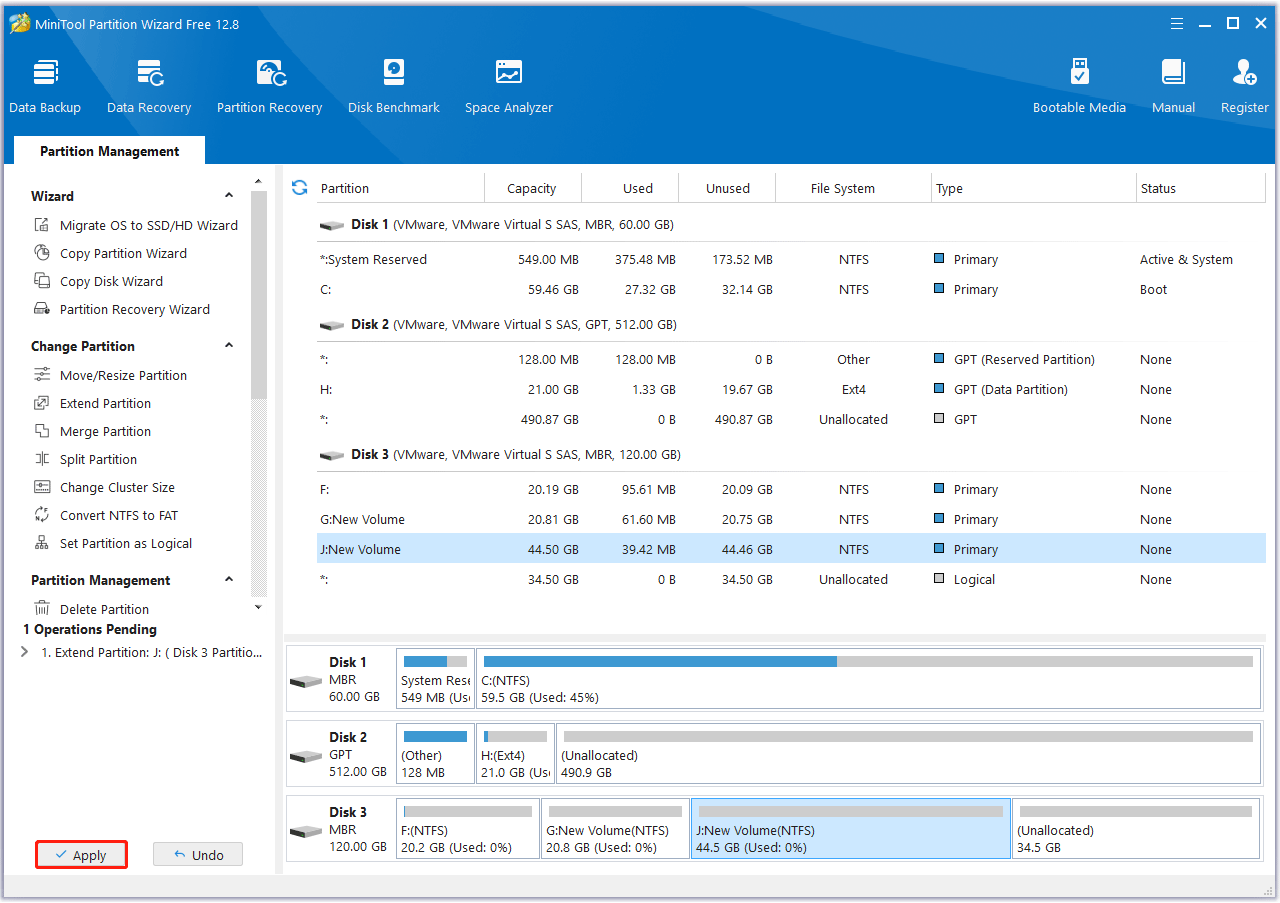
Step 3: Now you can see the target partition is extended, but this effect has not been applied. So, click on Apply to apply the changes.
How to Make Use of Unallocated Space After Conversion?
How to make use of unallocated space after converting free space to unallocated space? You can use unallocated space to create a new partition, which is a very easy step. You can do this directly using Disk Management or MiniTool Partition Wizard to create partitions.
Option 1: Create Partitions via Disk Management
- Open Disk Management. Right-click the unallocated disk and select New Simple Volume in the context menu.
- Click on Next in the pop-up window. Then specify the volume size and click Next. If you don’t want to use all the available unallocated disk space to create a partition, enter the exact partition capacity in the window.
- Assign a drive letter or path from the drop-down menu in the corresponding section and click on Next to continue.
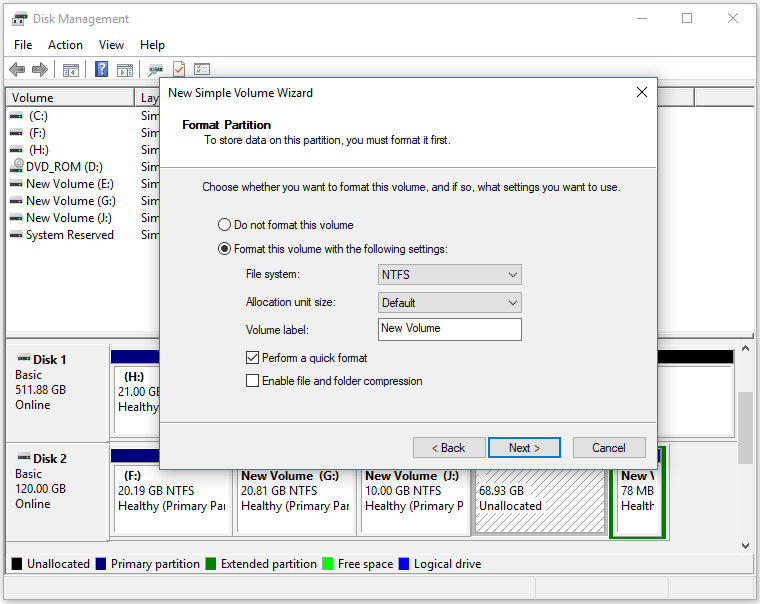
- Configure settings such as the file system, allocation unit size, and volume label for the new partition and check the Perform a quick format checkbox. Then click on Next.
- Click on Finish in the elevated window to complete the operation.
Option 2: Create Partitions via MiniTool Partition Wizard
As can be seen from the above steps, creating a partition via Disk Management is a bit time-consuming. Besides, this software provides more file systems like Ext2/3/4 that Disk Management cannot support.
To create partitions using MiniTool Partition Wizard, click the button below to download and install it, and then follow the given steps.
MiniTool Partition Wizard FreeClick to Download100%Clean & Safe
- Launch MiniTool Partition Wizard to enter its main interface.
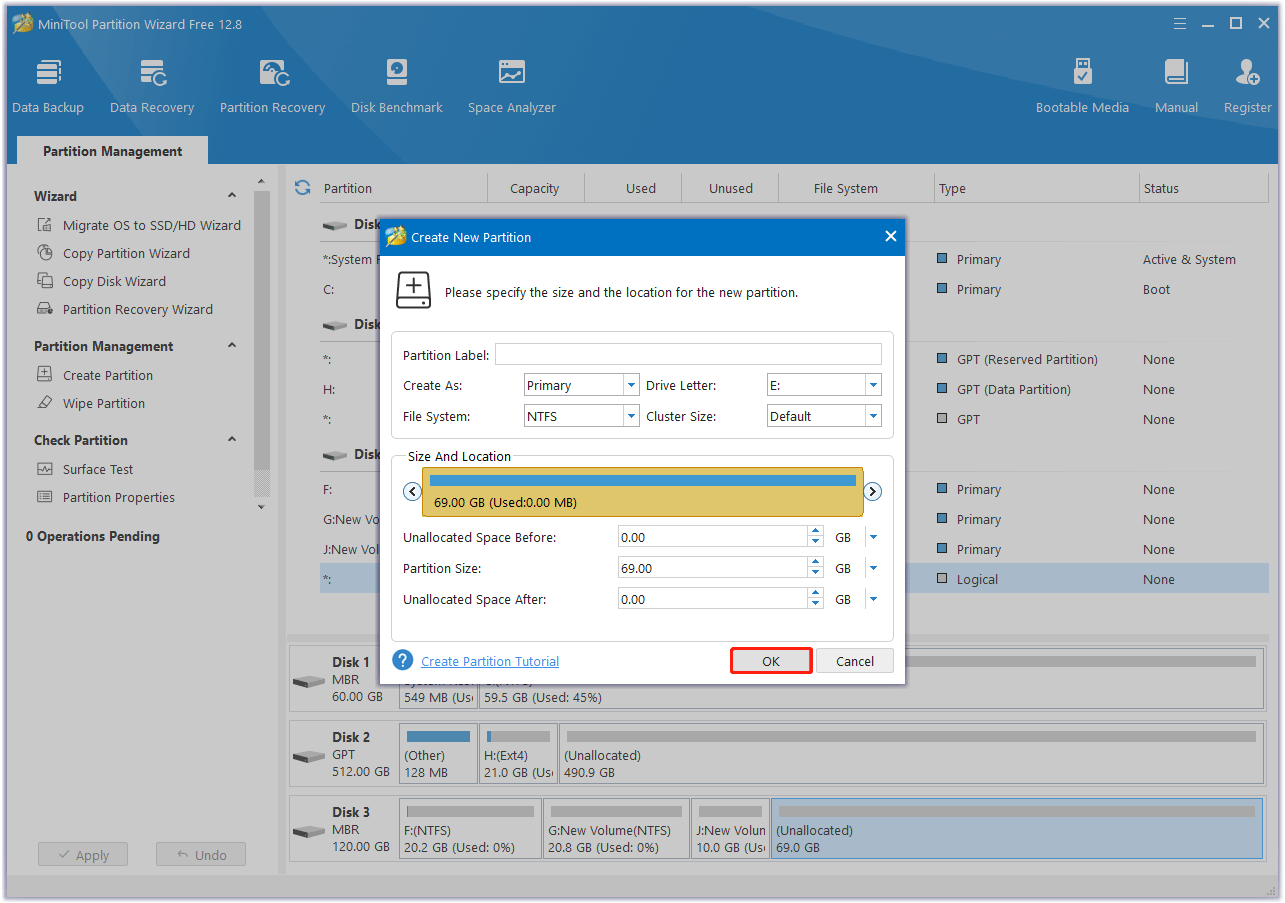
- Highlight the unallocated disk space, and then configure the partition settings in the next window, including partition label, partition type, file system, drive letter, cluster size, size, and location.
- Click on OK and Apply to save and execute the operation.
Bottom Line
This post offers the corresponding guide on how to convert free space into unallocated space in Windows 10/11. From the above, we learn that the operation can be completed by using a professional partition manager – MiniTool Partition Wizard. Besides, it offers a guide to make use of the unallocated space.
If you encounter certain issues while using MiniTool Partition Wizard, you can send us an email via [email protected]. We’ll get back to you as soon as possible.

User Comments :