Do you want to try CentOS on your PC? This post from MiniTool Partition Wizard tells you how to choose a proper CentOS download version and offers a complete CentOS install guide. Just have a try!
How to Download CentOS
What is CentOS? CentOS, short for Community Enterprise Operating System, is a RPM-based Linux distribution, developed on the base of Red Hat Enterprise Linux (RHEL). In 2014, CentOS announced the official joining with Red Hat while staying independent from RHEL.
CentOS is a free and open-source community-supported computing platform that is functionally compatible with its upstream source, RHEL. It’s one of the most popular Linux distributions for web servers.
How to get the CentOS download? Please follow the steps below:
Step 1: Go to the official CentOS download page. In this webpage, you will see two major CentOS editions: CentOS Linux and CentOS Stream. Under the CentOS Linux, CentOS 7 download and CentOS 8 download are offered. Under CentOS Stream, version 8 and version 9 are offered.
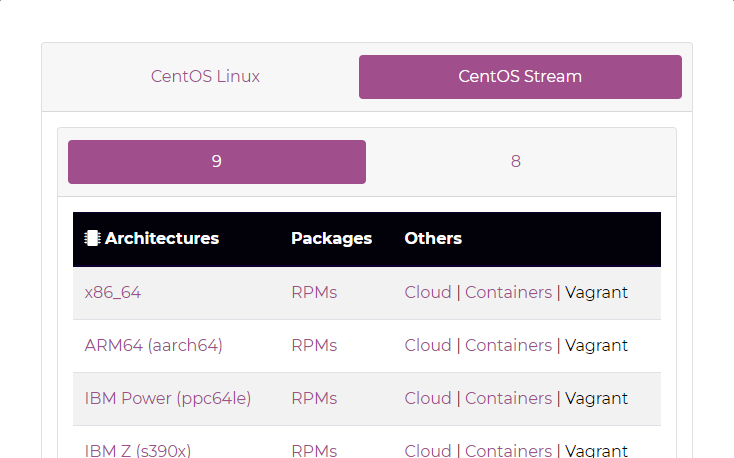
Which CentOS ISO download should you get? I recommend you choose CentOS Stream 9. The reason is as follows:
Red Hat has decided to discontinue the development of the CentOS Linux version. CentOS 7 was released in 2014 and its maintenance will be ended in June 2024. CentOS 8 was released in 2019. Red Hat has originally committed to maintaining CentOS to 2029, but the company broke the promise later and declared that it would end the support for CentOS 8 at the end of 2021.
In a word, if you want to build a production platform, CentOS Linux is not recommended anymore. Then, how about the CentOS Stream? Is it suitable for the production environment? The answer is NO. The reason is as follows:
Unlike CentOS Linux that is the downstream distribution of REHL, CentOS Stream is the upstream distribution of REHL.
For CentOS Linux, the development order is as follows: Fedora (a distribution with new features) -> REHL (a paid and stable distribution for enterprises) -> CentOS Linux (a free community-supported distribution with trademarks and other information removed).
For CentOS Stream, the development order is as follows: Fedora (a distribution with new features) -> CentOS Stream (a free and slightly stable distribution with rolling updates)-> REHL (a paid and stable distribution for enterprises).
This change will undoubtedly affect the stability of CentOS. Red Hat also doesn’t recommend users use CentOS Stream for production platforms.
Then, how to choose between CentOS Stream 8 and 9? CentOS Stream 8 is upstream of RHEL 8, while CentOS Stream 9 is upstream of RHEL 9. You can choose one according to your need.
Step 2: After deciding which CentOS version you want, please click the x86_64 link. This will offer you the suitable CentOS ISO download for PC.
How to Install CentOS on Windows 10
If you are a beginner of CentOS, I recommend you install CentOS on Windows 10. In this case, if some problems happen to CentOS, you can deal with them more easily.
To install CentOS on Windows 10, you can adopt the following two methods:
- Use VM software.
- Dual boot Windows 10 and CentOS.
Stage 1. Make Space for CentOS Install
No matter which method you use, you should make space for CentOS install. If you choose method 1, I recommend you create a separate partition for the VM so that you can manage it better. If you choose method 2, you should make enough unallocated space for CentOS.
In most cases, you can complete this job by using the Windows Disk Management tool to shrink a partition. But if each of partitions on the PC doesn’t have enough free space, I recommend you use MiniTool Partition Wizard. Its free feature Move/Resize can help you move the location of partitions.
You can shrink more than one partition and then gather all unallocated space together. In this way, you can have enough space for CentOS install. Here is the guide on how to use MiniTool Partition Wizard to move/resize a partition:
MiniTool Partition Wizard FreeClick to Download100%Clean & Safe
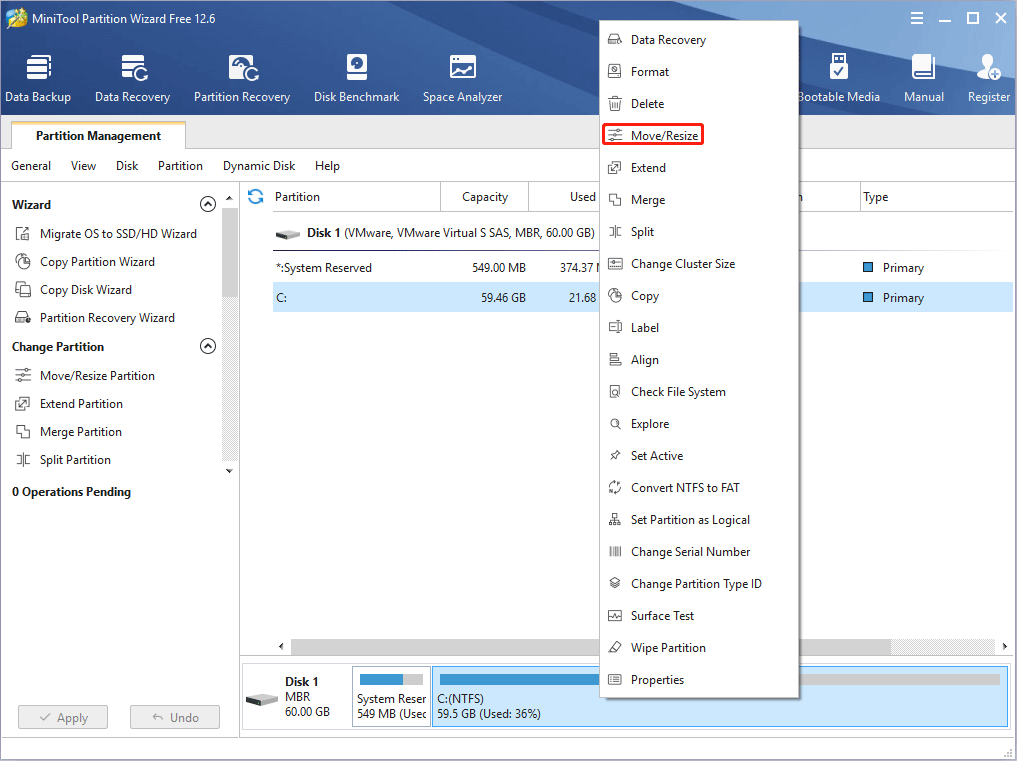
Step 1: Launch MiniTool Partition Wizard and go to its main interface. Right-click a partition and choose Move/Resize.
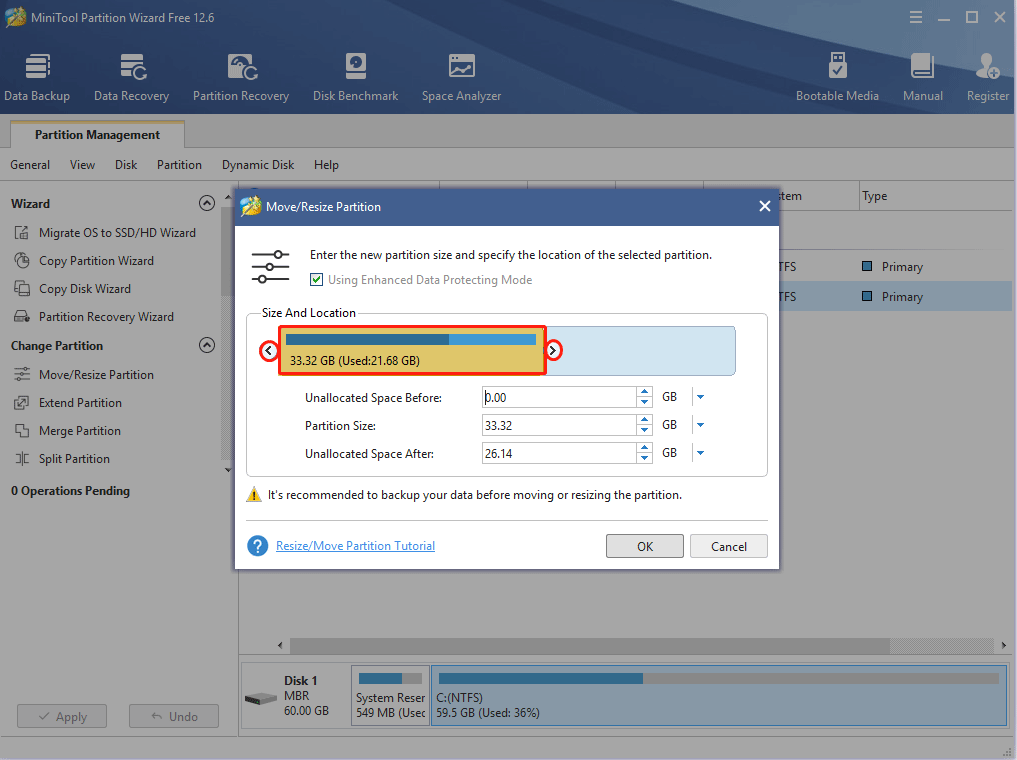
Step 2: Drag the two arrows on the two sides of the partition to shrink the partition, and then drag the block to move the location of the partition. Then, click the OK button. In this way, you can get unallocated space. Through the same method, you can gather all unallocated space together.
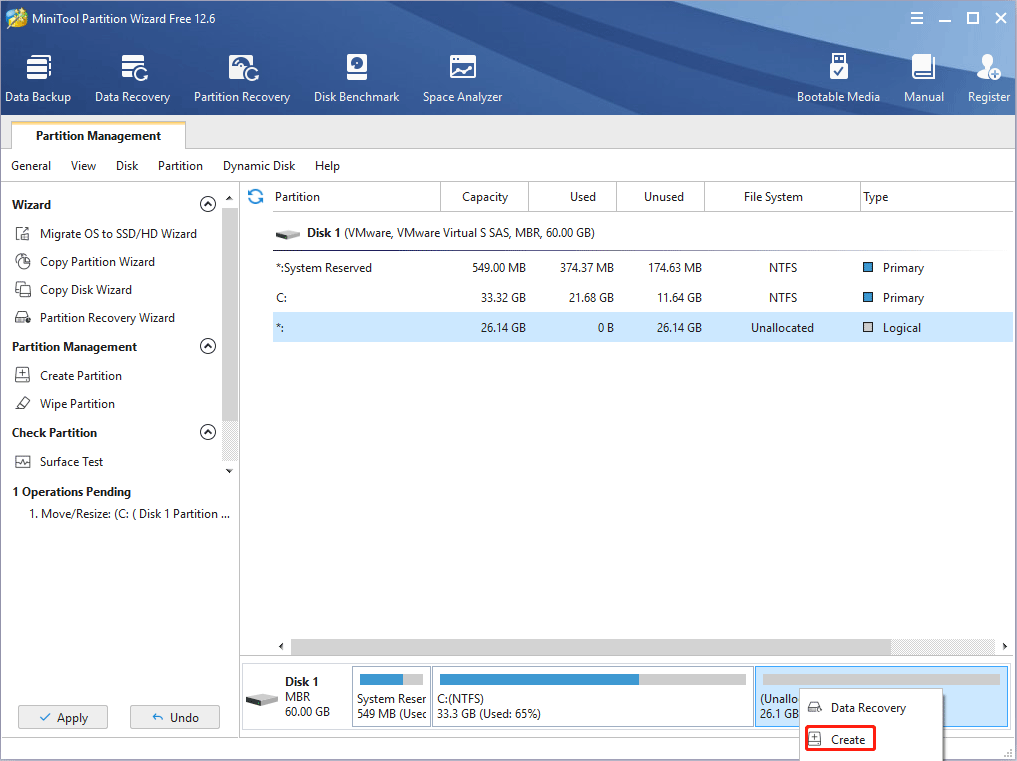
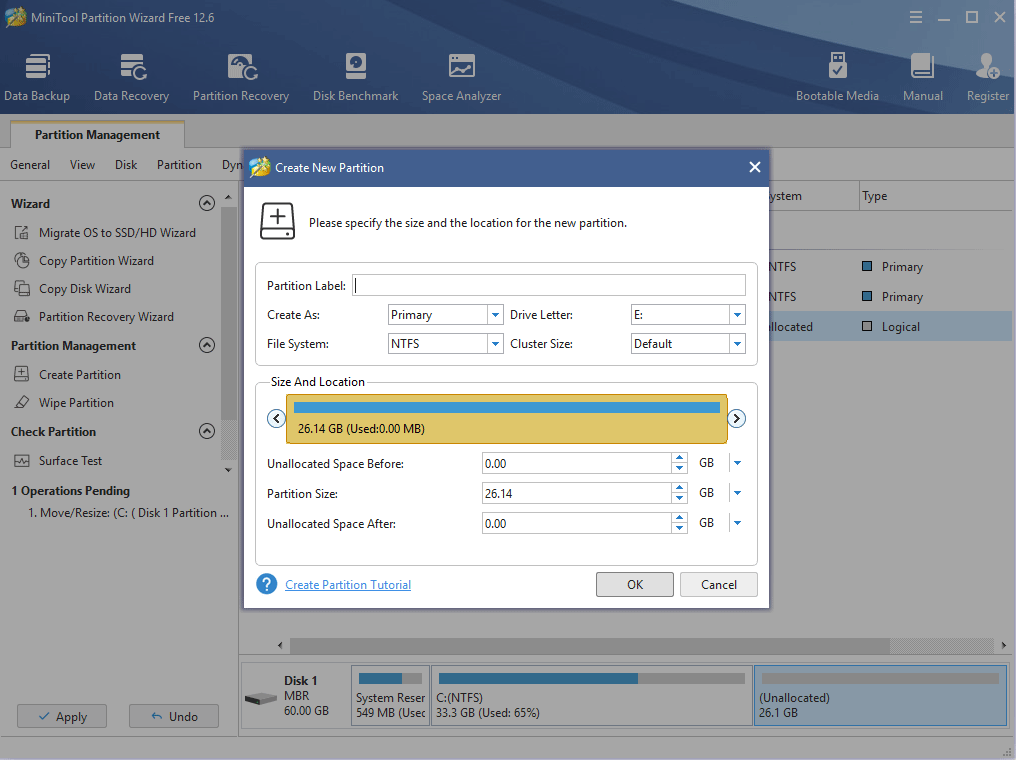
Step 3: If you want to dual boot Windows 10 and CentOS, you should click the Apply button to execute the pending operation. If you use VM software, you should right-click the unallocated space and choose the Create button.
Step 4: Set parameters for the new partition. You can keep all of them to the default value if you don’t have specific demands. Then, click the OK button.
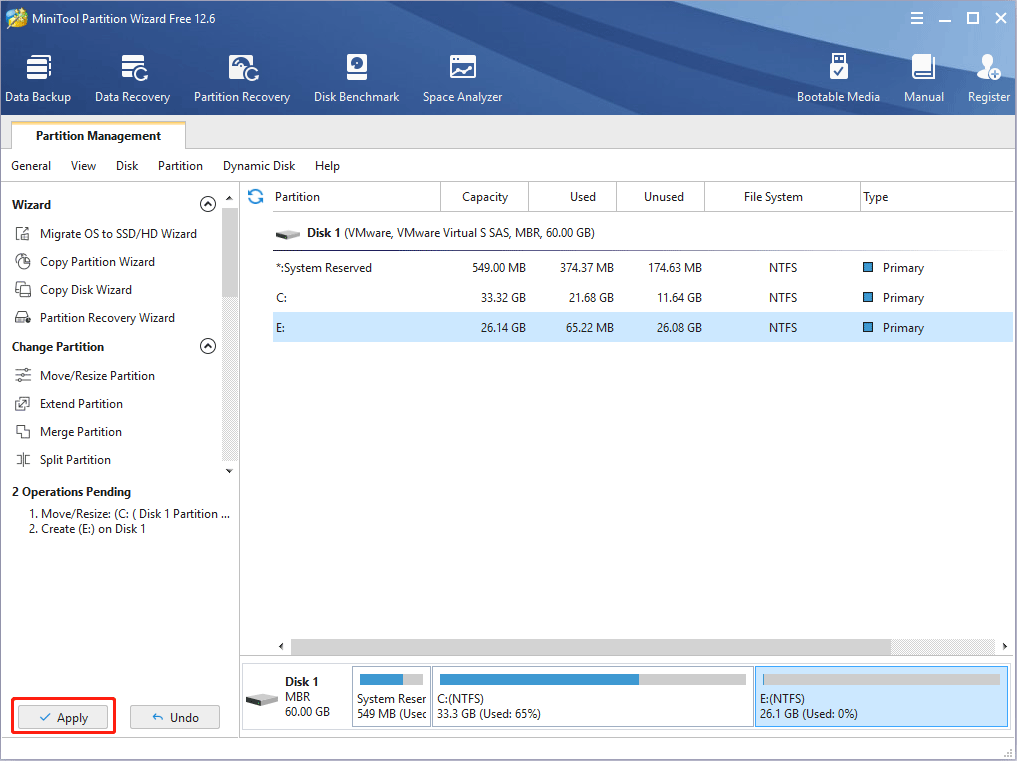
Step 5: Click the Apply button to execute pending operations.
Stage 2. CentOS Install
If you use VM software to install CentOS on Windows 10, you can use Hyper-V, VMware, or VirtualBox. Hyper-V is the Windows built-in virtual machine program, while VMware and VirtualBox are third-party virtual machine programs.
- If you want to use Hyper-V, please refer to this post: How to Create a VM with Hyper-V [Virtual PC Windows 10].
- If you want to use VMware and VirtualBox, please refer to this post: How to Use Windows 10 as a Virtual Machine – A Step-by-Step Guide.
If you want to dual boot Windows 10 and CentOS, please refer to the following detailed steps:
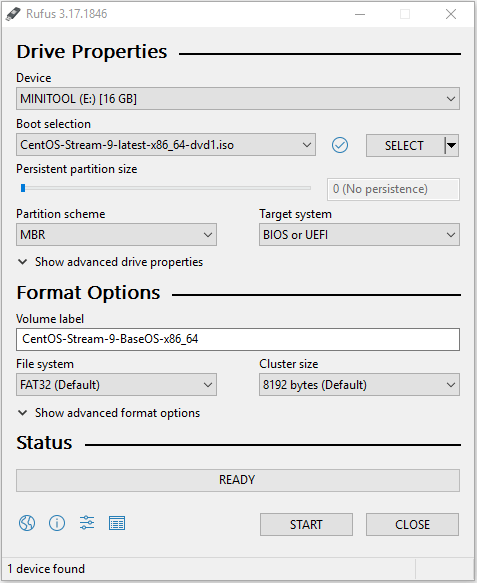
Step 1: Burn the CentOS ISO file you just downloaded to a USB drive. To do this, you may need to use an ISO burning program like Rufus. Here, taking Rufus as an example, I will show you how to burn the ISO file into the USB drive.
- Connect a USB drive to your PC.
- Download Rufus and launch it.
- Under the Boot selection, click the Select button, find the CentOS ISO file, and click Open.
- Choose GPT or MBR partition scheme according to your condition. Here I choose MBR because my disk is using MBR.
- Click the Start button.
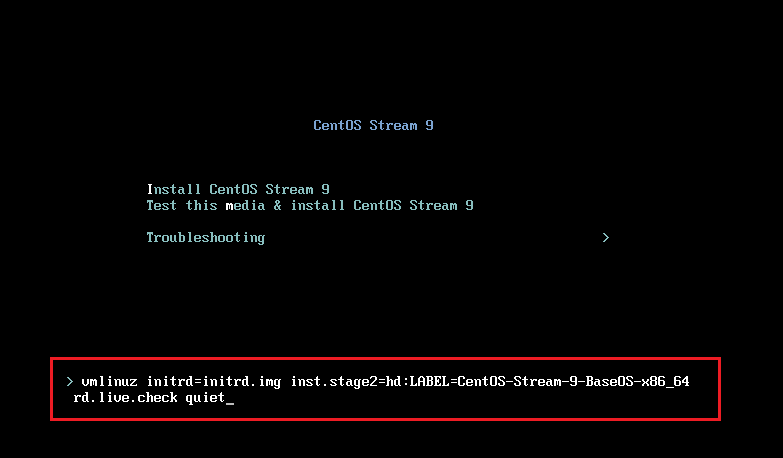
Step 2: Restart your computer. Press the BIOS key (Fn, Del, Esc, etc.) to enter firmware and set the USB drive as the first boot device. Then, save changes and exit the firmware. The PC will now boot from the USB drive. After that, you will see the following picture. Please select Install CentOS Stream 9 and press Enter. You will enter the CentOS installation interface.
Step 3: Now, you are in the CentOS installation interface and there is a GUI. You can follow the on-screen instructions to install the CentOS. During this process, here are some tips for you:
- For CentOS beginners, please select GNOME Desktop when choosing a Base Environment. Otherwise, Minimal Install is selected by default. Then, this OS will have no GUI.
- When making partitions, please select the unallocated space you have made and then check “automatically configure partitioning.” The installation wizard will automatically partition the space into the three main partitions (“/”, “/home”, and “/swap”). If you want to create the partitions manually, please check ‘I will configure partitioning.”
Step 4: After completing the CentOS installation, you need to repair the Windows 10 boot option so that you can enter Windows 10 later. To do this, here are 2 ways:
- Under the CentOS, run the terminal and enter command “vim /boot/grub2/grub.cfg”. Press “I” key to enter the editing state. Before the first menuentry, add the startup code “menuentry ‘Windows 10’ {set root=(hd0,1) chainloader+1}”. Then, save and exit.
- Create a Windows 10 bootable media and then use it to repair the Windows 10 MBR.
CentOS Alternatives
As mentioned above, CentOS is no longer suitable for the production environment. If you want to switch to another RHEL-based OS, you can consider the following CentOS alternatives.
- Rocky Linux: It is downstream of RHEL and is community-based distro that aims for “100% bug-for-bug compatibility” with RHEL.
- Springdale: It is a Linux distribution that focuses on scientific computing. It includes a special repository for scientific computing and these repositories are even available to those running other RHEL-based distros due to the degree of compatibility among them.
- Oracle Linux: It is also a version of Linux based on RHEL and it offers a script that can convert existing CentOS installations to Oracle Linux. This distribution itself is free to use, but Oracle charges money if you want a support contract.
- CloudLinux & AlmaLinux: CloudLinux is a paid RHEL-derived distro targeted towards data centers and web hosting providers. It can virtualize all the accounts to keep problems in one account from spilling over to the other ones. If you want a free version, use AlmaLinux, which also offers a script to convert existing RHEL and CentOS installation to AlmaLinux.
Bottom Line
Is this post useful to you? Do you have other ideas about CentOS install? Please leave your comments in the following zone. In addition, if you encounter problems when moving/resizing partitions, please feel free to contact us via [email protected]. We will get back to you as soon as possible.


User Comments :