In some cases, you need to update your Windows 10 to enjoy new features or repair existing issues on your PC. However, the upgrade process may not always succeed and will randomly reveal certain errors. For instance, you are likely to experience the Windows update error 0xc1900201 during the process of installing a Windows 10 feature update.
The error code 0xc1900201 can be caused by various reasons, such as insufficient disk space, corrupted Windows update components, corrupted/missing system files, etc. To get rid of this error, we summarize a couple of solutions. If you are one that encounters the error 0xc1900201, just pay attention to the following content.
Solution 1: Extend Your System Reserved Partition
If you experience the Windows 10 error 0xc1900201 with a message that says “Couldn’t update the system reserved partition” or “Reserved partition could not be updated”, it may indicate there is low disk space for the system reserved partition. In this case, it’s recommended that you enlarge this partition to see if the error will be resolved.
How to expand the system reserved partition? Windows 10 doesn’t provide you with an effective solution to perform this operation. Fortunately, you can use a piece of third-party software like MiniTool Partition Wizard. It’s a professional partition manager that offers a range of features to help you organize your partitions and disks.
Now, we will show you how to extend system reserved partition via MiniTool Partition Wizard step by step.
This operation requires you to upgrade MiniTool Partition Wizard to the Pro or higher editions. Additionally, you are suggested to back up your computer in advance in case of data loss.
Step 1: Download and install MiniTool Partition Wizard on your PC.
MiniTool Partition Wizard DemoClick to Download100%Clean & Safe
Step 2: Launch this program to create a bootable media by following the instructions in this post.
Step 3: Boot your computer from the created bootable drive. After a while, you will enter the main interface of MiniTool Partition Wizard automatically.
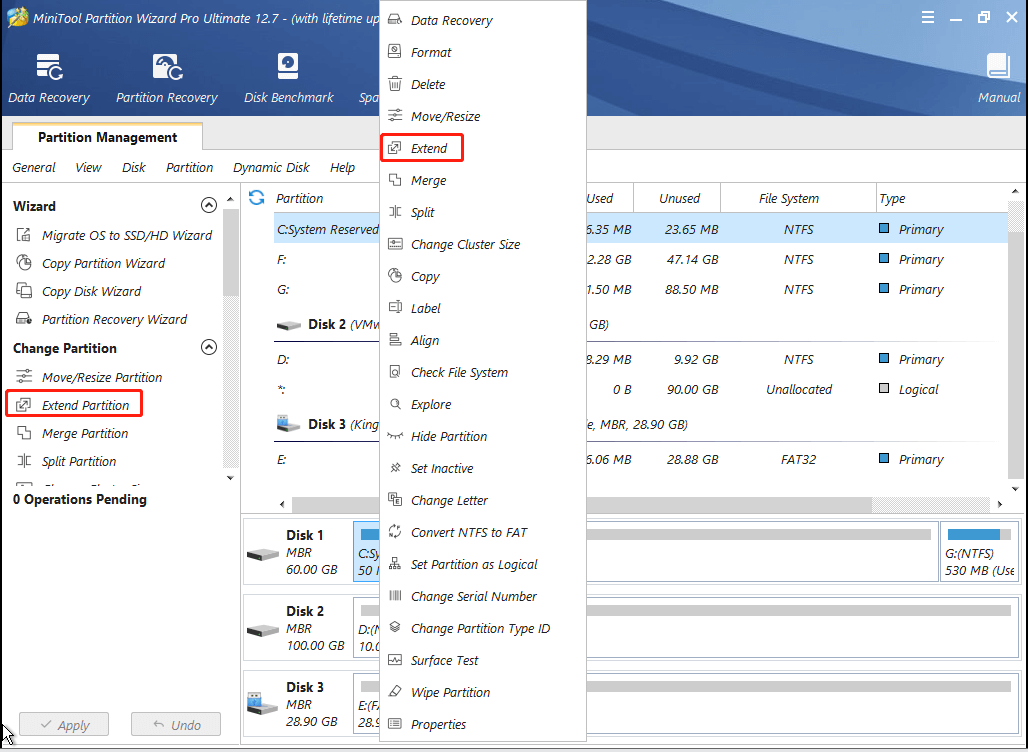
Step 4: Highlight the system reserved partition and select Extend Partition from the left action panel. Alternatively, you can right-click the target partition and select Extend.
Step 5: Select unallocated space or a partition on the same disk. Then drag the sliding handle rightwards to extend the system reserved partition.
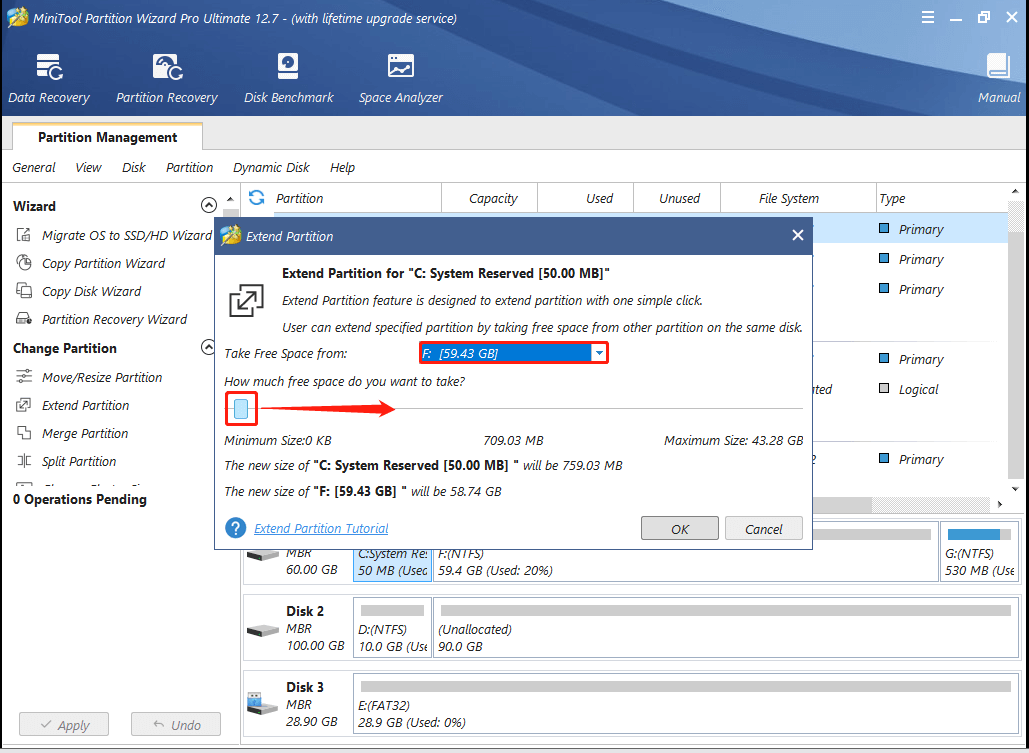
Step 6: After that, click OK and Apply to execute the operation.
Solution 2: Run the Windows Update Troubleshooter
The Windows Update troubleshooter is a Windows built-in utility that can always repair PC issues related to Windows Update. Therefore, when you are stuck in the Windows 10 update error 0xc1900201, running the Windows Update troubleshooter is a good way. The following are the detailed steps for this action.
Step 1: Press Windows + I to open Windows Settings. Then select Update & Security.
Step 2: Go to Troubleshoot and then click Additional troubleshooters from the right side.
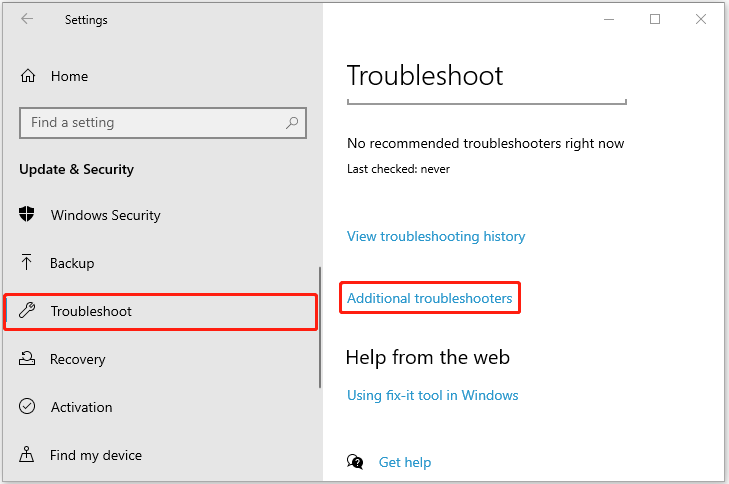
Step 3: In the next window, click Windows Update and then click Run this troubleshooter. After that, the troubleshooter will begin detecting possible problems.
Step 4: If any Windows Update problems are found, follow the on-screen instructions to repair them.
Step 5: Once the process is finished, restart your PC and try the update again to see if the Windows 10 error 0xc1900201 is resolved.
Solution 3: Reset the Windows Update Components
In some cases, the corrupted Windows Update components may lead to the Windows 10 upgrade error 0xc1900201 as well. To fix this error, you can try resetting these components. If you have no clue how to proceed with this operation, you can follow this post: Reset Windows Update with These Methods Now!
Solution 4: Rename the Catroot2 and SoftwareDistribution Folders
You can also try to fix the Windows 10 error code 0xc1900201 by renaming Windows Update folders including the Catroot2 and SoftwareDistribution folders. To do this, follow the steps below.
Step 1: Press the Windows and R keys to open the Run dialog.
Step 2: Type cmd in the text box and then press Ctrl + Shift + Enter to run Command Prompt as an administrator.
Step 3: In the elevated Command Prompt window, type the following commands one by one and press Enter after each to disable the relevant Windows Update services.
- net stop wuauserv
- net stop cryptSvc
- net stop bits
- net stop msiserver
Step 4: Type these commands below and press Enter after each one to rename the Catroot2 and SoftwareDistribution folders.
- ren C:WindowsSoftwareDistribution SoftwareDistribution.old
- ren C:WindowsSystem32catroot2 catroot2.old
Step 5: After that, you should restart these services you stopped before by executing the following commands.
- net start wuauserv
- net start cryptSvc
- net start bits
- net start msiserver
Step 6: Once done, reboot your computer to check if the Windows update error 0xc1900201 is repaired.
Solution 5: Run the SFC and DISM Scans
If there are some system files on your PC getting corrupted or missing, you are likely to encounter the Windows 10 upgrade error 0xc1900201. On this occasion, we recommend you try to solve this error using the SFC (System File Checker) and DISM (Deployment Image Servicing and Management) utilities. Here’s a step-by-step guide on how to run the two scans.
Step 1: Right-click the Start icon and select Run.
Step 2: Type cmd in the Run dialog and then press Ctrl + Shift + Enter to open the elevated Command Prompt.
Step 3: After you enter Command Prompt, type sfc /scannow in the panel and then press Enter to carry out this command.

Step 4: Wait till the process is completed. Then exit Command Prompt and restart your computer.
Step 5: Run Command Prompt as an administrator again. You ought to type the following commands and press Enter after each to make a DISM scan.
- DISM /Online /Cleanup-Image /ScanHealth
- DISM /Online /Cleanup-Image /CheckHealth
- DISM /Online /Cleanup-Image /RestoreHealth
Once you finish both the SFC and DISM scans, reboot your system and go to check if the error code 0xc1900201 is fixed.
Solution 6: Run the Windows Memory Diagnostic Tool
The Windows 10 update error 0xc1900201 may also happen due to certain memory problems. To find out if there are any memory errors on your PC, you can run the Windows Memory Diagnostic tool.
Step 1: Make sure you save all the Windows tasks and then close processes running in the background.
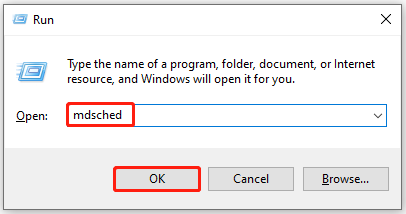
Step 2: Open the Run dialog and type mdsched in the box. Then click OK to open the Windows Memory Diagnostic tool.
Step 3: In the prompted window, select Restart now and check for problems (recommended).
If you don’t want to run this tool at once, you can select Check for problems the next time I start my computer.
Step 4: Wait for the system to find the existing problems patiently.
Solution 7: Perform a Clean Boot
The update error 0xc1900201 in Windows 10 may occur because of certain software conflicts too. Under this situation, it’s recommended that you perform a clean boot for your Windows. By doing so, the system will boot with a minimal set of drivers and startup programs, which may help you find out whether there is a background program preventing your computer from working properly.
Step 1: Type msconfig in the Run dialog and then press Enter.
Step 2: In the System Configuration window, go to the Services tab.
Step 3: Tick the checkbox next to the Hide all Microsoft services option. Then click Disable all.
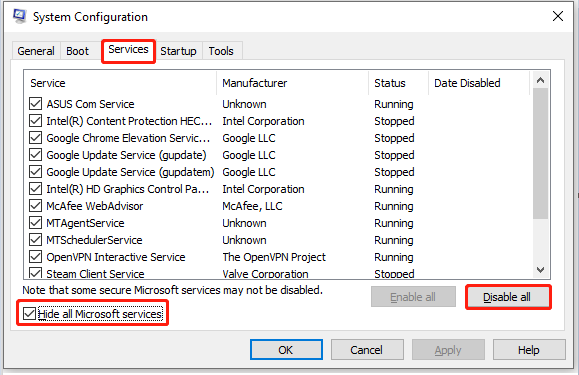
Step 4: After that, switch to the Startup tab and then click Open Task Manager.
Step 5: Once you enter Task Manager, right-click the process in the Startup section and select Disable. Repeat this step until you disable all the items.
Step 6: Exit Task Manager and restart your computer. If the error code 0xc1900201 disappears in the clean boot environment, it means one of the disabled services is the cause of this error.
Step 7: To find out the specific service that leads to this error, you should repeat the above steps but keep a part of the services enabled at a time.
Step 8: Once you find the problematic program, you should remove it from your computer so that you can resolve the Windows 10 upgrade error 0xc1900201 completely.
Solution 8: Perform a System Restore
If you have created system restore points before, you can also try restoring your computer to a previous state where the Windows 10 error 0xc1900201 didn’t show up.
Step 1: Type rstrui in the Run box and press Enter to enter the System Restore window.
Step 2: In the pop-up window, click Next to continue.
Step 3: Select a restore point without the error 0xc1900201 and then click Next.
Step 4: When the Confirm your restore point window appears, click Finish to complete this process.
Bottom Line
All these solutions mentioned in this post are available. When you are facing the Windows 10 update error code 0xc1900201, you can try them one by one until you solve your problem. If you have any other ways to repair this error, you can share them with us in the comment area below. We will appreciate you very much.
If you suffer from any issues while using MiniTool Partition Wizard, you can contact us by sending an email to [email protected]. We will reply to you as soon as possible.

User Comments :