About 0x0000001a Error
BSOD probably is one of the most frequently encountered Windows 10 problems. There are multiple kinds of BSOD errors including amifldrv64.sys error (when updating BIOS), hal.dll error, boot configuration data unreadable error 0xc000014c and the memory management error 0x0000001a discussed in this post, etc.
You may receive the error when attempting to install Windows Vista/7/8/10 OS and upgrade OS. Certainly, it may also occur to you suddenly. No matter for what, you need to work it out. To fix the stop code 0x0000001a successfully, you need to find out its possible causes.
According to the survey, there are several elements that can result in the error. As the error message “memory management” indicates, this error is related to your computer memory. Besides, hard disk issues can also cause the error. Malware or virus is responsible for the 0x0000001a error too.
How to fix this troublesome error? There are 7 available methods helping you solve it.
Top 7 methods to fix 0x0000001a error
- Scan for malware or virus
- Allocate more space for computer
- Check and fix disk errors
- Uninstall newly installed hardware or software
- Check for device drivers update
- Run system file checker
- Test your computer RAM
Solution 1: Scan Your Computer for Potential Malware
As malware and virus can cause the 0x0000001a error, scanning your computer for any malware is rather necessary. If you find any malicious programs on the computer, remove them from your PC temporarily and check if the issue can be fixed.
Certainly, you can also remove virus from laptop without antivirus software via some methods. For instance, you can end the virus-related programs via Task Manager, remove viruses via Command Prompt, check recently installed software and applications, delete virus by utilizing safe mode, etc.
You may like this: Is Windows Defender Enough? More Solutions to Protect PC
Solution 2: Allocate More Space for PC
When you don’t prepare enough free space for your computer, you may receive the memory management error 0x0000001a. Actually, the fact that the blue screen of death error happens due to the insufficient disk space is not rare. For example, the frequently encountered errors like Windows couldn’t be installed error 0x80300024 and 0x0000007e often occur because of low disk space.
Therefore, extending or freeing up disk space is an available fix for the error. How to do? The partition manager – MiniTool Partition Wizard can be helpful. It boasts the move/resize and extend partition magic, which allow you to obtain more disk space.
It enlarges your target partition by taking space from any other partitions or unallocated space on the same disk. If you want to expand a partition to non-contiguous unallocated or free space or there’s no unallocated or free space on the hard disk, extending partition is suitable for you.
Here are steps to extend partition.
Step 1: After restarting your computer with the help of the bootable media created by MiniTool Partition Wizard Pro Edition, enter the BIOS page and set the media as the first boot option by using the up and down arrow buttons.
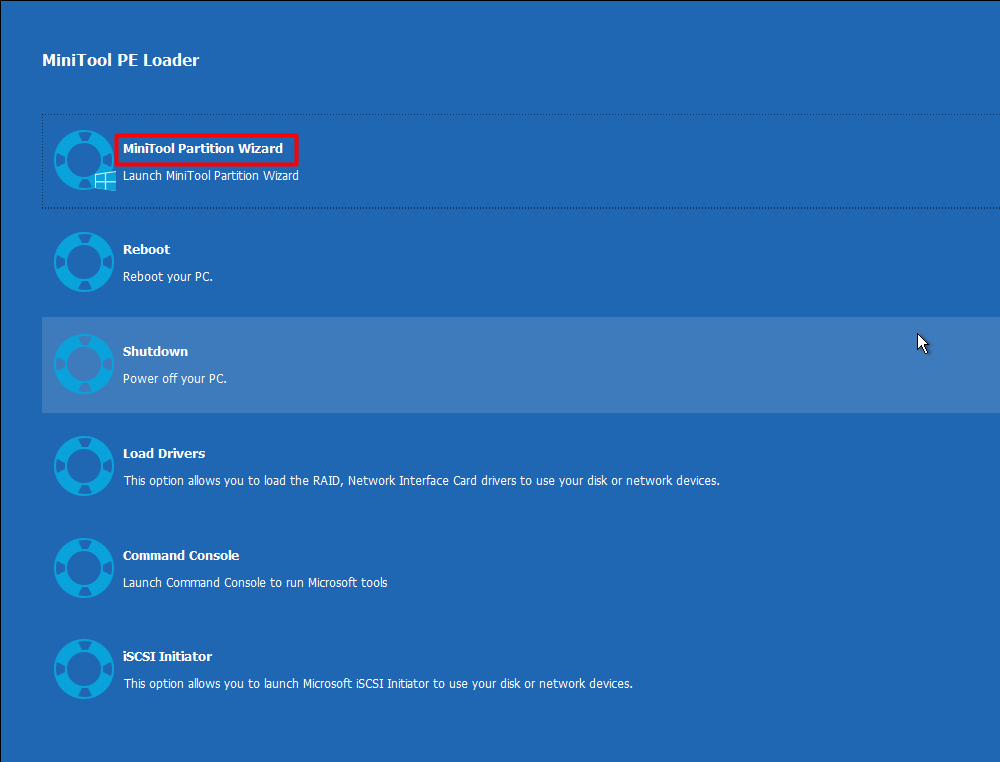
Step 2: Save and execute the operation by pressing that keys that pops up on the screen. In the MiniTool PE Loader page, click MiniTool Partition Wizard to go on.
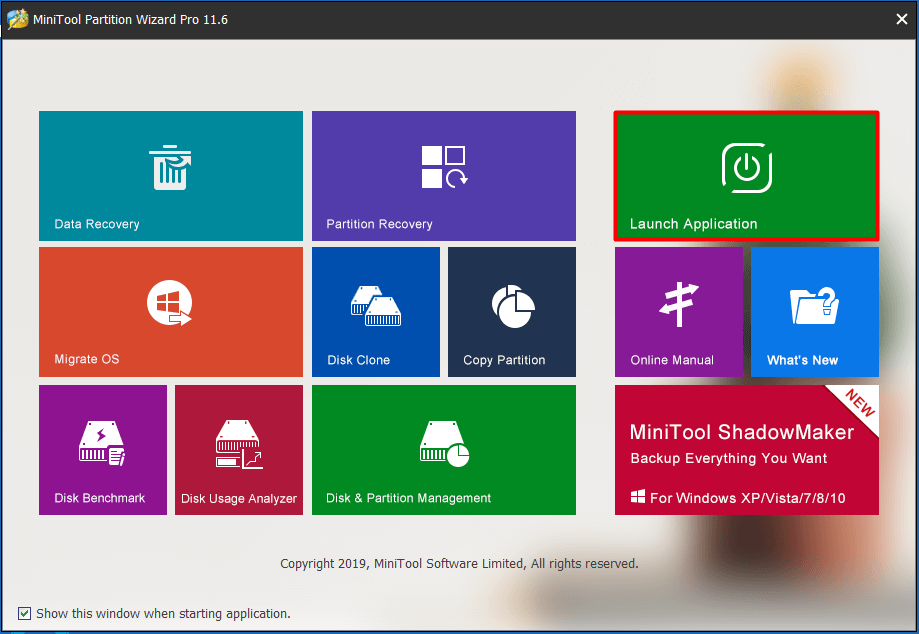
Step 3: Click on Launch Application on the pop-up window.
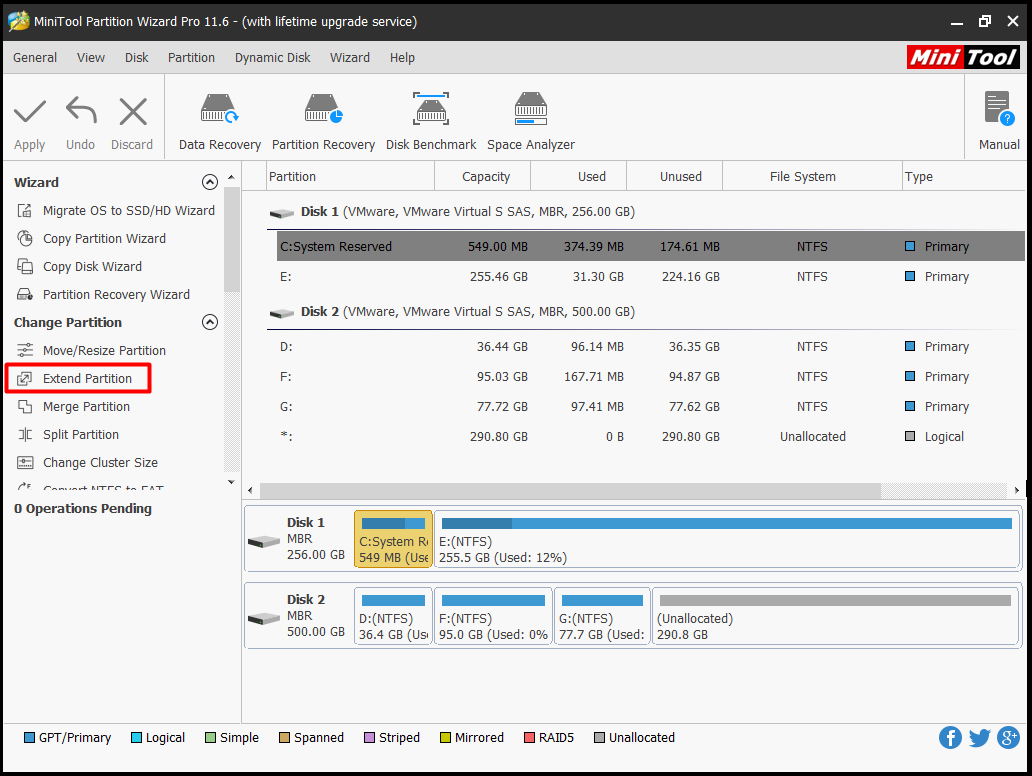
Step 4: Right click the target partition (typically the C drive) and choose Extend Partition option from the prompted function menu.
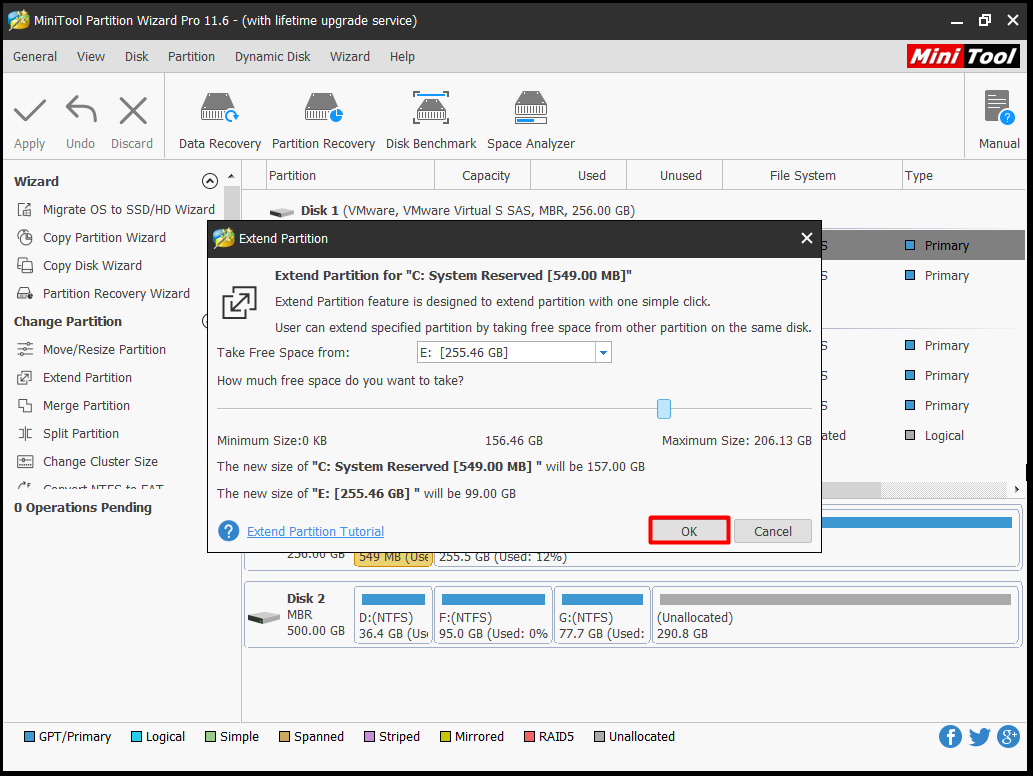
Step 5: In the next window, choose a partition that you would like to take free space from, and then decide the amount of free space that you want to take from the selected partition by moving the handle bar. After that, click OK to save the change.
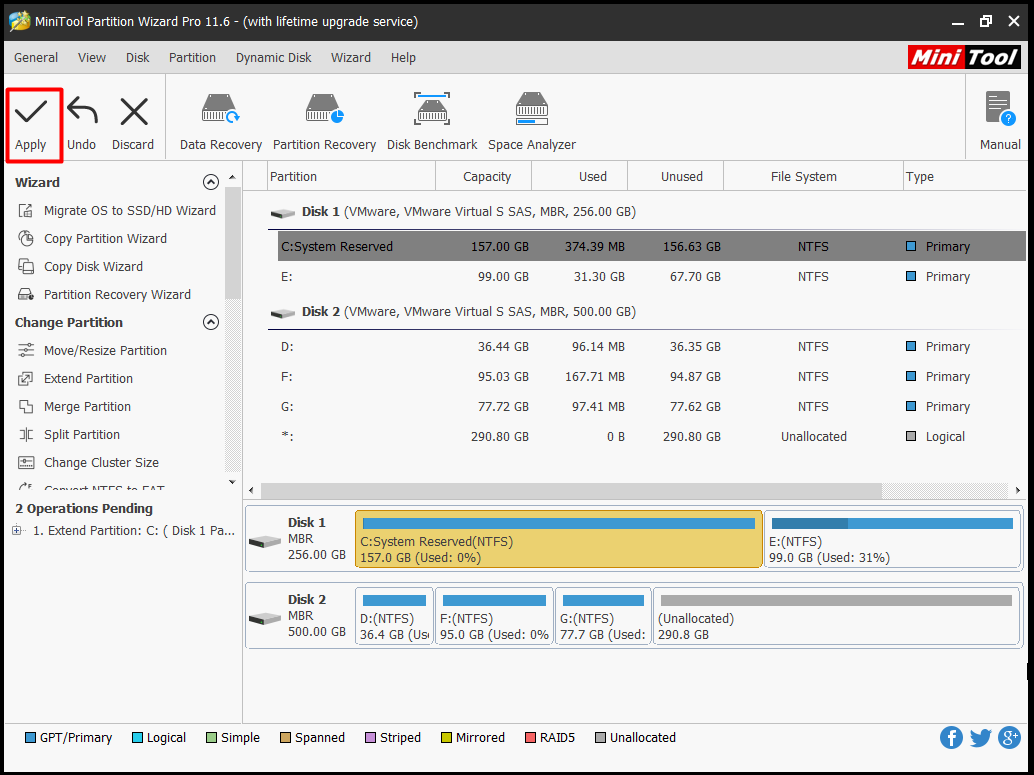
Step 6: In the MiniTool Partition Wizard main interface, click on Apply to execute the pending operation.
Solution 3: Test Computer RAM
Since the 0x0000001a error is a memory related error, you can try testing your PC RAM via the Windows built-in Memory Diagnostics Tool to check if the RAM is the cause. If it is, you should replace it with a new one or even change the motherboard.
As the computer cannot boot properly, you need to boot into the safe mode (use Solution 5 in as your computer cannot boot normally) before running the Windows Memory Diagnostics Tool. Now, follow these steps to test your computer RAM.
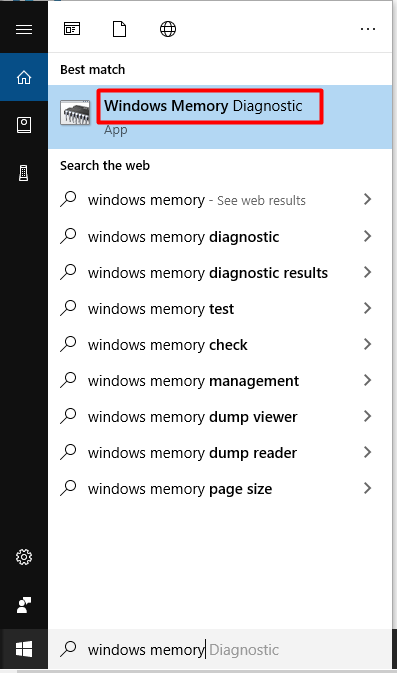
Step 1: Enter windows memory diagnostic or mdsched in the search box, and then select Windows Memory Diagnostic under the Best Match list.
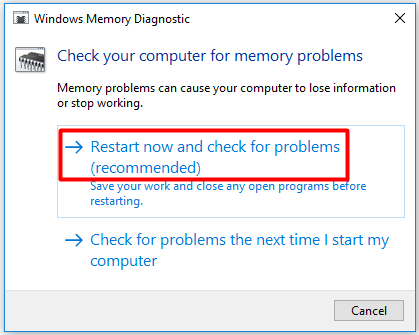
Step 2: Choose Restart now and check for problems (recommended) under the Check your computer for memory problems option list.
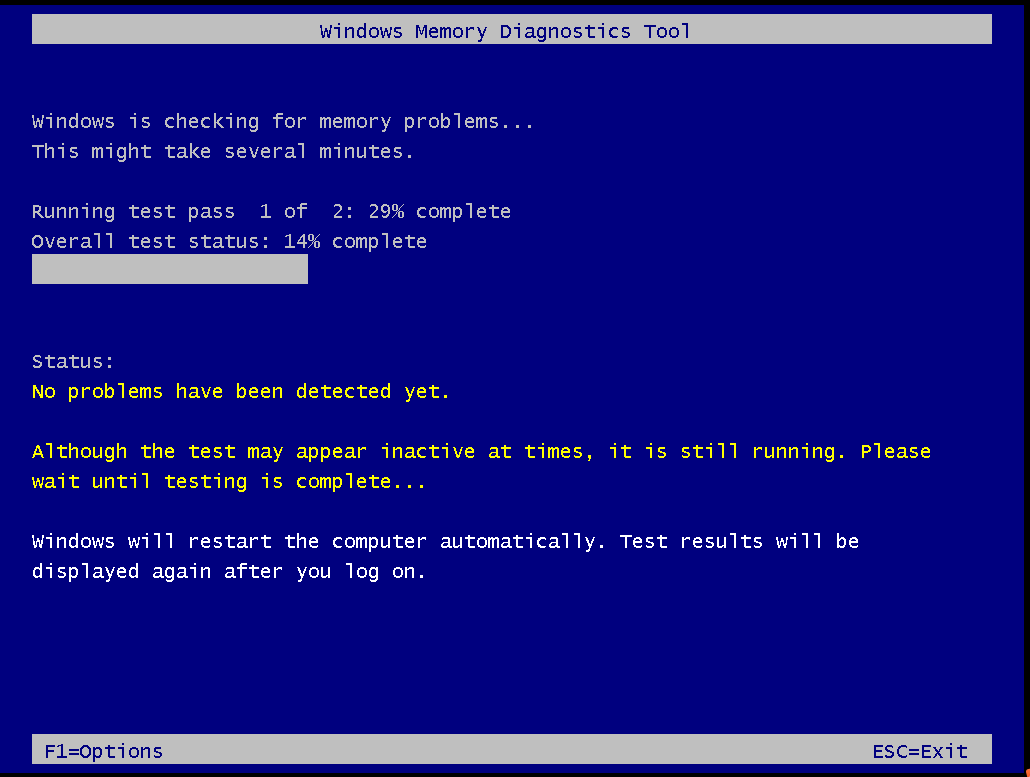
Step 3: Now, the Windows Memory Diagnostics Tool will immediately run by itself. You can see the scanning process and status on the screen as shown in the picture below. When the process ends, you are able to view the scanning results by logging on it again.
Also read: DDR4 vs DDR5: Explore the Difference and Make a Choice
Solution 4: Uninstall Recently Installed Hardware/Software
If you have installed some hardware or software like internal memory chips, internal hard disk drive recently and receive the error, consider uninstalling them to solve the error. It is very likely that the newly installed hardware or software is incompatible with your OS. Hence, they cannot work properly and lead to the error.
There are some slight differences between uninstalling hardware and software, so follow the corresponding guide to uninstall them.
The guide for uninstalling hardware
To uninstall hardware from computer, you need to switch off the device and then remove the newly installed hardware. After that, switch on computer to see if the error is fixed or not.
The guide for uninstalling software
Here are detailed steps for uninstalling software through Control Panel.
Step 1: Type control panel in the search box and click on Control Panel from the Best Match list.
Step 2: Change the View by to Category as the picture shows, and then click on Uninstall a program under the Program tab.
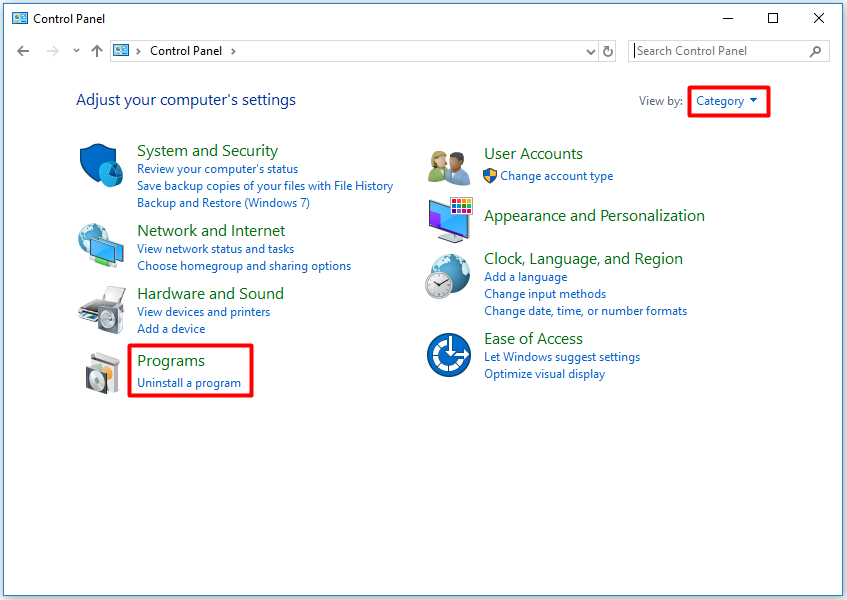
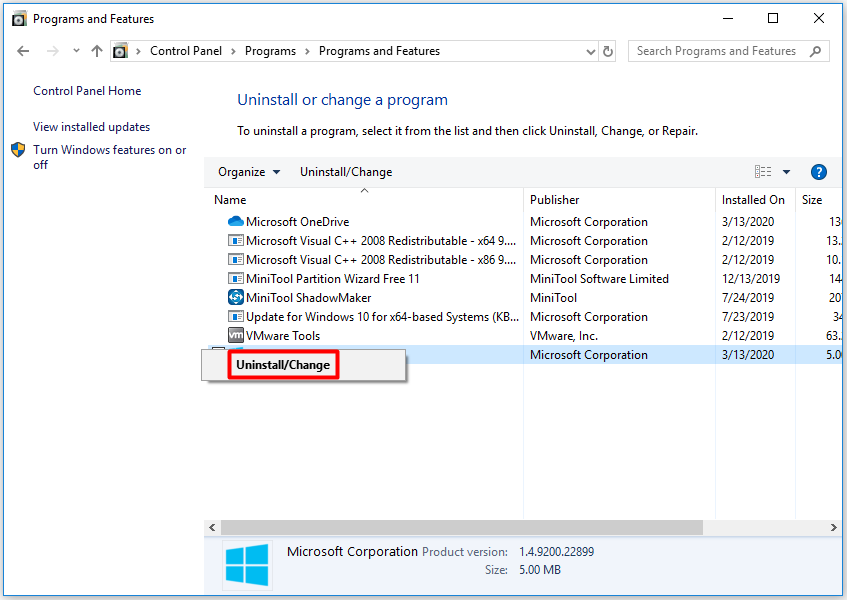
Step 3: Find and right click on the newly installed software, and then select Uninstall/Change option. Then, follow the on-screen instruction to complete the uninstallation operation.
Recommended article: Find Causes of Error Code 0x80240004 and Solutions to It
Solution 5: Check for Device Drivers Update
The outdated or wrong driver can also trigger the blue screen error 0x0000001a. You can check Windows Update to see if there is any update associated to device drivers. If there are, update them immediately.
You are able to update device drivers manually and automatically. How to do? Here are steps.
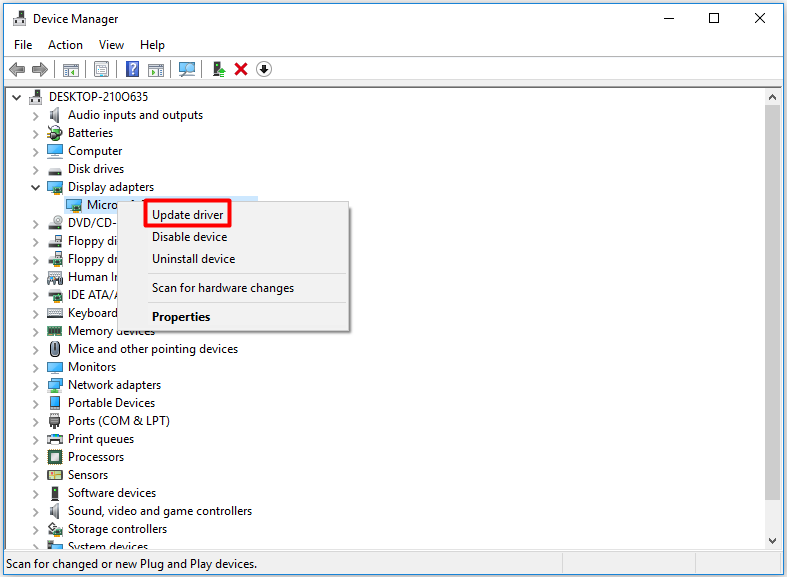
Step 1: Open Device Manager, and then expand device drivers one by one.
Step 2: Right click on the driver and choose Update driver option. Here we take Display adapters for example.
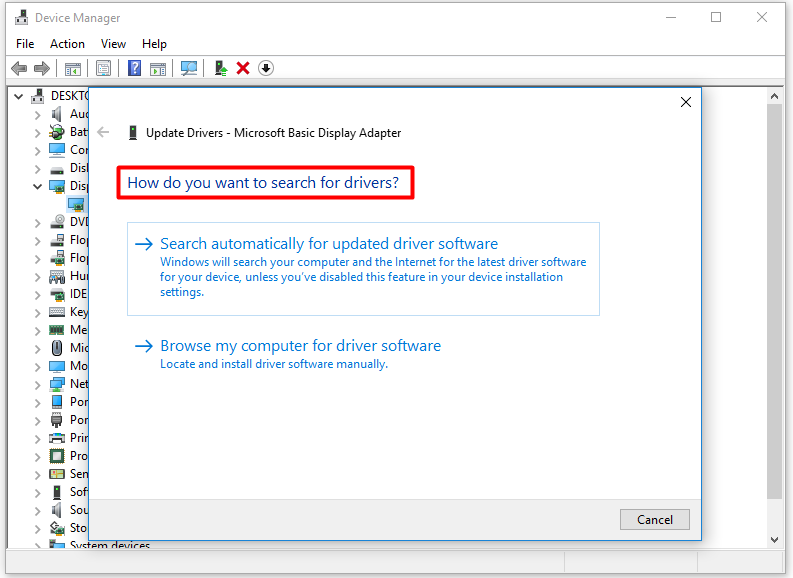
Step 3: In the next window, click Search automatically for updated software driver or Browse my computer for driver software based on you needs. Then, follow on-screen prompts to complete the update.
Also read: Quickly Remove “Unable to Read from Disk – Error Code 1117”
Solution 6: Run System Files Checker
Due to the broken or corrupted system files, the 0x0000001a BSOD Windows 10 will appear. To fix the damaged system files, you need to utilize a utility – SFC (system file checker). This utility is a Windows built-in program that can help you fix many system file related issues.
So, it is worth having a try to fix the error 0x0000001a. This method is only available if your computer can boot into safe mode. After entering the safe mode, you can follow the steps below.
Step 1: Run Command Prompt as administrator in the search box.
Step 2: In the next window, type sfc /scannow and hit Enter.

Solution 7: Check and Fix Disk Errors
Computer hard disk drive issues like bad sectors, hard drive corruption/ failure can be the cause for the error 0x0000001a. Based on that fact, checking you hard drive for issues is a wise way to fix the 0x0000001a BSOD error.
MiniTool Partition Wizard can diagnose if there are any bad sectors on the hard drive for you. Through its Surface Test feature, you are able to find any bad sectors on the hard disk. As your computer cannot boot normally, you still need to reboot the PC via the bootable media generated by MiniTool Partition Wizard Pro Edition.
After setting the media as the first boot order, follow the on-screen instruction to launch MiniTool Partition Wizard Pro Edition and enter its main interface. Then, follow the steps below to test and fix hard drive bad sectors.
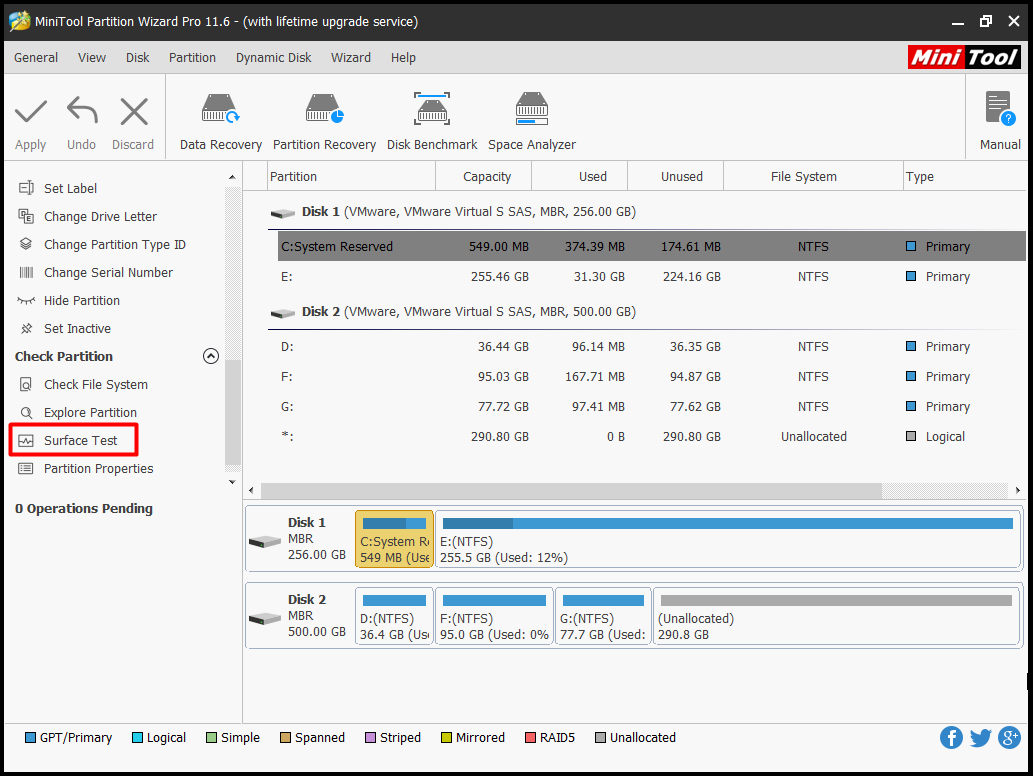
Step 1: Choose the system partition and click on the Surface Test feature in the left action panel.
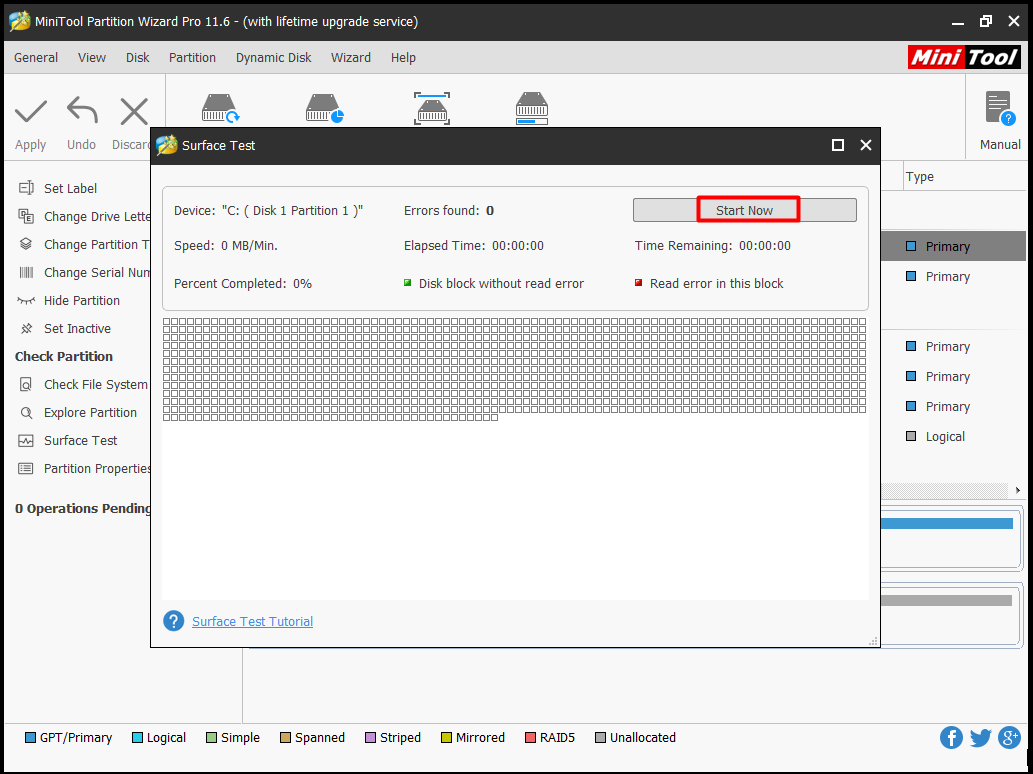
Step 2: In the next window, click the Start button to begin the scanning process. After the process ends, you can find that if your hard drive has any bad sectors via identifying the red blocks on the scan results.
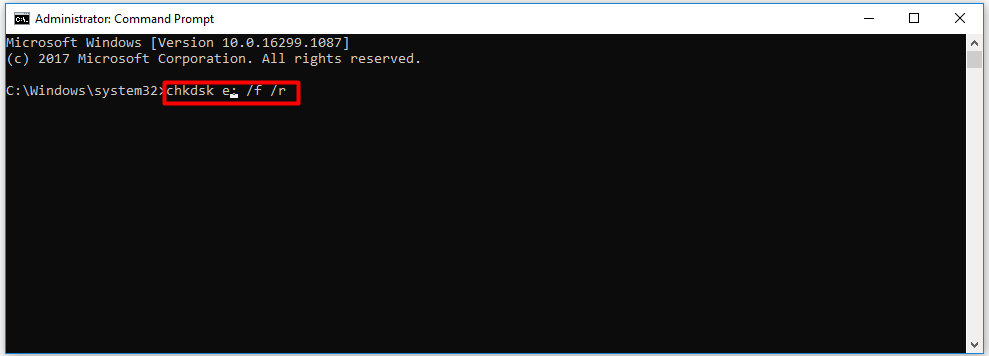
Step 3: Open Command Prompt as administrator, and then type chkdsk n: /f /r (n represents your system partition) and press Enter key to carry out the operation. After that, your hard drive can be used as before.
Related articles:
- CHKDSK won’t run
- CHKDSK is not available for RAW drives
- CHKDSK write protected error
- CHKDSK cannot open volume for direct access
- CHKDSK not working with Vanguard installed
Conclusion
Now, 7 methods to 0x0000001a BSOD Windows 10 have been offered to you. It’s time to make a decision now. All of them are available and effective. If you have some new ideas about the error 0x0000001a, you can share them with us in the following comment area. You can send your advice with an email via [email protected].

User Comments :