Sometimes, you may fail to log into a certain account in Windows 10 and be prompted that “your account has been disabled please see your system administrator”. In this article from MiniTool Partition Wizard, you will learn about how to fix the issue effectively.
When you are trying to log into Windows 10 with a certain user account, your Windows might think this account is disabled. And you will get the error message: Your account has been disabled. Please see your system administrator.
According to the reports from users, this error might come up due to the following facts:
- You have unexpectedly restarted your computer during the process of system restore, reset, or refresh.
- you have shut down your computer inappropriately while you were creating a user account after a fresh Windows installation or upgrade.

This error locks you out of your user account and prevents you accessing the desktop with the account. So, what can you do if you receive the error message that your account has been disabled please see your system administrator?
Don’t worry, here are some solutions you can use to fix the problem on your own.
Solution 1: Create A New Administrator Account in Safe Mode
If one of your account has been disabled, the direct solution is to use another account. If you don’t have a second account, you can create a new account with administrative privileges in Safe Mode. Here’s how to do it:
Step 1: When you are at the sign-in screen, click the Power button. Then, press and hold Shift key, and click Restart to enter the Window RE.
Step 2: Go to Troubleshoot > Advanced options > Startup settings > Restart.
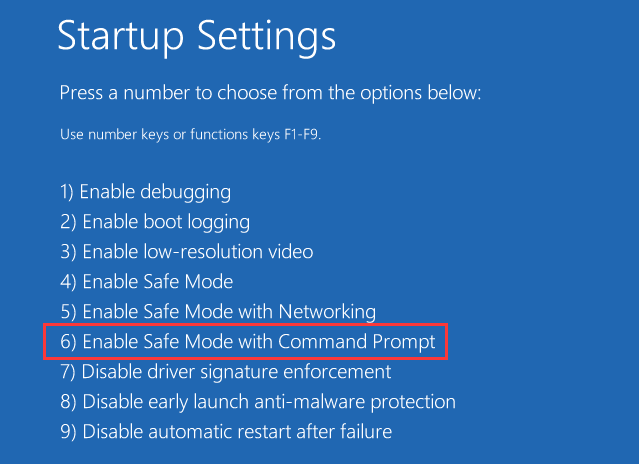
Step 3: When you get the following interface, press F6 to choose Enable Safe Mode with Command Prompt.

Step 4: Log into the hidden Administrator account and open Command Prompt. Type the following commands and press Enter after each:
- net user /add NAME (NAME refers to the actually name of the new account to be created)
- net localgroup administrators NAME /add
step 5: Input the command shutdown /r in and press Enter to restart your computer.
Now, you should be able to log into your Windows with the new account. With this new account, you can either give up the problematic account or enable it. As for how to enable an account, you can check the details in the next part.
Solution 2: Re-enable the Disabled Account
If you want to continue use the account which gives “your account has been disable” error message, you can re-enable it with another account or the built-in administrator account.
After logging into your Windows with either the second user account or the hidden administrator account, you can follow the instructions below to enable the target account.
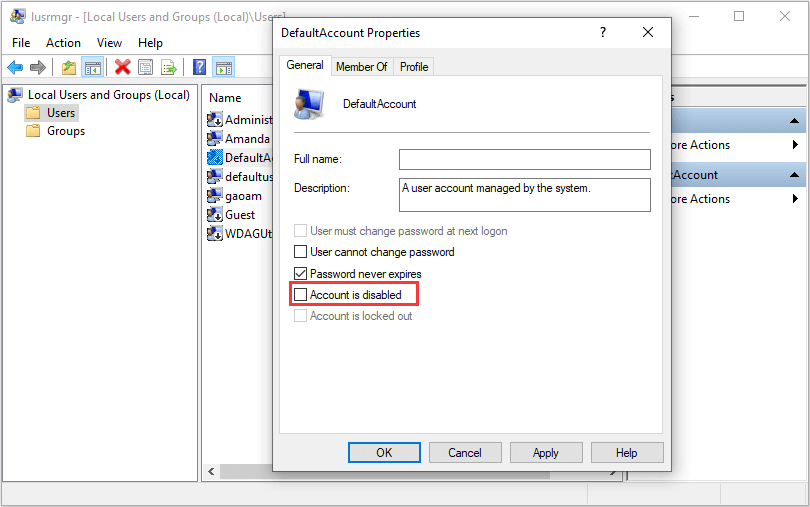
Step 1: Press Windows + R, input lusrmgr.msc and click OK button to open Local Users and Groups.
Step 2: Click Users in the left pane and locate the specific user account that gives the error message. Right-click the account and choose Properties.
Step 3: Under General tab, uncheck Account is disabled option, and click Apply and OK to save changes.

After that, restart your computer and try logging into the account to see if the error disappears.
Solution 3: Perform System Image Restore
Another method to resolve your account has been disabled Windows 10 issue it to perform image restore. By doing this, you can restore your computer to a previous point at which the problem didn’t appear.
Step 1: Enter Window RE according to the steps mentioned before.
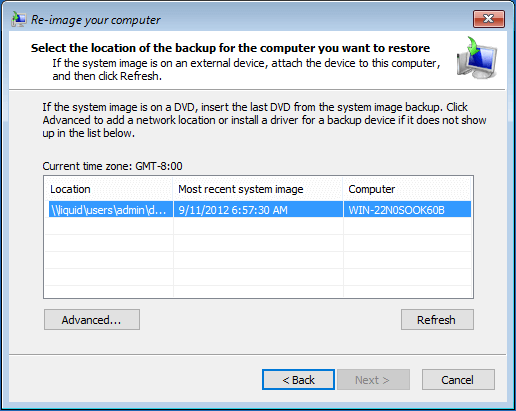
Step 2: Go to Troubleshoot > Advanced options > System Image Recovery.
Step 3: Select an account and enter password to open the window of system image recovery. Click Next to continue.
Step 4: Then, select a restore point at which the issue does not exist and click Next button. Then, follow the onscreen instructions to complete the process.

Once it’s done, restart your computer and hopefully the “your account has been disabled please see your system administrator” error message won’t appear again.


User Comments :