“Emulator: error: x86 emulation currently requires hardware acceleration" is an error message that you might encounter on Android Studio. In this post, MiniTool Partition Wizard puts together some solutions provided by users and you can also have a try to fix the problem.
Android Studio is the official integrated development environment for Android oprerating system. It is a developer tool for building market-leading apps and accelerating performance. Users can download and use this tool on Windows, macOS, and Linux based operating systems.
According to users, a message “emulator: error: x86 emulation currently requires hardware acceleration” pops up sometimes when they try to launch the AVD (Android Virtual Device). Unfortunately, the problem could exist on the Android Studio running on various Windows versions, including Windows 7, Windows 8, and Windows 10.
If you are bothered by the same problem, you might need these solutions listed in the following contents.
Solution 1: Disable Avast Hardware-assisted Virtualization
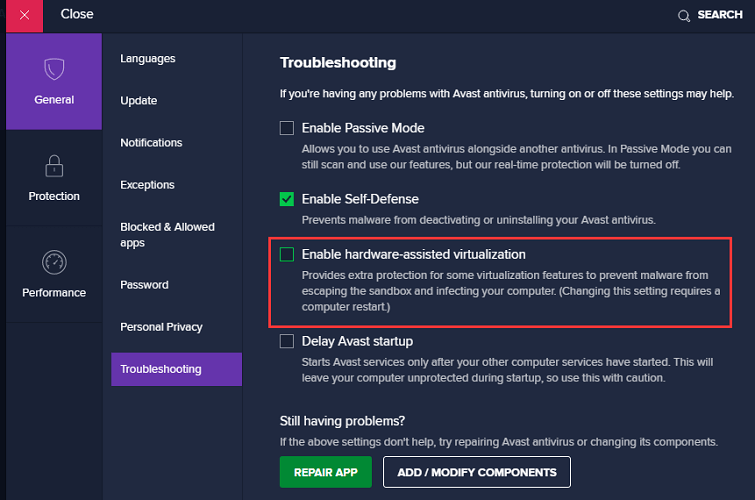
Some users report that the hardware-assisted virtualization of Avast would conflict with Android Studio’s AVD, which might be a reason for the error x86 emulation currently requires hardware acceleration on Android Studio. To fix the error, you can try disabling this feature in Avast if you have enabled it.
Step 1: Open the main interface of Avast and click Menu > Settings.
Step 2: In the General category, select Troubleshooting tab.
Step 3: Uncheck the option Enable hardware-assisted virtualization.

After disabling the hardware-assisted virtualization in Avast, you can restart your computer and launch Android Studio. Then check if the problem has been fixed. If it still exists, you should move on to the next solution.
Solution 2: Install the Intel HAXM Module
As we know, the PC need to meet the system requirements of Android Studio to run the program properly. Besides the system requirements, the Android Emulator also requires Intel Hardware Accelerated Execution Manager (HAXM) 6.2.1 or later versions.
Without HAXM module, AVD will be unable to compile applications using hardware virtualization and might get the error “emulator: error: x86 emulation currently requires hardware acceleration”.
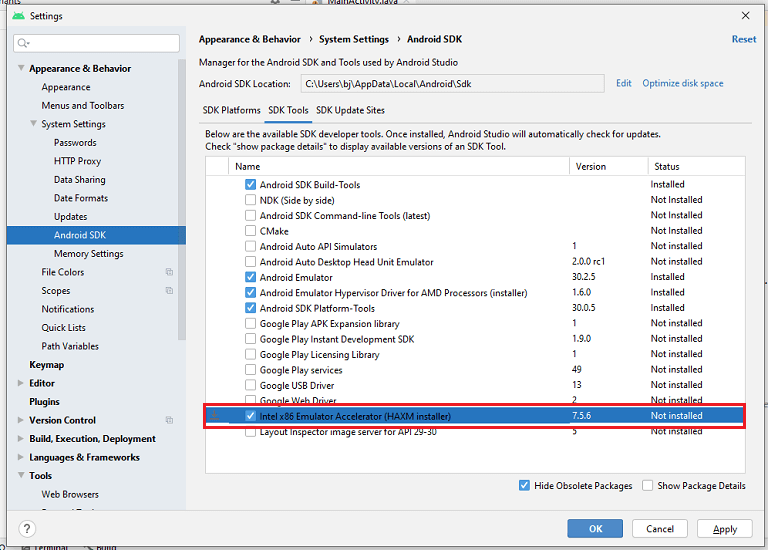
To solve the problem, you need to download and install the HAXM module via SDK Manager in Android Studio. You just need to:
Step 1: Open Android Studio and click File > Settings > System Settings > Android SDK to visit the SDK Manager.
Step 2: Select SDK Tools tab. Then check Intel x86 Emulator Accelerator (HAXM installer) and click OK or Apply. After that, follow the onscreen instructions to finish downloading the HAXM installer.

Step 3: Press Win + E to open File Explorer and find the installer. By default, it will be stored in the following location:
C:usersusernameAppDataLocalAndroidsdkextrasintelHardware_Accelerated_Execution_Managerintelhaxm-android.exe
Step 4: Double-click intelhaxm-android.exe to run the installer and follow the instructions to install the HAXM module.
Then you can relaunch Android Studio and check if it works properly. If this doesn’t work, you can keep trying the next solution.
Solution 3: Enable Windows Hypervisor Platform
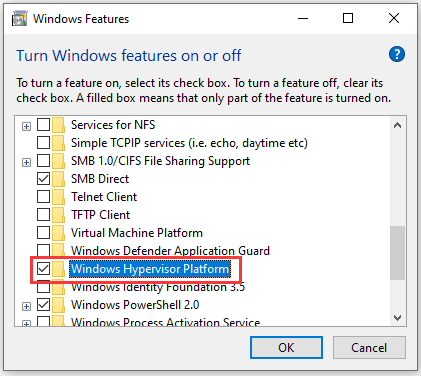
If you are using an AMD CPU with virtualization technologies (such as Ryzen), the reason for the error x86 emulation currently requires hardware acceleration on Android Studio might be the disabled Windows Hypervisor Platform on your PC. In this case, you can try enabling Windows Hypervisor Platform if it is available.
Step 1: Press Win + R to invoke Run window. Then type appwiz.cpl in the box and click OK to navigate to the programs and features quickly.
Step 2: Click Turn Windows features on or off in the left pane.
Step 3: Check the box next to Windows Hypervisor Platform and click OK to confirm the changes you have made.

Then you can reboot your PC and try using Android Studio again.
The “emulator: error: x86 emulation currently requires hardware acceleration” issue could also appear if the hardware virtualization is disabled in your BIOS or UEFI settings, and you might need to enable that feature to solve the problem.
Depending on the motherboard and CPU manufacturer, the detailed steps of enabling hardware virtualization might be different. You need to focus on the message which shows when the manufacturer logo appears during the startup. You can also search the motherboard module + setup key online to figure it out.


User Comments :