Do you want to try Windows 95? If so, you may need to download a Windows 95 ISO and then use it to create a Windows 95 VM. This post from MiniTool Partition Wizard offers you Windows 95 ISO download links.
Windows 95 ISO Download
Windows 95 is the successor to Windows 3.1x and the first operating system in the 9x family. It was released in 1995 and Microsoft ended extended support for Windows 95 in 2001.
Windows 95 merged Microsoft’s formerly separate MS-DOS and Microsoft Windows products. It improved the graphical user interface (GUI) and the “plug-and-play” feature. In addition, it also moved from the cooperatively multitasked 16-bit architecture to the 32-bit preemptive multitasking architecture.
Editions and Windows 95 ISO Download Links
Several Windows 95 editions have been released. There are several common editions:
- Windows 95 (retail and OEM): It is the original release.
- Microsoft Plus! for Windows 95: It contains several optional components for high-end multimedia PCs, including Internet Explorer, DriveSpace, and additional themes.
- Windows 95 OEM Service Release 2 (OSR 2): It introduces support for new hardware, most notably support for hard drives larger than 2 GB in the form of the FAT32 file system.
- Windows 95 OSR 2.5: It integrates Windows Explorer with Internet Explorer 4.0, making this version of Internet Explorer look very similar to the one featured in Windows 98.
Update: The download links have been removed due to the copyright issue. You need to find the ISO file on other websites.
System Requirements
To install Windows 95, the device should meet the following requirements:
- CPU: An Intel 386DX CPU of any speed
- RAM: 4 MB
- Storage: 50–55 MB
How to Install Windows 95 in VirtualBox
To try Windows 95, you may need to create a Windows 95 VM. Many people may want to use VirtualBox to create the Windows 95 VM. Here I will show you how to install Windows 95 in VirtualBox step by step.
Step 1: Click the above links to download a Windows 95 ISO file.
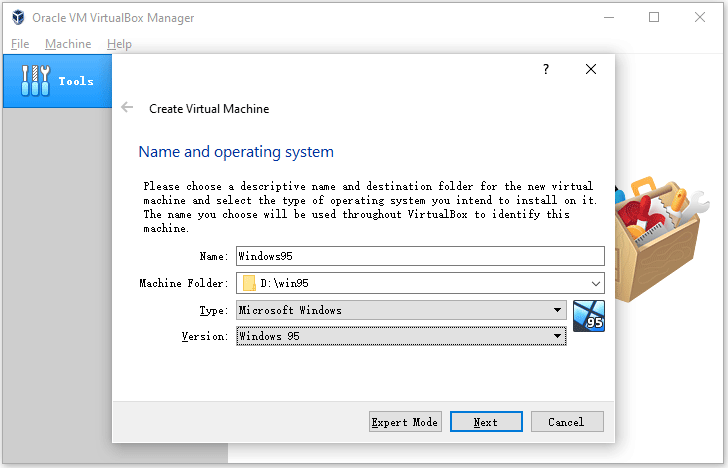
Step 2: Install and launch VirtualBox. Click the New icon and follow the Wizard to create a Windows 95 VM. Please set the VM Version to Windows 95. As for other parameters, you can keep the default options.

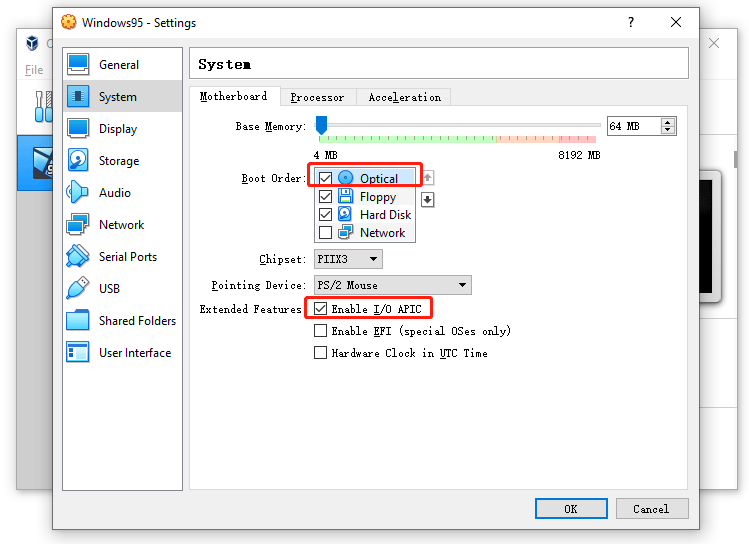
Step 3: Right-click the Windows 95 VM and choose Settings. Go to System > Motherboard. Set Optical drive as the first boot device and then enable the I/O APIC feature. Then, go to System > Processor and set the CPU value to 4.

Step 4: Go to USB and check the USB 1.1 (OHCI) Controller. Then, go to Storage and remove the Controller: Floppy. Then, highlight the Windows 95.vdi and check Solid-state Drive. Then, highlight Empty, click the optical drive icon, and click Choose a disk file. Add the Windows 95 ISO file you just downloaded to the VM.
Step 5: Save these changes and then click the Start button to run the Windows 95 VM. For the first running, you should follow the on-screen instructions to go through the complete Windows 95 installation process.

![Free Download Windows 98 ISO [1st & 2nd Editions]](https://images.minitool.com/partitionwizard.com/images/uploads/2022/03/windows-98-iso-thumbnail.png)

![Windows ME ISO Free Download and Install [Have a Try!]](https://images.minitool.com/partitionwizard.com/images/uploads/2022/07/windows-me-iso-thumbnail.png)
User Comments :