Password is used to protect your computer from being accessed by unauthorized users. However, if you are sure there is no one who has the physical access to your computer, you can enable Windows 7 auto login to enter your Windows 7 without password. MiniTool Partition Wizard provides more detailed information in the following contents.
Sometimes you might regard it as a waste of time if you need to enter the password when you want to access your Windows 7 PC. Actually, if there is no need to worry about privacy leakage, you can try the auto login in order to save time.
For computers running in a home environment, you can change the advanced User Account settings to enable auto login on Windows 7. For computers connected to a domain, you need to change some registry settings to achieve the goal. The detailed methods are listed below, and you can have a try.
Method 1: Set Auto Login Windows 7 via User Account
This method is quite easy to operate, and you just need to follow the steps below to enable Windows 7 auto login.
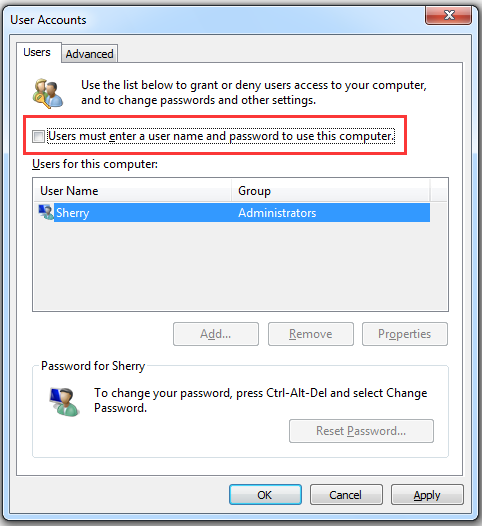
Step 1: Press Win + R to invoke Run window. Input netplwiz in the box and click OK to open User Account dialog.
Step 2: Under Users tab and Users for this computer section, select the user on which you want to set automatic login. Then uncheck Users must enter a user name and password to use this computer option.

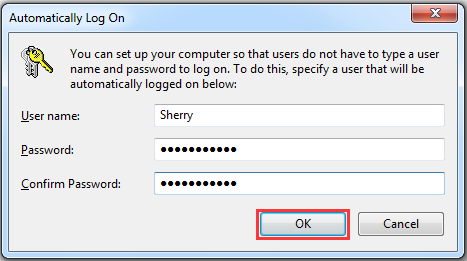
Step 3: Click Apply and the Automatically Log On window will pop up. Enter the password in the box and click OK.

Save the settings and you don’t need to enter the password the next time you launch the computer.
Method 2: Set Auto Login Windows 7 via Registry Editor
If your computer is connected to a domain, the method above won’t apply to you, as the username and password are assigned by the Active Directory. In this case, you need to change some registry keys if you want to enable auto login on Windows 7.
Here is how to do it.
Step 1: Open Run window and type regedit in the box. Then press Enter to run Registry Editor.
Step 2: Navigate to the following path:
HKEY_LOCAL_MACHINESoftwareMicrosoftWindows NTCurrentVersionWinlogon
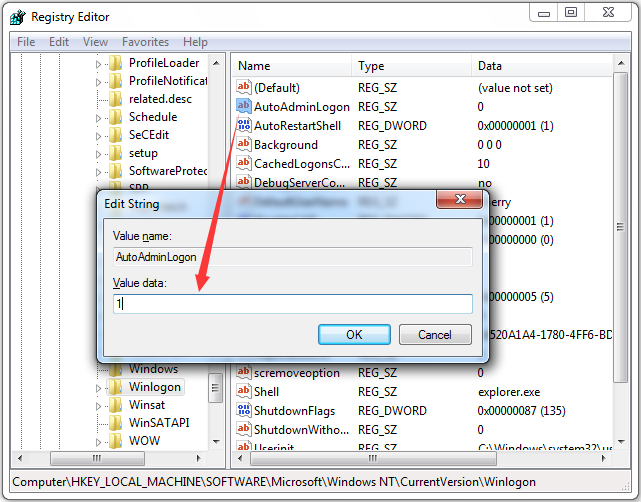
Step 3: Highlight Winlogon in left pane and right-click AutoAdminLogon in the right pane. Then select Modify and change the Value data to 1 in the pop-up window.

Step 4: Restart your computer and change User Account settings by following the Method 1.
Now you should restart your Windows 7 again. If you can log into your computer without password, it’s good. If you can’t, you need to run Registry Editor again and follow the steps below.
Step 1: Again, navigate to:
HKEY_LOCAL_MACHINESoftwareMicrosoftWindows NTCurrentVersionWinlogon
Step 2: With Winlogon highlighted in the left pane, right-click DefaultDomainName in the right pane and select Modify. Then type your domain’s name under Value data and click OK.
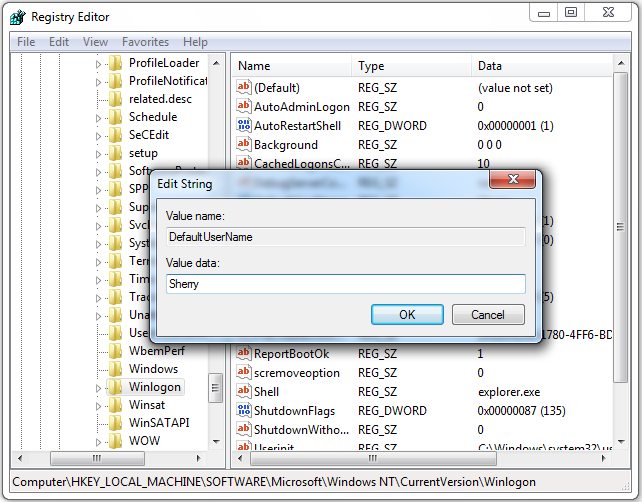
Step 3: Right-click any empty space in the right pane and select New > String Value and name it as DefaultUserName. Then input your username for its Value data.

Step 4: Create a string value named DefaultPassword with your current password as its Value data.
Step 5: Check if the Value data of AutoAdminLogon is 1. If it’s not 1, change it to 1.
Then restart your PC and you should be able to log in automatically.


User Comments :