Windows 11 is an operating system provided by Microsoft. It allows users to connect an iPad to a Windows 11 PC with a USB cable. However, some users reported the Windows 11 not recognizing iPad issue. This post from MiniTool Partition Wizard introduces how to solve it.
Windows 11, the successor to Windows 10, is a new operating system provided by Microsoft. It is based on Windows 10 and Windows 10 users can upgrade to Windows 11 for free as long as their PCs meet Windows 11 system requirements.
Unfortunately, some users reported that they cannot transfer files from their iPad to Windows 11 because the Windows 11 PC can’t recognize iPad. Why does it happen? How to solve the problem? Keep reading to figure them out.
Fix 1: Trust Your PC on iPad
When you connect your iPad to your Windows 11 PC for the first time, there will be a pop-up window asking you to trust this computer, which allows the PC to access your settings and data on the iPad. If you select the Don’t Trust option, your Windows 11 PC can’t recognize iPad.
So, when you receive the pop-up message, select the Trust option and then input the password to confirm the operation. If you taped Don’t Trust by accident, you can go to Settings > General > Reset > Reset Location & Privacy to reset that option.
If you have selected Trust but the problem still exists, move on to the next fix.
Fix 2: Try Another USB Port
Sometimes you might encounter iPad not showing up in Windows 11 due to a problematic USB port. To check for the connection issues, you should try plugging the USB cable into a different USB port on your Windows 11 PC.
In addition, you are recommended to disconnect other unnecessary peripheral devices, such as game controllers, external hard drives, USB flash drives, etc.
Fix 3: Make Sure Apple Mobile Device Service Is Enabled
If the Apple Mobile Device service is disabled, you could also encounter Windows 11 not recognizing iPad. To enable this service, you can:
Step 1: Click the Search tool on the taskbar and search for Services. Then open the Services app.
Step 2: Right-click App Mobile Device Service and select Properties.
Step 3: In the pop-up window, select Automatic for the Startup type option. Then click the Start button to run this service.
Step 4: Click Apply and OK to save the changed settings.
Fix 4: Update iTunes
iTunes is a program that can be used as a mobile device management tool. If your iTunes is outdated, your Windows 11 might be unable to recognize your iPad. Therefore, you’d better update your iTunes to the latest version. If there are any apps bundled with iTunes, update them as well. Alternatively, you can try reinstalling iTunes.
Fix 5: Run Hardware and Device Troubleshooter on Windows 11
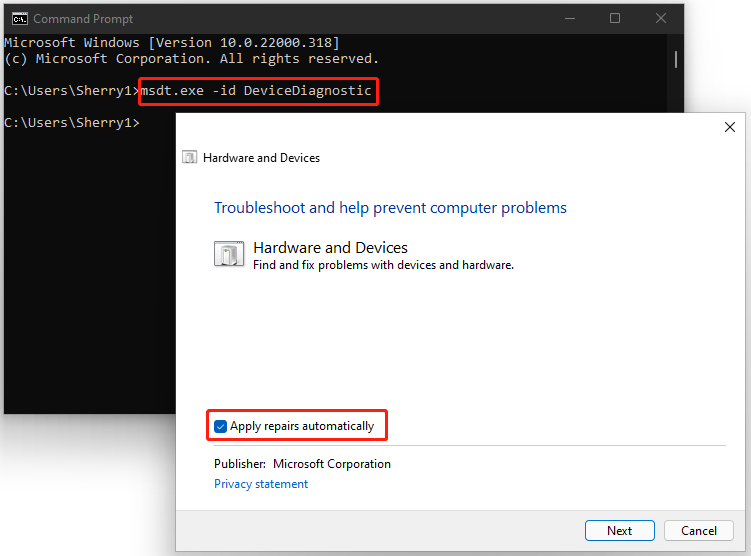
Windows 11 has a built-in troubleshooter that can check for hardware and devices issues. You can try to solve the iPad not showing up in Windows 11 issue by running this troubleshooter. And here are the detailed steps.
Step 1: Run Command Prompt.
Step 2: Type the following command and press Enter to execute it: msdt.exe -id DeviceDiagnostic
Step 3: In the pop-up window, expand the Advanced options and select Apply repairs automatically. Then click Next and follow the on-screen instructions.

Step 4: Restart your PC.
Fix 6: Reinstall the USB Device Driver for Your iPad
A corrupted or outdated USB driver could also lead to iPad not showing up in Windows 11. In this case, you need to reinstall the device driver to solve the problem.
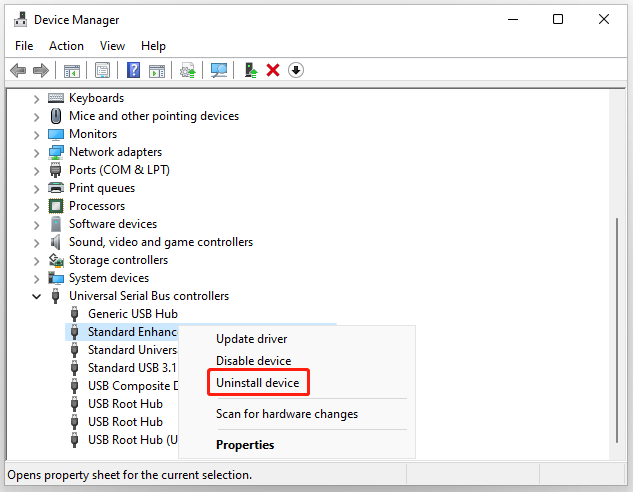
Step 1: Right-click the Windows button and select Device Manager.
Step 2: Expand the Universal Serial Bus controllers category. Then right-click the USB driver for your iPad and select Uninstall device.

Step 3: Follow the on-screen instructions to uninstall the driver successfully. Then right-click Universal Serial Bus controllers and select Scan for hardware changes to reinstall the driver.
Hope this tutorial can help you solve iPad not showing up in Windows 11.

User Comments :