A lot of users complain that Windows 11 keeps installing old AMD drivers automatically. Are you also troubled by the problem? Now, you come to the right place. This post of MiniTool explores several effective troubleshooting methods.
According to user reports, Windows 11 keeps installing old AMD drivers automatically even though they reinstall the drivers. Some other users reported that they installed the latest AMD driver from its official website but Windows 11 keeps replacing with old AMD drivers. Here’s a true example from the techcommunity.microsoft forum:
Windows 11 keeps installing old AMD display drivers. After the PC is idle for a couple of minutes Windows 11 starts an autoinstall of old AMD display drivers and my graphics card won’t work properly after that. It deletes the AMD Radeon software, too. I’ve already disabled driver auto-updates in the group policy settings, but that doesn’t help. Can you please fix this issue?https://techcommunity.microsoft.com/t5/report-an-issue/windows-11-keeps-installing-old-amd-display-drivers/m-p/3159002
How to fix the Windows 11 AMD driver issue? There are still no official fixes provided by Microsoft, but we summarize several proven troubleshooting methods after investigating extensive users reports from different forums and communities. Let’s start trying.
Fix 1. Roll Back Your AMD Display Drivers
The first and most effective method proven by many users is to roll back the AMD driver via Device Manager. If you installed the latest version of the driver from the AMD Radeon website but Windows 11 keeps replacing with old AMD drivers, then this method is suitable for you.
This is because when you use Device Manager to roll back the driver, it will actually set a flag for Windows Update to never update that specific driver again. Here’s how to do that:
Step 1. Press the Win + R keys to open the Run dialog box, and then type devmgmt.msc in it and hit Enter.
Step 2. In the Device Manager window, expand the Display adapters category, and then right-click the ADM Radeon graphics card driver and select Properties.
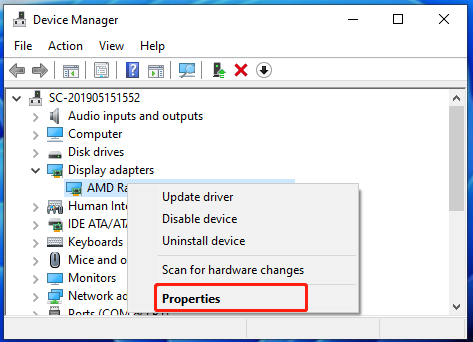
Step 3. Navigate to the Driver tab and click on Roll Back Driver.
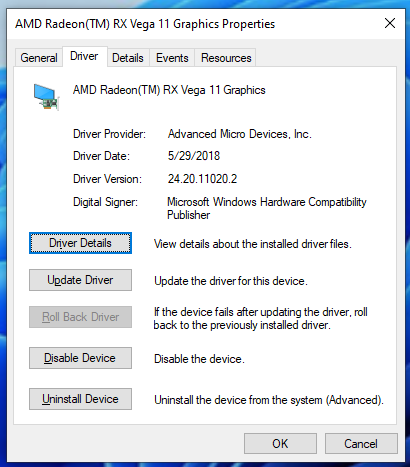
Step 4. Then a window pops up telling you why you want to revert the driver, select the most appropriate option and click on Next, and follow the on-screen instructions to complete the operation.
After that, you can reboot the computer and see if Windows 11 keeps installing old AMD driver automatically.
Fix 2. Uninstall the Current Old AMD Drivers
If Windows 11 keeps installing outdated AMD drivers, you can try uninstalling the current old driver and installing the latest one. To do so, you can follow Steps 1 to 2 to open the Device Manager window, right-click the AMD graphics card driver and select Uninstall driver. Once uninstalled, restart your PC and check if Windows 11 keeps installing old AMD driver automatically.
Fix 3. Change the Device Installation Settings
Sometimes Windows 11 keeps installing outdated AMD drivers is due to improper device installation settings. In this case, you can try changing the device installation settings to fix the issue.
Step 1. Press the Windows icon at the bottom of the screen, and then type view advanced and select View advanced system settings.
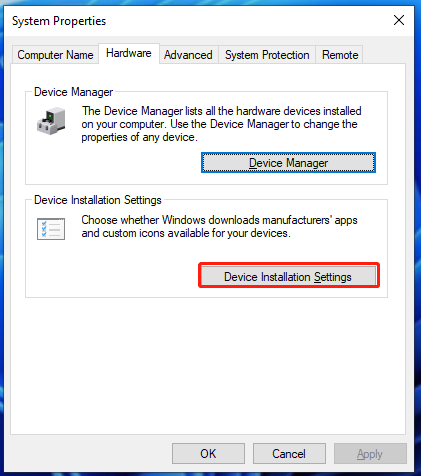
Step 2. In the System Properties window, go to the Hardware tab and click on Device Installation Settings.
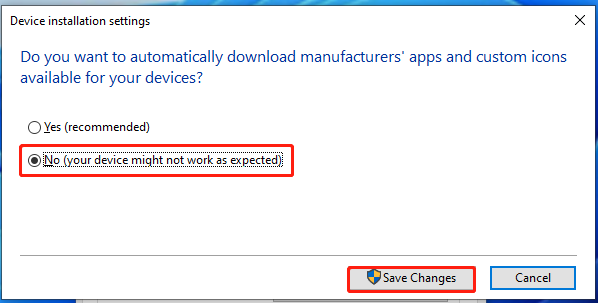
Step 3. Select the No (Your Device Might Not Work as Expected) option and click on Save Changes. Then click on Yes if you are prompted by User Account Control.
Step 4. Click on Apply and OK to execute the changes.
Once done, restart your computer and see if Windows 11 automatically installs outdated AMD drivers.
Fix 4. Do Not Include Drivers with Windows Update
Some users from the Reddit forum reported that they managed to fix the “old AMD driver keeps installing in Windows 11” error by making changes in Group Policy Editor. If you are using the Windows 11 Pro or Enterprise version, you can try this method.
Step 1. Press the Win + R keys to open the Run dialog box, and then type gpedit.msc in it and hit Enter.
Step 2. In the Local Group Policy Editor window, go to the following path via the left navigation bar.
Computer Configuration/Administrative Templates/Windows Components/Windows Update/Manage Updates offered from Windows Updates
Step 3. With the Windows Update entry selected in the left panel, and then double click the Do not include Drivers with Windows Update option.
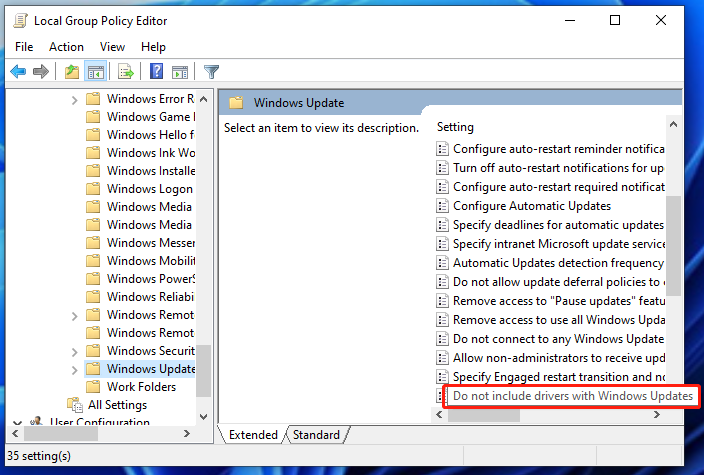
Step 4. Select Enabled in the pop-up window and click on Apply and then on OK to save the change.
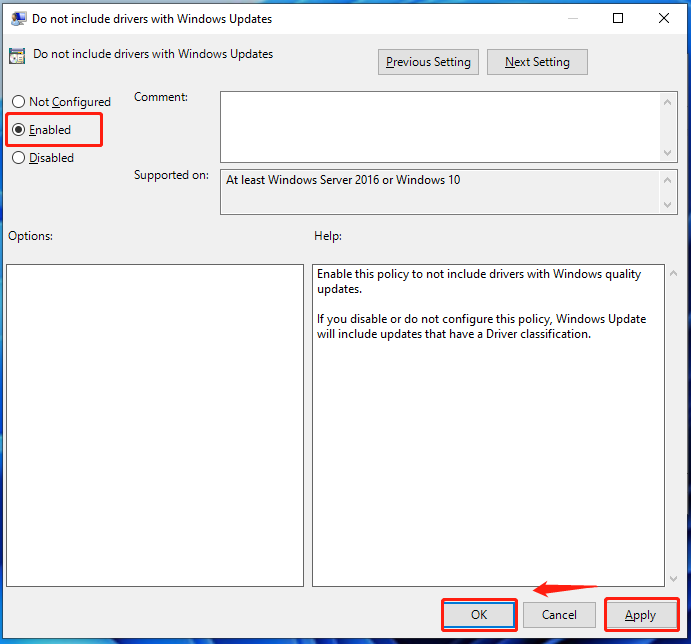
Now, you can reboot the computer and see if Windows 11 keeps installing old AMD drivers.
Fix 5. Use a Third-party Display Driver Uninstaller Tool
If none of the above methods fix the “Windows 11 keeps installing old AMD display drivers” issue, you may consider using a professional driver update and uninstaller tools such as DriverFix, DriverEasy, and DDU. These tools can help you uninstall, install, and update AMD drivers on Windows 11/10 easily.


User Comments :