What is a Windows 11 hosts file? Do you know how to edit hosts file Windows 11? In this post, MiniTool Partition Wizard provides a detailed introduction to the Windows 11 hosts file. If you are wondering how to edit hosts file Windows 11, this post may be helpful for you.
What Is Hosts File in Windows 11
The hosts file in Windows 11 is a very important file for Windows systems. It connects IPs and domains. Usually, this file is mainly used to connect a special IP address and a virtual domain, allowing you to access special websites. Or if some IP address is blocked by the router or government, you can change the IP address of that domain, if not blocked, then you can visit the website again. In most cases, the Windows 11 hosts file does not contain any IP addresses and domains, a completely blank file.
The file is located in the system partition: \Windows\System32\drivers\etc, which in most cases is the C drive. So, it’s in C:\Windows\System32\drivers\etc. In this folder, the first file has no extended file type, just a “host”.
How to Edit Hosts File in Windows 11
Sometimes, you may need to edit Windows 11 hosts file. Editing the hosts file allows you to trick your computer into resolving to the specific IP address you want. There may be many reasons why you might want to edit hosts file Windows 11. Maybe you are using software that has nothing to do with the domain name. Or you’re leaving your old server and want to test your domain before moving your DNS settings.
Whatever the reason, editing the hosts file in Windows 11 is fairly straightforward. So, there are two ways to edit Windows 11 hosts file. The first involves making a copy of the original file, then replacing it. The second uses the command line to append a line to hosts file.
Edit the Hosts File with Notepad
Step 1: Type notepad in the Windows search box, and then right-click the Notepad and select Run as administrator.
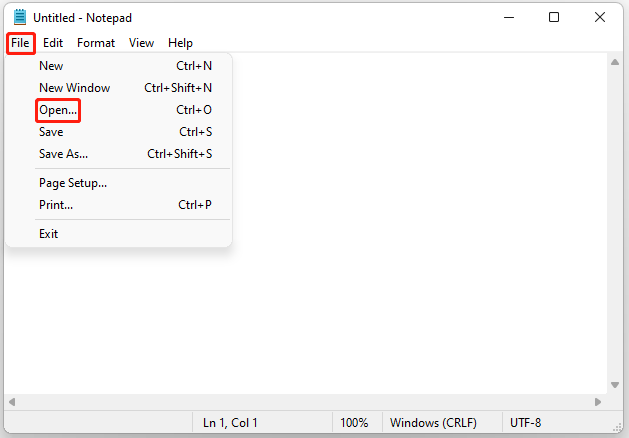
Step 2: In the Notepad window, click on File and select Open from the context menu.

Step 3: In the File name field, paste the following path on it and click on the Open button.
C:\Windows\System32\drivers\etc\hosts
Step 4: Now, you can edit the hosts file in Notepad. After you complete the editing, press the Ctrl + S key to save the changes. To map a specific domain, you can add a line to the hosts file according to the following example.
Start with the destination IP address, then type a space and the domain name. If you want to block the website, redirect it to 127.0.0.1.
To take effect, do not enter the #.
After that, restart your computer to make the new hosts file take effect.
Edit the Host File with Command Line
Step 1: Type command in the search box, and then right-click the Command Prompt and select Run as administrator to open the Command Prompt as administrator.
Step 2: In the Command Prompt window, use the command shown below to add an entry to your hosts file. Here, for example, add 192.168.1.12 TOMPC to the hosts file, the command line as:
echo 192.168.1.12 TOMPC >> %SystemRoot%\System32\drivers\etc\hosts
Step 3: To check if the hosts file has been updated, use the following command:
type %SystemRoot%\System32\drivers\etc\hosts
After that, restart your computer to make the new hosts file take effect.


User Comments :