Do you know where Action Center is in Windows 11? Have you encountered Windows 11 Action Center not working while using it? The problem could be caused by various factors, but don’t worry. In this post from the MiniTool Partition Wizard website, you can learn some fixes. Keep reading and have a try!
Windows 11 is a new operating system released by Microsoft in 2021. It has a different outlook from Windows 10 and some features are changed a lot. For example, the taskbar icons in Windows 11 display in the middle instead of the left by default. For more details about Windows 11 and Windows 10, you can refer to Windows 11 vs Windows 10.
In Windows 11, the Action Center is also different from that in Windows 10. Windows 11 Action Center is replaced by Quick Settings and Notification Center. When it comes to Windows 11 Action Center won’t open, it indicates one of them doesn’t work. How to fix it?
Reasons for Windows 11 Action Center not opening could be various. You might need to try multiple solutions until the problem is fixed. Now, let’s see what you can do.
Fix 1: Restart File Explorer
File Explorer is a built-in tool in Windows 11 that manages files and is responsible for displaying the desktop icons, the Start Menu, the Taskbar, the Control Panel, etc. If your Windows 11 Action Center won’t open, the first solution you should try is to restart File Explorer.
Fix 2: Make Sure Your Windows 11 Action Center Is Enabled
To solve Windows 11 Action Center not opening, you should also ensure that the Action Center is enabled.
You can enable Windows 11 Action Center using Registry Editor, and here are the steps.
Step 1: Press the Windows key along with the R key. Then type regedit in the box and press Enter to open Registry Editor.
Step 2: In Registry Editor, navigate to ComputerHKEY_CURRENT_USERSoftwarePoliciesMicrosoftWindows.
Step 3: In the left pane, right-click Windows and select New > Key. Then name the new key as Explorer. If there is already a key named Explorer, you can jump to Step 5.
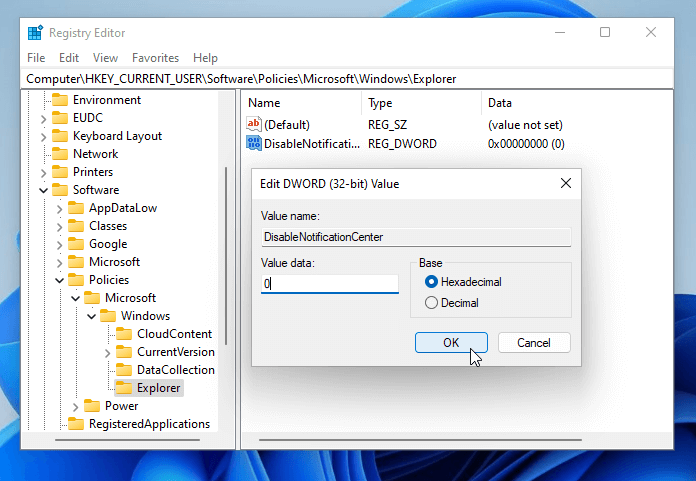
Step 4: Select the Explorer key. In the right pane, right-click any empty space and select New > DWORD (32-bit). Then name the new string as DisableNotificationCenter.
Step 5: Right-click DisableNotificationCenter and select Modify. In the pop-up window, change the Value data to 0.

Step 6: Exit Registry Editor and restart your computer.
Then you can check if the problem “Windows 11 Action Center won’t work” has been solved.
Alternatively, you can enable Windows 11 Action Center via Group Policy Editor:
- Open Group Policy Editor.
- Go to User Configuration > Administrative Templates > Start Menu and Taskbar.
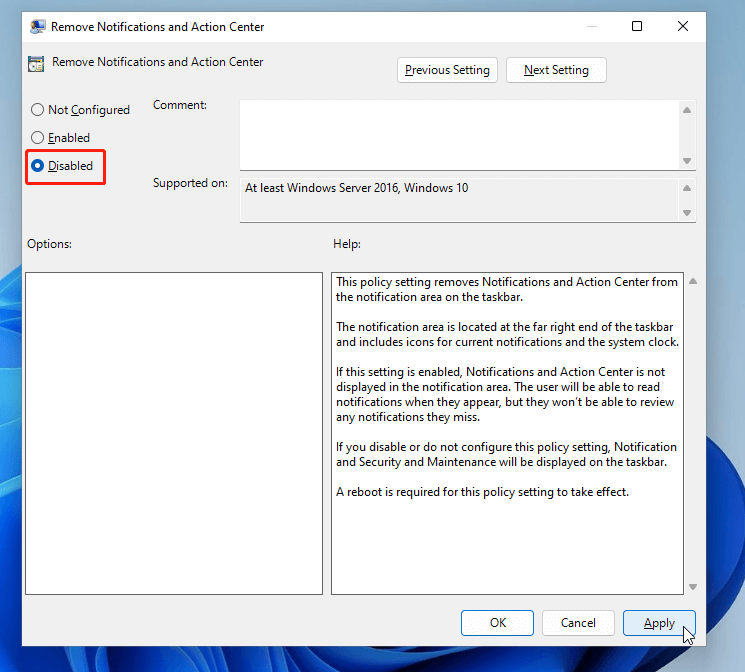
- In the right pane, find Remove Notifications and Action Center and double-click it.
- Make sure the Disabled option is selected and click Apply > OK.
- Restart your Windows 11.

Fix 3: Repair Windows Apps
You might also encounter Windows 11 Action Center won’t open because of corrupted Windows apps. To repair Windows apps, you can use Windows PowerShell.
Step 1: Open Windows Search and search for PowerShell. Then right-click PowerShell in the search results and select Run as administrator.
Step 2: In PowerShell, input the following commands one by one and press Enter after each:
- Get-AppxPackage Microsoft.Windows.ShellExperienceHost | foreach {Add-AppxPackage -register “$($_.InstallLocation)appxmanifest.xml” -DisableDevelopmentMode}
- Get-AppXPackage | Foreach {Add-AppxPackage -DisableDevelopmentMode -Register “$($_.InstallLocation)AppXManifest.xml”}
Fix 4: Run an SFC Scan
You should also check for corrupted or missing system files and SFC (System File Checker) can help.
Step 1: Open Windows Search, search for Command Prompt, right-click it, and select Run as administrator.
Step 2: Input sfc /scannow and press Enter.
Then you just need to wait patiently until the process is finished.
If Windows 11 Action Center missing or not opening issue still exists, you might need to check for account issues by creating a new user account. You can also try restoring Windows 11 to a previous point.

User Comments :