How much do you know about USB debugging which is a developer mode in Android phones? In this article, MiniTool Partition Wizard will give a brief introduction about USB debugging and show you how to enable or disable it in Android.
What is USB Debugging Android
Android is very user-friendly and has been improved a lot nowadays. Apart from the common features, there are also plenty of hidden features designed for advanced users. If you are a senior user of Android phone, you might have heard about and even used the USB debugging. It is one of hidden features listed under the Developer Options menu.
USB debugging is a mode on Android phones that allows Android devices to communicate with the Android Software Developer Kit (SDK) over a USB connection. In other words, this mode works to facilitate the connection between the Android device and a computer with Android SDK, which enables you to pull crucial information from Android phone easily.
By connecting the Android device to the computer in USB debugging mode, you can copy data between your computer and your device, install apps on your device without notification, and read log data. It is commonly used for development purpose, as the developer need to copy the newly programmed apps from PC to the device for testing and read the internal logs. So, it is also known as Developer Mode.
How to Enable USB Debugging Android
After learn about what is USB debugging, you might want to enable it. But how? To enable USB debugging, you need to firstly activate the Developer options menu which is hidden by default. Here’s a simple guide.
Step 1: Go to Settings of your Android device.
Step 2: Scroll down to locate About phone section. Then, you will see a Build number item in the new page. Tap it several times, and you will receive a notification saying that you’re now a developer.
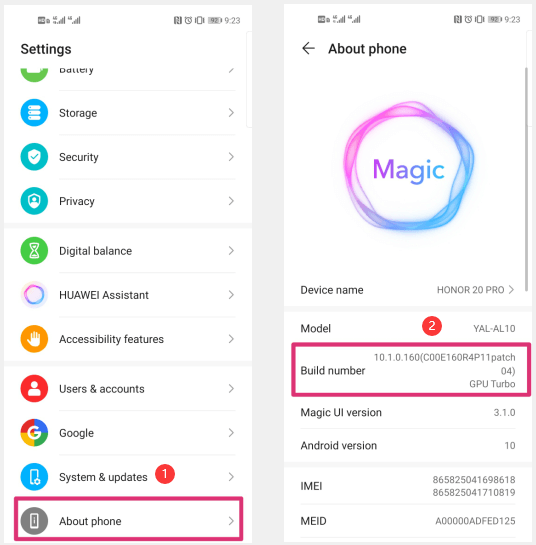
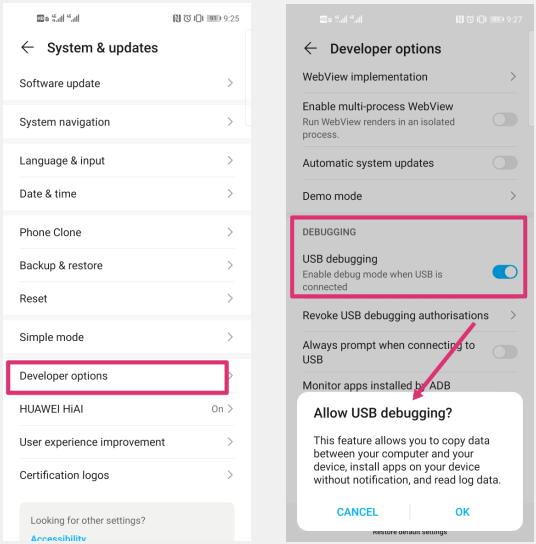
Step 3: Go back the Settings and now expand the System & updates section where you can see the Developer options entry is available now. In some versions of Android, you might find this entry in About phone section instead.
Step 4: Open Developer options menu, locate USB debugging under the DEBUGGING section, and tap the slider to enable it. When you get a dialog that tells what the feature is for, just hit OK to confirm allowing USB debugging.
How to Disable USB Debugging
After enabling the USB debugging Android, it is OK to have your device connected to your personal computer or you are trying to use the Android Debug Bridge (ADB).
But problems might occur when you plug your device into an unfamiliar USB port like the public charging station. Someone who can access the charging station will get the permission to access your device granted by this mode, and they are able to steal your private information and even push certain malware or virus to your device.
Therefore, it is not recommended for non-developers to always keep the USB debugging mode on. You should enable it only when you need to use it, and don’t hesitate to disable it after you’ve finished your operations.
To disable this feature, just find it in the Settings of your device as mentioned before and toggle off its switch button. You can also exit the development environment by tapping the slider next to Developer options in the same page. In this way, the Developer options menu will be hidden again automatically.

User Comments :