Are you troubled by Warframe error 10054? This error is accompanied by the pop-up message “An existing connection was forcibly closed by the remote host. Error 10054”. Don’t worry. This post of MiniTool summarizes 5 solutions to fix the issue.
Solution 1. Adjust the In-Game Region
If there are any issues between the Warframe servers and your game’s region, you may encounter the error 10054. To get rid of the error, you can try changing your current region. Here’s how to do that:
Step 1. Locate to the Warframe Menu and click on Options from the left pane.
Step 2. Go to the Gameplay tab and click on Region from the listed options. Then select another region from the drop-down menu and click on the Confirm button.
Step 3. Revert back to your region.
Step 4. Close the Warframe Menu and see if error 10054 Warframe still persists.
Solution 2. Enable the IPv6 Internet
As you might know, IPv6 is the latest IP standard that provides an identification and location mechanism for your computers on routers and networks. With enabled IPv6 internet, Warframe can access its servers more quickly, which may fix Warframe chat not working. Follow the steps below to enable IPv6.
Step 1. Open the Warframe Menu again and navigate to the Chat tab.
Step 2. Navigate to the Ipv6 section and switch it on.
Step 3. Now, you need to enable IPv6 access on your Windows PC. Right-click the Network icon in the Notification Area and select Open Network and Sharing Center.

Step 4. Click on Change adapter options (Settings) in the pop-up window.
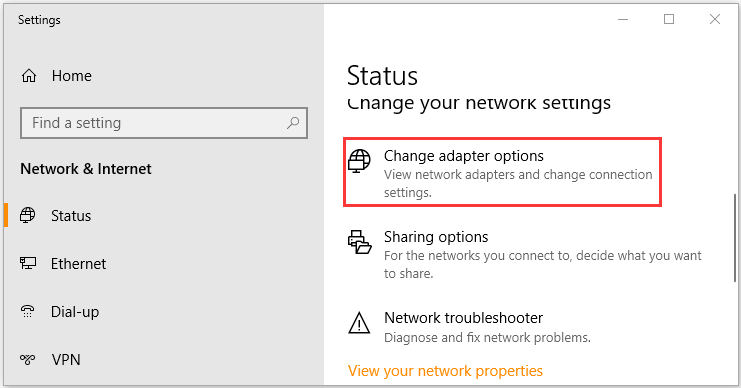
Step 5. Right-click the active network connection and select Properties from the pop-up window.
Step 6. Tick the checkbox next to Internet Protocol Version 6 (TCP/IPv6) and click on OK to save the changes.
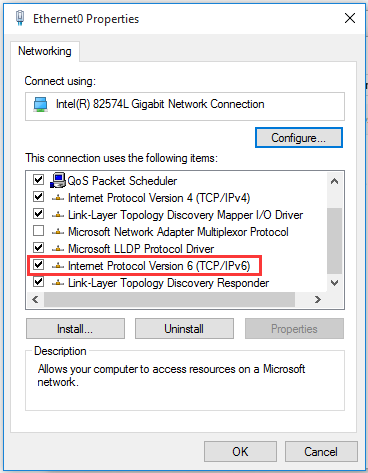
After that, launch the program and check to see if the Warframe failed to connect to chat server issue has been fixed.
Solution 3. Switch to Google DNS
If there are any problems in querying the DNS server, then it may trigger the Warframe error 10054. Under this situation, you can try switching to the Google DNS server. Here’s how:
Step 1. Type control in the search box and select the Control Panel app.
Step 2. Change the View by to Category type and click on View network status and tasks.
Step 3. Click on Change adapter settings, and then right-click the network adapter and select Properties.
Step 4. Go to the Networking tab, and then select the Internet Protocol Version 4 (TCP/IPv4) and click on Properties.
Step 5. In the pop-up window, select Obtain an IP address automatically and Use the following DNS server addresses. Then enter 8.8.8.8 to replace the initial IP address for the Preferred DNS server and enter 8.8.4.4 for the Alternate DNS server. After that, click on OK to save the changes.
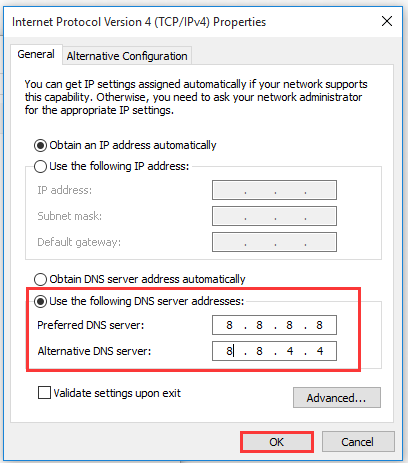
Now, launch the client and see if you get rid of the Warframe error 10054.
Solution 4. Refresh the Network Settings
It is reported that corrupt network settings of the Windows system can cause Warframe error 10054. To fix it, you can try resetting the network settings.
Step 1. Type cmd in the search box, and then right-click Command Prompt and select Run as administrator from the context menu.
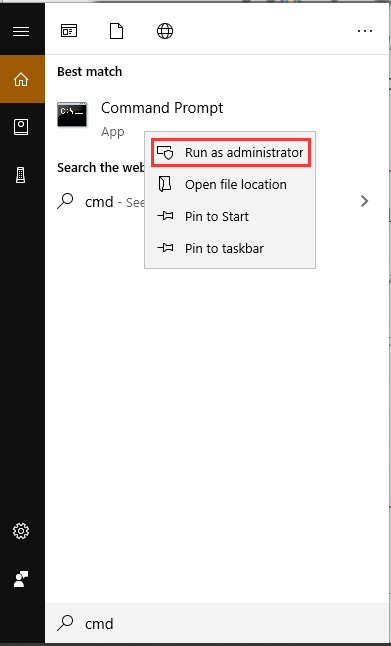
Step 2. Type the following commands one by one and hit Enter after typing each one.
- netsh int ip reset c:resetlog.txt
- ipconfig /release (Skip if you are using static IP)
- ipconfig /renew (Skip if you are using static IP)
- ipconfig /flushdns
- netsh winsock reset
Step 3. Reboot your computer and see if error 10054 Warframe still persists.
Solution 5. Disable UPnP and NAT-PMP
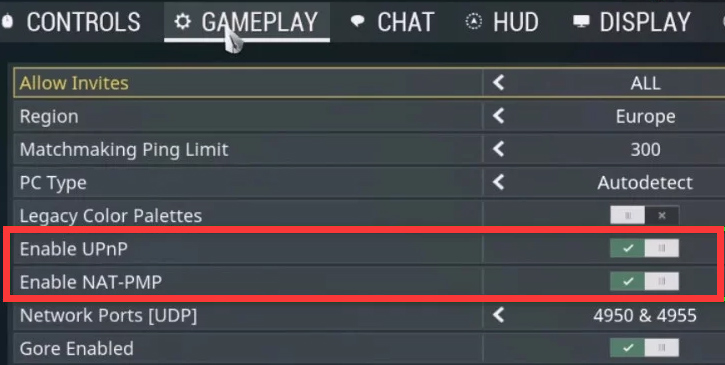
Some users reported that disabling UPnP and NAT-PMP can help fix the Warframe error 10054. Here it’s worth having a try.
Step 1. Open the Warframe Menu and click on Options, and then navigate to the Gameplay tab.
Step 2. Toggle off the switch to Enable UPnP and Enable NAT-PMP.
Step 3. Click on Confirm to save the changes.
Now, check if the error 10054 Warframe is resolved or not.

User Comments :