Do you know how to share files between host OS and guest OS in VirtualBox? In this post, MiniTool Partition Wizard shows you how to create a VirtualBox shared folder in your computer.
Sharing Files Between Host and Guest OS
Virtual machine is software that simulates a computer in an isolated environment. Through this software, you can run Linux on Windows computer or run Windows on Linux computer. Its obvious advantage is that the risks (like virus, OS corruption, etc.) appearing in guest OS (the simulated OS in virtual machine) will not affect host OS (the physical computer).
However, due to the isolation, the guest operating system in the virtual machine is not allowed to access your computer’s file system by default. If you need to share files between the host and guest computers, this is very inconvenient.
If you don’t need to share files between host and guest computers frequently, you can use USB drive to transfer files between host OS and guest OS. You just need to move files to USB drive in an OS and then switch control to the other OS. But this method is inconvenient if you need to transfer files frequently.
In this situation, you need to create a shared folder for the host and guest OS. VirtualBox is one of the best virtual machine programs. In the following content, I will show you how to create a VirtualBox shared folder.
How to Mount a VirtualBox Shared Folder
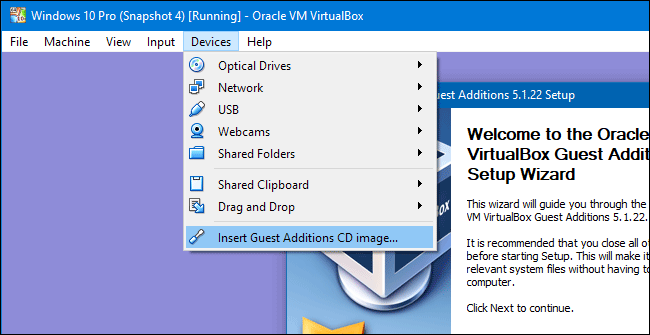
Step 1: Install VirtualBox Guest Additions on the guest computer. This will provide additional capability to a guest virtual machine, including file sharing. Please open the guest OS and then navigate to Devices > Insert Guest Additions CD image. Then, VirtualBox will look for the needed file.

Step 2: After VirtualBox Guest Additions tool is installed, you should then designate a folder from the host OS as the shared folder. Please follow the steps below:
- Navigate to Machine > Settings.
- In the “Settings” window, switch to the “Shared Folders” tab.
- Click the “Add” button to create a new shared folder.
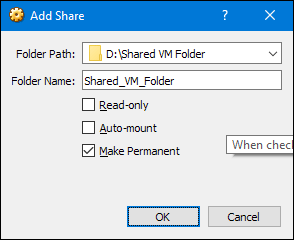
Step 3: Configure shared folder properties and click OK button. In the “Add Share” window, you can specify the following items:
- Folder Path: The location of the shared folder on your host OS.
- Folder Name: The name of the shared folder on the guest OS.
- Read-only: By default, the virtual machine has full read-write access to the shared folder. This checkbox makes the virtual machine only able to read files from the shared folder, but not modify them.
- Auto-mount: This option makes the guest operating system attempt to automatically mount the folder when it boots.
- Make Permanent: This option makes the shared folder a Machine Folder. Machine Folders are permanent folders that are shared until you remove them. If you don’t select this option, it becomes a transient folder that is removed with the virtual machine restarts.

Through the above steps, the VirtualBox shared box is created well. You can then find it in your operating system’s network drive list or in the file system explorer.


User Comments :