Do you need to make VirtualBox boot from USB? In this post, MiniTool Partition Wizard gives you a detailed guide on how to boot VirtualBox OS from USB drives. This guide can be applied in Windows, Linux, and other OS.
Can I Make VirtualBox Boot from USB?
VirtualBox is one of the most popular solutions used to manage and run virtual machines. It can run a guest operating system in a virtualized environment and some people like to try a new OS in it.
After a Virtual machine is created, VirtualBox allows it to boot from the CD-ROM, floppy disk, or hard disk by default, but there is no U disk to boot. However, some people prefer to boot the VirtualBox OS from USB so that they can save space, etc.
Then, can I boot from a USB flash drive? The answer is yes! But as this option isn’t exposed in the interface and requires some digging, it may not always work perfectly.
VMware vs VirtualBox, Which Is Better For You
How to Make VirtualBox Boot from USB
In this part, I will take Windows as an example to show you how to make VirtualBox boot from USB. Please refer to the following steps:
Step 1: Make sure you have VirtualBox installed on your system. Then, connect the USB drive containing the operating system you want to boot to your computer.
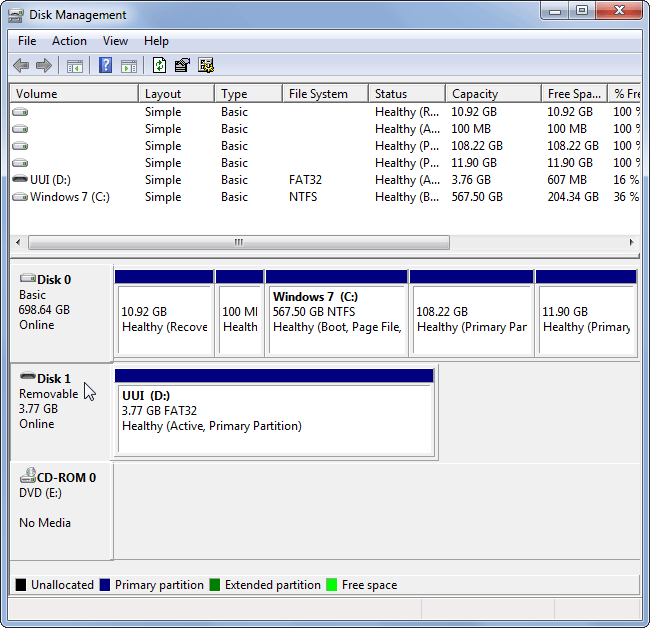
Step 2: Press “Windows + R” keys, type “diskmgmt.msc” into the Run dialog, and press Enter to open the Disk Management window. In the window, note down the disk number associated with the USB drive. In the following picture, the disk number is Disk 1.
Step 3: Close any open VirtualBox windows. Then, open a Command Prompt as Administrator. Here are two ways for you:
- On Windows 7: Open the Start menu, search for Command Prompt, right-click the Command Prompt shortcut, and select Run as administrator.
- On Windows 8 or 10: Press Windows Key + X and click Command Prompt (Administrator).
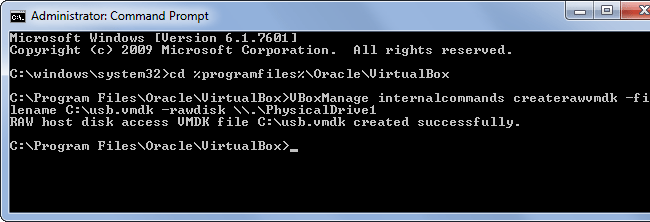
Step 4: In the Command Prompt window, type the following commands and press Enter.
- cd %programfiles%OracleVirtualBox (This command will navigate to the directory where the VirtualBox is located, but if you installed VirtualBox to a custom directory, the directory path in the command should be replaced accordingly).
- VBoxManage internalcommands createrawvmdk -filename C:usb.vmdk -rawdisk \.PhysicalDrive# (vmdk is a virtual machine disk file related to the USB device. C:usb.vmdk is the file path where you want to save the usb.vmdk file. # is the disk number you noted down before.)
Step 5: Create a virtual machine based on the usb.vmdk file.
- Right click the VirtualBox shortcut and select Run as administrator. Only in this way, VirtualBox can access raw disk devices.
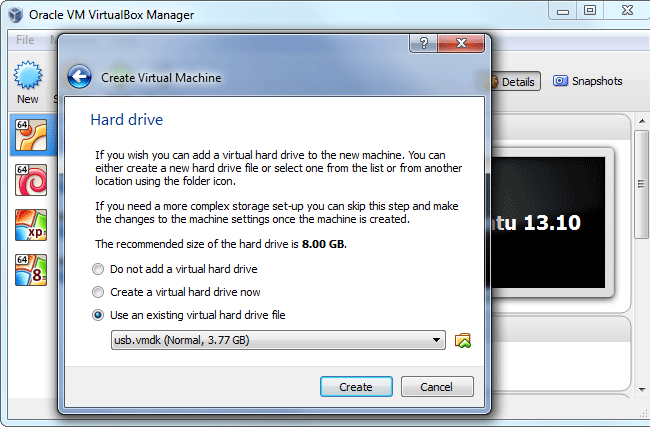
- Create a new virtual machine by clicking the New button and go through the wizard. Select the operating system on the USB drive when prompted.
- When you’re asked to select a hard disk, select Use an existing virtual hard drive file, click the button to browse for the file, and navigate to the file path (for example, C:usb.vmdk) where the vmdk file is saved.
After completing the above steps, you can boot the virtual machine and it should boot the operating system from your USB drive, just as if you were booting it on a normal computer. But when you boot VirtualBox from USB, there are some notes for you:
- The USB drive containing the OS image should be inserted into your computer.
- The VirtualBox should be run as an administrator.
- The USB device must be the first hard disk in your virtual machine or VirtualBox won’t boot from it.

User Comments :