This post mainly talks about some questions related to virtual drive Windows 10 like what is virtual drive, how large can a VHD virtual disk be, what tool can you use to modify a virtual hard disk, etc. You can check for details in this post of MiniTool.
What Is Virtual Drive Windows 10
In Windows 10, a virtual hard disk (VHDX or VHD) is a file with a “.vhdx” or “.vhd” extension. In essence, virtual hard drives are a computer within a computer, but with storage instead of processing power.
In some cases, virtual drive also refers to a cloud-based storage solution. For example, Google Drive, iCloud, OneDrive, and Dropbox are virtual hard drive services.
The VHDs usually are attached to virtual machines and work as their data drives. You can use the virtual drive as a hard drive, CD drive, or RAM disk. On virtual drives, you can store any files including documents, pictures, videos, boot files, and even the whole OS.
Also read: How to Use Windows 10 as a Virtual Machine – A Step-by-Step Guide
Further reading:
How large can a VHD virtual disk be? The VHD format supports virtual disks up to 2040GB in size, while the VHDX format supports disks up to 64TB.
What Does the Virtual Drive Do
Virtual hard drives serve plenty of purposes, such as storage, security, and additional storage as well. This disk image file format is used for replicating an existing hard drive in some cases, including all data, applications, and structural elements. It can store the contents that the physical host can access and use.
As the virtualized drive is separate from the main system, it is likely that cyberthreats will be confined to this drive. Managed Services Providers (MSPs) works on a virtual drive to keep business data safe within a broader system. The virtual drive could be a useful environment where you can test changes and updates without affecting the main server directly.
Virtual drives are pretty useful in cases where data need to be fairly portable. They are beneficial to Windows devices because the OS can natively mount a VHD or VHDX file as easily as it mounts other removable media.
Recommended reading: How to Mount and Unmount Drive in Windows 10
How Does Virtual Drive Work
A virtual hard disk (VHDX or VHD) works in the same way as a physical hard drive. However, it is associated with virtual machines and feature as their system drives. Though it is convenient and flexible, it often results in slower performance.
The creation of a virtual drive is performed by dividing disk space on a machine to install virtual elements. If a virtual drive is installed on the computer in this way, it can contain an operating system, data, and applications.
Under this circumstance, the capacity of the physical drive affects the capacity of the virtual drive. Virtual drive types decide how they occupy physical disk space on a host’s file system. Fixed-size drives automatically consume the whole allocated space once the drive is created, while the dynamically expanding option will only use the necessary space.
How to Create a Windows 10 Virtual Drive
The multiple uses of the virtual drive can extend your disk management capabilities on Windows 10, which brings you many benefits.
A virtual drive Windows 10 is useful in cases like loading a DVD image in ISO format, partitioning ramdisk for apps that hog system performance, or creating a drive that is protected by a password.
Here comes the question – how to create a VHDX or VHD virtual drive on Windows 10. Here is a step-by-step guide for you.
Step 1: Right-click on the Windows icon on the desktop and then click Disk Management in the prompted menu.
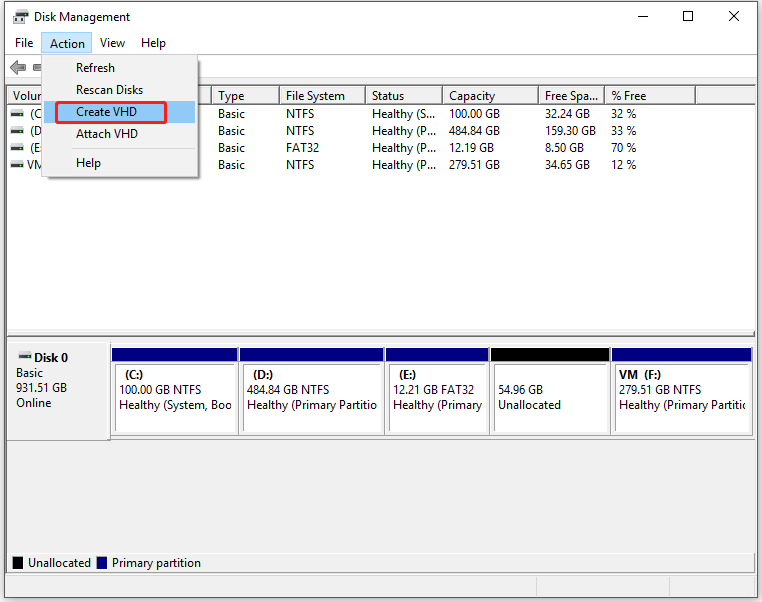
Step 2: Click on the Action tab in the Disk Management window and click Create VHD.
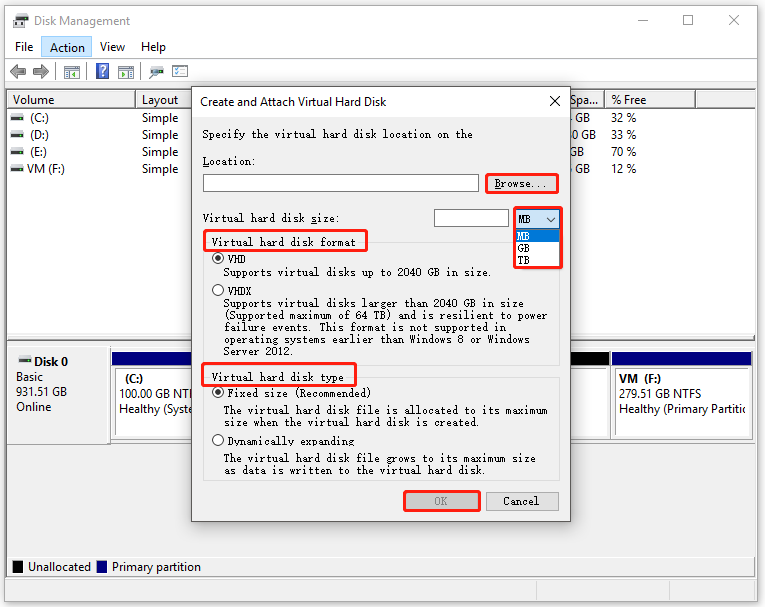
Step 3: In the pop-up window, configure settings for the new virtual drive Windows 10.
- Click Browse.
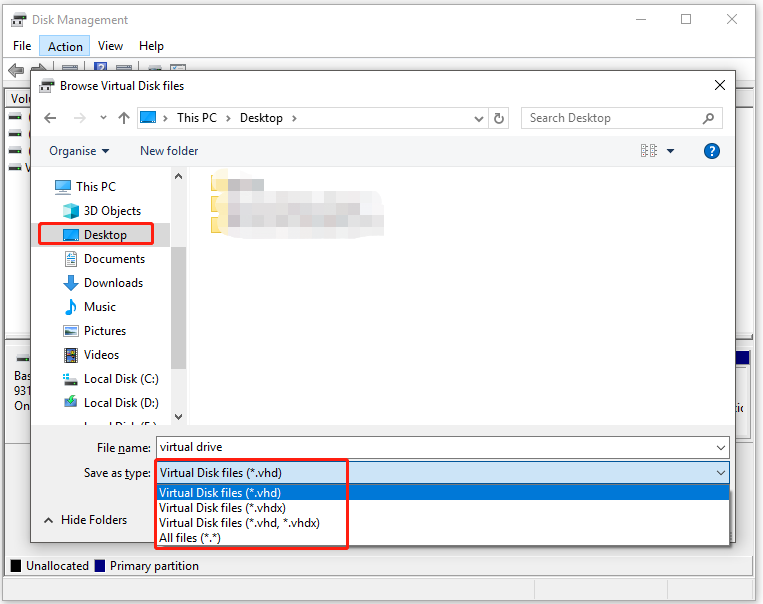
- In the elevated window, choose the location of the virtual drive in the left pane. Here, we select Desktop. Then input the file name of the drive and choose Save as type from the drop-down menu.
- Click the Save button to store the changes.
- Type the exact number behind the Virtual hard disk size section and choose an option from the drop-down menu (MB, GB, TB).
- Choose a virtual hard disk format (either VHD or VHDX) based on your demand.
- Pick a virtual hard disk type (either the fixed size or the dynamically expanding option)
- Click OK to save the changes.
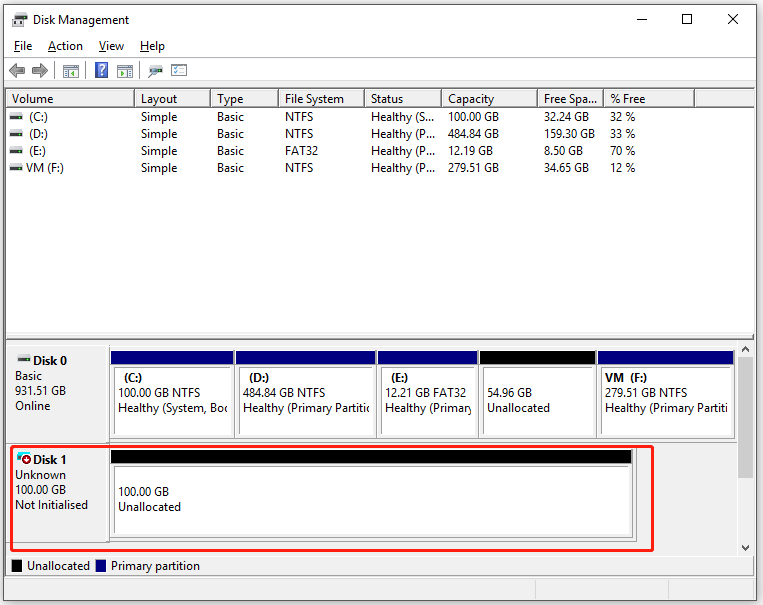
Step 4: Then you can see the created virtual drive Windows 10 in Disk Management.
How to Install Ubuntu on VirtualBox? Here’s the Full Guide
How to Manage Virtual Drive Windows 10
After creating the VHD, you need to do some operations before using it further. First and foremost, you are required to initialize the drive to use it. Then you have to create partitions on the drive as you can’t use the unallocated space directly.
What tool can you use to modify a virtual hard disk? As it works as the physical drive, tools used to manage physical drive can also modify the VHD. To be specific, you can modify a virtual drive with Disk Management, Command Prompt, and third-party partition managers.
Here are steps for initializing the virtual drive.
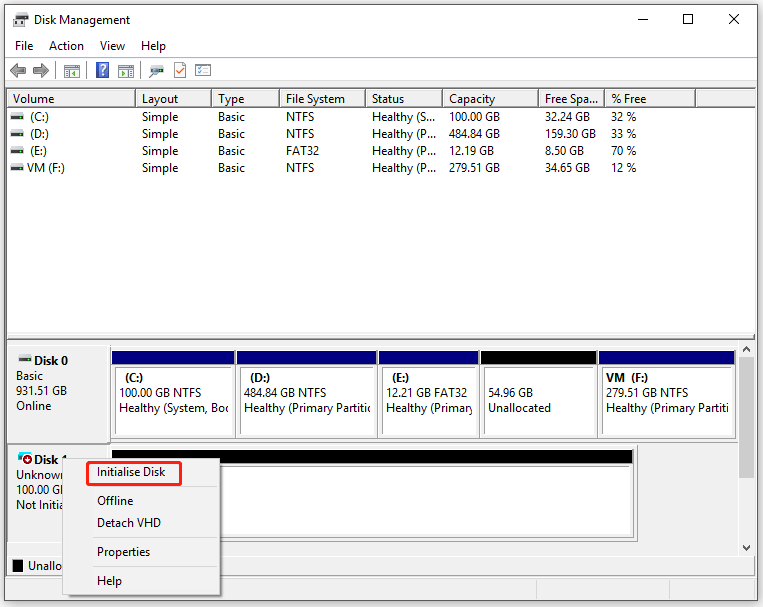
Step 1: To use the virtual drive, you need to initialize it first. For that, right-click on the drive and choose Initialize Disk.
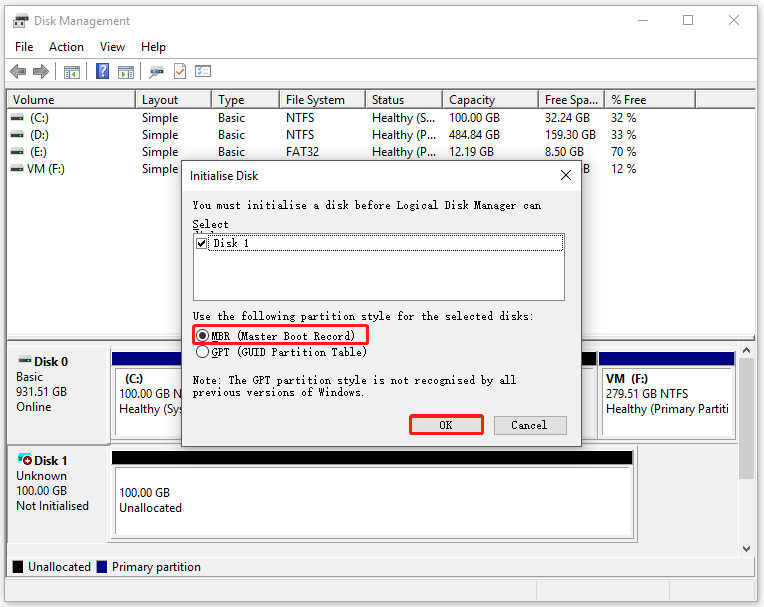
Step 2: In the Initialize Disk window, choose a partition style for the virtual drive. To learn the difference between the two listed partition styles, please refer to MBR vs GPT.
Now, you can create a partition on the virtual drive manually. Well, you have multiple ways to do that.
#1. Create a partition on the VHD via Disk Management
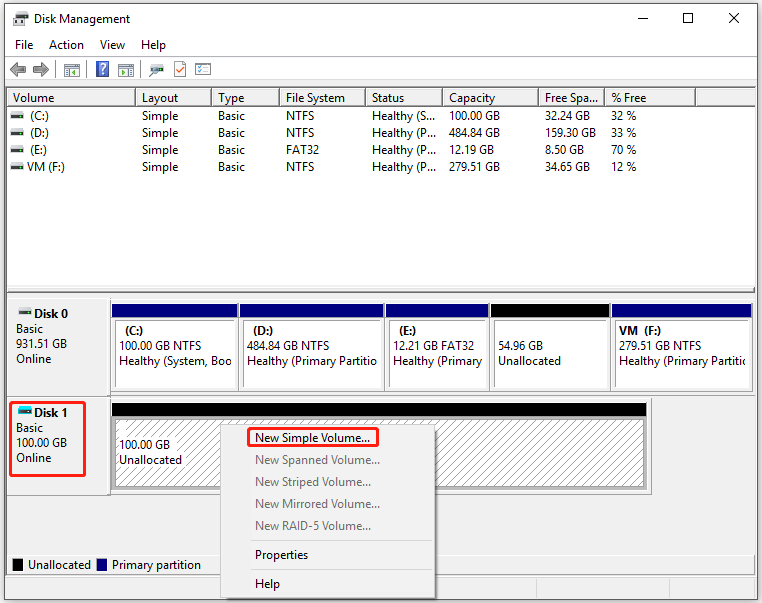
Step 1: Right-click on the unallocated space and tap New Simple Volume.
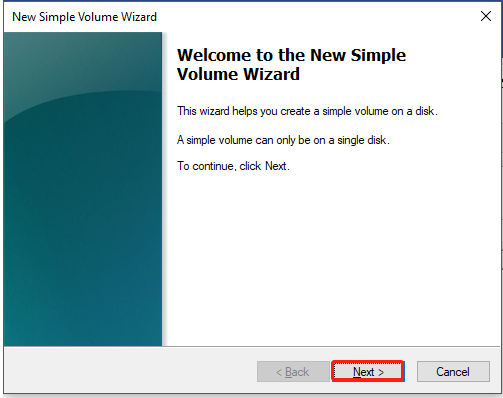
Step 2: Click Next in the New Simple Volume Wizard window.
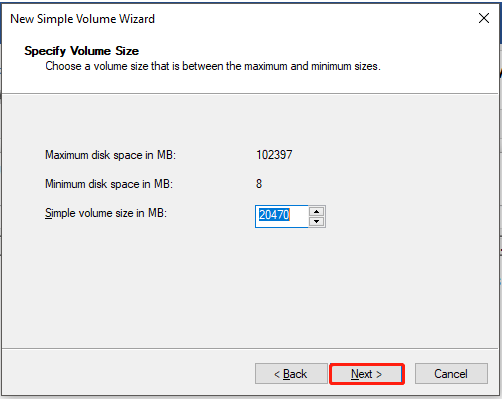
Step 3: In this window, specify the volume size and then click Next.
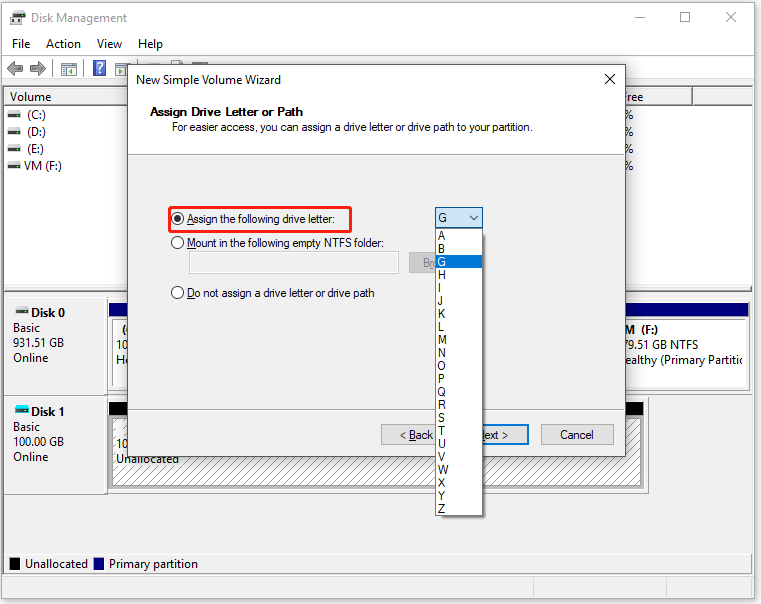
Step 4: Assign a drive letter for the new volume. You can pick one from the drop-down menu. Then click Next to continue.
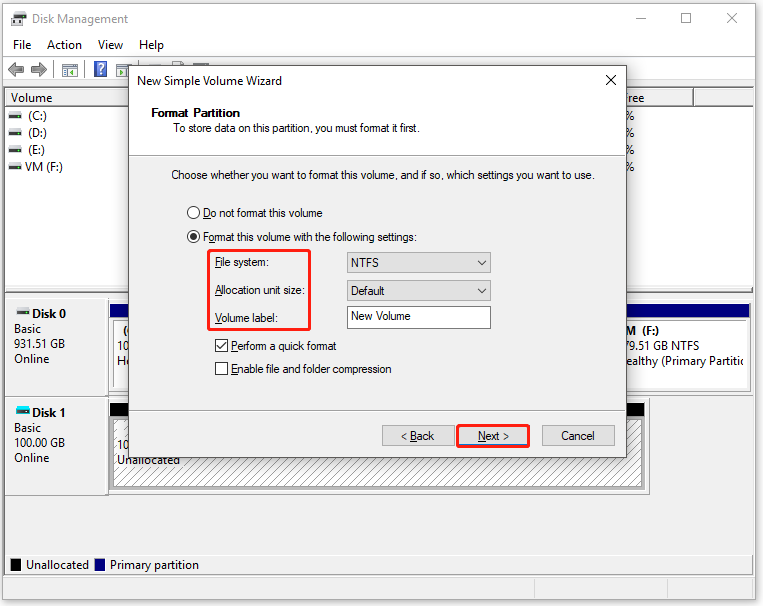
Step 5: You need to configure format settings (file system, allocation unit size, and volume label) for the new partition. If you choose the Do not format the volume box, you will encounter the “you need to format the disk before you can use it” error while trying to use the partition.
Step 6: After clicking the Finish button in the next window, the new partition will be created automatically.
Sometimes, you may encounter the new simple volume greyed out error while trying to creating partition via Disk Management. Besides, you can’t create a Fat32 partition over 32GB in this program. In these situations, try other disk management utilities.
#2. Create a partition on the VHD via Command Prompt
Step 1: Run Command Prompt as administrator.
- Type cmd in the search box.
- Right-click on Command Prompt under Best match and click Run as administrator.
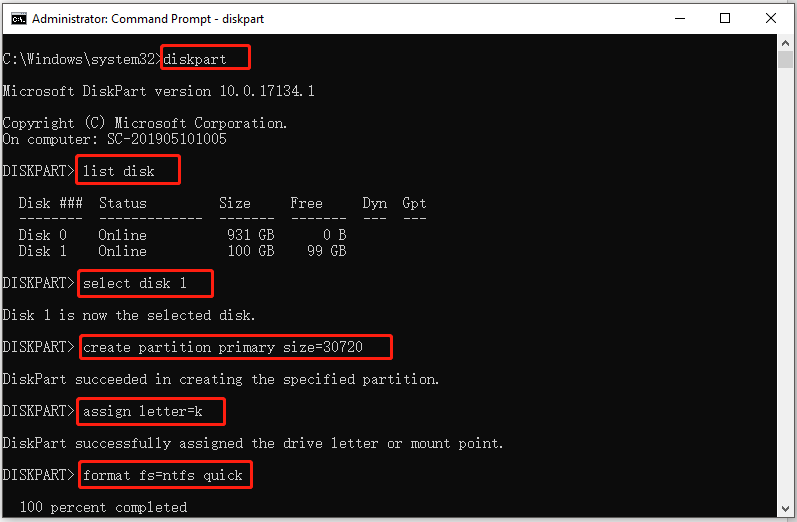
Step 2: In the elevated window, type the following commands and hit Enter after each.
- diskpart
- list disk
- select disk 1
- create partition primary size=* (* stands for the size that you want to allocate for the new partition.)
- assign letter=# (# represents the drive letter)
- format fs=ntfs quick
#3. Create a partition on the VHD via MiniTool Partition Wizard
In addition to the above two methods, you can also create partitions on the Windows 10 virtual drive with MiniTool Partition Wizard – a professional and all-in-one partition manager. It allows you to extend/move/resize/format/wipe/recover partitions beside creating partition.
Compared with Disk Management, MiniTool Partition Wizard has some advantages. For instance, Disk Management can’t create and extend a Fat32 partition larger than 32GB, but MiniTool Partition Wizard does. Additionally, it has some unique features.
Here’s the tutorial on how to create partitions on the Windows 10 virtual drive through MiniTool Partition Wizard.
Step 1: Download and install MiniTool Partition Wizard to your PC by clicking the button below.
MiniTool Partition Wizard FreeClick to Download100%Clean & Safe
Step 2: Run this program to enter its main interface.
Step 3: Right-click on the unallocated space of the virtual hard drive and click Create.
Step 4: In the Create New Partition window, configure partition parameters like partition label, file system, drive letter, cluster size, size, and location based on your needs. Then click OK to save the changes.
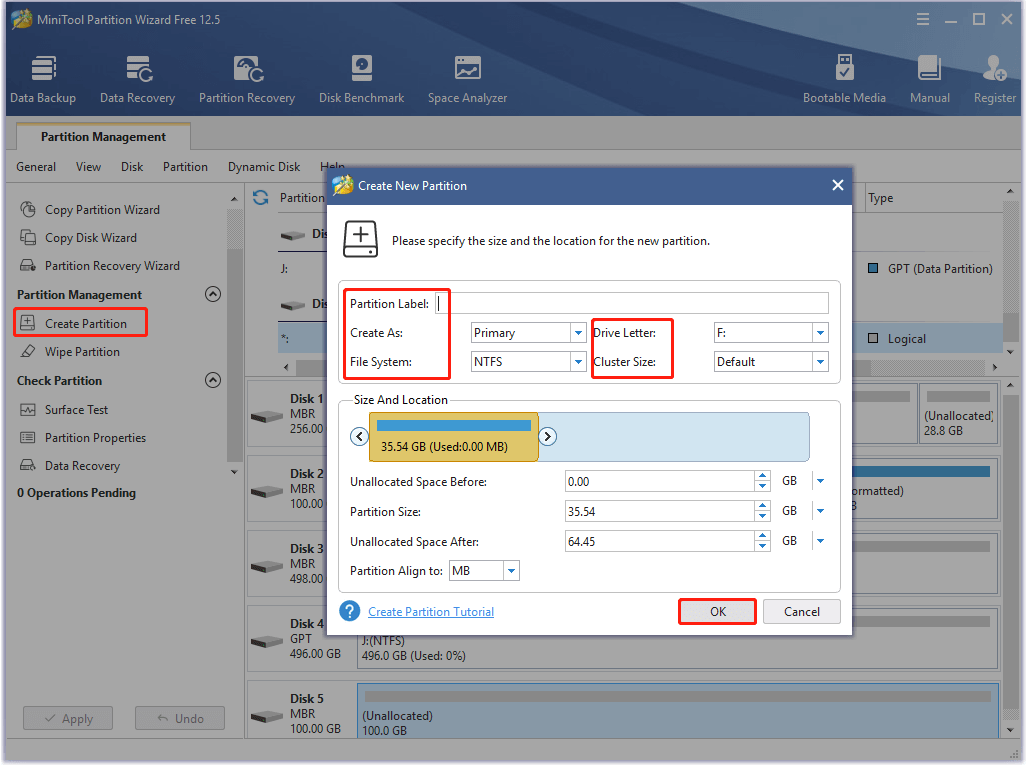
Step 5: After returning to the main interface, click Apply to execute the pending operation.
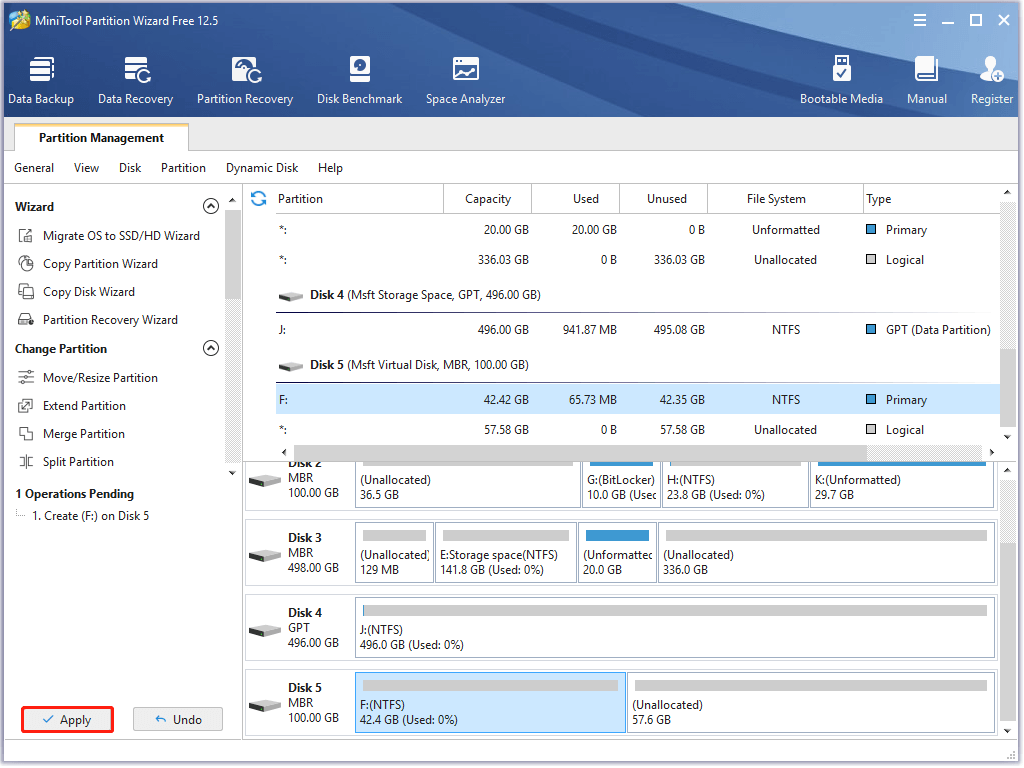
After creating partitions on the virtual drive, you can use the Windows 10 virtual drive smoothly.
You may also like: Undelete Windows 11 Partition with Partition Recovery Software
Bottom Line
This post has illustrated what virtual drive Windows 10 is, what does the virtual drive do, how does virtual drive work, and how to create and manage virtual drive Windows 10. In a word, this is a comprehensive tutorial on Windows 10 virtual drive.
If you have other thoughts about virtual hard drives, you can share them with us in the comment area. For any questions on MiniTool Partition Wizard, send us an email via [email protected].

User Comments :