Do you know how to use Windows 10's built-in virtual desktops feature? This feature allows you to better manage and switch among multiple apps and windows. Read this post to know how to use it.
You may need to multitask in Windows, which requires you to run many apps. Sometimes you end up with too many apps on your desktop, turning it into a crowded, confusing mess. This desktop is not convenient for you to navigate and may interrupt work ideas.
One solution is to use virtual desktops. You can create two, three, or more virtual desktops and stuff each one with different apps and windows. For example, you can use one desktop to house all your open Microsoft Office applications, another to house your Adobe applications, a third to house miscellaneous applications.
In addition, you can also move an app from one desktop to another, and delete a desktop when you no longer need it. Please keep reading to know how to use virtual desktops in Windows.
How to Create Virtual Desktops in Windows 10
When you start to work, you may open a few apps like File Explorer, your browser, Microsoft Word, Microsoft Excel, iTunes to listen to music, and maybe Skype to receive a video call. Then, you may need to open Adobe applications to work on a print or design project that requires Photoshop, InDesign, and Acrobat.
There are so many apps on your desktop and you don’t want to add more apps to it. In this situation, you can create a second virtual desktop to house these apps. As for how to create a virtual desktop in Windows 10, you can refer to the following steps.
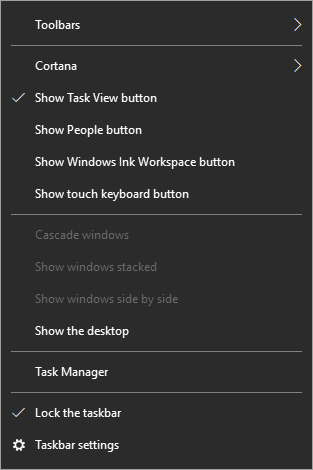
Step 1: Right-click on Windows taskbar and check Show Task View button.

Step 2: After performing step 1, you can see Task View button on the taskbar next to the Cortana control. Click this button.
![]()
Step 3: Click New desktop option.

Then, you create a new virtual desktop. After that, you may wonder how to fill this desktop with apps. Keep read to know some tricks.
How to Move an App to a Virtual Desktop
Actually, if you just created a new desktop, you can click the thumbnail for the new desktop to enter it and then open the applications you need.
However, if you’ve scattered similar applications across different desktops, for example, you opened several Microsoft Office applications in different desktops, and now you want to move them all into the same desktop, please follow the steps below.
Step 1: Click the Task View button and move your cursor to the desktop that contains an app you want to move.
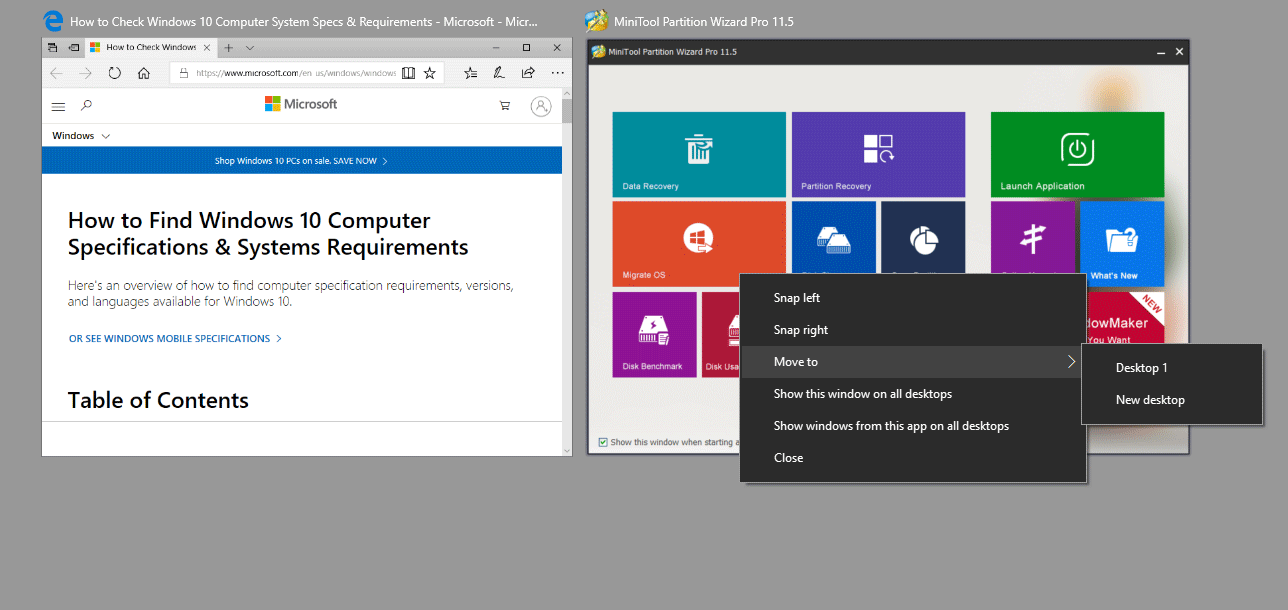
Step 2: Right-click the app’s thumbnail, move your cursor to the Move to entry in the menu and select the desktop to which you want to move this application.

You can continue moving apps to different desktops until you organize your virtual desktops in a way that makes sense to you.
If you need a third virtual desktop for your applications, you can follow the above tutorials to create and then populate Desktop 3 with additional applications.
How to Quickly Switch Virtual Desktops
You may have already known you can switch back and forth between virtual desktops by clicking the Task View button and the desktop thumbnail. But you can switch between virtual desktops more easily through the notebook touchpad (if you are using a laptop). Please refer to the following steps.
Step 1: Place three fingers on the touchpad, and then swipe outward to open the Task View.
Step 2: Place four fingers on the touchpad, and then swipe right or left to switch to the virtual desktop on the right or left side.
Finally, if you want to close a certain desktop, just click the Task View button and click the X on the thumbnail for that desktop.
Now, you should know how to use virtual desktops in Windows. Have a try!


User Comments :