The USB to HDMI adapter enables users to connect their desktop or laptop to a secondary display device via HDMI, even if they don’t have an HDMI port on their device. However, USB to HDMI adapters doesn’t always work for some Windows 10 users. Some people have even posted on the Microsoft forums about their USB to HDMI adapters not working.
Well, how to fix USB C to HDMI not working on Windows 10/11? Please keep reading.
Solution 1: Update or Rollback Windows
You can fix the USB-C to HDMI not working issue by updating to the latest version or rolling back to a previous version. The steps are as follows:
1. Rollback Windows 10
To rollback Windows 10, here is the guide:
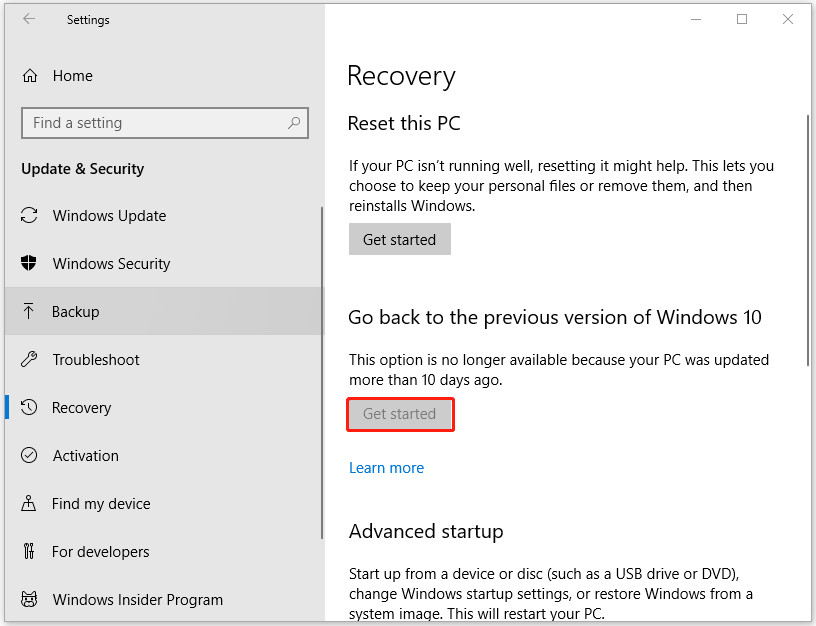
Step 1: Press the Win + I key to open Settings. Then click Update & Security.
Step 2: Click the Recovery option on the left side of the window, and then click the Get started button under the Go back to the previous version of Windows 10.

Step 3: Follow the on-screen instruction to roll back the platform.
2. Update Windows 10 to the latest version
To, update Windows 10 to the latest version, here is the guide:
Step 1: Navigate to Settings > Updates & Security.
Step 2: Click on the Windows Update option and then click on Check for updates.
Step 3: Once the updates are installed, restart your computer and see if the problem exists.
Solution 2: Update the USB to HDMI Driver
The USB C to HDMI not working issue can be caused by incorrect or incompatible device drivers. So, updating the USB to HDMI adapter driver might fix it. Here is the guide:
Step 1: Right click the Windows icon on the taskbar and then select the Device Manager option.
Step 2: In the Device Manager window, expand the Other Devices option. Then right click on your USB device and select Update Driver.
Solution 3: Connect to an Alternative USB Port / Change Hub
There may be a problem with the USB port used to connect the USB to the HDMI adapter. So, try connecting your USB to an HDMI adapter that has another port on your desktop or laptop. Alternatively, if you are using a USB to HDMI hub and have a spare, switch between them to see if this is not a hardware issue.
Solution 4: Scan for Hardware Changes
To solve the USB C to HDMI not working issue, you can scan for hardware changes.
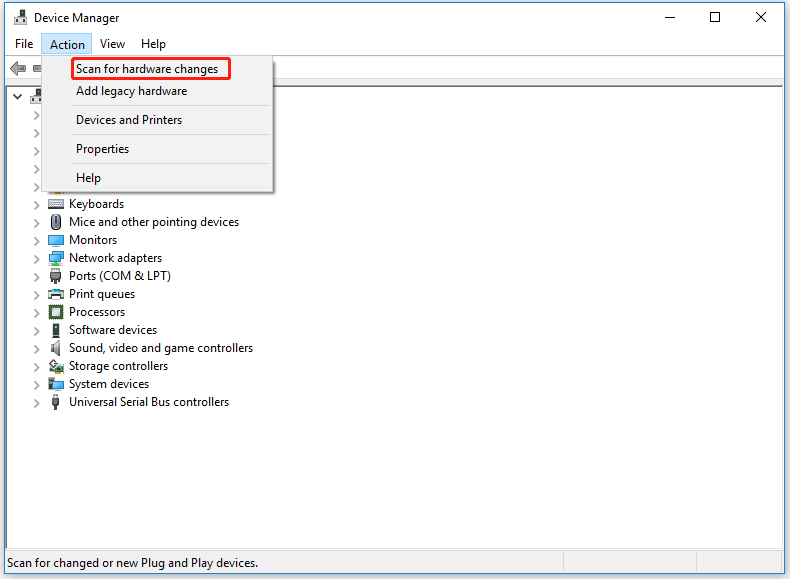
Step 1: Open Device Manager. Then select your PC at the top of Device Manager.
Step 2: Select the Action tab and click the Scan for hardware changes option.

After you scan for hardware changes, Windows may recognize an attached USB to HDMI adapter.
Solution 5: Changing the Adapter
The problem is neither your computer nor your external monitor. Another problem could be that the adapter is not working properly. In this case, first, try to check if the adapter works with other devices. If this is not the case, the adapter needs to be changed.
Bottom Line
After you read this post, you may have known how to fix the USB C to HDMI not working problem on Windows 10/11. If you have problems with this article, you can leave them in the following comment zone.


![[Full Guide] How to Choose Hard Drive for Your Toshiba Laptop?](https://images.minitool.com/partitionwizard.com/images/uploads/2024/06/hard-drive-for-toshiba-laptop-thumbnail.png)
User Comments :