How to uninstall Microsoft Teams on Windows 10? If you are also trying to search for a guide, then you come to the right place. This post of MiniTool will walk you through detailed steps for the Microsoft Teams uninstallation.
Microsoft Teams is a communication platform for proprietary business. It is also a part of the Microsoft 365 family of products. This platform mainly focuses on workspace chat and video conferencing file storage, and application integration. However, a large number of users want to delete Microsoft Teams. How to remove Microsoft Teams? Let’s keep reading the following parts.
How to Uninstall Microsoft Teams
There are 2 simple methods on how to uninstall Microsoft Teams. The first one is to use the Windows Settings app. The other is to utilize Control Panel.
Method 1. Uninstall Microsoft Teams from Settings
Before the following steps, make sure you have quitted the MS Teams process. Then follow the steps below to delete Microsoft Teams.
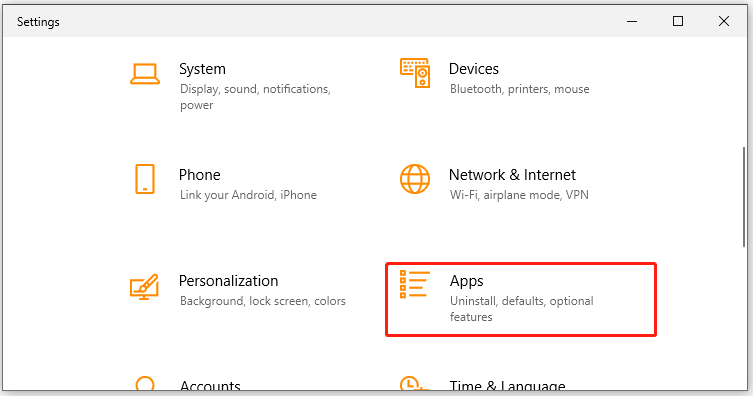
Step 1. Press Win + I keys to open the Settings window, and then click on the Apps section.

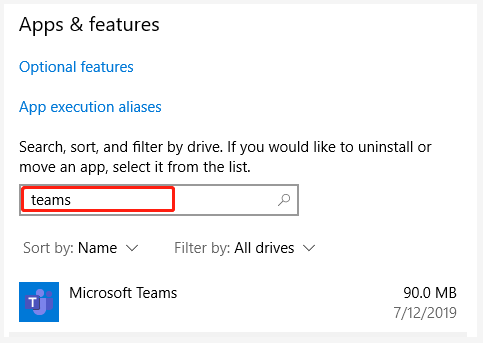
Step 2. Beside the Apps & features tab, search for Teams in the box. Then select Microsoft Teams and click on Uninstall.

Step 3. Click on the Uninstall button again in the confirmation window and follow the on-screen instruction to complete the Microsoft Teams uninstallation.
Method 2. Uninstall Microsoft Teams from Control Panel
Alternatively, you can use Control Panel to remove Microsoft Teams. Here’s how to do that:
Step 1. Type control in the search box and select the Control Panel app from the context menu.
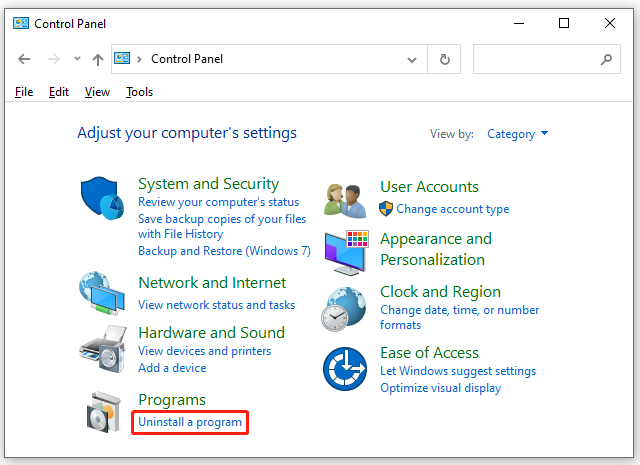
Step 2. Change the View by type to Category, and then click on Uninstall a program under the Programs section.

Step 3. Then a list of installed programs will be shown here. Right-click the Microsoft Teams and select Uninstall. Click on Yes to confirm this uninstallation and follow the on-screen prompts to complete this operation.
The above 2 methods can help you uninstall Microsoft Teams, but the leftover cache and temporary files persist in your computer. So, how to get rid of Microsoft Teams permanently? Let’s go on.
How to Delete Microsoft Teams Permanently
There are 2 parts on how to delete Microsoft Teams permanently. The first part is to clear all MS Teams-related cache and temp files. The second part is to prevent Microsoft Teams installation again via Registry Editor.
Part 1. Clear Microsoft Teams Cache
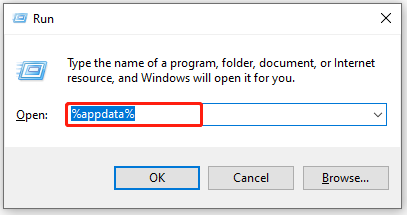
Step 1. Press Win + R keys to open the Run dialog box, and then type %appdata% in the box and hit Enter.

Step 2. Inside the Roaming folder, right-click on the Teams folder and select Delete.
Step 3. Open the Run dialog box again, and then type %Programdata% and hit Enter. After that, select the Microsoft Teams folder and press the Delete key.
Part 2. Prevent Microsoft Teams Installation via Registry Editor
Some users report that Microsoft Teams keep installing on Windows 10. In this case, you can follow the steps below to prevent MS Teams from installing again.
Step 1. Open the Run dialog box again, and then type regedit and hit Enter.
Step 2. Navigate to the following path:
HKEY_LOCAL_MACHINESOFTWAREPoliciesMicrosoftOffice16.0commonofficeupdate
Step 3. Select the officeupdate folder, and then create a new entry named preventteamsinstall in the right pane by right-clicking the empty area and selecting New > DWORD (32-bit) Value.
Step 4. Set the Value data of the preventteamsinstall entry key to 1.

![Easily Fix Windows 10 Lowers Volume Automatically [Full Guide]](https://images.minitool.com/partitionwizard.com/images/uploads/2021/04/win10-lowers-volume-automatically-thumbnail.jpg)
![How to Fix Windows 10 Black Box Keeps Popping Up [5 Solutions]](https://images.minitool.com/partitionwizard.com/images/uploads/2021/04/win10-black-box-keeps-popping-up-thumbnail.jpg)
User Comments :