Java helps some websites and applications to run properly, but it is not necessary for most common users. If you need to uninstall Java, you can try these methods provided by MiniTool Partition Wizard.
Have you found the Java process appears on your PC somehow? If you are not a programmer, the Java application might be useless for you. In this case, it’s a good choice to uninstall it. Here are three methods about how to uninstall Java software, and you can choose the one you prefer.
Method 1: Uninstall Java via Control Panel
Control Panel is a component of Microsoft Windows. You can use it to view and change settings as well as manage your installed features and programs. To remove Java with Control Panel, you just need to follow the steps below.
Step 1: Press Win + S to open the Windows Search utility. Then search for Control Panel and open it.
Step 2: Choose View by: Category from the upper right corner. Then click Uninstall a program to view your installed features and programs.
Step 3: Scroll down to find Java application and right-click it. In the pop-up window, click Uninstall.
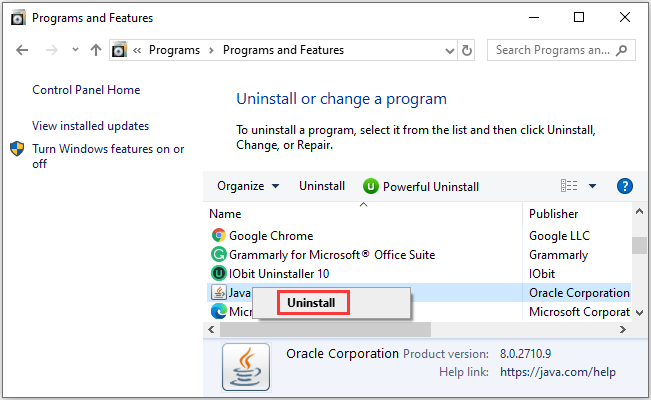
Step 4: Follow the onscreen instructions to finish the operation.
After uninstalling Java, you might need to delete left files and folders manually. For more detailed information, you can refer to the following post: How to Remove Remnants of Uninstalled Software? Try These Ways!
Method 2: Uninstall Java via Java Uninstall Tool
Java provides an official tool which can be used to remove Java application. It is called Java Uninstall Tool. You can download it on Java’s official website. Let’s see the detailed steps.
Step 1: Open your web browser and search for Java Uninstall Tool. Then select the first result that comes from the official website of Java.
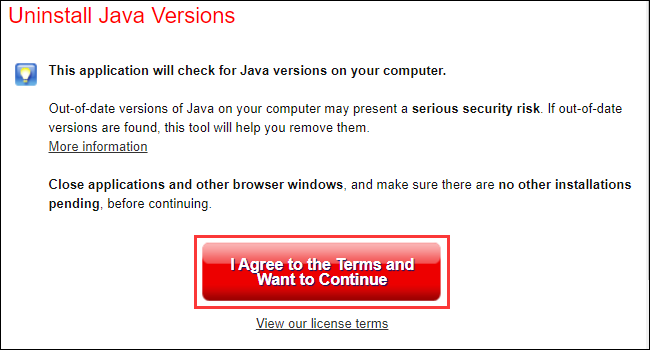
Step 2: When you get the page where you can download Java Uninstall Tool, review the terms of use for the tool, and then click the I Agree to the Terms and Want to Continue button to download it.
Step 3: Open the JavaUninstallTool.exe file you downloaded in the last step to run the Java Uninstall Tool. A User Account Control window will pop up, just click Yes to continue.
Step 4: Click Agree to accept the license terms and continue. Then Java Uninstall Tool will search for installed Java versions on your PC.
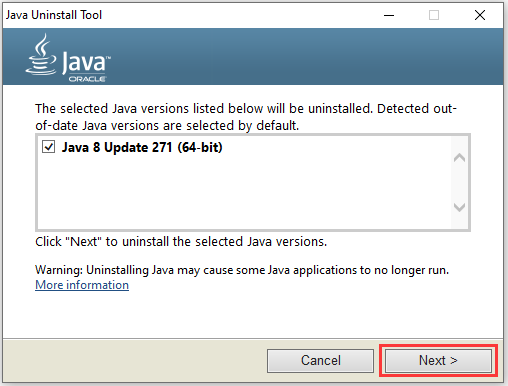
Step 5: Check your Java program and click Next to uninstall it. If you have more than one version of Java, you need to check them all. Then follow the instructions to finish the process.
After uninstalling Java, the Java Uninstall Tool might be useless for you, and you can delete it to free up disk space.
Method 3: Uninstall Java via a Software Uninstaller
You can also remove Java with a reliable third-party program that is professional at uninstalling software, such as IObit Uninstaller, Geek Uninstaller, Wise Program Uninstaller, etc. In this way, you don’t need to delete related files and folders manually, and you can keep the uninstaller so that you can use it to remove other applications in the feature.
Here is how to uninstall Java with IObit Uninstaller.
Step 1: Download and install IObit Uninstaller. Then launch it.
Step 2: In the left pane, select Programs > All Programs.
Step 3: In the right pane, wait until IObit Uninstaller finishes analyzing all programs. Then check Java. If you have other programs to uninstall, you can check them, too.
Step 4: Click the Uninstall button. Then IObit Uninstaller will uninstall Java and delete related files automatically. And you just need to wait patiently.

User Comments :