When you get a new hard disk, the first thing you need to do is partitioning it. But what are the two different methods for partitioning hard drives? In this post, MiniTool shows the answer and guides you how to partition your hard drive.
Why Need to Partition Your Hard Drive?
Don’t put all your eggs in one basket. Buffett
You have ever heard the above sentence. In terms of disk partitioning, this sentence also needs to be kept in mind. Without partitioning a new hard drive that only contains a system partition, your system will be sluggish if you put all files on this drive. What’s worse, your system will crash if you delete system-related files by accident.
Partitioning a hard drive can also bring you the following benefits:
- Easier data backup: You can back up one specific partition with ease.
- Improved data security: Partitioning your hard drive may protect your data from malware attacks. If your system partition has been invaded by ransomware, it would have a lesser chance of locking your personal files on another partition.
- Multiple file systems: You can set different partitions on your hard drives to different file systems to improve your computer experience.
- Multiple operating systems: If you want to use different operating systems on your computer and choose which to boot into, each must reside in a separate partition.
Partitioning a hard drive unreasonably can also lead to some troubles, such as wasted disk space and therefore think twice before slitting your hard drive.
What Are Two Different Methods for Partitioning Hard Drives
After learning the importance of partitioning hard drive, let’s explore the question: what are two different methods for partitioning hard drive.
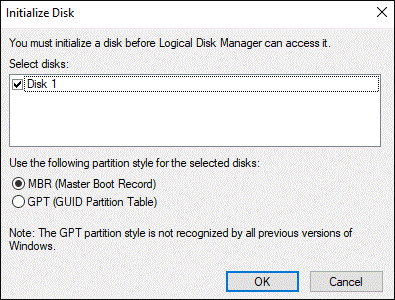
When you install your new hard drive on your computer or connect it to your computer and then open Disk Management, you may get a prompt that asks you to initialize your disk to MBR or GPT.
Hot article: Full Solutions to Fix Disk Unknown Not Initialized (2 Cases)
What are GPT and MBR? GPT and MBR are the two different methods for partitioning hard drives.
Each of them stores the partitioning information on a drive in its own way. The information includes where partitions start and begin. Therefore, your operating system knows which sectors belong to each partition and which partition is bootable.
Master Boot Record (MBR)
MBR, short for Master Boot Record, first appeared in 1983 with IBM PC DOS 2.0. MBR is a special type of boot sector at the very beginning of partitioned computer mass storage devices. That’s why it is called Master Boot Record.
Master boot sector is the first sector of the hard disk. It is comprised of three parts:
- MBR: Occupying 446 bytes (0000H-01BDH) in the total 512-byte master boot sector, it is responsible for loading from the active partition and running the system boot program.
- DPT: DPT Partition Table occupies 64 bytes (01BEH-01FDH).
- Magic number: Magic number occupies 2 bytes (01FEH-01FFH).

As we can see that DPT only occupies 64 bytes, MBR disk can only be divided into 4 primary partitions or 3 primary partitions plus one extended partition as each partition will occupy 16 bytes. In other words, if you initialize your hard disk to MBR, you can create a total number of 4 primary partitions or 3 primary partitions plus one extended partition on this drive.
To learn more about MBR, please click here.
But if you initialize the hard disk to GPT, how many partitions you can create?
GUID Partition Table (GPT)
GPT (Globally Unique Identifier Partition Table), a part of EFI (Extensible Firmware Interface), is a new standard that is gradually replacing MBR.
It is called GUID Partitionable Table because every partition on the hard drive has a “globally unique identifier (GUID)” that is a random string so that every GPT partition likely has its own unique identifier.
The following image shows the structure of GUID Partition Table.
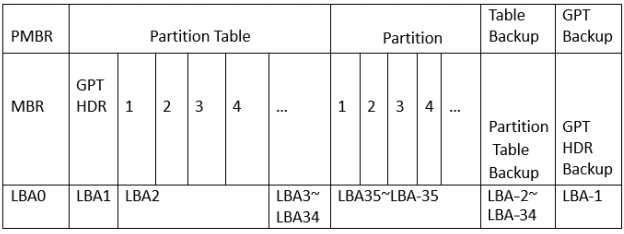
- PMBR (Protective MBR): Located in the first sector of GPT disk, PMBR is used to prevent the partitioning tools that do not support GPT from operating on the hard disk, such as formatting.
- GPT HDR: Starting from LBA1 on the hard disk, GPT HAR usually only occupies this single sector. It is used to define the location and size of the partition table. Furthermore, it also can help find the errors immediately as it contains a checksum of the header and the partition table.
- Partition Table: Occupying LBA2~LBA33, Partition Table can hold 128 partition table entries. The size of each partition table entry size is 128 bytes.
- GPT Partition: As the biggest area on GPT disk, GPT Partition is used to store
- your data.
- Backup area: Located in the end of the hard disk, the Backup area contains Partition Table Backup and GPT HDR Backup. This area occupies the last 33 sectors of the hard disk. The last sector is used to back up the EFI information area (GPT HDR), while the remaining 32 sectors are used to back up the LBA2 to LBA33 sectors.
To learn more about GPT, please click here.
Till now, you may have figured out the different layout of these two partition styles.
You may have noticed that you can create 128 primary partitions on the GPT disk from the above content.
Apart from the different number of partitions you can create on the MBR disk and GPT disk, there are other differences between the two methods for partitioning hard drive.
1. Supported hard disk space
MBR only supports the hard drive no more than 2TB. In other words, if you initialize a hard drive that is larger than 2TB to MBR, you cannot use the extra space. For example, 3TB only shows 2TB.
On MBR disk, the partition size is stored in length of 4 bytes (32 bit). This means that the maximum value in hexadecimal is FFFFFFFF (equal to 4,294,967,295 sectors). At present, each sector is up to 512 bytes. So, the maximum of disk size is 2,199,023,255,040 bytes (equal to 2TB).
However, on GPT disk, the partition size id stored in length of 8 bytes (64 bit). So, the maximum of disk size for 512 bytes sector is 9,444,732,965,739,290,427,392 bytes (equal to 9.4ZB). In practice, this size depends on the operating system limitations as well.
2. Boot mode
MBR disk should be boot in the BIOS mode, while GPT disk should be boot in the UEFI mode. To see the detailed comparison between BIOS and UEFI, please read the post: UEFI vs. BIOS – What’s the Differences and Which One Is Better.
3. Security
One an MBR disk, the partitioning and boot data is stored in one place. Once the data is overwritten or corrupted, there will be a great trouble. However, GPT disk stores multiple copies of this data across the disk and therefore it is much safer and is recovered if the data goes corrupt.
Convert MBR to GPT or GPT to MBR
If you have initialized your new hard disk to MBR but you prefer using it as GPT disk after reading the comparison between GPT and MBR, you can refer to the following tutorial to convert MBR to GPT.
Here is the tutorial on how to convert a data disk from MBR to GPT.
Step 1: Download the professional tool MiniTool Partition Wizard that can help you make this conversion with ease. When the downloading process finishes, please install it and then launch it to get its main interface.
MiniTool Partition Wizard FreeClick to Download100%Clean & Safe
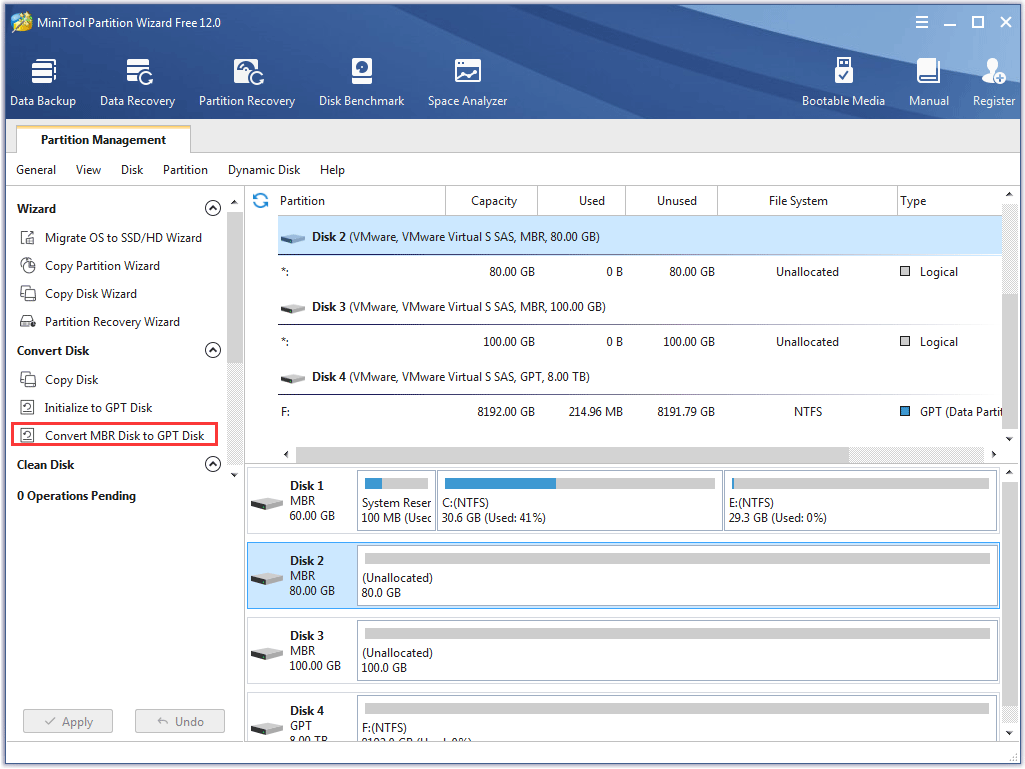
Step 2: On the Disk Map, highlight the hard disk you want to convert and then select Convert MBR Disk to GPT Disk from the left panel.
Step 3: Click the Apply button on the main interface of the program to execute the changes.
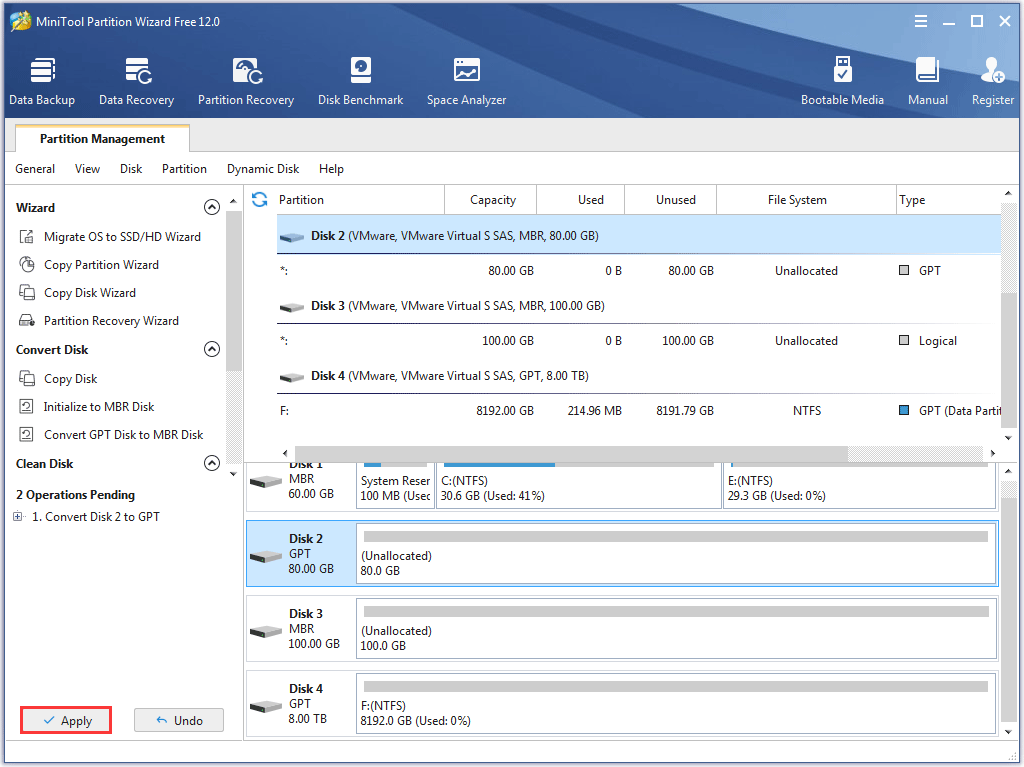
When the process comes to an end, your hard disk is converted to GPT. This way is convenient and it won’t bring any data loss. Furthermore, this program can also help you convert MBR to GPT during Windows installation.
To convert the data disk from GPT to MBR, you can try the Convert GPT Disk to MBR Disk feature built in MiniTool Partition Wizard.
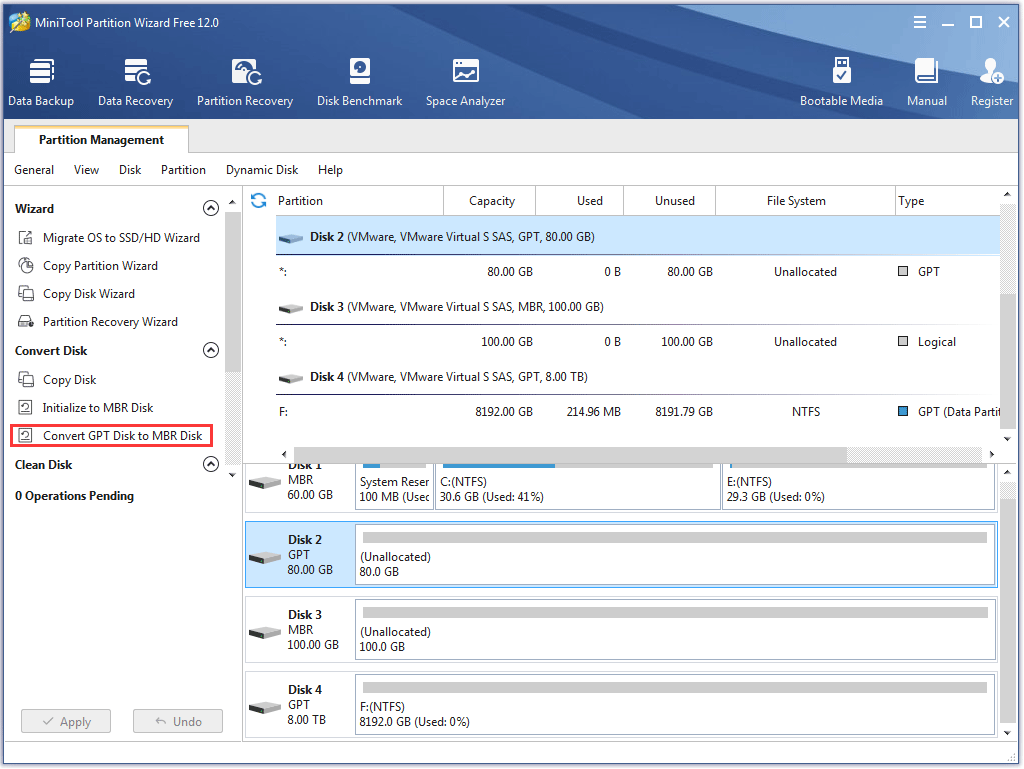
To learn more about this feature, you can read the help document.
Create Partitions on Hard Drive
After initializing the new hard disk that generally contains one partition, you need to split it to store different types of data.
There are three types of partition on Windows OS, namely primary partition, extended partition, and logical partition.
Way 1: Partitioning Hard Drive via Disk Management
How do you partition a hard drive? Generally, you may use Disk Management to split the disk to some partitions.
Here is the tutorial on how to partition a hard disk via Disk Management.
Stage 1: Shrink the partition on the new hard disk to get unallocated space.
Since the new hard drive usually is fully covered by one partition, you need to shrink this partition to get the unallocated space and then create new partitions on the unallocated space. If your new hard drive is fully covered by the unallocated space, you can directly create partitions.
Step 1: Open Disk Management.
- Press Windows + R to call out the Run window.
- On the Run window, please type diskmgmt.msc and then click the OK button to open Disk Management.
Step 2: On the Disk Management window, right-click the partition on the disk and then choose Shrink Volume.
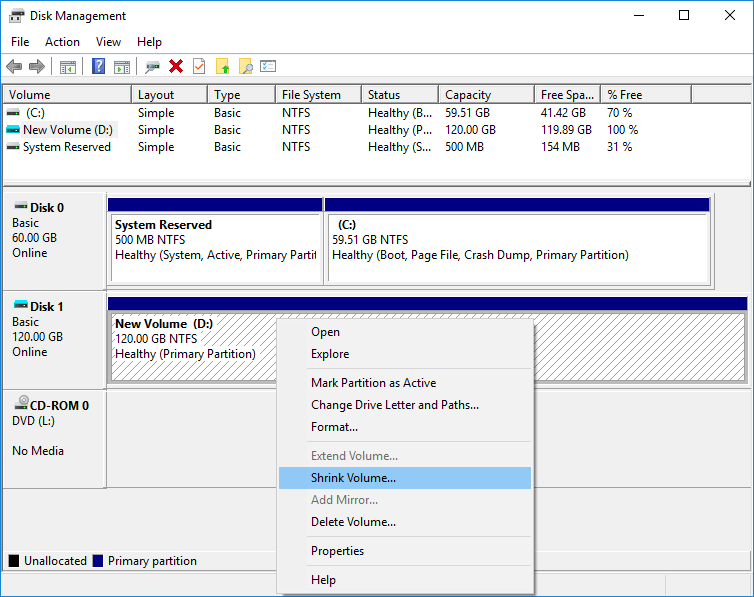
Step 3: On the popping-up window, input the space you want to change and click the Shrink button (The unit in this window is MB not GB (1GB=1024MB)).
Stage 2: Create Partitions on the unallocated space
After shrinking the partition, you get unallocated space on this disk and you can create other partitions.
If the disk is an MBR disk, please keep in mind that you can only create 4 primary partitions or 3 primary partitions plus one extended partition. If it is a GPT disk, there is no such limitation.
Step 1: Right-click the unallocated space and then choose New Simple Volume > Next.
Step 2: Enter the size of the volume you want to create and then select Next.
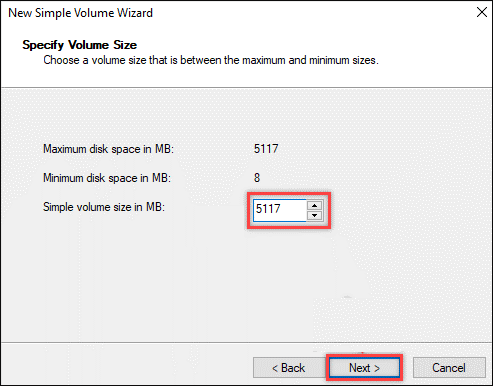
Step 3: Accept the default drive letter for the partition you will create or choose your preferred one and then click Next.
Step 4: Choose how to format this partition you will create: NTFS, FAT32, or exFAT and then click Next. Finally, click Finish.
Way 2: Partitioning Hard Drive via MiniTool Partition Wizard
Alternatively, you can use MiniTool Partition Wizard to create partitions on the new hard disk quite easily.
Here is the tutorial on how to partition hard drive in Windows 10 via MiniTool Partition Wizard.
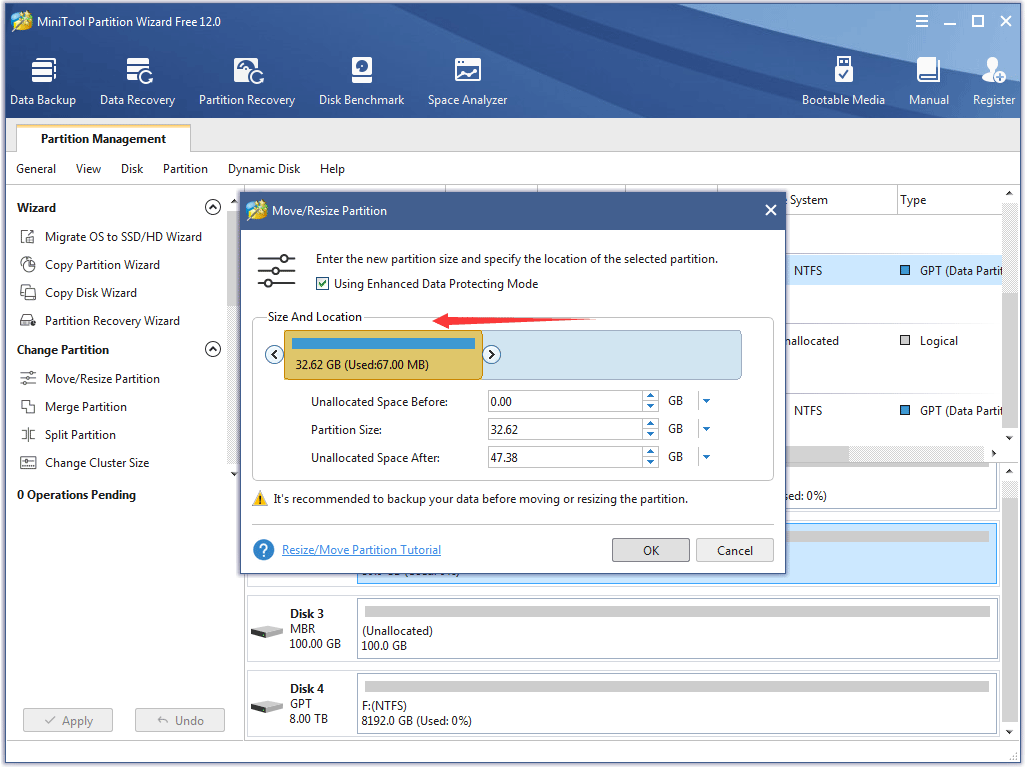
Step 1: Launch MiniTool Partition Wizard to get its main interface. Highlight the partition on the disk and then choose Move/Resize Partition from the left side.
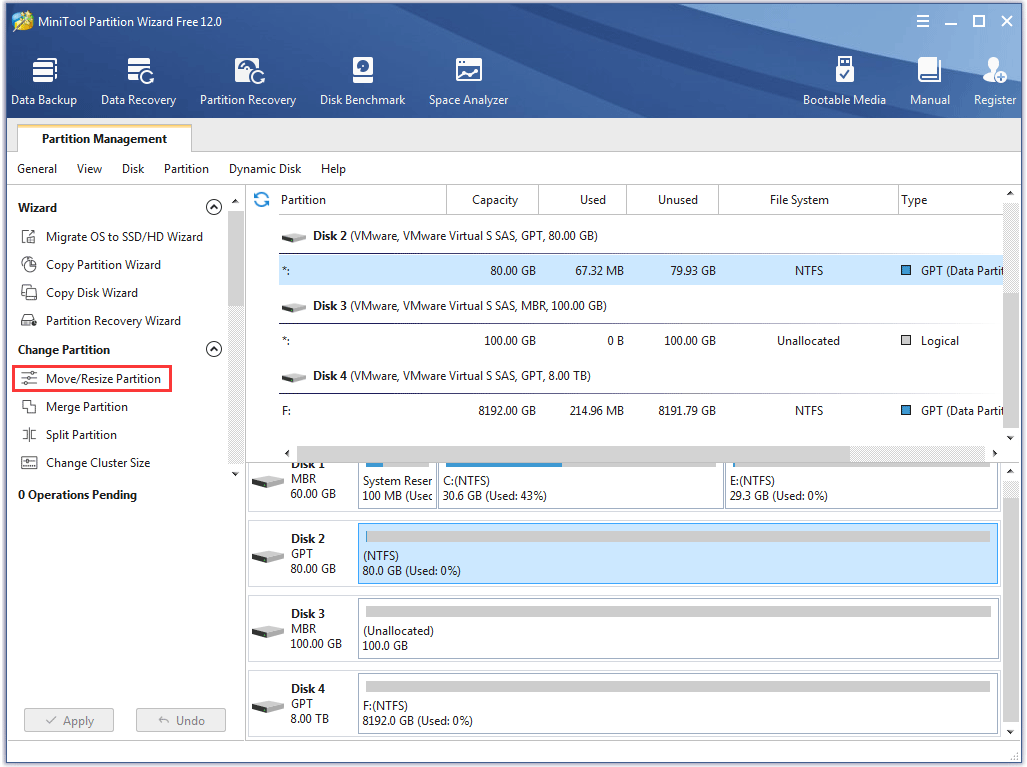
Step 2: Drag the blue handle to the left side to get the unallocated space and then click OK.
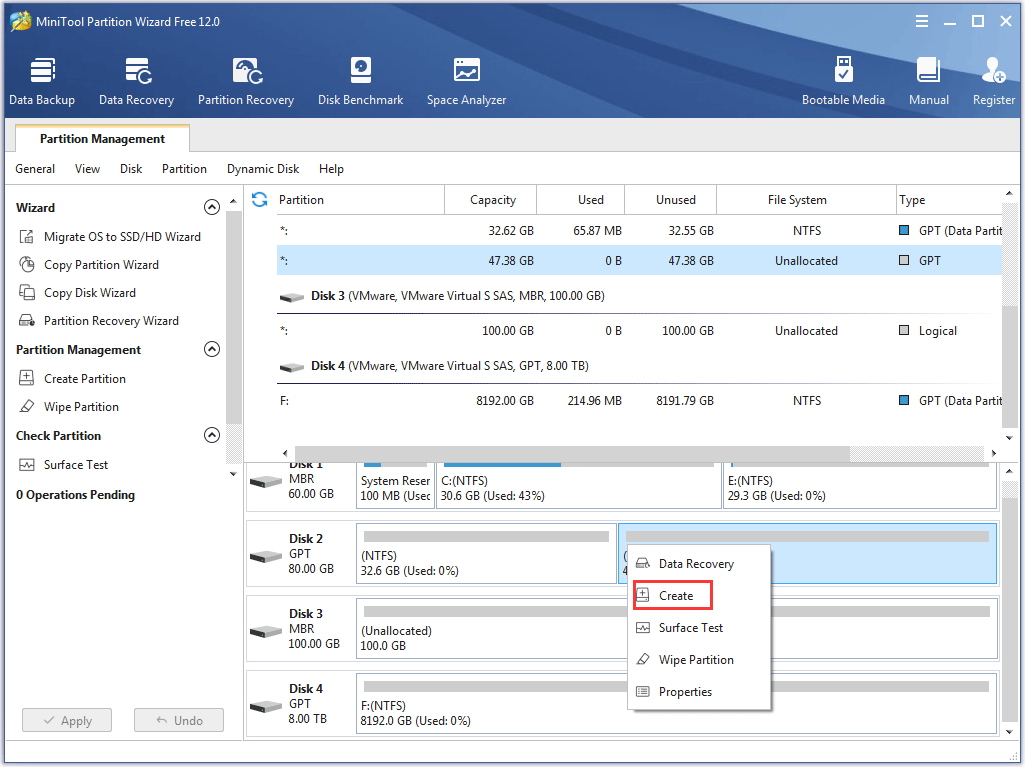
Step 3: Right-click the unallocated partitions on the unallocated space and then click Create.
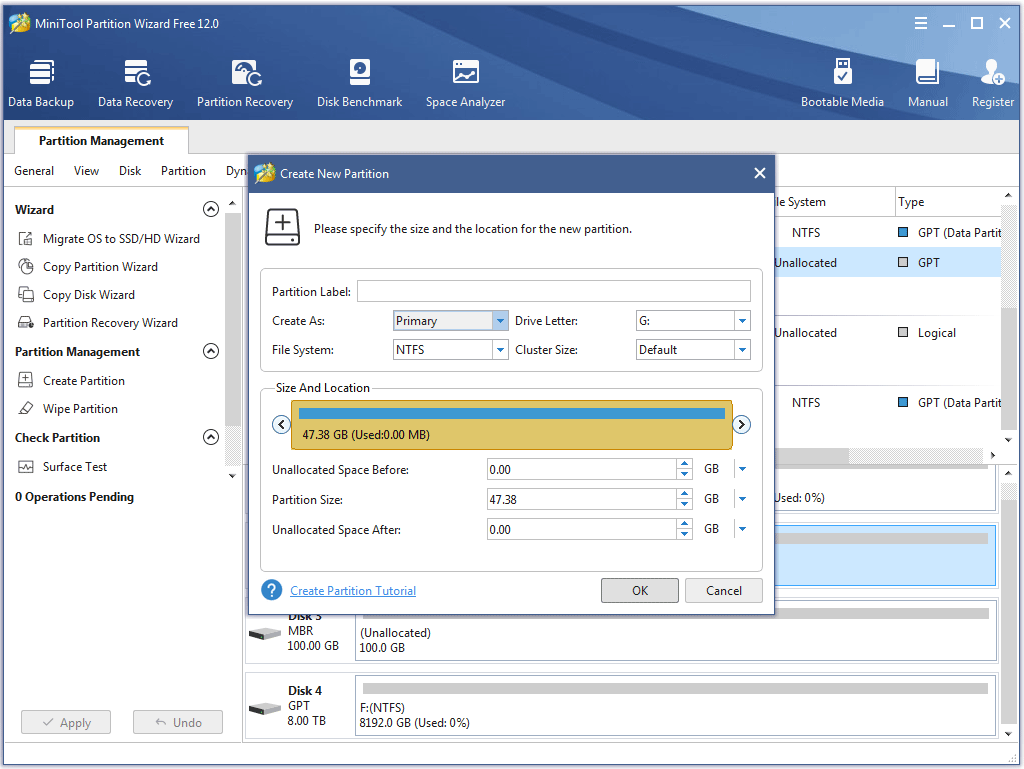
Step 4: On the Create New Partition window, confirm the parameters for the partition you will carte, including partition type (being primary or logical), drive letter, file system, size and location. After confirming, click OK.
Step 5: Click the Apply button to execute all the changes.
Bottom Line
Have you gotten the answer to the question: what are the two different methods for partitioning hard drives? The two methods are MBR and GPT. If you have any doubts about these two methods, please leave them in the following comment zone.
The post also shows you how to convert MBR to GPT and GPT to MBR and create partitions on these two partition styles. If you have any questions about these operations, please contact us via [email protected] immediately and we will reply to you as soon as possible.
What Are the Two Different Methods for Partitioning Hard Drives FAQ
- Easier data backup;
- Improved data security;
- Use different file systems;
- Run operating systems.

User Comments :