iPod, a popular MP3 player, can provide good sound quality. However, iPod easily fills up, so iPod users want to transfer music from iPod to iTunes Windows 10 to free up iPod storage. The question is how to transfer music from iPod to iTunes Windows 10. This post from MiniTool Partition Wizard tells you how to do that.
How to transfer music from iPod to iTunes Windows 10? Scroll down to get more details.
Before Transferring Music from iPod to iTunes Windows 10
iTunes is an application for a media player which is used to play and manage digital music and video files and transfer music from iPod to computer. If you have iTunes on your computer, you can start performing music transfer; if not, you need to install it on your computer. The installing steps are as follows.
Step 1: Click the “Windows” icon on the taskbar and then find and click “Microsoft Store” in the Start menu.
Step 2: Enter the keyword “iTunes” in the search box, and find the “iTunes” application from the list of search results.
Step 3: Click the “Get” button to download the “iTunes” application.

Step 4: Follow the on-screen instructions to complete the iTunes setup on Windows 10.
Finally, the iTunes program can be found and used in the Start menu, and then you can start to transfer music from iPod to computer with iTunes.
Start Transferring Music from iPod to iTunes Windows 10
For how to transfer music from iPod to iTunes Library Windows 10, here is the guide.
1. Connect iPod to Windows 10 and Create a New Folder
Use a USB cable to connect your iPod to your computer. Wait for the computer to identify the device, and don’t sync up your iPod.
Then, create a new folder on your computer to save music from your iPod and name it “New iPod music” or something else.
2. View iPod’s Hidden Folder
When the iPod is connected to the computer, open “File Explorer” and you can see that the iPod is a drive on your computer. To show all files (including the hidden files) on the iPod drive, you need to:
- Click the “View” tab on the File Explorer window.
- Check the “Hidden items” option.

3. Transfer Music from iPod to iTunes
Now, you can start to copy music from iPod to a folder on your computer’s hard disk.
Step 1: Enter the iPod drive and open the “iPod_Control” folder.
You can find a new folder called “iPod_Control” in your iPod drive. Open this folder up and you may see other folders, such as, “photos”, “notes”, etc. But, if you would like to save all of your music, pay attention to music folder inside the “iPod_Control” folder.
Next, what you need to do is to open the “iPod_Control” folder, and then open the music folder where you can see many folders, like “F00”, “F01”, “F02”, and so on. Then, you can start to copy those folders one by one onto the folder you have created on your computer.
Step 2: Add the “New iTunes Music” Folder to iTunes Library.
After you finish copy those music folders to the folder on your computer, you should add the folder to iTunes Library:
- Open “iTunes”.
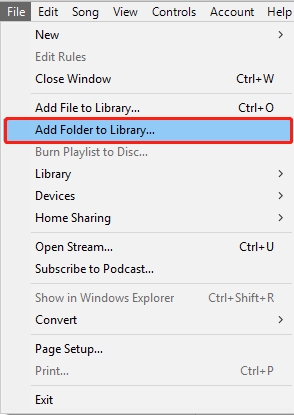
- Click “File” and then “Add Folder to Library”.
- Select the folder on your computer and click “Select folder”.
- Wait for the folder to be added to Library.

Finish Transferring Music from iPod to iTunes Windows 10
Now you can play the songs from your iPod with iTunes on Windows 10.
That’s all about how to transfer music from iPod to iTunes Windows 10. Do you have any questions about this topic? Please leave them in the comment zone and we will try to answer them for you as soon as possible.


![When and How to Transfer Files from PC to PC [5 Methods]](https://images.minitool.com/partitionwizard.com/images/uploads/2025/10/transfer-files-data-from-old-pc-to-new-pc-thumbnail.png)
User Comments :