What causes the “third monitor not detected” problem? Many users report that they can get only two monitors to display in Windows 10 while the 3rd monitor is not detected. After analyzing extensive user reports and posts, we find the issue is often related to improper display settings.
In addition, other factors like a temporary glitch, conflicting or outdated graphics card drivers are also responsible for the issue. Don’t worry. Here are several proven ways to fix Windows not detecting third monitor.
Solution 1. Select the Extend Desktop to This Display Option
Many affected users managed to fix the 3rd monitor not working issue by changing the display settings. To do so, follow the steps below:
Step 1. Press Win + R keys to open the Run dialog box, and then type ms-settings:easeofaccess-display in it and hit Enter.
Step 2. In the pop-up window, scroll down to the Additional display settings link and click on it.
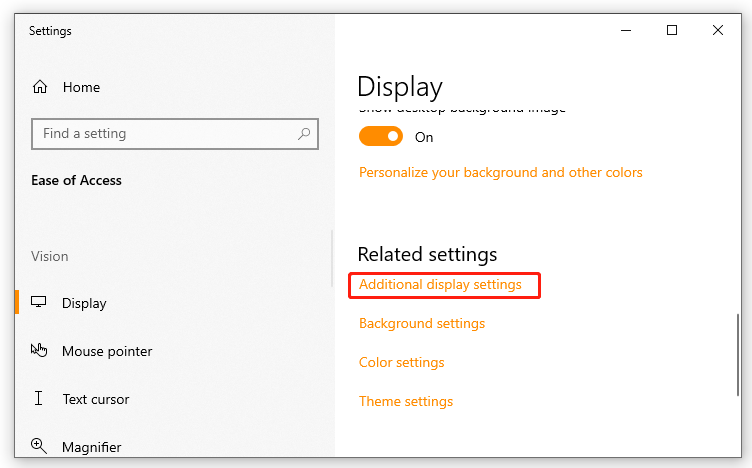
Step 3. Scroll down the list of your displays and click on each one to check which is disconnected. Once you confirmed the monitor that is disconnected by default, click on it and select the Extend desktop to this display option from the Multiple displays drop-down menu.
Step 4. Click on Apply to execute this change.
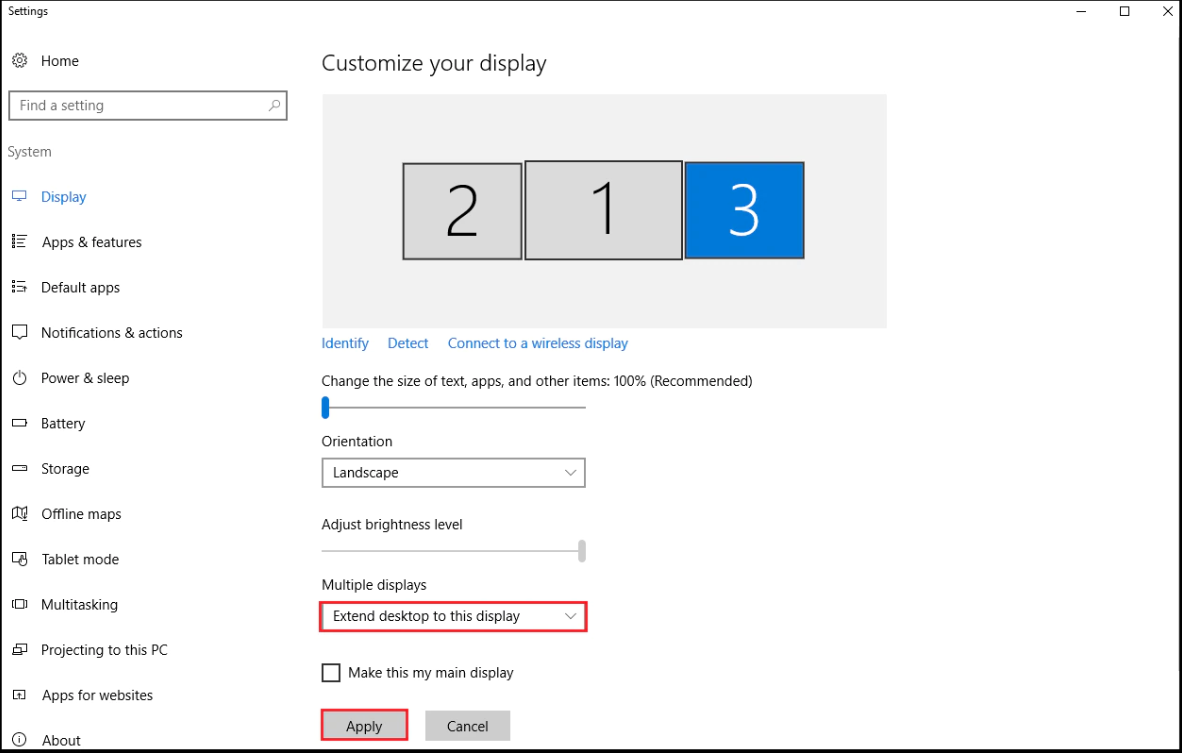
–image from https://www.amd.com/
Now, you can see if the third monitor not detected Windows 10 issue gets solved.
Solution 2. Reconnect All Monitors One by One
Sometimes the “3rd monitor not detected Windows 10” issue can occur due to a temporary glitch. In this case, you can reconnect all monitors in order and check if the third monitor is displayed in the Advanced Display Settings window.
Step 1. Press Win + P keys at the same time and select PC screen only in the Project window.
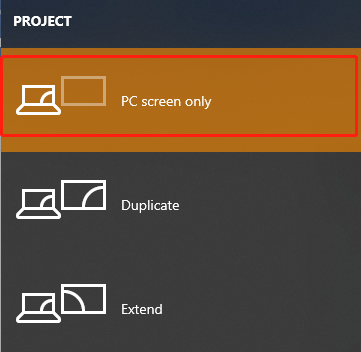
Step 2. Disconnect all the external monitors in order and power off your computer.
Step 3. Plug back in the monitors one by one and power on your computer to see if the third monitor is detected.
Solution 3. Set up Multiple Displays
Some users report that the “Windows 10 not detecting third monitor” issue can be solved by setting up the multiple displays manually in Nvidia Control Panel. If this scenario applies to you, you can follow the guide below:
Step 1. Right-click the empty area on your desktop and select Nvidia Control Panel from the context menu.
Step 2. Navigate to the Display section from the left pane and select Set Up Multiple Displays and make sure you tick every checkbox next to your monitors and then save the changes.
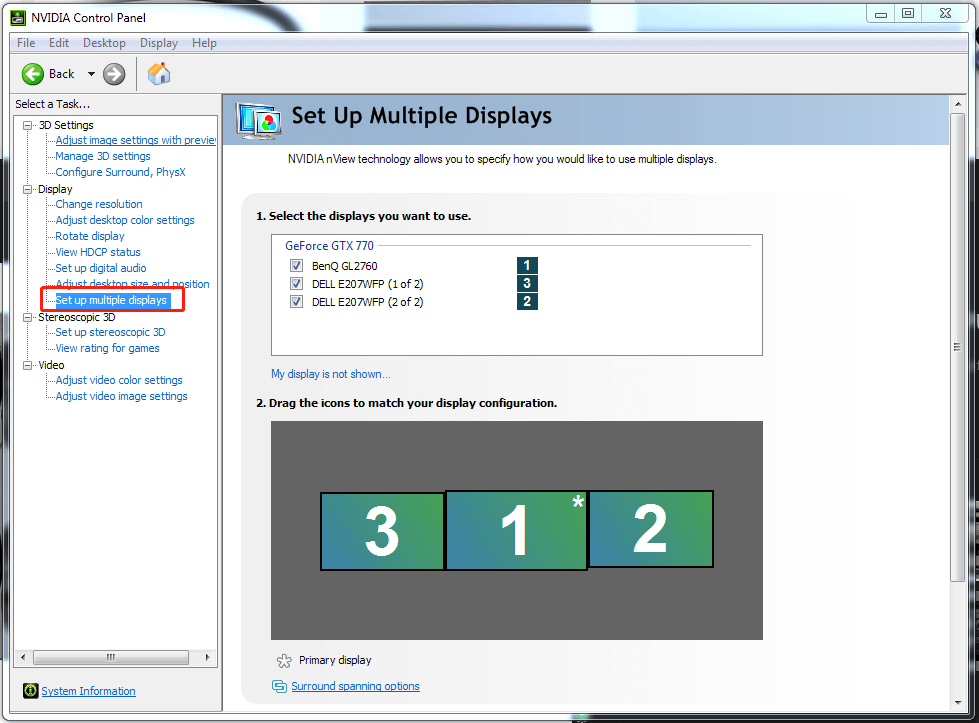
–image from the pcworld
After that, you can reboot your computer and see if the “3rd monitor not working” issue is fixed.
Solution 4. Disable the Integrated Intel Graphics Card
As mentioned above, a conflicting graphics card driver can trigger the error. It’s reported that the Integrated Intel card driver can create conflicts. To fix the issue, you can try disabling the driver.
Step 1. Press Win + R keys to open the Run dialog box, and then type devmgmt.msc in the box and hit Enter to open this program.
Step 2. In the Device Manager window, expand the Display adapters categories, and then right-click the Intel graphics card driver and select Disable device.
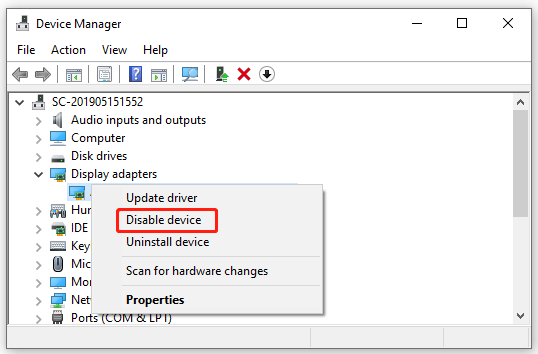
Step 3. Now, reconnect the third monitor and check if it can be detected.
Solution 5. Check Your Graphics Card Driver
An outdated or corrupt graphics card driver can trigger various issues like Windows not detecting third monitor. So, we highly recommend you check your display drivers. For that:
Step 1. Open the Device Manager window like Step 1 in Solution 4.
Step 2. Expand the Display adapters category, and then right-click the graphics card driver and select Update Driver.
Step 3. Then you can select the Search automatically for drivers option and follow the on-screen prompts to complete the update. Alternatively, you can download the graphics card driver from the manufacturer’s website and install it on your computer.
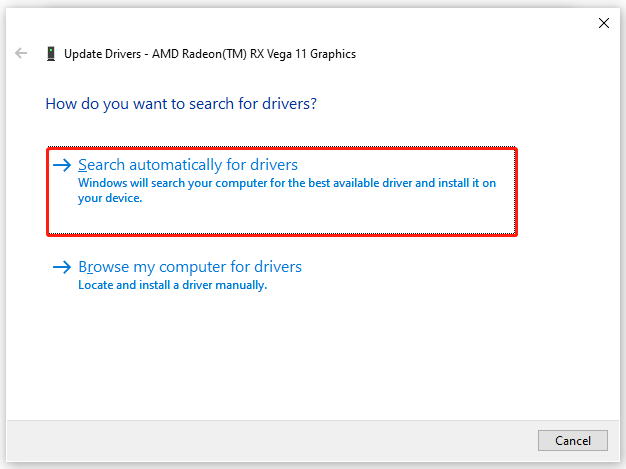
Once updated, you can restart your computer and check if it works. If the issue persists, you can try uninstalling the display driver by selecting Uninstall device and following the on-screen prompts to complete it.

![The CPU Has Been Disabled by the Guest Operating System? [Fixed]](https://images.minitool.com/partitionwizard.com/images/uploads/2021/11/cpu-has-been-disabled-by-the-guest-operating-system-thumbnail.jpg)
User Comments :