Steam keeps disconnecting when you are playing games online? Don’t worry. In this post, you can learn about 5 methods from MiniTool to resolve Steam disconnected issue. Just keep reading to get the detailed information.
Steam is an online game platform which allows users to download and manage various games. Although users have benefited a lot from the client, some problems related Steam have been reported on the forum and affected users’ gaming experience.
In some cases, the Steam client gets disconnected after users start a game. Focusing on this problem, several methods are listed in the following contents. If you are facing the same problem, try them one by one until you resolve it successfully.
Method 1: Check Your Internet Connection
At first, you had better check your internet connection. Just right-click the network icon in the Taskbar and see if your network is connected.
- If it is disconnected, select the network and click Connect
- If it is already connected, open your browser and go to a certain webpage to check if you have a good network connection.
- If it is connected but you cannot load a page smoothly, try disconnecting and reconnecting your network. You can also hard reset your router/modem or use a wired connection instead.
Method 2: Allow Steam Through Windows Firewall
If you always encounter Steam going offline after running a game, perhaps the Windows Firewall has blocked the request from Steam client. So, you might be able to fix the issue by allowing Steam through Windows Firewall.
Step 1: Press Windows + S, input control panel in the search bar and click the search result to open Control Panel.
Step 2: Go to System and Security > Windows Defender Firewall.
Step 3: Click Allow an app or feature through Windows Defender Firewall in the left pane.
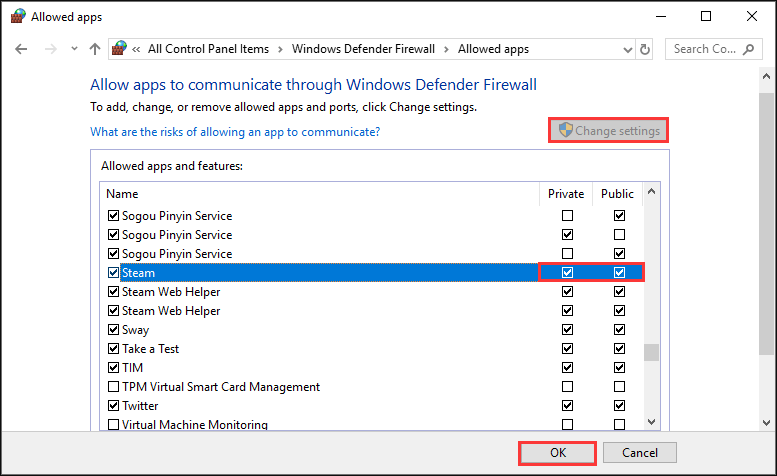
Step 4: Click Change settings button and locate Steam. Tick its boxes of both Private and Public and click OK.

Method 3: Flush DNS and Steam Config
Some users also recommend flushing DNS and Steam config, which has been proven to be effective.
- To flush DNS, just press Windows + R to open Run window, type ipconfig /flushdns and click OK Then, a command box will appear on your screen and the DNS will be cleared.
- To flush Steam config, you should also invoke Run Input steam://flushconfig, click OK and confirm the operation.
Once it’s done, you can open your client to check if Steam disconnected issue has been fixed. If the issue still exists, just continue with the next method.
Method 4: Update Graphics Driver
Keeping your graphics driver updated is also a good solution if your Steam keeps disconnecting. To achieve this, you can refer to the following guide:
Step 1: After opening Run dialog, input devmgmt.msc and click OK to open Device Manager.
Step 2: Right-click your graphics driver under Display adapters category and choose Update driver.
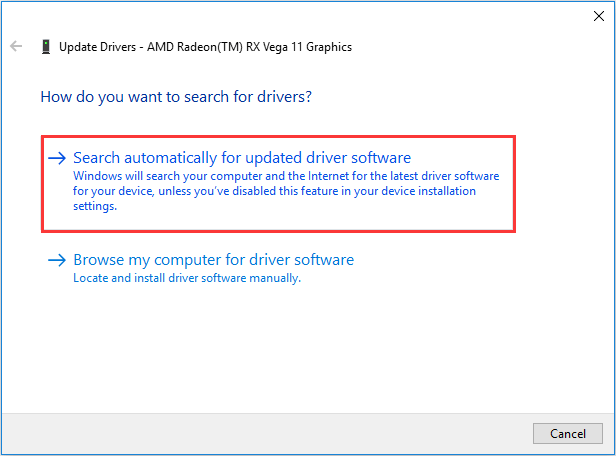
Step 3: Choose Search automatically for updated driver software in the pop-up window.

Your Windows will start searching for the latest driver software for your device, and you just need to follow the onscreen instruction to complete the process. If your Windows finds no updates, perhaps you can go to the official website to download the latest version of your driver and install it manually.
Method 5: Reinstall Steam Client
Finally, if all the above methods fail to help you resolve the problem, you can try reinstall your Steam. Just uninstall the program from your computer and download the last version of Steam from the official website. Then, install it and make it run as administrator.


User Comments :