Are you stuck in “Steam Access Denied”? This post shows you how to get rid of this issue in different ways. Try them one by one. By the way, if you always run into “Steam not enough space”, you can try MiniTool Partition Wizard to upgrade to a large hard drive.
Steam Access Denied
Lots of Steam users reported the “Access Denied” error that appeared any time when they performed any operation.
Not sure what has happened but when using the Steam client, any time I go to anything in the section under my name I get “Access Denied” with things like “You don’t have permission to access “http://steamcommunity.com/id/userID/home/” on this server.” Badges, Profile, Friends, Activity, Groups, Content, Inventory. All those are affected. reddit
What triggers the “Steam Access Denied” error? Possible culprits are bad internet and security software interference.
Now, try the following solutions to fix the “Access Denied” error on Steam.
Fix 1: Try a VPN
Sometimes Steam might restrict access from certain IP addresses. So, try a VPN.
- Purchase a premium VPN subscription, download it, and install it on your computer.
- Log in to your account and connect to the VPN.
- Launch Steam on your computer.
See if the “Access Denied” error appears again.
Fix 2: Clear DNS Cache
The “Steam Access Denied” error might appear due to DNS cache build-ups. So, try clearing your DNS cache:
Step 1: Launch Command Prompt as administrator on your computer.
- Type Command Prompt in the Windows search bar.
- Right-click the result and choose the Run as administrator option.
Step 2: Once Command Prompt opens, run the following command one by one to clear your DNS cache.
- ipconfig /flushdns
- ipconfig /registerdns
- ipconfig /release
- ipconfig /renew
- netsh winsock reset
Step 3: Restart your computer.
When your computer starts, open Steam and see if the “Steam Access Denied” error gets solved.
Fix 3: Try Another DNS
There are many free public DNS server you can try. Follow the tutorial below to switch to another DNS server.
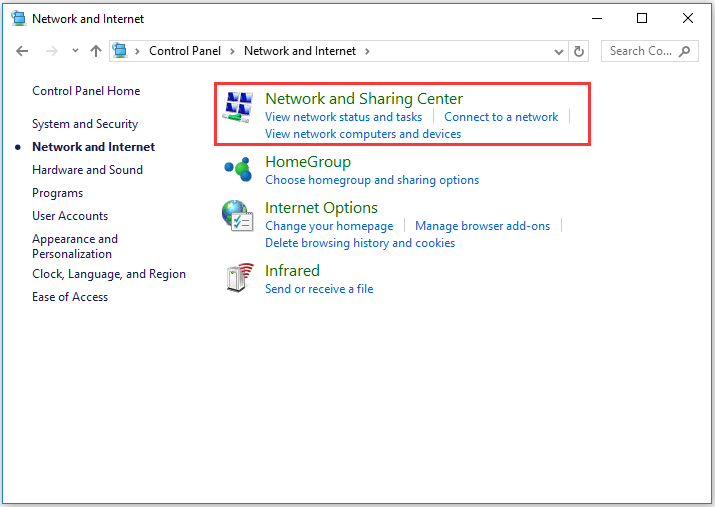
Step 1: Input Control Panel in the Windows search bar and click the result.
Step 2: Click the Network and Internet option on the Control Panel window.
Step 3: Choose the Network and Sharing Center option.

Step 4: Click the Change adapter settings option from the left pane.
Step 5: Right-click the network you are using and then choose the Properties option.
Step 6: Find the Internet Protocol Version 4 (TCP/Ipv4) option and then click the Properties button and
Step 7: Choose the Use the following DNS server address option.
Step 8: Type the following values in the boxes next to Preferred DNS Server and Alternate DNS Server.
- 8.8.8.8
- 8.8.4.4
Step 9: Click the OK button to save the changes.
Fix 4: Check the Security Software on Your PC
Go to the security software you have installed on your PC and see if Steam is blocked by it. If yes, unblock it and relaunch Steam. The “Steam Access Denied” error might disappear.
If all the four fixes you have tried but the error persists, the problem may be on the Steam side. In this case, you need to wait for Steam to fix the issue.

![How to Set Up a VPN on Your Windows 10 PC [Full Guide]](https://images.minitool.com/partitionwizard.com/images/uploads/2019/12/how-to-setup-a-vpn-thumbnail.jpg)


User Comments :