Some users complain that the computer screen keeps dimming even if they are trying to brighten the screen. To prevent screen from dimming and fix the problem, MiniTool Partition Wizard develops this guide where 5 possible solutions are displayed.
Sometimes, the screen might dim randomly and even keep dimming all the time. It is not a big problem, as it won’t affect your tasks, programs, and system. However, it could be distracting or annoying, and you may want to brighten the screen as your preference. Besides, the screen keeps dimming still after users have tried to adjust screen brightness manually.
What can you do if your computer screen keeps dimming Windows 10? Don’t worry. We summarized several feasible solutions that may help you solve the problem. Just keep on your reading.
Fix 1: Disable Adaptive Brightness
Some devices use ambient light sensors and provide the adaptive brightness feature that can adjust screen brightness automatically based on the natural lighting conditions around. If your screen keeps dimming, you can go to disable this feature.
Step 1: Press Windows + S, input power in the empty box, and click Edit power plan from the search results.
Step 2: Click Change advanced power settings to open the Power Options window.
Step 3: Under the Advanced settings tab, expand Display > Enable adaptive brightness and set the setting’s status to Off.
Step 4: Click Apply and OK button to save changes.
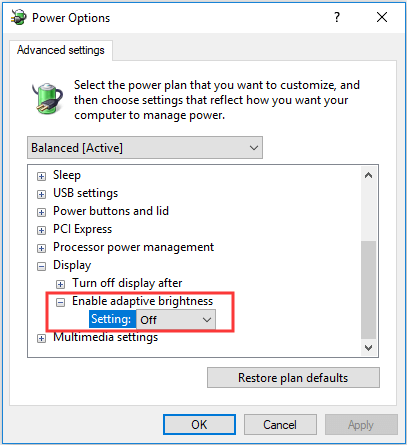
After that, you can check if the “screen keeps dimming Windows 10” has been resolved. If your computer doesn’t have this feature or this method fails to work, you can move on to the next solution.
See also: Fix Windows 10 Adaptive Brightness Missing/Not Working
Fix 2: Perform Windows Power Troubleshooter
The Windows Power troubleshooter is a built-in tool that helps users to find and fix problems with the computer’s power settings. If your device screen keeps dimming Windows 10, you can go to perform this troubleshooter.
Here’s what you need to do:
Step 1: Press Windows + I to open Settings.
Step 2: Navigate to Update & Security > Troubleshoot.
Step 3: Select Power and then click the Run the troubleshooter button.
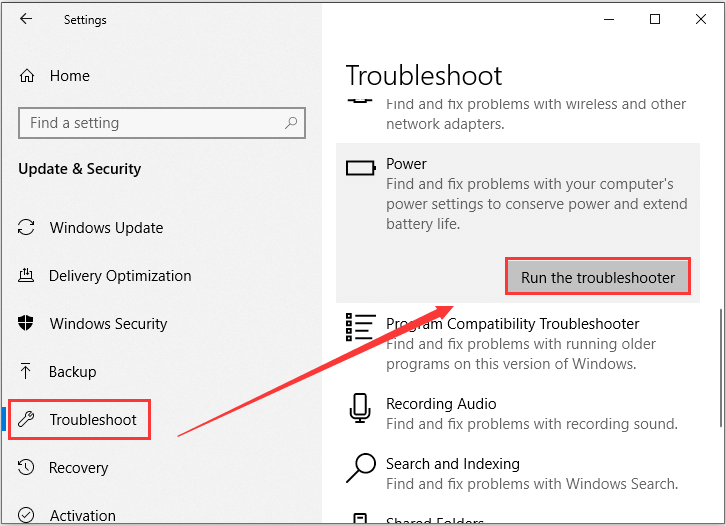
Step 4: The tool will start detecting problems. If there are any fix strategies found, select the Apply this fix option to continue.
Fix 3: Calibrate Display Color
Windows provides a tool named Display Color Calibration that helps improve the color on the display and make sure colors appear accurately. Some users report that they have resolved the screen dimming issue by calibrating display color using this tool. You can also have a try.
Step 1: Input calibrate in the Search bar and click Calibrate display color from the results.
Step 2: Click the Next button to skip the welcome page of Display Color Calibration.
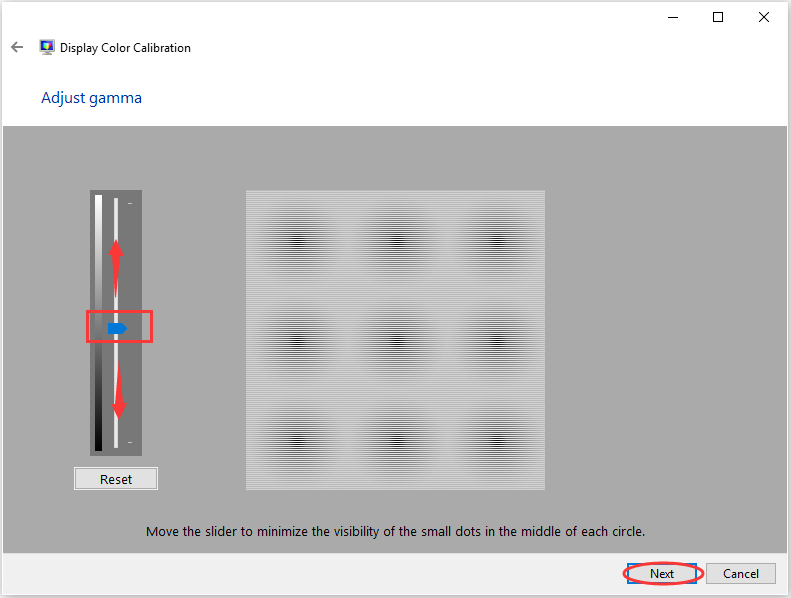
Step 3: Keep clicking the Next button until you get the Adjust gamma screen. Move the slider up or down to minimize the visibility of the small dots in the middle of each circle. Click Next to continue.
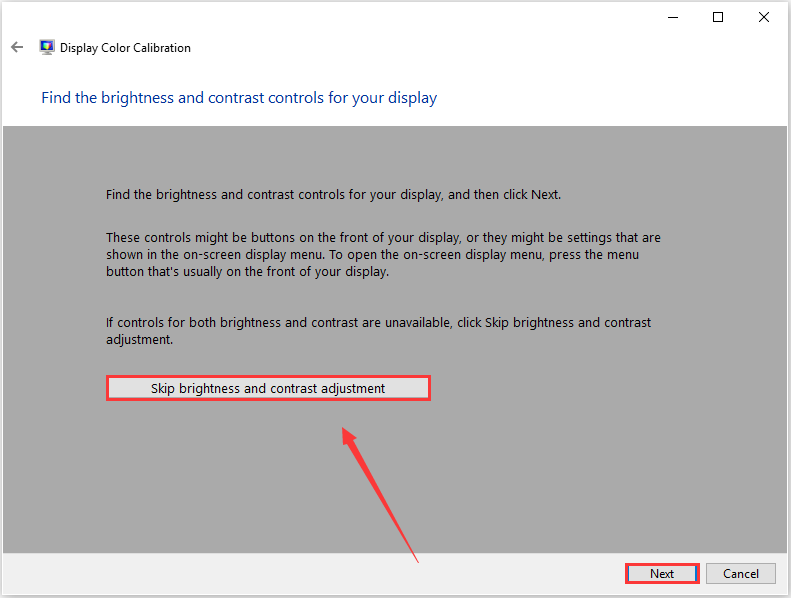
Step 4: Click the Skip brightness and contrast adjustment option and keep clicking the Next button until you get the Adjust color balance page.
Step 5: Adjust the red, green, and blue sliders to reach the color balance you prefer and click the Next button.
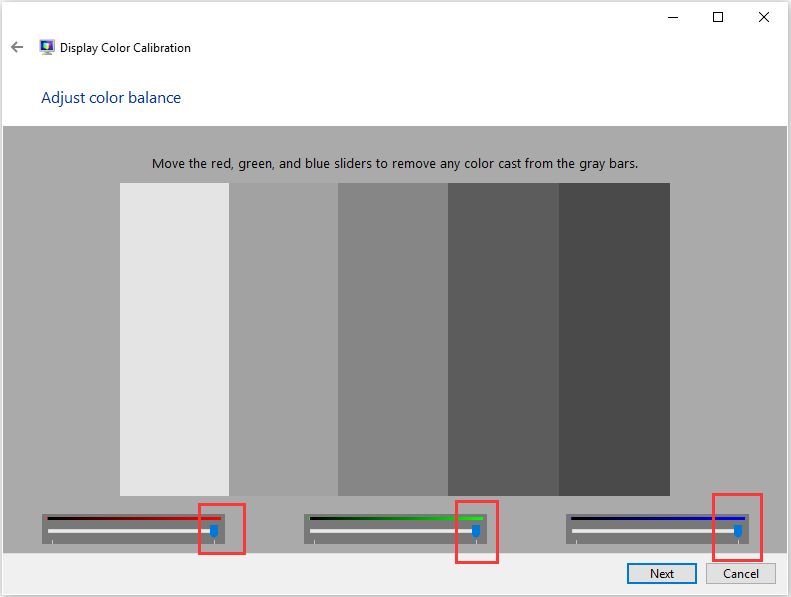
Step 6: Click the Finish button to save the new calibration and exit the tool.
Now, you can check if the screen dimming problem is removed.
Fix 4: Update the Display Driver
Besides, if your computer screen keeps dimming, perhaps there are some problems with your display driver. In this case, updating your display driver might help you fix the screen dimming issue.
Step 1: Right-click the Start button and choose Device Manager to open it.
Step 2: Expand the Display adapters category.
Step 3: Right-click your display driver and choose Update driver.
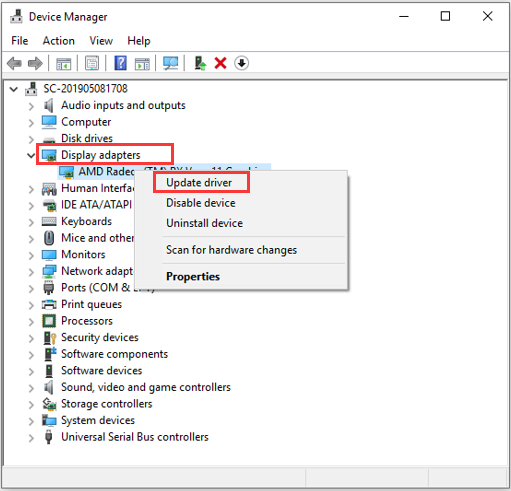
Step 4: Choose Search automatically for updated driver software to continue and follow the onscreen instructions to complete the process.
After updating your display driver to the latest version, you can check if you can brighten the screen.
Fix 5: Modify Windows Registry
To prevent screen from dimming, some users also recommend modifying the Windows registry. This is not a routine solution, but you can have a try if none of the above methods work for you.
Step 1: Press Windows + R, input regedit, and click the OK button to open Registry Editor.
Step 2: Back up your registry in advance to avoid any damages due to misoperation.
Step 3: Copy and paste the following path to the address bar and press Enter to locate the 0000 key quickly:
Computer\HKEY_LOCAL_MACHINE\SYSTEM\ControlSet001\Control\Class\{4d36e968-e325-11ce-bfc1-08002be10318}\0000
Step 4: In the right pane, double-click the FeatureTestControl entry to edit it. Then, set its Value data to f048 and click the OK button to save changes.
Once it’s done, restart your computer and check if the “screen keeps dimming Windows 10” issue has been resolved.

User Comments :