How to delete Windows 7 after installing Windows 10? How to remove Windows 7? And the problem of how to remove Windows 7 after installing Windows 10 has become a common issue. This post will show you how to delete Windows 7 in two ways.
Windows 10 Installations Takes up Disk Space
Microsoft cooperation provides a free upgrade to Windows 10 from Windows 7 or Windows 8.1 that ends on July 29, 2016, which attracts many users all over the world. Nowadays Windows 10 is becoming a very popular operating system because of its advantages, such as beautiful interface, short booting times, useful Cortana voice assistant, less storage used and better System Restore.
Have you upgraded your computer to Windows 10? If you have done this, the Windows 10 installation files are saved to your hard drive and take much disk space. It is not such a serious issue if there is a large hard drive on your laptop or desktop. However, it is useful to get a few gigabytes of space from system partition on small hard drives. How to solve such a problem?
How to Delete Windows 7 for Free Disk Space
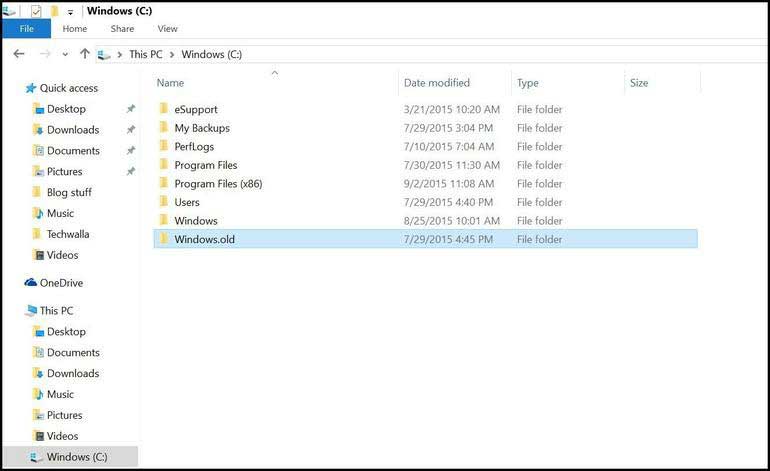
When upgrading your Windows 7/8.1 to Windows 10, the previous Windows operating system files are stored to a folder which is called Windows.old. The folder can be used to roll back Windows 10 to Windows 7 or Windows 8.1 if there is an error after the upgrade. If it goes well, after installing Windows 10, you also can use this folder to go back to the old system during the first 30 days. If you continue to use the Windows 10, this folder will be removed automatically 30 days later.
If you are satisfied with Windows 10 and want to remove Windows 7 after installing Windows 10, then you can do as the following ways show:
Way 1: In this case, you can choose to delete the Windows.old folder directly to remove Windows 7. Open the system partition in Windows Explorer and find the folder to delete.
Way 2: Use Disk Cleanup to uninstall Windows 7 by deleting previous Windows installation. Do as the following says:
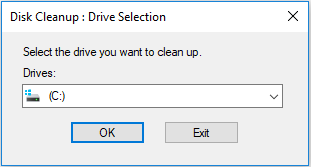
Step 1: Type disk cleanup in the search box of Windows 10 and launch it.
Step 2: When the application is launched, it goes to the drive by default in which your Windows installation is located. Click OK to scan the drive.
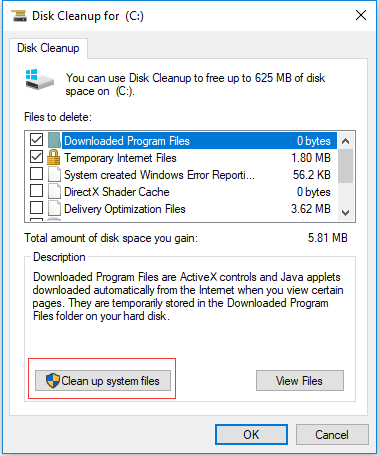
Step 3: In the popup window, click Clean up system files to continue.
Step 4: You need to wait for a while during the process of Windows scanning files. Then please scroll down the list and check Previous Windows installation(s) and click OK to delete the files.
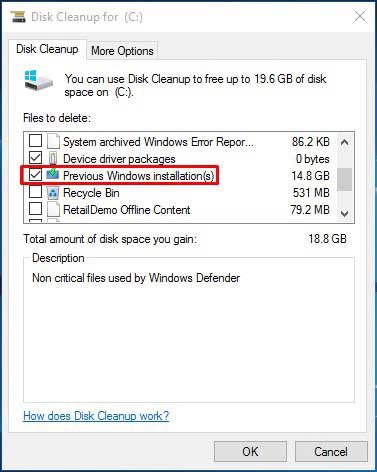
When the steps are finished, you can successfully delete Windows 7.
However, if you do not like Windows 10, you can also choose to remove Windows 10 or uninstall Windows 10.
To remove or uninstall Windows 10, the Windows.old folder is necessary, which is used to roll back your computer to Windows 7 within 30 days. If the time is over, the option Go back to Windows 7 will disappear. In this situation, you can choose to reinstall Windows 7 to remove Windows 10 on your computer.
The here we will show you how to remove Windows 10 update.
Step 1: Press Windows key and I key together to open Settings.
Step 2: Choose Update & Security.
Step 3: Then go to the Recovery tab.
Step 4: Select the option Go back to Windows 7 and click Get started.
Step 5: After that, you can follow the on screen to continue.
When it is finished, you have successfully removed Windows 10 or uninstalled Windows 10 and roll back your computer to Windows 7.
Useful Tip after Deleting Windows 7
When reading here, you may think it is useful to remove Windows 7 after installing Windows 10 in order to release some disk space which can make your system partition spare to some degrees. If there is another drive with low disk space issue, you can extend the small partition by resizing system partition size to release some free space for this partition. You may ask how to perform this task.
Thus, in order to resize Windows 10 partition, the professional partition manager – MiniTool Partition Wizard would be a good assistant.
With its various powerful features, it can resize the partition without data loss and its operations are pretty easy.
Thus, in order to release more disk space, you can download MiniTool Partition Wizard to resize Windows 10 partition. After that, you can extend partition which is going to run out of.
MiniTool Partition Wizard FreeClick to Download100%Clean & Safe
And now, we will show you how to resize the system partition step by step.
Step 1: Install this program and launch it to enter its main interface.
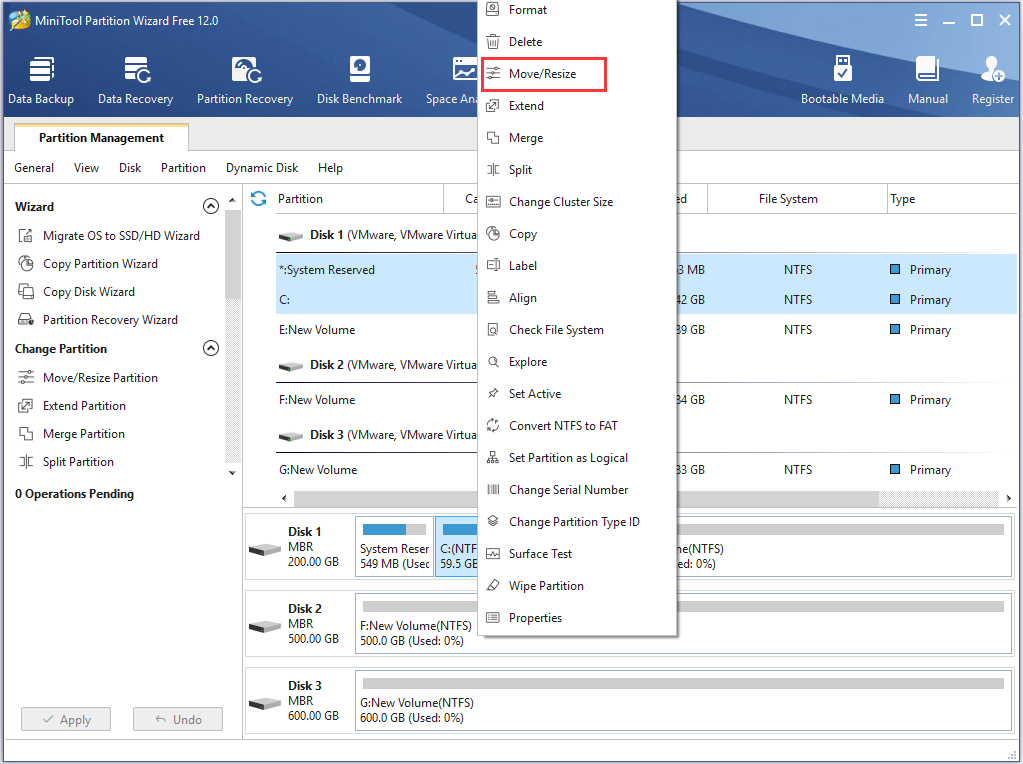
Step 2: Select the system partition and choose Move/Resize feature from the context menu to continue.
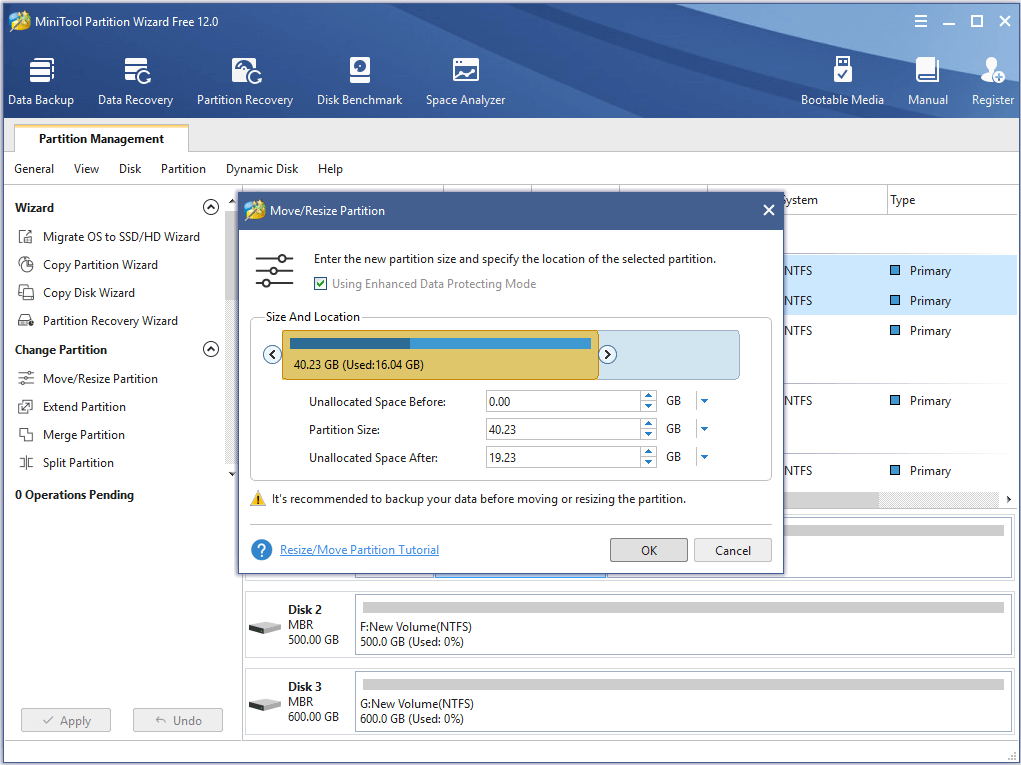
Step 3: Then you can drag the slider to choose how much space you want to shrink and click OK to continue.
Step 4: Then you preview the change and click Apply to confirm the change.
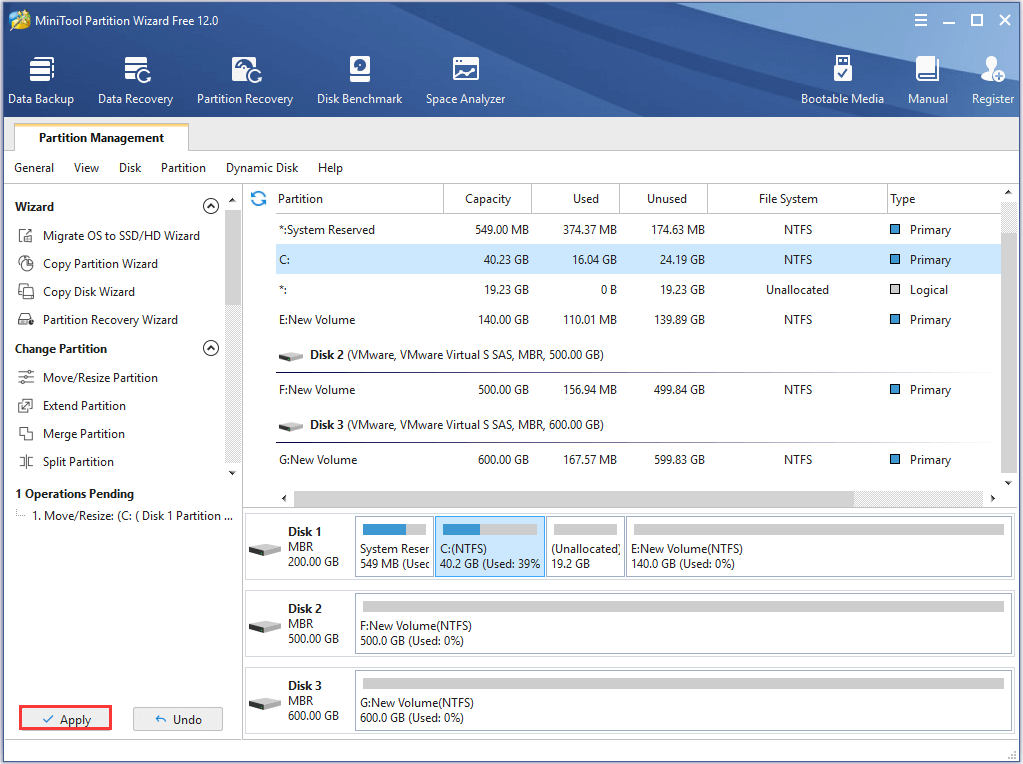
When you have finished the above steps, you can get the unallocated space. Thus, you can extend the partition which is going to run out of. And MiniTool Partition Wizard is also can help to extend partition with ease.
In addition, if you remove Windows 7 after reinstalling Windows 10, you had better make a backup image for your system. When you encounter a system error, you can use this system image to restore your computer to a previous state. Thus, you can take the professional Windows backup software – MiniTool ShadowMaker to have a try.
MiniTool ShadowMaker TrialClick to Download100%Clean & Safe
Bottom Line
In this post, we have introduced two ways to remove Windows 7 after installing Windows 10. If you want to uninstall Windows 7, try these methods.
If you have any better solution to remove Windows 7 after reinstalling Windows 10, please share it on the comment zone.
If you have any problem of MiniTool Partition Wizard, please don’t hesitate to contact us via the email [email protected].
Removing Windows 10 Update from Windows 7 FAQ
- Open Control Panel.
- Choose Uninstall a program under Programs section to continue.
- Then click View install updates in the left panel to view all updated installed on your computer. Then all updated will be listed.
- Right-click the Windows update you wish to uninstall and choose Uninstall.
- Click Yes.
- Click Restart Now to continue.
- Uninstall KB971033 Update.
- Using SLMGR -REARM Command.
- Windows 7 Not Genuine Fix Using RSOP.
- Turn off the Windows Automatic Update.
- Register Windows Genuine When This Copy of Windows Is Now Genuine 7601 Crack.
You can read the post: [SOLVED] This Copy of Windows Is Not Genuine 7600/7601 – Best Fix to learn more detailed instruction.

User Comments :