PSVR is a device specially made by Sony for the PlayStation 4 TV game console. Do you know it can also work on PC? In this post, MiniTool Partition Wizard shows you how to use PSVR on PC.
Can You Use PSVR on PC?
PlayStation VR (“PSVR” for short) is a virtual reality head-mounted display developed by Sony Interactive Entertainment. This machine is a device specially made by Sony for the PlayStation 4 TV game console. But some people may want to use PSVR on PC to play Steam VR games. In this way, they can save money on the PC VR headset.
PC VR Headset: Best VR Headsets for PC in 2021
Can PS4 VR work on PC? Yes, you can connect PSVR to PC to play games, but you need the help of third-party software like Trinus PSVR or PSVRToolbox (an open-source project). But before proceeding, you should make your PC is VR ready.
To judge whether your PC is VR ready, you should refer to the requirements listed by other official PC VR devices like HTC vive, Oculus Rift, HTC Cosmos, Valve Index, etc. The minimum PSVCR PC requirements may be as follows:
- Video Card:NVIDIA GTX 1060 / AMD Radeon RX 480 or greater
- CPU:Intel i5-4590 / AMD Ryzen 5 1500X or greater
- Memory:8GB RAM or greater
- Video Output:DisplayPort 1.2/1.4
- USB Ports:1x USB 3.0 port
- OS:Windows 10
How to Use PSVR on PC
In this part, I will show you how to set up PSVR on PC. The guide is as follows:
Step 1: Head to the Trinus VR website to download and install Trinus PSVR, which is the third-party software program that allows your computer and your PSVR headset to ‘talk’ to each other.
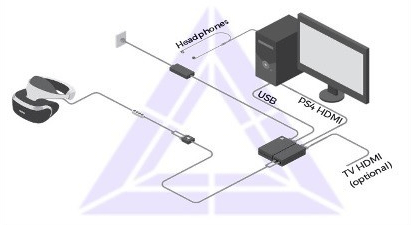
Step 2: Connect the PSVR to your PC as follows:
- Plug an HDMI cableinto the PS4 HDMI port on the processing unit and then plug the other end of the HDMI cable into an HDMI port on your PC.
- Plug the micro-USB end of a USB to Micro-USB cable into the processing unit and then plug the USB end of the cable into a USB port on your PC. Use USB 3.0 if at all possible.
- Plug the PSVR head-mounted display into the processing unit and plug the processing unit power cable into a power outlet.

Step 3: Configure resolution as follows:
- Press the power switch on the inline cord remote to turn the headset on. The PC will identify the headset as a 2nd display screen.
- On the PC, head to Settings > System > Display. Then, under the Multiple Displays subheading, select Extend these displays. Under Resolution, select 1920 x 1080 and click Apply Under this resolution, PSVR can run finest.
Step 4: Configure Trinus PSVR as follows:
- Right-click Trinus PSVR and select Run as Administrator.
- Click Install and Trinus PSVR should then automatically find your Steam library.
- Click the Main tab > expand PSVR Display dropdown menu to choose DISPLAY1 > expand PSVR Mode dropdown menu to select VR. If you want to play standard 2D games in VR, you can select Cinematic mode.
- Click Assign button next to Reset View to bind a key on your keyboard to reset your view in PSVR. Unlike with the PlayStation, there’s no camera to capture movement information, so the PC can (occasionally) get the tracking a little wrong. If you want to be able to zoom while in-game using your mouse scroll wheel, make sure the checkbox next to Use Mouse Wheel is checked.
- Make sure that your PSVR is on a flat surface, and click Start to begin calibration.
- Run Steam as administrator and select VR
- Click Run Room Setup > Standing Only > Next > Calibrate Center > Next > and enter your height in inches or cm in the height field. Then, click Calibrate Floor > Next > Done.
- If successful, you should see the SteamVR Home pop-up on your display in split view. Then, make sure the window is highlighted and hit Windows key + Shift + Right arrow to move the window to the headset.
Through this way, you can play any Steam VR games that offer keyboard and mouse support. But you may not be able to move around or physically interact with the environment.


User Comments :