PS5 storage expansion provides more storage space for PS5 game lovers. Nowadays, PS5 beta users can add a larger SSD to their consoles. If you wonder how to become a beta user and upgrade PS5 SSD, this post from MiniTool Partition Wizard can help. Besides, it also introduces how to add an external hard drive to a PS5.
Do You Need PS5 Storage Expansion?
PS5 (PlayStation 5), released on November 12, 2020, is a game console developed by Sony Interactive Entertainment. It is the successor to the PlayStation 4 (PS4) and has been quite popular among game lovers since its release.
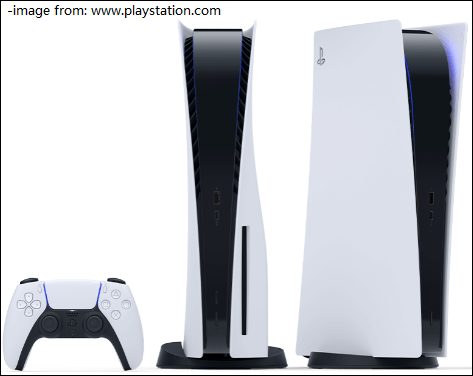
PS5 comes with many new features and higher performance compared with PS4. However, it has a disadvantage: the capacity of its internal hard drive is 825GB and there is only 667.2GB of storage space available for users. It might be not enough especially for those who love to play various high-end video games.
Fortunately, PS5 is designed with a USB slot and an expandable NVMe M.2 SSD slot that can be used to add additional storage space. If you expect to play more video games on your PS5, PS5 storage expansion is a wise choice.
Generally, there are two ways to expand PS5 storage space: add an external hard drive or install an additional internal SSD. You can choose one according to your preferences.
As for how to expand PS5 storage space, you can refer to the following content.
PS5 Storage Expansion: How to Add an External Hard Drive
When your PS5 is running out of space, adding an external hard drive to the console can help you get more storage space. Before that, here are some things you should know:
- A PS5 external hard drive can be used to store both PS5 games and PS4 games. You can play PS4 games through the external hard drive directly on PS5. But to play a PS5 game, you need to copy the game to the internal storage first.
- Not all external hard drives can be used on the PS5 console. A PS5 external hard drive needs to be SuperSpeed USB 5 Gbps or later. And the capacity of a PS5 external hard drive needs to be 250GB minimum, and 8TB maximum.
If you decide to add an external hard drive to your PS5, you should format it with a compatible file system before starting to use it. According to Sony, PS5 supports FAT32 and exFAT file systems. Considering that FAT32 is unable to deal with a single file larger than 4GB, you’d better choose the exFAT file system for your PS5 extended storage device.
MiniTool Partition Wizard is a professional and reliable tool that can help you format it quickly within a few clicks. Now, let’s see how to make PS5 storage expansion via an external hard drive.
All the data on the external hard drive will be deleted during the formatting process. Therefore, please prepare an external hard drive that contains no important files.
Step 1: Connect the external hard drive to a computer.
Step 2: Download and install MiniTool Partition Wizard on the computer. Then launch MiniTool Partition Wizard.
MiniTool Partition Wizard FreeClick to Download100%Clean & Safe
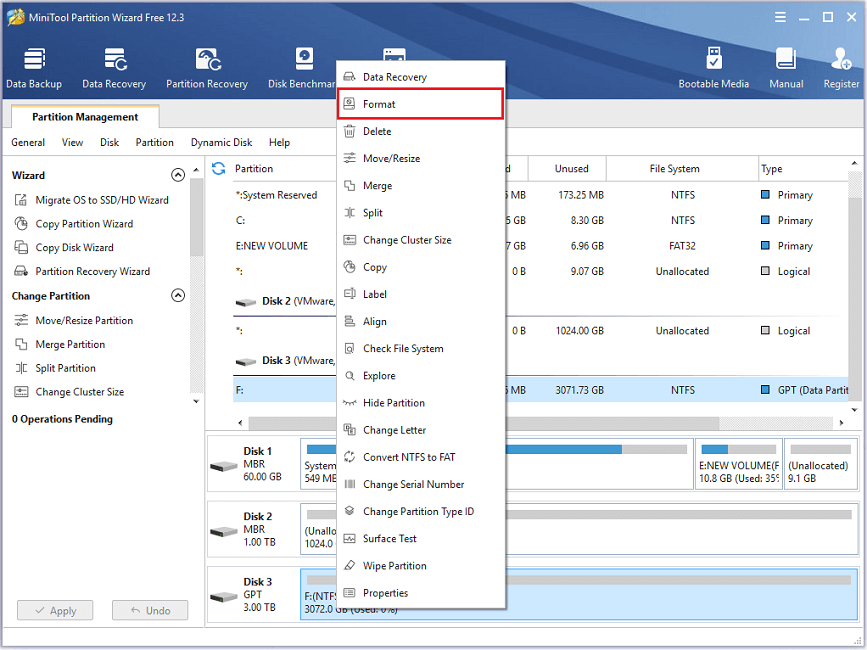
Step 3: When you get the main interface of MiniTool Partition Wizard, right-click the partition on your external hard drive and select Format.
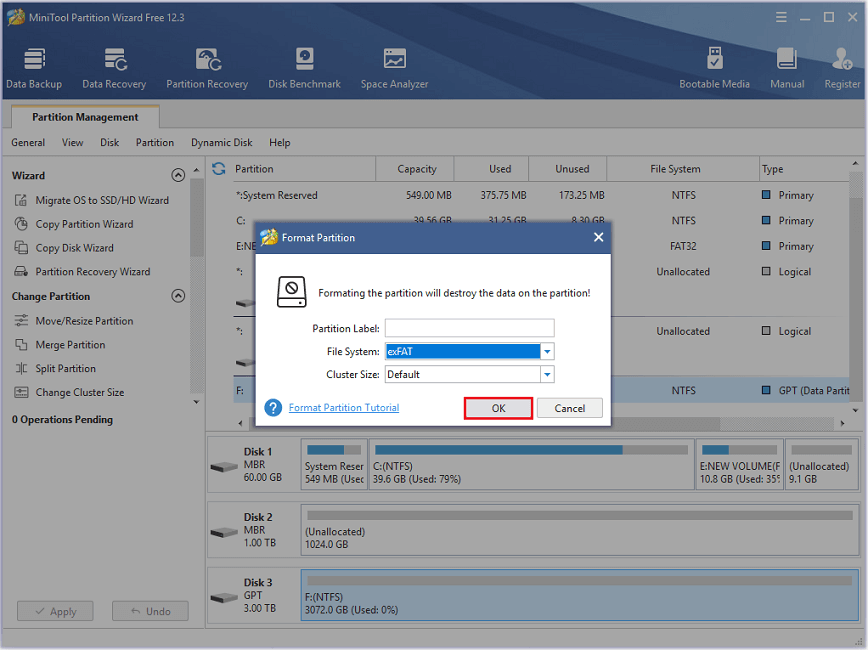
Step 4: In the pop-up window, configure the file system as exFAT. Then click OK to continue.
Step 5: Click Apply at the bottom left corner.
Once the formatting process is finished, you can connect the external hard drive to your PS5 and use it to store new games.
Achieving PS5 storage expansion by adding an external hard drive has both advantages and disadvantages.
On the one hand, it is easy to use and portable. With an external hard drive, you can share your games with your friends or play your games on another PS5 or PS4 console easily. But on the other hand, you are not allowed to play PS5 games on the external hard drive, which might be inconvenient.
Don’t worry. If you don’t like to expand PS5 storage space via an external hard drive, you can choose to install an additional internal SSD on your PS5 console. Please keep reading for more details about PS5 SSD expansion.
PS5 SSD Expansion: How to Add an Internal SSD
As mentioned, PS5 has an expandable storage NVMe M.2 SSD slot. It means you can add a new internal SSD to your PS5 to expand PS5 storage space. Once you installed the SSD, you can use it to download, copy, and play PS4 and PS5 games as well as apps.
It might be uneasy to operate if you have never made similar operations. To make sure everything goes well, you’d better follow the steps below one by one or ask professionals for help.
Generally, you need to go through four stages to add a new internal SSD to your PS5:
- Choose a proper M.2 SSD.
- Make sure you have PS5 system software beta.
- Install the SSD on your PS5.
- Format the new SSD.
Now, let’s see them one by one.
Stage 1: Choose a Proper M.2 SSD for Your PS5
Not all SSDs can be used for PS5 SSD expansion. To add an internal SSD to your PS5, you should make sure the SSD meets the following recommended requirements.
- Interface: PCIe Gen4 x4 M.2 NVMe SSD
- Form Factor: M.2 type 2230, 2242, 2260, 2280, and 22110 (the numbers refer to the size of M.2 SSDs in millimeters. 22 refers to the width, and the remaining digits to the length)
- Total size including cooling structure: smaller than 110mm (L) x 25mm (W) x 11.25mm (H)
- Capacity: 250GB – 4TB
- Sequential read speed: 5,500MB/s or faster
- Socket type: Socket 3 (Key M)
For more details, you can refer to the official website of PlayStation. By the way, the above requirements are recommended for PS5 system software beta. The final specifications might be different when the official system software is updated.
If you are still confused which SSD to buy, here are the best internal M.2 SSDs for PS5 that you can take into consideration:
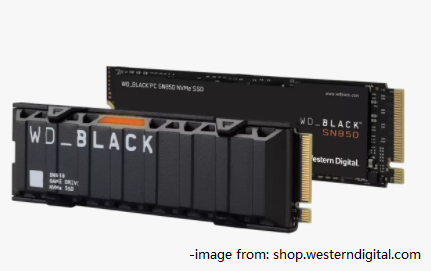
- WD Black SN850 NVMe SSD
- Seagate FireCuda 530 NVMe SSD
- Gigabyte Aorus 7000s SSD
- XPG Gammix S70 SSD
Stage 2: Install PS5 System Software Beta
Please note that Sony provides the internal M.2 SSD expansion feature for beta users only. In other words, if you want to add an internal SSD to your PS5 for PS5 expansion SSD, you need to make sure you have installed the PS5 system software beta at first. Otherwise, the system might not work correctly. Before the operation, you are recommended to back up your data.
You can navigate to Settings > System > System Software > Console Information on your PS5 to check whether you have the beta system version. If it is already installed, you can ignore the following steps and jump to Stage 3.
Step 1: Sign up PlayStation 5 system software beta program and apply for access to PS5 beta. When you successfully register for the program, you will receive an email telling you the 12-character voucher code.
Step 2: Launch your PS5 console and go to Settings > Users and Accounts > Account > Payment and Subscriptions > Redeem Codes. Then enter the voucher code and select Redeem.
Step 3: Go to Settings > System > System Software > System Software Update and Settings and choose Update System Software (beta) > Update. Then agree to the PlayStation 5 system software beta agreement and start updating.
Once you have PS5 system software beta, you can start to install a new M.2 SSD on your console.
If you want to revert to the latest official system version in the future, you need to remove the added M.2 SSD and go to Settings > System > System Software > System Software Update and Settings > Stop Using Beta Version. If you don’t remove the M.2 SSD before stopping using the beta version, the system might not work properly.
Stage 3: Install a New M.2 SSD on Your PS5
Before installing a new M.2 SSD on your PS5, please touch a metal-grounded object to remove any static electricity from your body. Otherwise, the SSD or your PS5 console might get damaged during the installing process. Then you can follow the steps below to install the M.2 SSD.
Step 1: Turn off your PS5 console and remove all the connected cables and devices from your console, such as a controller.
Step 2: Wait until your console cools down. Put your console on a soft cloth on a flat surface. You’d better keep the PS logo facedown and make sure the power button is on your left side. So, you can remove the cover easily in the next step.
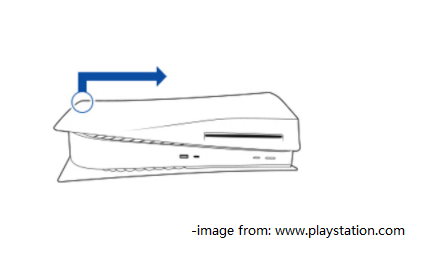
Step 3: Put your hands near the top corners. Then gently lift the edge of the PS5 cover and pull it to the side in the direction showing in the following picture. After removing the case, you can see a rectangular metal cover.
Step 4: Now, you need to remove the screw on the cover with a standard cross-head screwdriver. Then remove the cover and the expansion slot will show up.
Step 5: There is a screw with a spacer installed at one end of the expansion slot. Remove the screw and the spacer. Then put the spacer into the screw hole to fit the size of your M.2 SSD. After that, you can align your M.2 SSD with the notch on the expansion connecter and insert it into the slot.
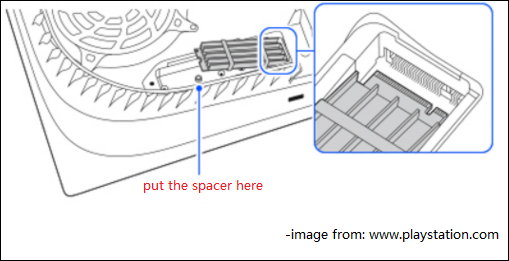
Step 6: Make sure the M.2 SSD has been fully inserted and fasten it with the screw that you removed in the last step. Then attach the expansion slot cover with the screw removed in step 4.
Step 7: Put your PS5 case back by sliding it in the opposite direction to step 3. You will hear a click during the process.
Once you finished all the steps above, the new SSD is installed on your PS5 successfully. However, to use the M.2 SSD, you need to format it. Connect all the cables back, power on your PS5, and go to the next stage.
Stage 4: Format Your New M.2 SSD
After installing a new M.2 SSD on PS5, you will see an M.2 SSD Storage screen asking you to format the SSD when you power on your PS5 console. Just select the Format M.2 SSD option to continue. When the formatting process is finished, select OK. Then you can start to use the expanded PS5 M.2 SSD storage.
By default, your games will be installed on the internal console storage. To use the storage space of the newly added M.2 SSD, you can set the new SSD as the primary installation location.
You just need to go to Settings > Storage. Then select Installation Location. Under the “Set the default installation location for games and apps” section, you can replace Console Storage with M.2 SSD Storage for your “PS5 Games and Apps” and “PS4 Games and Apps”.
You can also move your current games and apps to your PS5 expansion SSD with the following steps:
- Go to your games home and select Game Library.
- Highlight the data you plan to move and press the Options
- Select Move Games and Apps. Check the target games and apps and then select Move.
- There will be a pop-up window noticing that the item you selected will be moved to PS5 M.2 SSD storage. Just click OK to confirm the operation.
Are you planning to make a PS5 storage upgrade? Here is a detailed tutorial.Click to Tweet
Bottom Line
There are two ways to make PS5 storage expansion. You can choose to connect an external SSD or add an internal M.2 SSD. You can share your ideas and experiences in the following comment zone. For any problems with MiniTool Partition Wizard, you can contact us via [email protected].

![How to Transfer PS4 Data to PS5 [Three Ways Included]](https://images.minitool.com/partitionwizard.com/images/uploads/2021/06/how-to-transfer-ps4-data-to-ps5-thumbnail.png)
User Comments :