PlayStation 4 (PS4) is a popular home video game console developed by Sony Interactive Entertainment. You can get a lot of fun by playing games on PS4. However, it is possible for you to meet some problems when using PS4. For example, you may get stuck in the “PS4 controller orange light” issue from time to time.
Usually, the orange light on PS4 controller means that your console is charging or in Rest Mode. But in some cases, it indicates there is something wrong with your console. There are some possible signals:
- The PS4 controller runs slowly
- Your controller cannot connect to the console
- The controller shuts down randomly
- The light remains orange or keeps steady orange when gaming
- …
When you meet the above issues, you need to take action to fix the orange light on PS4 controller.
Solution 1: Connect Your Controller to Another Device
When you run into the “orange light PS4 controller” issue, you are supposed to test your controller on another device, such as a computer or another PS4 console. In this way, you can check out if the issue is caused by the controller itself.
If the issue disappears on another device, it indicates that the problem is with your PS4 console. If the issue disappears on the PC but appears on another PS4 console, your PS4 controller might be incompatible with the console. In this case, you need to use the original DualShock 4 controller. Unfortunately, if the issue exists on all devices, then you should go to fix your controller.
Solution 2: Replace Your DualShock 4 Cable
Sometimes, if the DualShock 4 cable gets damaged, the “PS4 controller orange light” issue may come out. In this case, you should replace the cable with an android charging cable or a new DualShock 4 cable.
After you connect the USB to the new cable, you may see the light on your controller change to blue, which means the issue has been removed and your controller can work normally.
Solution 3: Press the PS Button Repeatedly
Repeatedly pressing the PS button might also help you remove the orange light on PS4 controller. Follow the steps below, please.
Step 1: Turn off your PS4 console completely.
Step 2: Connect your PS4 controller to the console with a charging cable.
Step 3: Turn on your console.
Step 4: When you see “Press the PS button to use the controller” on the screen, press and hold the Power button to turn your console off again.
Step 5: Turn on your console once again and when you see the same message as Step 4, unplug your controller’s cable from the micro USB port.
Step 6: Wait for several seconds. Then plug the cable back and repeatedly press the PS button.
After the operation, your PS4 controller may start flashing blue light and then remains solid blue light.
Solution 4: Re-sync Your PS4 Controller
When the “orange light PS4 controller” issue appears, you might be able to fix the issue by re-syncing your controller.
Step 1: Connect another PS4 controller that can work properly to your PS4 console. Then turn on the console.
Step 2: Go to Settings > Devices > Bluetooth Devices. You will see all the devices synced with your console.
Step 3: Press and hold the PS and Share button on the problematic controller for about 5 seconds. After that, you will see the controller shows up on the screen, which means it has been synced successfully.
The issue might be fixed after you re-sync the PS4 controller. If the issue persists, you need to move on to the next solution.
Solution 5: Reset the Controller
Usually, the “PS4 controller orange light” issue shows up due to the corrupted firmware. On this occasion, you can try to reset your PS4 controller to fix the issue.
Step 1: Turn off your console and unplug it from your controller.
Step 2: Use a small tool, such as a pin, to push the Reset button inside the hole on the back of the PS4 controller.
Step 3: Hold the button for 3 to 5 seconds. Then connect your controller to the console using a USB cable and press the PS button.
If the light turns blue, it means that the issue is resolved. But if the light remains orange, then you need to go on with another way.
Solution 6: Replace Your PS4 Controller Battery
If you have used your PS4 for a long time, the battery of your controller will be aging and may not run properly. As a result, the “PS4 controller orange light” issue is likely to occur. Therefore, to fix the issue on this occasion, you can try to replace the old battery with a new one.
If the issue is not resolved in this way, you should continue to try other methods.
Solution 7: Rebuild the PS4 Database
In some cases, the “PS4 controller orange light” issue can be caused by the corrupted files on your PS4 console. To fix the error, you should try to rebuild the PS4 database.
Step 1: Press and hold the Power button for 3 seconds to turn off your console.
Step 2: After you turn off the console completely, press and hold the Power button again until you hear the second beep.
Step 3: Connect your controller to the console with a USB cable and then press the PS button to turn on your console in Safe Mode.
Step 4: After you enter Safe Mode, select option 5: Rebuild Database.
You are likely to spend several hours finishing the process. Don’t turn off your PS4 console during the process, or some new errors probably show up.
After you rebuild the database successfully, go to check if you have resolved the orange light on PS4 controller.
Solution 8: Initialize Your PS4
The last way you can try to fix the “PS4 controller orange light” issue is to initialize your PS4. Since all the data on your console will be deleted during the process, you need to back up the game data before the operation.
You can back up the data to PS Plus online storage. To do so, you should go to Settings > Application Data Management > Saved Data in System Storage > Upload to Online Storage on your console. Then you can select files to upload.
Please note you can only save no more than 100GB of PS4 data to the PS Plus online storage and the number of game files should be less than 1000. Therefore, if there is too much data you want to back up, you are supposed to use an external hard drive instead.
The process of initializing your PS4 with an external drive can be divided into three parts.
Part 1: Prepare a Compatible External Hard drive
First of all, you need to prepare an external hard drive that is large enough to back up all the data on your PS4. In addition, the external hard drive should be formatted to exFAT or FAT32 so that it can be recognized by your PS4. As FAT32 doesn’t support a single file larger than 4GB, it might be better to format the drive to exFAT.
Note: The process of formatting the drive will delete all the data on it. So, you’d better make a backup before the operation.
You can directly format the external hard drive with your PS4 console. Just go to Settings > Devices > USB Storage Devices and then choose Format as Extended Storage after selecting the target drive.
Alternatively, you can also try to format the drive by using the third-party disk partition software, MiniTool Partition Wizard, on a Windows computer. It is a comprehensive partition management program that provides you with many conveniences to manage your partitions and disks. With this helpful tool, you can create partition, wipe disk, migrate OS to SSD/HD, and so on.
To format the external drive, follow the steps below.
Step 1: Download and install MiniTool Partition Wizard on a Windows PC.
MiniTool Partition Wizard FreeClick to Download100%Clean & Safe
Step 2: Connect the external hard drive to your computer and then launch the MiniTool Partition Wizard to enter its main interface.
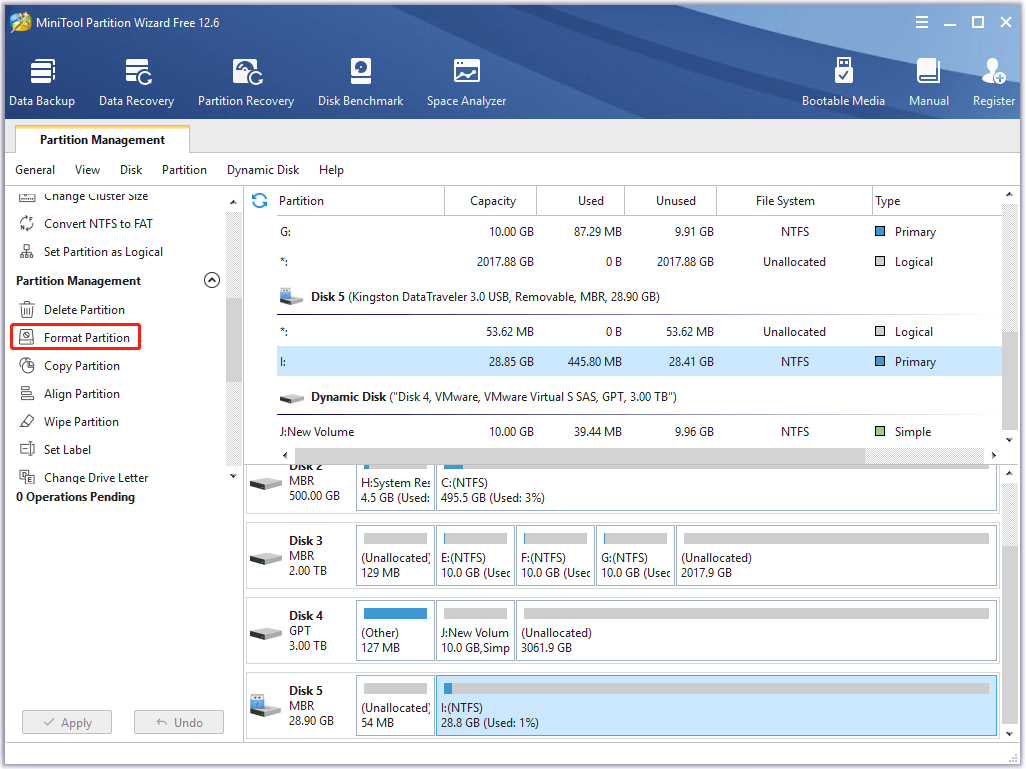
Step 3: Select the partition on the external hard drive and choose Format Partition from the left action pane.

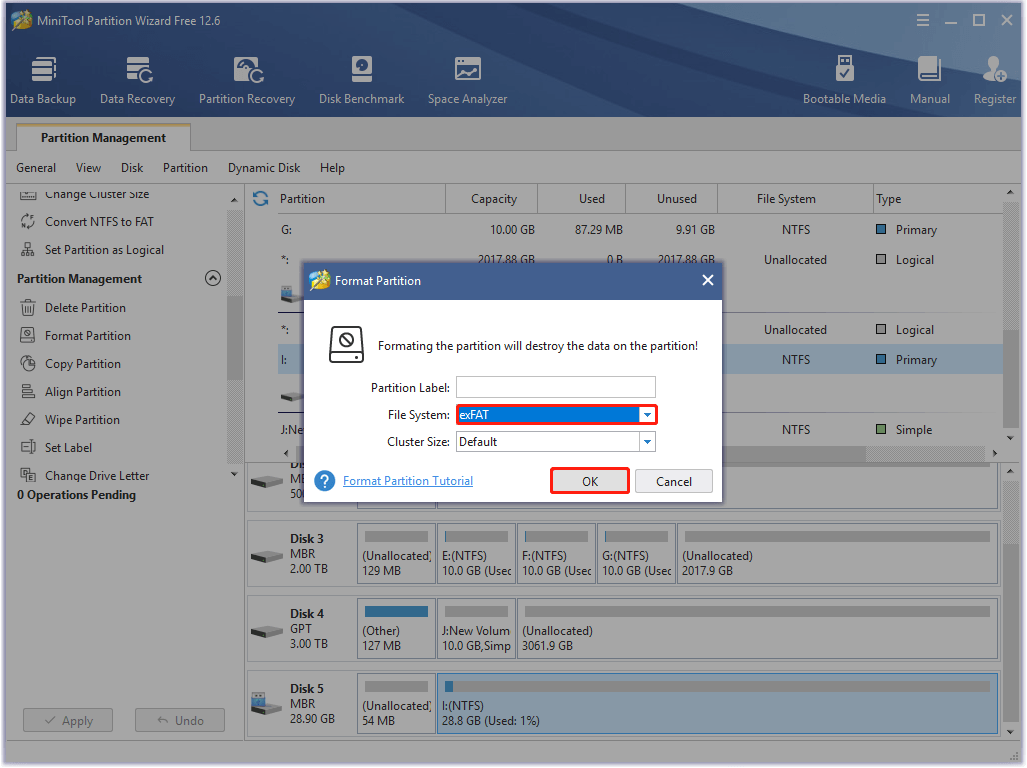
Step 4: In the pop-up window, select exFAT as the file system. Then click OK.

Step 5: Finally, don’t forget to click Apply to carry out the operation.
Part 2: Back up PS4 Data
Once you finish formatting the external drive to exFAT, you can start to back up the data on your PS4 with the formatted drive.
Step 1: Connect the external hard drive to your PS4 console.
Step 2: Go to PS4 Settings > System > Back Up and Restore > Back Up PS4.
Step 3: Choose the Back Up feature and press the X button to start the backup.
Step 4: Disconnect the external hard drive after the backup process is completed.
Part 3: Initialize PS4
The following are detailed steps for you to initialize the PS4 console.
Step 1: Go to PS4 Settings > Initialization > Initialize PS4.
Step 2: Select Full in the next window. Follow the instructions to accomplish the process. It will take some time.
Note: Don’t turn off your console unless the process is finished, or some unexpected errors may appear.
Step 3: Once the process is completed, go to Settings > Back Up and Restore > Restore PS4 to restore the data you have backed up. Then reinstall the games and applications.
After you execute the whole operation, restart your console to check if the “PS4 controller orange light” issue is fixed.
Bottom Line
The “PS4 controller orange light” issue is troublesome but you needn’t worry about it. All these solutions mentioned in this post are available. You can try them one by one to fix the error. In addition, if you have any other methods for solving the issue, you can leave a message below.
If you have any problems when you are using MiniTool Partition Wizard, please contact us via [email protected].


User Comments :