Photoshop is skilled in photo editing and has attracted millions of users. However, some users ran into the “Photoshop not enough RAM” error in different cases. How to get rid of this issue? Read the post from MiniTool Partition Wizard.
Photoshop is a powerful photo editor and lots of users choose it for editing photos. However, not enough RAM issue on Photoshop is a nightmare form many users— the issue impedes them from accessing editing tools. How to get rid of the issue? Solutions are displayed below.

Before you try the following solutions, please first check whether your PC meets the Photoshop system requirements.
Solution 1: Switch to the Official Version
Have you downloaded Photoshop torrent files? Generally, Photoshop loaded from a torrent has been hacked. In other words, the source code of Photoshop has been somehow damaged. That’s why not enough RAM keeps showing up. In this case, the solution is to install the official Photoshop version.
Solution 2: Allocate More RAM to Photoshop
You can try allocating more RAM to Photoshop to stop the “not enough RAM Photoshop” error.
Here are steps to allocate more RAM to Photoshop:
Step 1: Open Photoshop.
Step 2: Click the Edit tab at the top of the Photoshop interface.
Step 3: Choose the Preferences from the menu and then choose the Performance option.
Step 4: On the new window, move the slider to the right to set the value to 100% of RAM.
Step 5: Save the change.
Solution 3: End Background Programs
If there are too many programs running in the background, they will consume RAM and not enough RAM will be available for running Photoshop. In this case, you need to close the background programs.
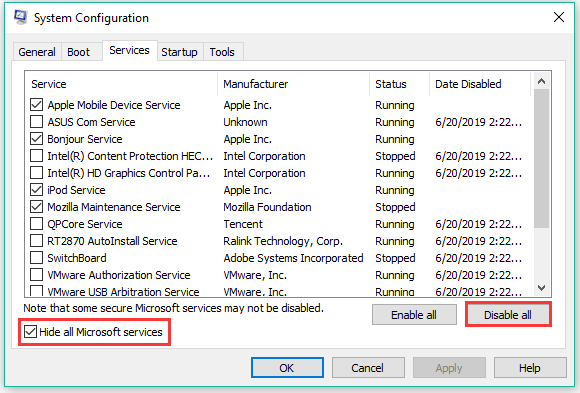
Step 1: Type System Configuration in the Windows Search bar and click the result.
Step 2: Switch to the Services tab.
Step 3: Under the Services tab, tick the checkbox of Hide all Microsoft services.
Step 4: Click the Disable all button to disable all active third-party services.

Solution 4: Make Changes in Registry Editor
Step 1: Launch Registry Editor:
- Press Windows + R to call out the Run dialogue box.
- On the dialogue box, type regedit and then click the OK button.
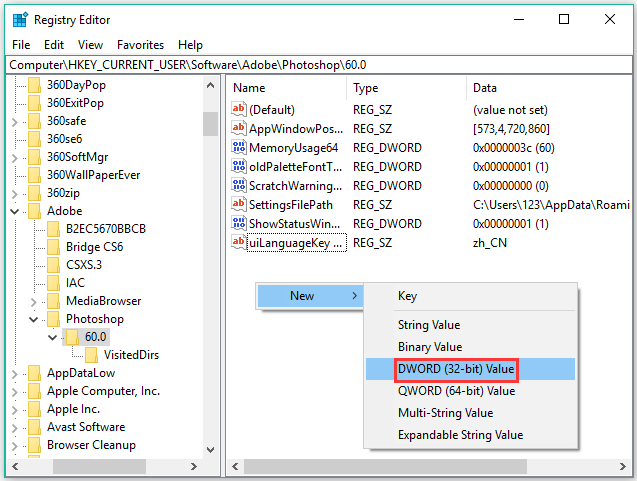
Step 2: On the Registry Editor window, navigate to the following path:
ComputerHKEY_CURRENT_USERSoftwareAdobePhotoshop
Step 3: Expand the folder (indicating your Photoshop version) under the Photoshop folder. Then, right-click the empty area in the right pane and choose New > DWORD (32-bit) Value.

Step 4: Double click the DWORD to:
- name the DWORD OverridePhysicalMemoryMB.
- set its value to 2400.
- make sure the Hexadecimal is selected.
Step 5: Save the changes.
Now, you can run your Photoshop again and see if the issue shows up.
Solution 5: Reinstall Photoshop
If the above solutions are not helpful, the last resort you can take is to reinstall Photoshop.
Step 1: Type Photoshop in the Windows search bar and right-click the result to choose Uninstall.
Step 2: On the Programs and Features window, find Photoshop and right-click it to choose Uninstall.
Step 3: Navigate to Program Files on the system partition and delete the remaining folder.
Step 4: Restart your computer. Download the Photoshop version you have licensed and install it on your computer.


User Comments :