To maintain a good computer performance, it is important to make a PC hardware check on a regular basis. What is your PC hardware? How to check your PC hardware? Today, MiniTool will show you several hardware diagnostic tools Windows 10.
What Could Be Wrong with Your PC Hardware
What is your PC hardware? In fact, a large number of users are still unclear about this question. Your PC hardware is mainly composed of 6 parts including hard disks, CPU, GPU, motherboard, RAM, and battery. Each part is very important to make a PC work normally.
Due to various hardware issues, you may be troubled by lots of errors like system crash, blue screen of death, second monitor not detected, unexpected store exception error, etc. So, it’s high time to make a PC hardware check if your computer is often vexed by these problems.
First of all, you can use a Windows built-in tool – Performance Monitor to conduct an overall check of your hardware. Then you can further utilize some specific tools to check PC hardware. Here’s how to use Performance Monitor:
Step 1. Press Win + R keys to open the Run dialog box, and then type perfmon /report and hit Enter. Then you will see a window that’s collecting data for the next 60 seconds.
Step 2. Click on the Diagnostic Results section, and then you will find the following subsections that show detailed results.
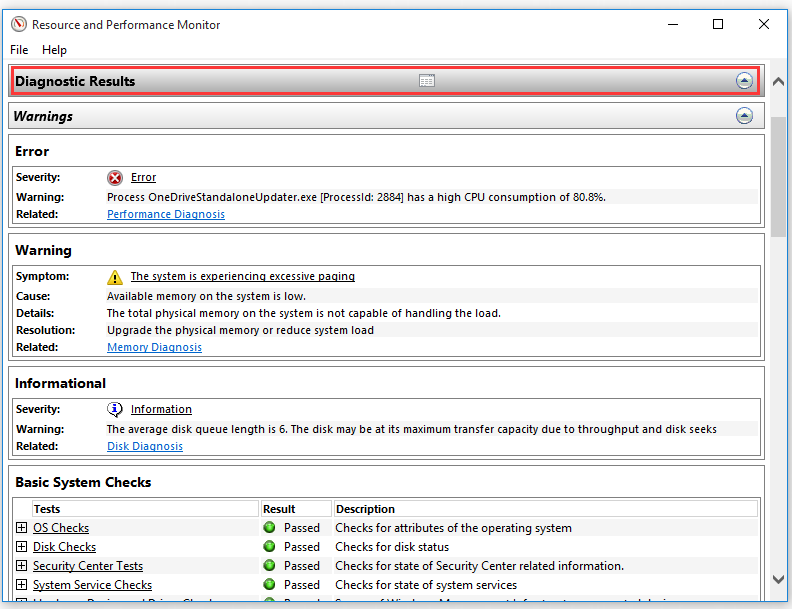
- Errors: This part shows any errors related to performance diagnostics. For instance, you can check what is consuming high CPU.
- Warning: This subsection will show you the issues related to memory diagnostics and provide some solutions to fix the issue. As the picture showed, the available memory is low and you’re recommended upgrading memory or reducing system load.
- Informational: This subsection will show you the results related to Disk Diagnostics. From here, you can get overall information about your HDD/SSD.
- Basic system checks: It contains the basic system checks of OS, Disks, Security Center, System Service, Hardware Device, and Drivers.
According to the above method, you may have a preliminary PC hardware check, but it is not comprehensive. So, we will further introduce several professional PC hardware diagnostic tools to you.
MiniTool System Booster TrialClick to Download100%Clean & Safe
PC Hardware Check
In this section, we mainly focus on how to check PC hardware using specific tools. Usually, the PC hardware contains the top 6 parts of your PC – HDD/SSD, memory, motherboard, CPU, GPU, and battery. Besides, you will get some useful tips to deal with these hardware issues.
Part 1. Check Your HDD/SSD
There is no doubt that your storage device (HDD or SSD) has great significance in computer running and performance. If your computer often gets crashed or frozen, it is necessary to check your hard drive for errors.
Usually, you may use the Windows built-in tool like CHKDSK to test the hard drive. However, if your computer won’t be able to boot into Windows, you will need a professional tool to check and fix your hard drive. Under this situation, you can use MiniTool Partition Wizard that helps you boot the computer via bootable media and then check hard drive errors.
It is a reliable partition manager that can help you convert FAT to NTFS, recover lost data, rebuild MBR, check disk performance, and etc. Now, let’s see how to check your drive with this powerful program.
PW-Ultimate
Step 1. Download the MiniTool Partition Wizard Pro-Ultimate Edition and create a bootable USB media.
Step 2. Use this bootable USB to start your computer and follow the on-screen prompts to enter its main interface.
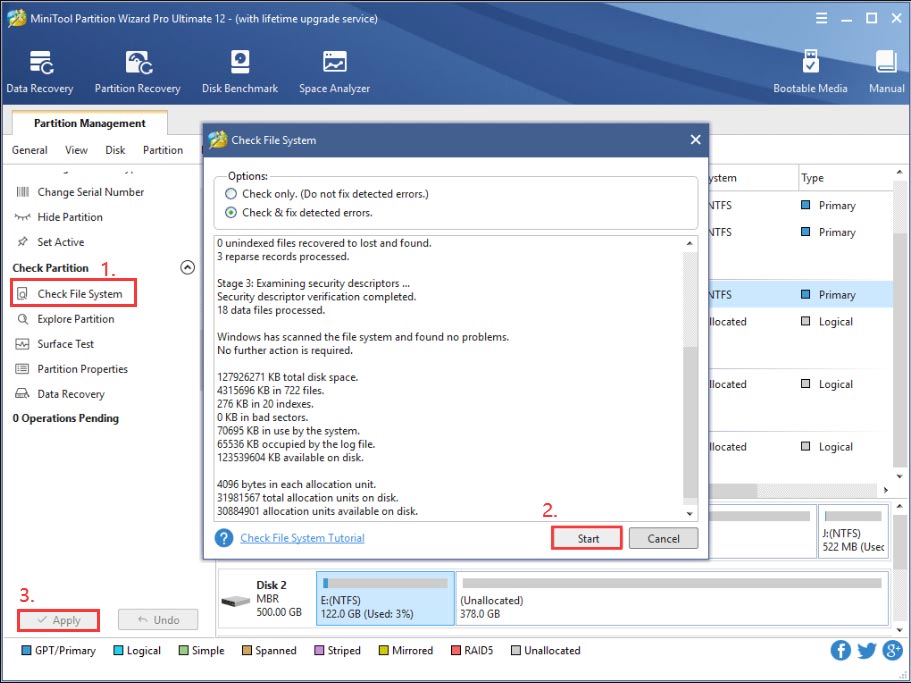
Step 3. Select the drive that you want to check and click the Check File System.
Step 4. Select the Check & fix detected errors option and click on the Start button. This tool will check and fix file system errors immediately.
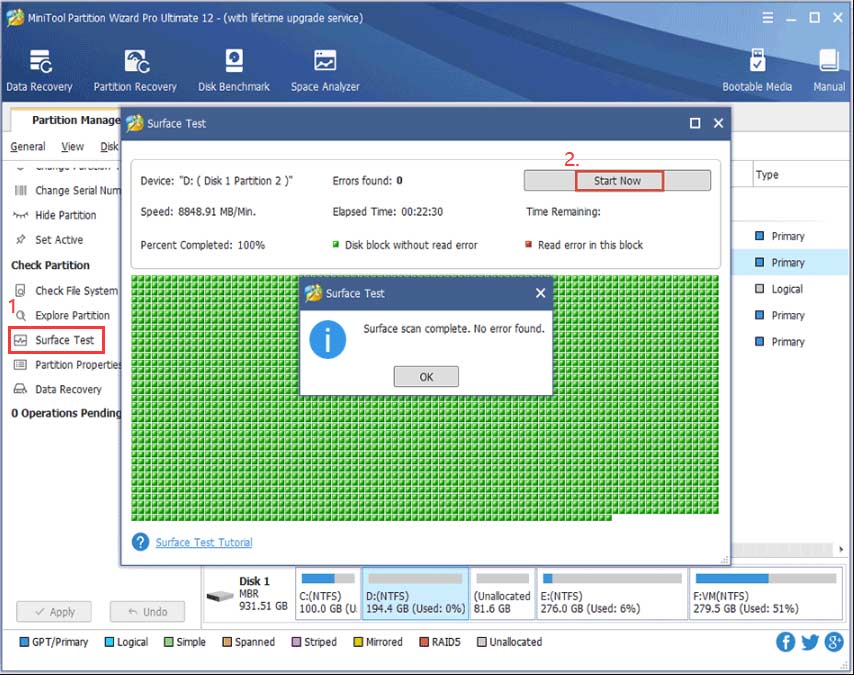
Step 5. Then you need to further check if there are any bad sectors on the drive. In the main interface, select the disk again and click on the Surface Test from the left pane.
Step 6 Click on the Start now button. Now, this tool will scan the hard disk immediately. The bad sectors will be marked with red color. For this, you can run chkdsk /f/r to shield the bad sectors or replace the bad drive with a new one.
Part 2. Check Your Memory
RAM is one of the most important components of your computer that allows data to be read and written. An excellent memory will provide fast read and write access to your storage devices. Once the memory gets faulty you may encounter some common errors like unexpected kernel mode trap error, memory management error 0x0000001a, etc.
Thus, we recommend checking memory timely so that you can take some effective measures to resolve the issue. Windows Memory Diagnostic is one of the most effective hardware diagnostic tools Windows 10. It can help you check RAM easily. Follow the steps below to use it:
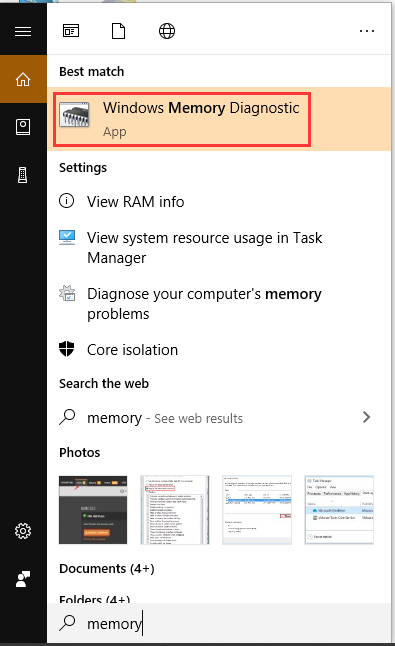
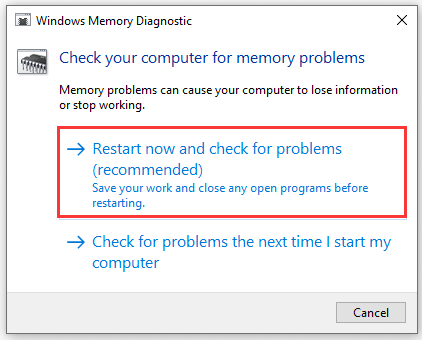
Step 1. Type memory in the search box and select the Windows Memory Diagnostic program from the Best match.
Step 2. Here are 2 options for you to check your computer for memory problems. Here we recommend you select the Restart now and check for problems option.
Step 3. Then your computer will restart and this PC hardware diagnostic tool will automatically test RAM. Wait patiently for this process to complete. During the process, you will receive the overall test status bar and the detected problems.
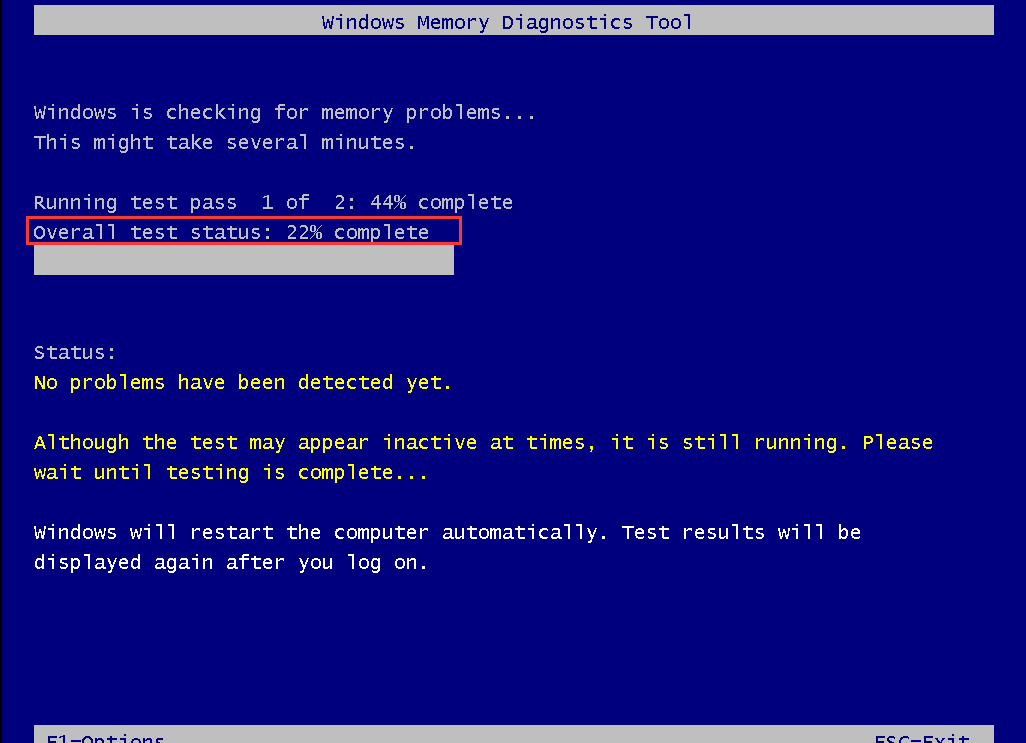
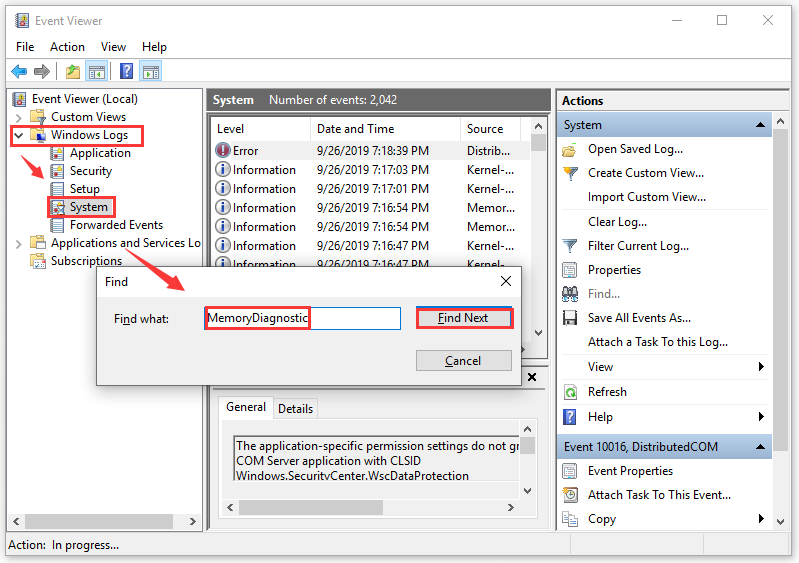
Step 4. Once the hardware test completes, your PC will reboot automatically. In order to view the test results, you can right-click the Start menu and open the Event Viewer app.
Step 5. Go to Windows Logs and System tab, you will see a list of events. To find the RAM test results, you can click Find on the right pane and type MemoryDiagnostic in the box. Then you can click Find Next to see the results at the bottom of the window.
In addition to the Windows Memory Diagnostic Tool, you can use other third-party RAM test programs like MemTest86 as well. Here you can refer to this post to know more free RAM test programs.
Part 3. Check Your Motherboard &CPU
A failed motherboard can trigger various problems on your PC. How to tell if your motherboard is faulty? If your computer often can’t boot or randomly reboot, it’s time to check your motherboard and CPU. Besides, the following symptoms also indicate that your motherboard or CPU get failed.
- Unusual burning smell. One of the most obvious symptoms is the strong burning odor, which indicates that your motherboard or CPU is overheating caused by an incompatible component.
- BIOS menu appears by itself at startup. As you know, the BIOS menu manages the hardware agreements on your PC. When it appears by itself during the startup process, it means that there is a hardware issue like motherboard or a mass of software issues.
- Blue screen of death. It is a Windows stop error that always indicates a hardware issue on your PC like motherboard, CPU, or hard disk.
So, how to check motherboard and CPU? The first thing you should perform a visual check. Here’s a quick guide for you:
Step 1. Check if the motherboard has blown or bulged the capacitors.
Step 2. Check the top of each capacitor. If it is leaking or bulging, then you need to replace the capacitor with the help of professionals.
Step 3. Check if there are any strange burning smell and see if all the components are connected properly.
Step 4. See if all the CPU fans are spinning when your system turns on.
Step 5. PSU (Power Supply Unit) is also important to the motherboard. You can check it by plugging it into a normal system. If the PSU fails to work, it indicates PSU goes wrong, instead of your motherboard.
As for CPU, you can check it through specific software. For instance, if you want to check the functionality of an Intel processor, you can use Intel Processor Diagnostic Tool
Part 4. Check Your GPU
A great many people are confused about the difference between CPU and GPU. GPU is another important hardware that manages the performance of the video and graphics. A suitable GPU will greatly enhance gaming performance, especially for game PC.
Sometimes, however, there is something wrong with your GPU. If you often encounter these issues like GPU fan not spinning issue, high GPU usage, GPU shuttering, screen glitches, loud fan noise, it is time to check your GPU.
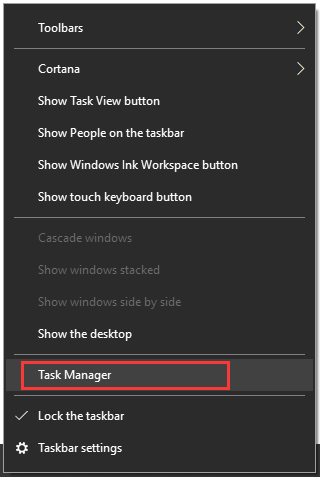
First of all, you can check the GPU performance and usage in Task Manager. Here’s how:
Step 1. Right-click the Taskbar at the bottom of the screen and select Task Manager.
Step 2. Go to the Performance tab, and then click on the GPU section and you will see the GPU usage and its overall performance.
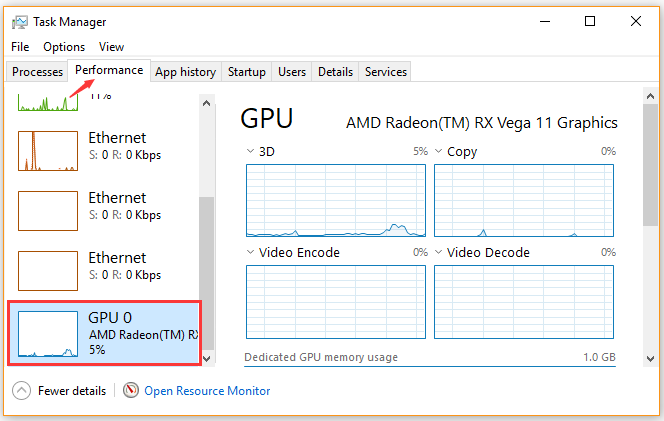
The above steps are mainly used to check your GPU usage and performance. If you want to know more detailed information on the GPU test, you can refer to this post “How to Tell If Your Graphics Card Is Dying?>”
Part 5. Check Your Battery
Needless to say, the battery is essential to make sure that the computer is running normally. Once the battery is damaged, various types of issues will happen to you such as plugged in not charging, laptop displays a wrong battery percentage, no battery is detected, etc.
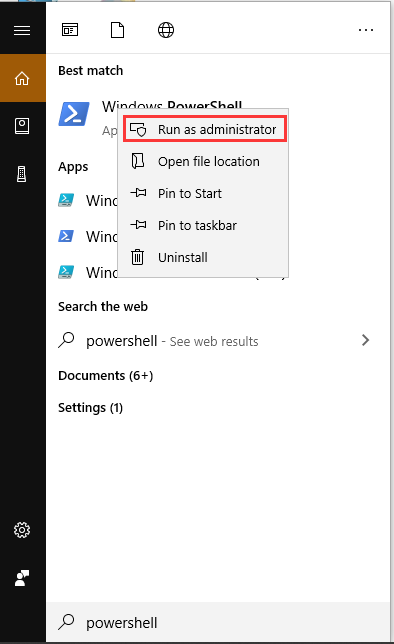
If you are often troubled by these vexing issues, it’s high time to check your battery health and replace the damaged battery timely. Here’s how to check battery health:
Step 1. Type PowerShell in the search box, and then right-click Windows PowerShell and select Run as administrator.
Step 2. Type powercfg /batteryreport and hit Enter in the prompted window. Now, this command will run automatically.
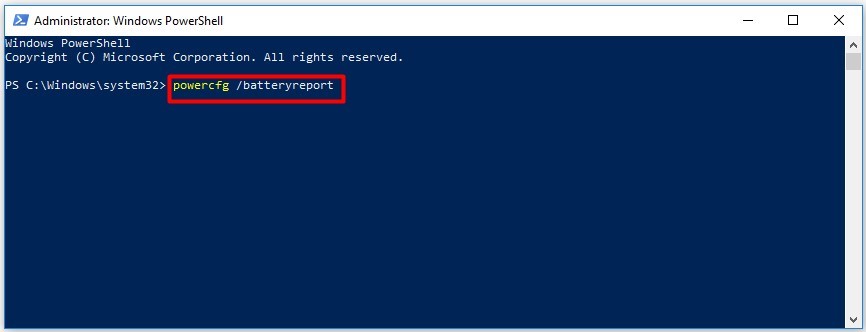
Step 3. When the process completes, close the window and view the battery health report on your PC.
What’s Your Opinion
Here comes the end of the post. Today, we introduce several PC hardware diagnostic tools. You can utilize them to check your hard drive, RAM, motherboard, CPU, GPU, and battery respectively. If you have any questions or suggestions about MiniTool Partition Wizard, you can contact us via [email protected]. Also, we appreciate any ideas in the comment area.
PC Hardware Check FAQ
You can check computer PC specs for hardware by using this simple guide:
- Press Win + I keys to open the Settings window and select System.
- In the Settings window, scroll down the left sidebar and select About.
- Then you can find hardware specs include RAM, processor, and system type under Device specifications.
You can check the GPU information through the steps below:
- Press Win + R key to open the Run box, and then type dxdiag in it and hit Enter.
- When the DirectX Diagnostic Tool opens, go to the Display
- You can see the information about your graphics card shown in the Device
You can use Command Prompt to check your RAM type. Here’s how:
- Type cmd in the search box, and then right-click the Command Prompt and select Run as Administrator.
- Type the wmic MemoryChip get MemoryTypein the elevated command prompt and hit Enter.
- Press Win + R key to open the Run box, and then type perfmon in it and hit Enter.
- In the Performance Monitor window, navigate to Data Collector Sets > System > System Performance.
- Right-click System performance and select Start from the context menu.
- Once the process completes, click on Reports > System > System Performance from the left pane.
- Double click the System Performance Report section and you will see an overall system performance summary.

User Comments :