The password reset disk is a rather useful tool when you forget the password to your computer account. In this article, MiniTool will introduce how to create and use a password reset disk in Windows 10.
It is really a frustrating thing if you forget the password to your local account of your Windows PC. Luckily, you can avoid this problem by creating a password reset disk.
The password reset disk is a file that you create on a removable media, such as USB flash drive or SD card. Once you plug it into your Windows 10 PC, it will allow you to reset your password with the screen locked.
The lifespan of the password reset disk you create is not affected by the times you use it. What’s more, you don’t have to create a new disk when you change your password, even if you have changed it for several times.
Let’s see the specific steps of creating and using a password reset disk in Windows 10.
How to Create a Password Reset Disk in Windows 10
Before you create a password reset disk, you need to prepare a USB flash drive or SD card, of course. Besides, you have to make sure that you have signed in with your local account.
Step 1: Insert the prepared USB or SD card into your computer.
Step 2: Open Control Panel and go to User Accounts. In the new page, choose User Accounts again.
Step 3: Hit Create a password reset disk and click Next in the pop-up welcoming page.
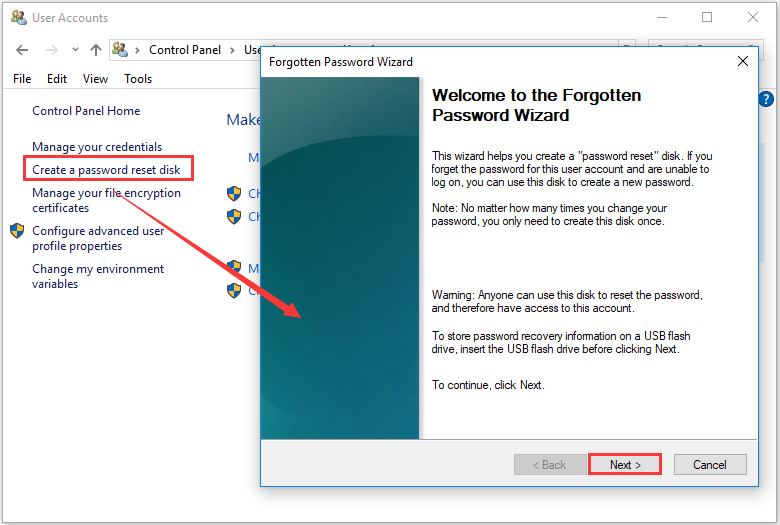
Step 4: Then you need to choose the drive (the USB/SD card you have plugged in) to create a password key disk and click Next. Your password information about this user account will be saved to the selected drive.
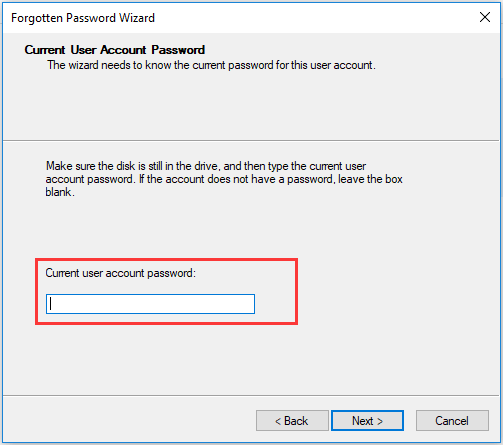
Step 5: Now, input the current user account password in the empty box and click Next. If the account does not have a password yet, just leave the box blank.
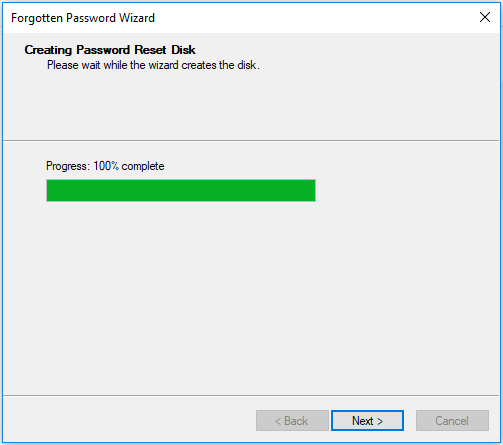
Step 6: The wizard will start creating a password reset disk at once and you can see the progress bar in the new page. After the progress is 100% completed, click Next. Then, click Finish button in the completing page.
How to Use a Password Reset Disk in Windows 10
If you have forgotten your password unfortunately, it’s time to use the created a password reset disk to reset your local account password. Here are the steps.
Step 1: Insert the password reset disk to your computer.
Step 2: In the login screen, click Reset password and click Next in the pop-up window,
Step 3: Choose the drive on which the password reset disk is located and click Next.
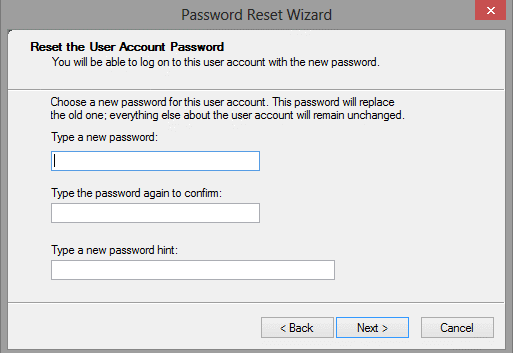
Step 4: You will get the following interface. You need to input a new password and a new password hint which will replace the old ones. Then, click Next.
Step 5: Click Finish in the completing page.
That’s all about how to create and use a password reset disk. Create a password reset disk as soon as possible if you are using a local account in Windows 10. It will be too late if you do until you have forgotten your password.


User Comments :