If you are looking for a solution for Outlook AutoComplete not working issue, your search ends! In this post, MiniTool Partition Wizard will show you the reasons that can cause this issue and how to fix it successfully.
About Outlook AutoComplete Feature
Microsoft Outlook is a personal information management software system from Microsoft that is a part of the Microsoft Office and Microsoft 365 software suites. It is an email client that is popular among many businesses.
Autocomplete is an important feature in Outlook that suggests email addresses as soon as you type the initials. It is very easy and convenient for you to use it to autofill email addresses in Outlook.
However, some users encounter the Outlook AutoComplete not working issue on their computer. This issue bothers them a lot. Have you also encountered the same error? If you are, you don’t need to worry about it anymore. This post will show you the reasons for and solutions to this issue.
If you have any needs, such as cloning the system, better managing disks or recovering data, MiniTool Partition Wizard will be your good choice.
MiniTool Partition Wizard FreeClick to Download100%Clean & Safe
Why Is the Outlook AutoComplete Not Working?
There are numerous reasons why the Outlook AutoComplete feature may not function properly. Here are some common reasons:
- You have disabled the Autocomplete feature on your Outlook before.
- You have reinstalled MS Office or replaced your PC recently.
- The AutoComplete cache gets full on your PC.
- There are corrupted add-ins on your PC.
- There are some bugs and glitches with Outlook.
- There are some corrupt Outlook data PST files on your PC.
- Outdated or corrupt Microsoft Office updates can cause this error.
- The RoamCache folder on your PC is corrupted.
- There are some issues with your user profile.
After knowing the possible reasons that can cause Outlook AutoComplete not working issue, you may want to see the solutions as soon as possible. Following are the troubleshooting methods to solve this problem.
Solution 1. Enable AutoComplete in Outlook
If you haven’t enabled the Autocomplete Settings before, you can encounter the Outlook AutoComplete not working issue. In this case, you can try to fix this error with the steps below:
- Launch the Outlook app on your computer.
- Navigate to File > Options.
- Then select the Mail tab from the left panel.
- Scroll down to the Send messages section and make sure the box “Use Auto-Complete List to suggest names when typing in the To, Cc, and Bcc lines” is checked. If not, check it.
- Next, click the OK button.
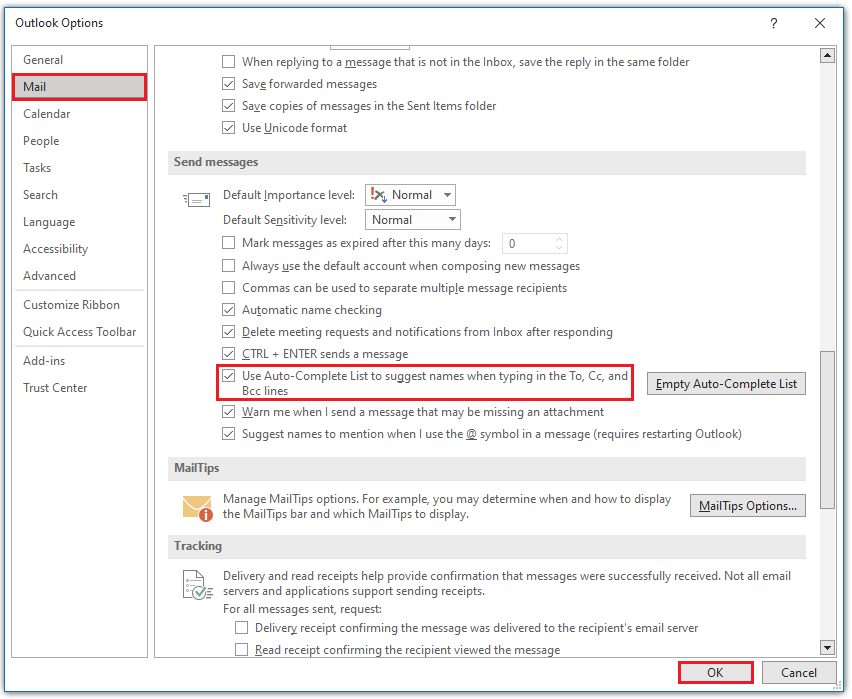
Once done, check if the error is fixed. If not, you can try emptying the Autocomplete list by using the below steps:
- Navigate to the Options > Mail > Send messages section again.
- Click the Empty Auto-Complete List
- Click Yes to make a confirmation.
- Once done, check if the Outlook autofill not working issue has been resolved.
Solution 2. Rename the RoamCache Folder
You can also try renaming the RoamCache folder to fix this Outlook AutoComplete not working issue.
Before trying that, you need to check whether your account type is a Microsoft Exchange Server account or some other one. For that, launch Outlook, and go to File > Info, and then click Account Settings. Next, check the account type in the new window.
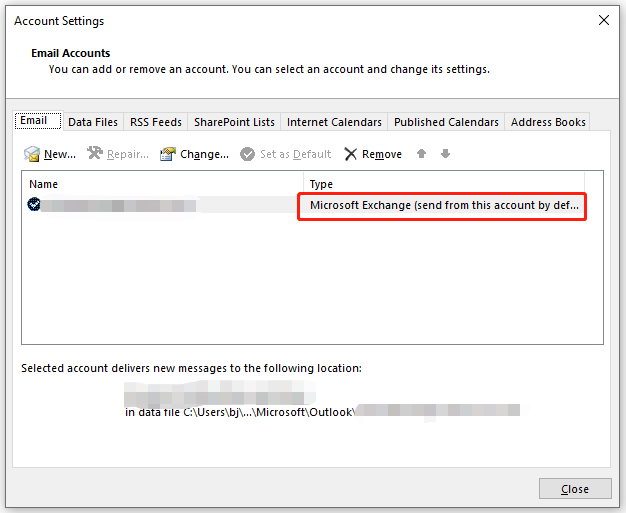
If your account type is Microsoft Exchange, you can do the following steps:
Step 1. Go to File > Info > Account Settings, and then select the Microsoft Exchange account.
Step 2. Click the Change account button, and then click More Settings.
Step 3. Go to the Advanced tab and uncheck the box “Use Cached Exchange Mode”. Then click OK.
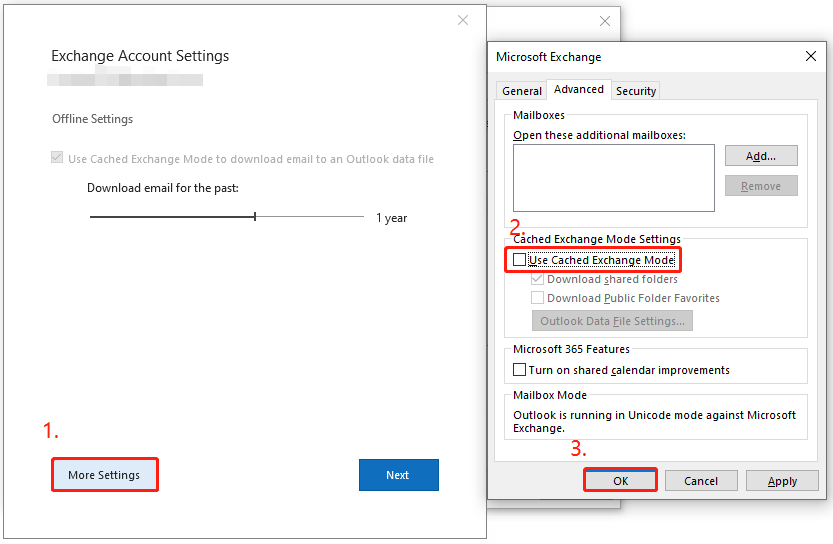
Step 4. Now, press the Windows+R keys simultaneously to open the Run window.
Step 5. Type “%LOCALAPPDATA%\Microsoft\Outlook” in the box and press Enter.
Step 6. Rename the RoamCache folder as “old_RoamCache”.
Step 7. Next, relaunch the Outlook app. Enable the box “Use Cached Exchange Mode” by repeating steps 1-4.
Step 8. Once done, relaunch Outlook and check if the Outlook autofill not working issue is fixed.
If you are using a home email account, you can skip steps 1-3 and step 7, and follow the other steps to rename the RoamCache folder and reset Autocomplete.
Solution 3. Run Outlook in Safe Mode
If you are experiencing the Outlook AutoComplete not working issue on your PC, you can run Outlook in safe mode to fix this error. Here’s the way:
- Press the Windows+R keys simultaneously to open the Run window.
- Type “Outlook.exe /safe” in the box and press Enter.
- Once done, you can run Outlook in safe mode. Check if the error is fixed in this mode.
Solution 4. Run Outlook with a New Profile
You can also try using another Outlook profile to check if the key reason is your profile. To do that, you just need to launch Outlook and then go to File > Info. Next, click Add Account and enter the login credentials for a different account.
Solution 5. Disable Outlook Add-Ins
The Outlook AutoComplete not working issue can be caused by add-ons. You can try disabling Outlook add-ins to fix this issue. Here’s the guide:
- Launch Outlook on your PC.
- Go to File > Options > Add-ins.
- Click the down arrow beside Manage and select COM Add-ins from the drop-down menu. Then click Go.
- Here, uncheck all the add-ins and click OK.
- Once done, relaunch Outlook and check if the error is fixed.
Solution 6. Update Your Office
Outdated MS Office may also cause Outlook AutoComplete not working issue. In this case, you can try updating it to fix the error. To do that, you need to launch Outlook and go to File > Office Account. Then click Update Options and select Update Now from the drop-down menu. Once done, check if the error is fixed.
Solution 7. Repair Outlook Data PST File
If your Outlook’s PST file is corrupt, you may encounter the Outlook AutoComplete not working issue. In this situation, you can try using the Inbox repair tool to fix this error. Here’s the tutorial:
Step 1. Press the Windows+E keys simultaneously to open the File Explorer window.
Step 2. Open the Outlook folder. Its location could be this on 64-bit Windows: C:\Program Files (x86)\Microsoft Office\root\Office16, and be this on 32-bit Windows: C:\Program Files/Microsoft/OfficerootOffice.
Step 3. Scroll to find and click the SCANPST.EXE file. Then click Browse to select your PST file.
You can find it by following this path, the PST file is often at this location: C:\Users\Username\AppData\Local\Microsoft\Outlook.
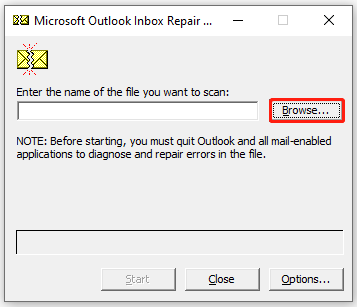
Step 4. After that, click the Start button to fix the PST file.
Step 5. Once done, relaunch your Outlook and check if the error has been resolved.
Bottom Line
This post explains the causes and solutions for the autofill email addresses in Outlook not working problem. You can try these solutions to fix it on your own.
In addition, MiniTool Partition Wizard is an all-in-one partition manager that can be used for data recovery and disk diagnosis. If you are interested in it, you can visit MiniTool Partition Wizard’s official website.


![How to Fix Outlook Not Receiving Emails Issue [7 Simple Ways]](https://images.minitool.com/partitionwizard.com/images/uploads/2020/05/outlook-not-receiving-emails-thumbnail.jpg)

![[Solved] Outlook We Are Unable To Connect Right Now](https://images.minitool.com/partitionwizard.com/images/uploads/2022/11/outlook-we-are-unable-to-connect-right-now-thumbnail.png)
User Comments :