A lot of users are confused about the Notepad++ word wrap operation. Are you also searching for a guide? In this post, MiniTool will show you how to wrap text in Notepad++ using 4 ways.
As it’s well known to us all, Notepad++ is a widely popular free text editor and source editor for Microsoft Windows. This tool can be used to deal with various tasks such as Notepad change font size, format XML in Notepad++, compare two files in Notepad++, format JSON Notepad++, enable Notepad++ dark theme, etc.
However, many users and even professionals are unclear about these operations. For example, a user from the superuser.com forum asks how to wrap lines in Notepad++ after N symbols. If you are also trying to figure it out, the following 4 methods can help you word wrap Notepad++ easily.
# 1. Notepad++ Word Wrap Directly
Notepad++ also comes with the Word Wrap option like many other text editors. Here you can enable the Notepad++ word wrap feature within a few steps.
Step 1. Launch Notepad++ from the Windows search menu.
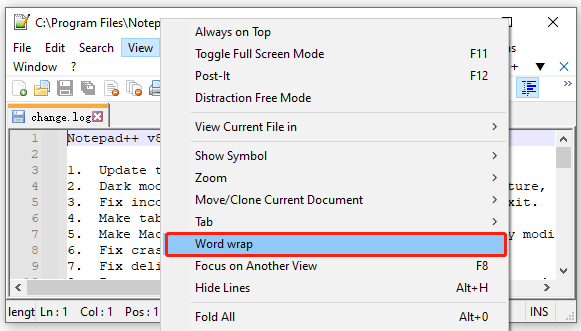
Step 2. Open the file that you want to wrap text, and then navigate to the View tab and select Word wrap from the pop-up menu. Then all the lines in the file will be wrapped to fit within the window.

# 2. Notepad++ Word Wrap Using a Hotkey
In addition, you can set up a hotkey to enable the Notepad++ wrap text option. Here’s how to do that:
Step 1. In the main interface of Notepad++, select View > Word wrap from the top toolbar menu.
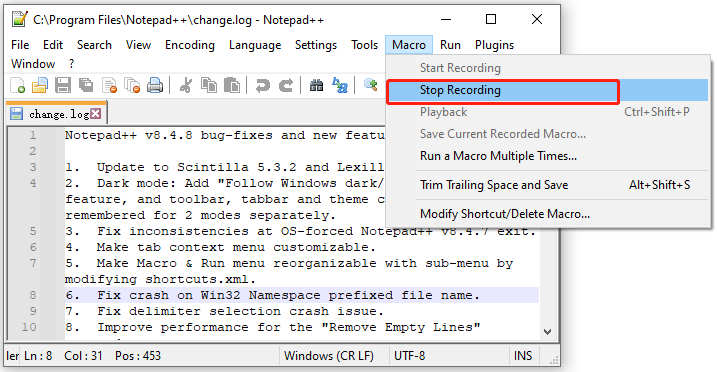
Step 2. Navigate to the Macro tab from the top menu and select Stop Recording.

Step 3. Select the Save Current Recorded Macro option and enter a title from the macro.
Step 4. Tick the checkboxes next to Ctrl and Shift and select an additional key for the hotkey.
Step 5. Click on OK to save the change. After that, you can press the Ctrl + Shift hotkey to add the word wrap Notepad++ to a document.
# 3. Notepad++ Word Wrap Using the Find Feature
If you want to set up the Notepad++ line wrap after a specified number of symbols or characters, you can use the Find option. To do so, follow the steps below:
Step 1. In the main interface, navigate to the Search tab and select Find from the drop-down menu.
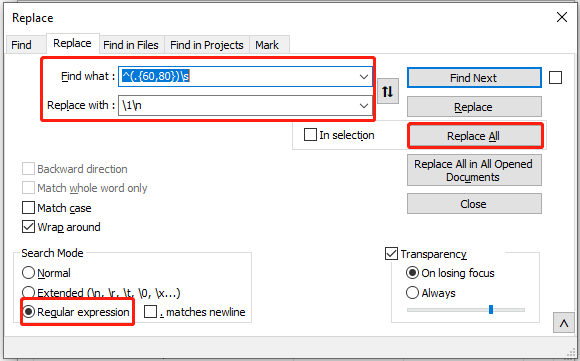
Step 2. Go to the Replace tab, and then enter the following command in the Find what box and type “1n” in the Replace with section.
Note: This command means that the text lines will be split between 60 and 80 characters. You can replace them with your desired numbers.
^(.{60,80})s
Step 3. Make sure you select the Regular expression option and click on Replace All to set the word wrap in Notepad++ according to the number of characters you provided.

# 4. Notepad++ Word Wrap Using the TextFX Plugin
In addition, the TextFX plugin can help you wrap lines in Notepad++ at a specified number of characters. For that:
If you can’t find the TextFX plugin from the toolbar menu, you can manually download it from this source and install it in Notepad++.
Step 1. In the main interface, select Plugins from the top menu and select Plugin Manager/Admin > Show Plugin Manager.
Step 2 In the Available tab, type TextFX in the search box and click on Install to get the tool for Notepad++.
Step 3. Once installed, open the text you want to wrap in Notepad++ and select TextFX > TextFX Edit from the top menu, and then select ReWrap Text and enter the number you want to wrap. Note the number refers to the length that you want your text to wrap.
Further reading: Do you want to manage your partition and disk on Windows effectively? MiniTool Partition Wizard is a good choice that can help you extend/resize/delete partitions, convert a disk to MBR/GPT, migrate OS, etc. Besides, it can help fix various problems such as C drive full, and corrupt file system.


User Comments :