A lot of players encounter the Minecraft black screen issue when launching or updating the game. What causes the Minecraft launcher black screen error? How to fix it on Windows 10/11? Now, let’s explore the answers together with MiniTool.
Minecraft is a widely popular video game where you can create a world for an adventure of limitless possibilities. Sometimes, however, this game also runs into various errors and issues such as Minecraft Java Virtual Machine launcher error, Minecraft can’t resolve hostname, and Minecraft launcher black screen. Here’s true example from the answers.microsoft.com:
Minecraft Java Edition Black screen from launcher. My laptop worked with it when i first got it a few days ago and now it hangs up on the black screen from launch every time.Any help would be great. HP Laptop AMD Ryzen 3 processor with Radeon Vega Graphics card. 4 GB of RAM. plenty of memory. Any help is greatly appreciated. Thanks!!!
https://answers.microsoft.com/en-us/windows/forum/all/minecraft-java-edition-black-screen-from-launcher/85aba47b-ecc2-43d7-b3c6-9fa5f5d7fb6a
What causes the Minecraft screen black issue? After analyzing extensive user reports and posts, we find the error is often related to outdated or corrupted graphics card drivers. In addition, other causes like antivirus software interference, improper graphics card settings, compatibility issue, and outdated Java are also responsible for Minecraft black screen.
# 1. Update or Reinstall Your Graphics Card Driver
Graphics cards play an important role in affecting the performance of video games. If the graphics card drivers get outdated or corrupted, you may encounter various issues while playing games like Minecraft launcher off screen.
Step 1. Press Win + R keys to open the Run dialog box, and then type devmgmt.msc in the box and hit Enter to open this program.
Step 2. In the Device Manager window, expand the Display adapters categories, then right-click the graphics card driver and select Properties.
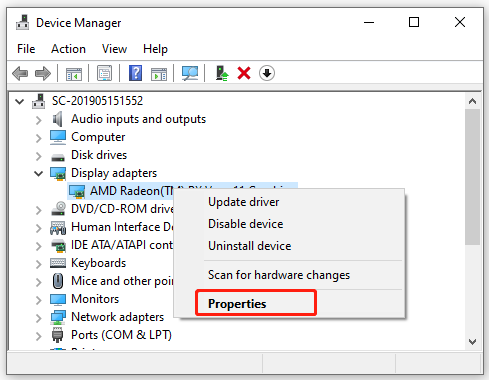
Step 3. In the pop-up window, navigate to the Driver tab, and click on Update Driver.
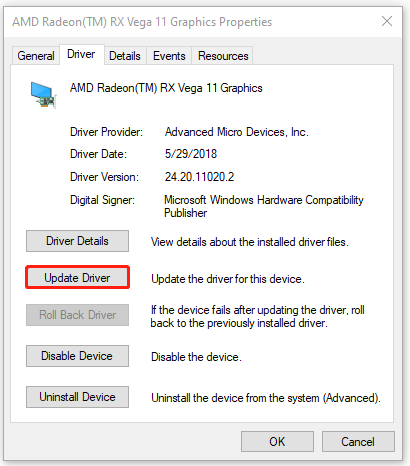
Step 4. Select a way to updates your display driver. You can update the driver automatically or manually based on your preference. Then follow the on-screen prompts to complete the update.
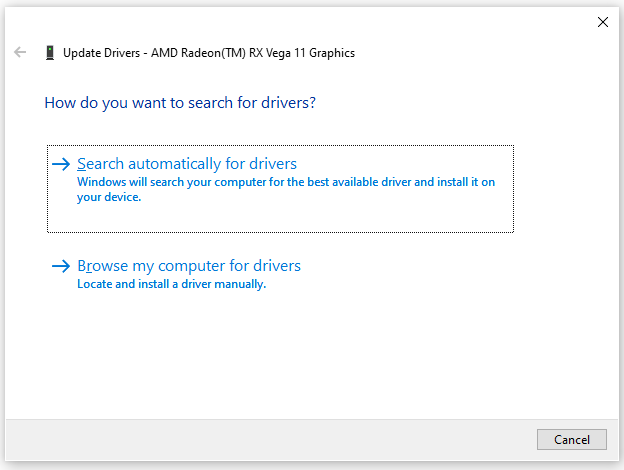
Step 5. Once updated, you can relaunch the game and check if the Minecraft screen black issue disappears. If not, you can go back to the Graphics Properties window, click on Uninstall Device to reinstall the driver and see if it works.
# 2. Check Your Antivirus or Firewall Interference
Sometimes your antivirus software and even Windows Firewall may block certain games files from accessing its server. If you encounter the Minecraft black screen on startup, you can try adding the game to exception list of your Firewall and antivirus software.
Step 1. Type firewall in the search box and then select the Windows Defender Firewall from the context menu.
Step 2. Click on Allow an app or feature through Windows Defender Firewall from the left pane.
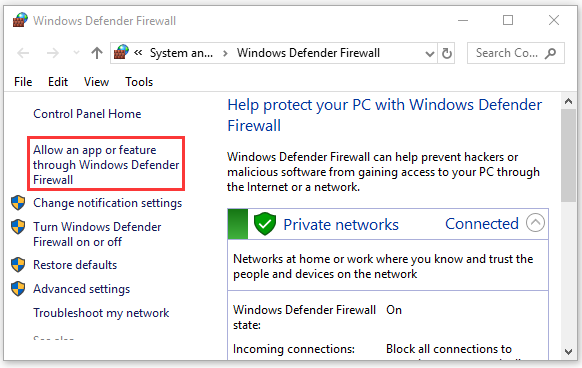
Step 3. Click on Change settings and then on Allow another app.
Step 4. Select the checkbox for Minecraft from the list of programs, and then tick the checkbox for both Private and Public networks, and click OK to save the change.
If you are using Avast on your computer, read this post to add an exception to Avast. For AVG antivirus, navigate to Home > Settings > Components > Web Shield > Exceptions to add the game to the exceptions list. If you are using Kaspersky, navigate to Home > Settings > Additional > Threats and Exclusions > Exclusions > Specify Trusted Applications > Add.
Once done, launch the game again and check if Minecraft screen goes black.
# 3. Run the Game in Compatibility Mode
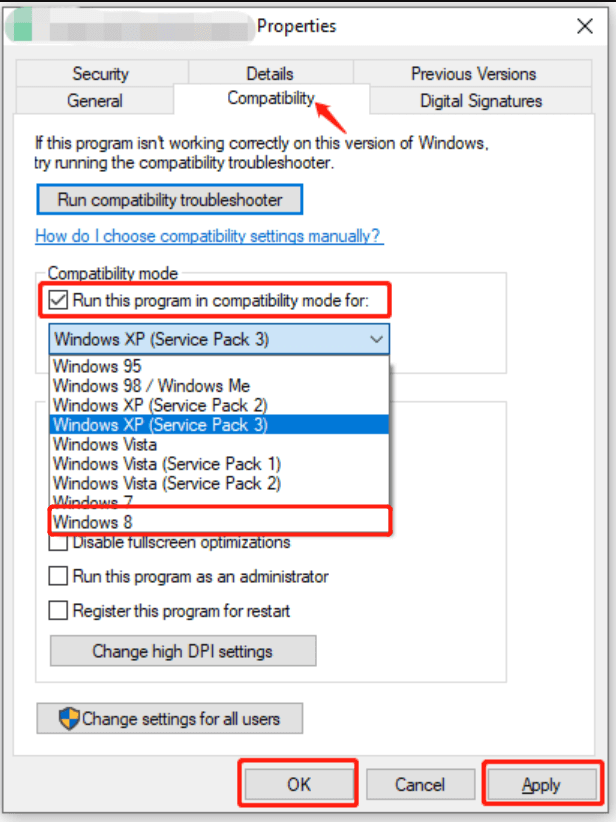
Some gamers reported that the Minecraft launcher black screen error gets fixed when running the game in compatibility mode. Here you may have a try.
Step 1. Right-click the executable game file in File Explorer and select the Properties option.
Step 2. Go to the Compatibility tab in the pop-up window, and tick the checkbox for Run this program in compatibility mode for.
Step 3. Select Windows 8 from the drop-down menu, click on the Apply button to confirm the change and click on OK to exit the window.
# 4. Delete the .Minecraft Folder
Some users from the answers.microsoft.com forum reported that they managed to fix the black screen Minecraft by deleting the game folder in AppData folder. It can refresh the Minecraft game cache and help fix the error.
This operation will delete all worlds you created in Minecraft. So, you should drag the worlds files out and put them into another place so that you can get the worlds back.
Step 1. Open the Run dialog box, and then type %appdata% in it and hit Enter.
Step 2. In the Roaming folder, find the .minecraft folder and delete it.
Step 3. Open the game launcher and it will take you to the login screen.
# 5. Use Ctrl + Alt + Delete Shortcut
Another simple solution is to use the Ctrl + Alt + Del shortcut, which can help bring you back to the normal game screen. If you encounter the Minecraft black screen after launching, you can press the Ctrl + Alt + Del keys together and click on Cancel to return back to Windows, and see if the black screen Minecraft disappears.
# 6. Update the Java Version
If you are running the latest version of Minecraft on Windows 10/11, we recommend you update the Java to the latest version as well. This is because outdated Java can trigger various problems like Minecraft launcher black screen. If you don’t know how to do that, this post “Download, Install, and Update Java 32 Bit & 64 Bit [JDK vs JRE]” provides you with a full guide.
Further reading: If you encounter some issues like the C drive full and corrupted file systems, MiniTool Partition Wizard can help you fix them easily. Moreover, you can use it to extend/resize/format partition, convert a disk to MBR/GPT, migrate OS, etc.

![[Full Guide] How to Make a Minecraft Server Java on Windows 10/11](https://images.minitool.com/partitionwizard.com/images/uploads/2022/08/how-to-make-a-minecraft-server-thumbnail.jpg)
![How to Find Minecraft Server Address on PC/PS4/Xbox? [Full Guide]](https://images.minitool.com/partitionwizard.com/images/uploads/2022/08/minecraft-server-address-thumbnail.jpg)
User Comments :